
Popular categories
Looking for a yarn?


Comments / Questions (27)
![]() Deneux wrote:
Deneux wrote:
Bonjour, je ne comprends pas vos explications. le schéma n'est pas claire, lorsque nous faisons 3 brides, si nous voulons que le point corresponde et bien , nous devons en faire quatre??? est ce moi qui le lis mal? merci
28.02.2015 - 17:26DROPS Design answered:
Bonjour Mme Deneux, pouvez-vous préciser votre question s'il vous plaît, je ne suis pas sûre de bien la comprendre. Merci.
02.03.2015 - 08:32
![]() Anna Marie Pedersen wrote:
Anna Marie Pedersen wrote:
Så kommer der da ekstremt mange huller i. Når nan skal læse fra højre mod venstre. Så bruger du da kun meget lidt af diagrammet
10.02.2015 - 19:00DROPS Design answered:
Hej Anne-Marie. Ja, men du begynder saa efter starten helt forfra paa diagrammet igen. F.eks. str. 5/6 aar saa er du begyndt med (Omg 2) 1 st + 2 lm, og her slutter diagrammet, men saa gaar du helt tilbage til starten igen og haekler hele diagrammet.
11.02.2015 - 15:58
![]() Anna Marie Pedersen wrote:
Anna Marie Pedersen wrote:
Hej drops. Tak for en super hjemmeside med lækre opskrifter og lækkert garn. Er ved at hækle den bolero til min datter men forstår ikke helt mønster diagrammet. Hvordan skal det læsses med hensyn til str og sådan.
10.02.2015 - 13:33DROPS Design answered:
Hej Anne Marie. Selv tak. Du skal starte ved den störrelse du vil haekle, og her kan du laese hvordan du skal laese vores diagrammer. God fornöjelse.
10.02.2015 - 14:43
![]() Louke Cramer - Van Assem wrote:
Louke Cramer - Van Assem wrote:
......Maar in de tekst staat dat je bij het streepje van de maat moet beginnen zodat het patroon gelijk is aan beide zijkanten. Wat doe ik nu dan verkeerd? Heb al meer manieren geprobeerd maar links en rechts blijven ongelijk Alvast bedankt voor het uitleggen
29.09.2014 - 19:11
![]() Louke Cramer - Van Assem wrote:
Louke Cramer - Van Assem wrote:
Ik heb een vraag. Ik ga net beginnen met dat patroontekenen. De toer na de kruisjes maak ik vanaf links voor de maart 5+6 jaar. Dan toer erna van rechts naar links en de toer met 1e gaatje van links naar rechts. Ik haak elke keer van of tot het streepje van de 5-6 jaar maat. Als ik dan aan het eind ben eindig ik met het 10e stokje en in begin heb ik er 4 tot het 1e gaatje....
29.09.2014 - 19:10DROPS Design answered:
Hoi Louke. Je begint bij het streepje aangegeven in de teltekening. Daarna moet je haken van begin tot eind van de teltekening. Dwz, toer 2 begint voor maat 5/6 jaar met een stokje + 2 l. De volgende toeren haak je de hele teltekening van links naar rechts of van rechts naar links.
30.09.2014 - 16:43
![]() Bianca wrote:
Bianca wrote:
Hallo Ik mail u nog maar een keer ik wil zo graag aan het vestje beginnen. Alleen kom ik niet uit het getekende patroon. Moet ik links beginnen of rechts en met welke steek. Vg Bianca. Patroon 24-13
05.09.2014 - 14:23DROPS Design answered:
U begint rechtonder en haakt van rechts naar links. Dan keert u het werk en haakt u de volgende toer van links naar rechts. Zo gaat u verder.
05.09.2014 - 17:51
![]() Bianca wrote:
Bianca wrote:
Ik heb van u een antwoord gekregen op mijn vraag over het kindervestje 5 eb 6 jaar. Ik denk dat ik mijn vraag niet goed gesteld heb. Ik bedoel waar moet ik beginnen met patroon haken. A1 maar begin rechts of links beneden en met wat voor steek. Vg Bianca
04.09.2014 - 15:49
![]() Bianca wrote:
Bianca wrote:
Ik wil het vestje haken voor 5 en 6jaar maar waar moet ik nu beginnen.want dat snap ik niet. Alvast mijn dank.
03.09.2014 - 18:20DROPS Design answered:
U haakt de tweede maat, dus u volgt overal de aanwijzingen die als tweede staan in de rij getallen. Voorbeeld: EERSTE KANT: Haak 69-77-84-91-98 l U haakt dan dus 77 l voor uw maat.
04.09.2014 - 14:40
![]() Ronda Thompsom wrote:
Ronda Thompsom wrote:
I've downloaded the pattern(thank-you by the way.) But I can't understand it. Do you have a written and not a charted one to e-mail to me?
27.04.2014 - 18:11DROPS Design answered:
Dear Mrs Thompson, the bolero is worked starting from mid back outwards sides (sleeves) - see measurement chart. Follow pattern step by step, in the diagram each st is represented by 1 symbol. Start reading diagram from bottom corner on the right side towards the left on RS row, and from left towards the right on WS rows. Happy crocheting!
28.04.2014 - 10:22
![]() Geertje wrote:
Geertje wrote:
Heb het gedaan zoals ik beschreef en loop nu goed door.
15.04.2014 - 13:52
|
|||||||||||||
Abby#abbybolero |
|||||||||||||
 |
 |
||||||||||||
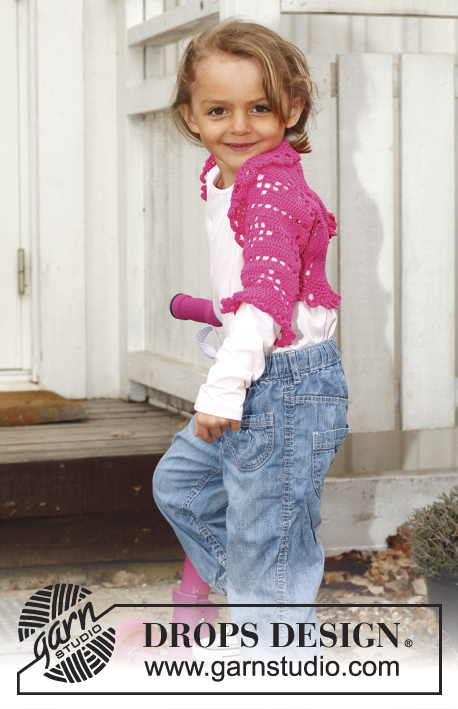
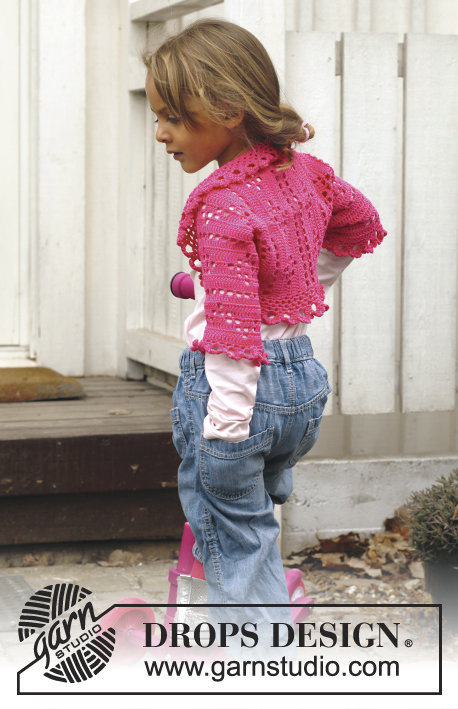
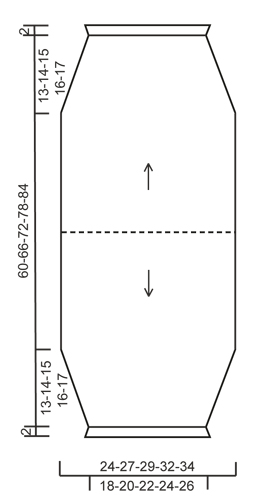
Crochet bolero with lace pattern in DROPS Safran. Size children 3 - 12 years.
DROPS Children 24-13 |
|||||||||||||
|
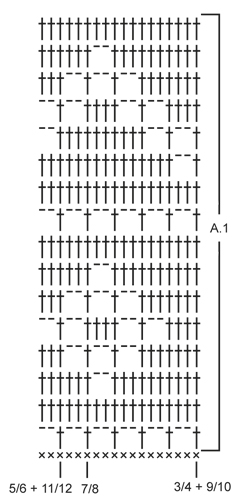
CROCHET INFO: Replace first tr on every row with 3 ch. PATTERN: See diagram A.1. NOTE: The first dc row in diagram is not a part of repetition and is not repeated when working. DECREASE TIP: Work 2 tr tog as follows: Work 1 tr in first st but wait with last pull through, work 1 tr in next st but on last pull through, pull thread through all 3 loops on hook. -------------------------------------------------------- BOLERO: Worked from mid back. Work first one side and down to beg of sleeve, then work the other side and down to beg of other sleeve. Then sew sleeve seams and work a flounce around the entire opening. FIRST SIDE: Work 69-77-84-91-98 ch with Safran on hook size 3 mm. Turn and work 1 dc in 2nd ch from hook, continue with 1 dc in each of the next 7-3-4-5-6 ch, * skip 1 ch, 1 dc in each of the next 5 ch *, repeat from *-* the entire row = 58-64-70-76-82 dc (first ch on row does NOT count as 1 dc). Continue with diagram A.1 - beg with 2nd row in diagram at the line for the size you are working so that the pattern is the same in both sides – READ CROCHET TIP! Repeat pattern until finished measurements. At the same time when piece measures 17-19-21-23-25 cm, insert 1 marker in the side (marks how far the sleeve seam is worked afterwards). On next row dec 1 tr in each side by working the second and third tr and the 2 next to last tr tog – SEE DECREASE TIP! Repeat dec every other row 6-7-8-8-9 more times = 44-48-52-58-62 sts remain - NOTE: When dec work only tr over the sts that do not fit the pattern. Work pattern until piece measures approx. 30-33-36-39-42 cm in total, finish after a row with only tr, fasten off. OTHER SIDE: Work 1 dc in each of the 58-64-70-76-82 dc worked on 1st row on first side (i.e. mid back). Then work pattern as on first side. Make sure to finish on same row in diagram at the bottom of sleeve in both sides. ASSEMBLY: Fold the bolero double alongside, and sew tog from bottom of each sleeve and up to where marker was is inserted in each side - sew edge to edge to avoid a chunky seam. FLOUNCE AROUND OPENING: Work around the entire opening as follows (start mid back): ROUND 1: 1 sl st in first st, * 3 ch, 1 dc in next tr *, repeat from *-* the entire round, finish with 3 ch and 1 sl st in first sl st at beg of round - NOTE: Adjust so that there are an even number of ch-spaces in total otherwise round 5 will not fit. ROUND 2: Work 1 sl st and 1 dc in first ch-space, * 3 ch, 1 dc in next ch-space *, repeat from *-* the entire round and finish with 1 sl st in first dc from beg of round. ROUND 3 and 4: Work as 2nd round. ROUND 5: Work 1 sl st and 1 dc in first ch-space, * 8 ch, 1 dc in next ch-space, 1 ch, 1 dc in next ch-space *, repeat from *-* the entire round and finish with 1 sl st in first dc from beg of round. ROUND 6: 1 ch, 1 dc in first large ch-space, [* 4 ch, 1 tr in first ch worked (= 1 picot), 1 dc in same ch-space *, repeat from *-* 2 more times (i.e. there are 3 picots in the large ch-space), 1 dc in the little ch-space (the one with only 1 ch which is between the large ch-spaces), 1 dc in next large ch-space], repeat from [-] the entire round, instead of last dc work 1 sl st in first dc on round. Fasten off. FLOUNCE AT THE BOTTOM OF SLEEVES: At the bottom around the sleeves work a somewhat shorter edge, here work only 1st, 5th, and 6th round of flounce worked around the opening - NOTE: On 1st round skip 1 tr between every ch-space. |
|||||||||||||
Diagram explanations |
|||||||||||||
|
|||||||||||||
 |
|||||||||||||
 |
|||||||||||||
Have you finished this pattern?Tag your pictures with #dropspattern #abbybolero or submit them to the #dropsfan gallery. Do you need help with this pattern?You'll find 7 tutorial videos, a Comments/Questions area and more by visiting the pattern on garnstudio.com. © 1982-2026 DROPS Design A/S. We reserve all rights. This document, including all its sub-sections, has copyrights. Read more about what you can do with our patterns at the bottom of each pattern on our site. |
|||||||||||||


With over 40 years in knitting and crochet design, DROPS Design offers one of the most extensive collections of free patterns on the internet - translated to 17 languages. As of today we count 325 catalogues and 12298 patterns translated into English (UK/cm). 12298
We work hard to bring you the best knitting and crochet have to offer, inspiration and advice as well as great quality yarns at incredible prices! Would you like to use our patterns for other than personal use? You can read what you are allowed to do in the Copyright text at the bottom of all our patterns. Happy crafting!
Post a comment to pattern DROPS Children 24-13
We would love to hear what you have to say about this pattern!
If you want to leave a question, please make sure you select the correct category in the form below, to speed up the answering process. Required fields are marked *.