
Popular categories
Looking for a yarn?


Comments / Questions (24)
![]() DROPS Design wrote:
DROPS Design wrote:
Hej Katarina, du skall fortsätta flätmönstret med samma antal varv mellan varje fläta. Om vi skulle ritat in en fläta till hadde det blivit fel antal rader ( det skall vara 15) mellan flätorna. Lycka till!
29.04.2011 - 14:33
![]() Katarina wrote:
Katarina wrote:
MEN det är ju det som är problemet!!!!! Om jag ska ha 15 rader mellan den stora flätan så förskjuts de små flätorna så att mönstret inte går att använda. Man kan inte ha ett mönster med tomma rutor, hur ska dom då stickas????
29.04.2011 - 10:10
![]() DROPS Design wrote:
DROPS Design wrote:
Nei, radene kan ikke slettes frodi man strikker 15 rader mellom flettene.
28.04.2011 - 12:02
![]() Katarina wrote:
Katarina wrote:
Mönsterdiagrammet över mönster M1B har 2 helt tomma rader längst upp, det verkar inte stämma. Borde nog rättas!
24.04.2011 - 17:29
![]() Leida wrote:
Leida wrote:
Ik ben dit vestje aan het maken, wordt heel mooi maar bij de maat XXL eindig je met 2 kabeltjes op het voorpand en niet, zoals beschreven, met 3. Zeker een aanrader om te maken.
04.02.2010 - 13:11
![]() Mary Jane wrote:
Mary Jane wrote:
Very cute
23.01.2010 - 21:55Inge wrote:
Sehr schön. Genau mein fall
18.01.2010 - 15:38
![]() Andrea wrote:
Andrea wrote:
Schönes Modell, sieht super aus
15.01.2010 - 20:11
![]() Sabine wrote:
Sabine wrote:
Sehr schön! Freu mich auf die Anleitung!
15.01.2010 - 19:03
![]() Jeri wrote:
Jeri wrote:
You can't get more feminine than this vest. Bravo!
07.01.2010 - 08:46
|
||||||||||||||||
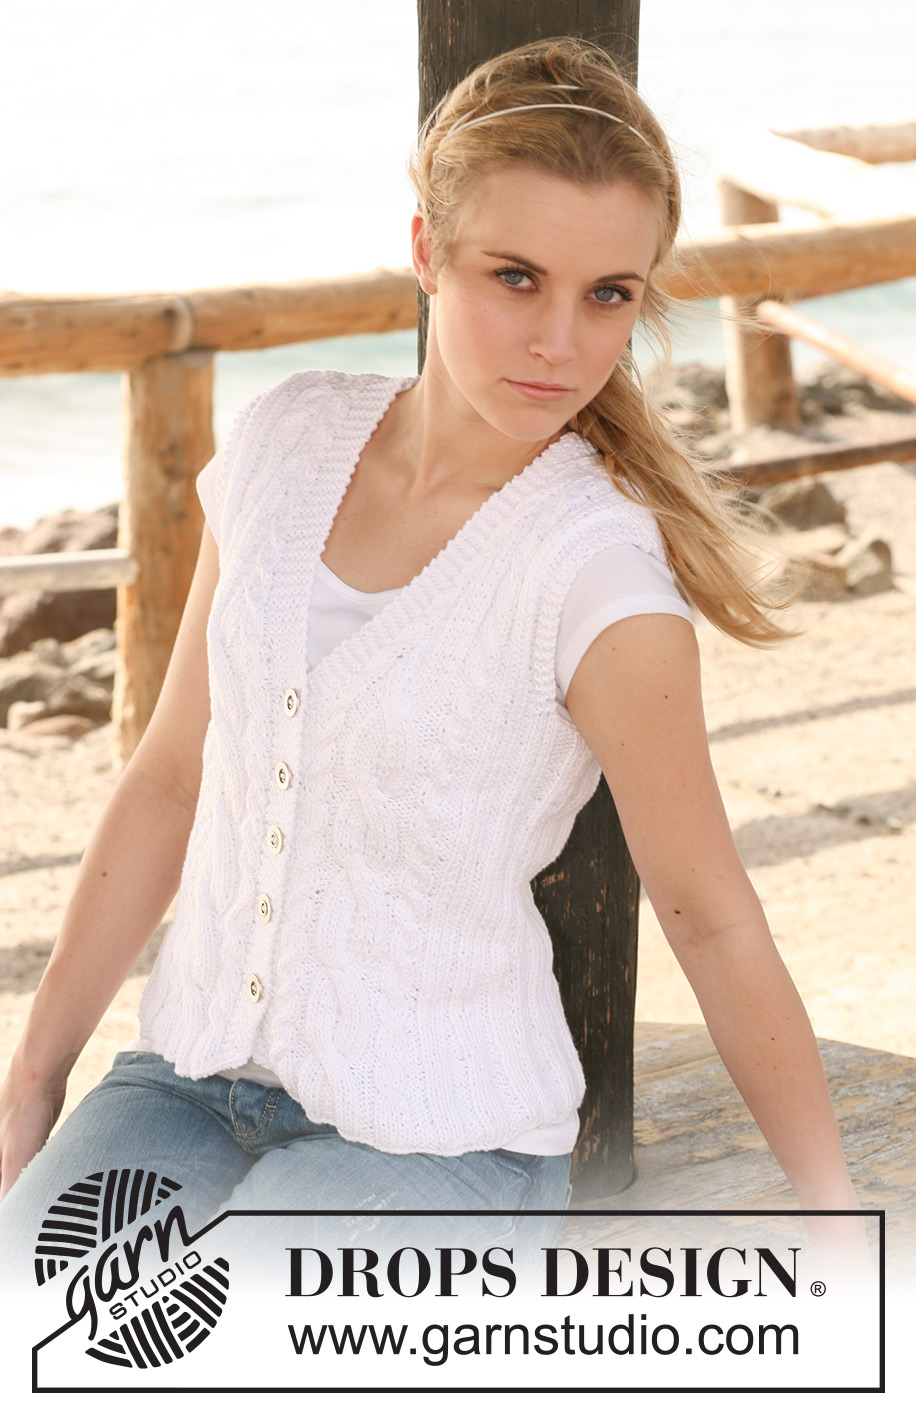
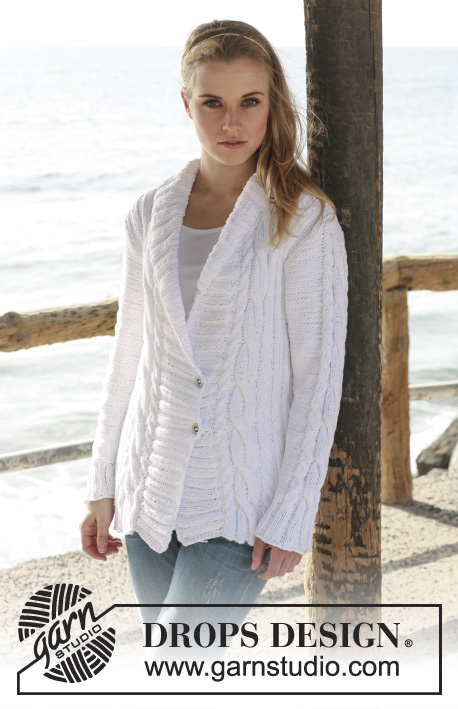
Ocean Mist Cardigan#oceanmistcardigan |
||||||||||||||||
 |
 |
|||||||||||||||
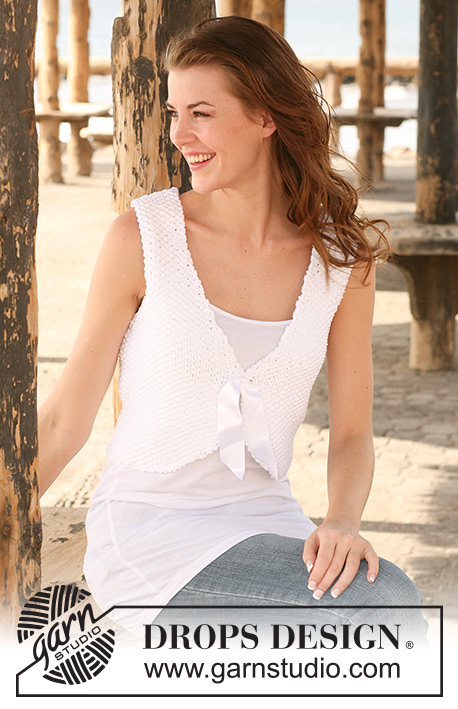
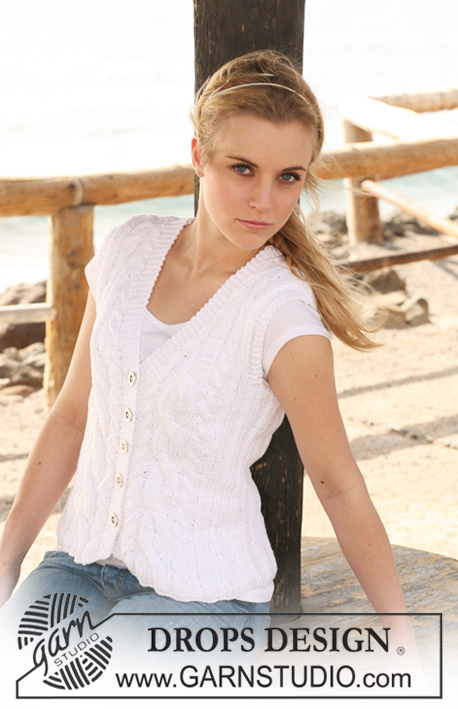
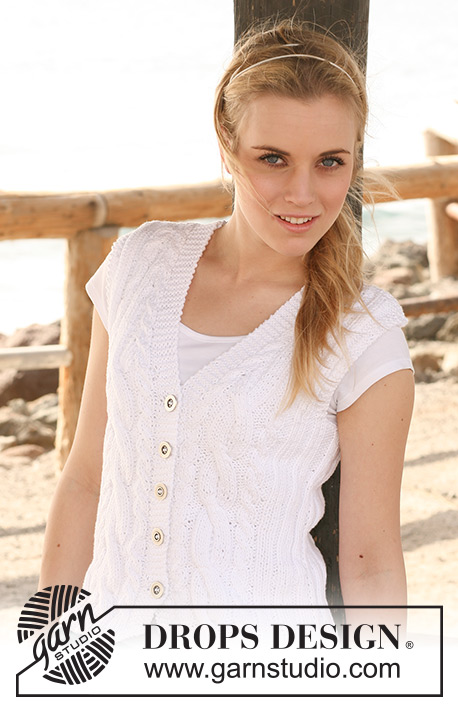
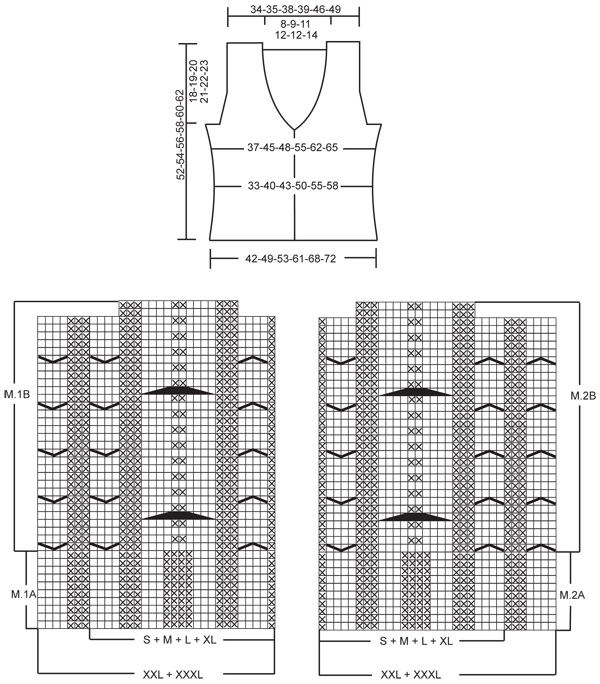
Knitted DROPS sleeveless top with rib and cables in ”Paris”. Size S to XXXL.
DROPS 120-21 |
||||||||||||||||
|
GARTER ST (back and forth on needle): K all rows. DECREASING TIP-1 (applies to armhole): Make all dec from RS inside 3 garter sts. Dec as follows after 3 garter sts: Slip 1 st as if to K, K1, psso. Dec as follows 2 sts before 3 garter sts: K2 tog. DECREASING TIP-2 (applies to neckline): Dec inside 6 front band sts in garter st + 5 sts in pattern (= 11 sts). Make all dec from RS! Dec as follows after 11 sts: P2 tog. Dec as follows 2 sts before 11 sts: P2 tog into back of loop. PATTERN: See diagram M.1 and M.2. Diagrams show the pattern from RS. BUTTONHOLES: Make buttonholes on right front band. 1 buttonhole = cast off 4th front band st from mid front and cast on 1 new st on next row. Make buttonholes when piece measures: Size S: 6, 12, 18, 24 and 30 cm. Size M: 7, 13, 19, 25 and 31 cm. Size L: 8, 14, 20, 26 and 32 cm. Size XL: 8, 13, 18, 23, 28 and 33 cm. Size XXL: 7, 12, 18, 23, 29 and 34 cm. Size XXXL: 8, 13, 19, 24, 30 and 35 cm. --------------------------------------------------------- --------------------------------------------------------- BACK PIECE: Cast on 80-94-101-115-129-136 sts (includes 1 edge st each side) on needle size 4 mm with Paris. P 1 row from WS and continue in rib as follows (first row = RS): 1 edge st in GARTER ST - see above, K2, * P4, K3 *, repeat from *-* until 7 sts remain and finish with P4, K2 and 1 edge st in GARTER ST. When piece measures 4 cm work next row as follows from RS: 1 edge st in garter st, K2, * P4, K3 *, repeat from *-* a total of 2-2-2-2-3-3 times, P4, 10-17-17-24-24-24 stocking sts, * P4, K3 *, repeat from *-* a total of 2-2-3-3-3-4 times, P4, 10-17-17-24-24-24 stocking sts, * P4, K3 *, repeat from *-* a total of 2-2-2-2-3-3 times, P4, K2 and 1 edge st in garter st. Continue like this with K over K, P over P and edge sts in garter st. REMEMBER THE KNITTING TENSION! When piece measures 7 cm dec as follows from RS: dec all P4 (= 9-9-10-10-12-13 times) to P3 by P tog the 2 first P sts = 71-85-91-105-117-123 sts. When piece measures 14 cm dec the same 9-9-10-10-12-13 P-sections (from RS) from P3 to P2 by P tog the last 2 P sts = 62-76-81-95-105-110 sts. When piece measures 22-23-24-25-26-27 cm inc as follows from RS: inc all P2 to P3 (= 9-9-10-10-12-13 times) by making 1 YO between the 2 P sts = 71-85-91-105-117-123 sts. On next row K YO into back of loop to avoid a hole. When piece measures 32-33-34-35-36-37 cm work garter st on 6-6-6-12-12-12 sts each side, with remaining sts as before. Continue like this until piece measures 34-35-36-37-38-39 cm. Now cast off 3-3-3-9-9-9 sts each side for armhole (i.e. cast off at beg of the next 2 rows) and cast off to shape the armhole– see DECREASING TIP-1: 1 st on every row from RS a total of 0-6-6-6-6-6 times = 65-67-73-75-87-93 sts. Continue with K over K, P over P and 3 garter sts each side. When piece measures 49-51-53-55-57-59 cm - adjust so that next row is from RS – dec 5-5-7-7-7-9 sts evenly on the middle 15-15-21-21-21-27 sts (i.e. dec P3 to P2 and dec K3 to K2 mid back), work remaining sts as before = 60-62-66-68-80-84 sts. On next row (= WS) continue in garter st on the middle 28-30-32-34-34-38 sts with remaining sts as before. When piece measures 50-52-54-56-58-60 cm cast off the middle 16-18-20-22-22-26 sts for neck = 22-22-23-23-29-29 sts left on each shoulder and complete each shoulder separately. Continue with K over K, P over P, 6 garter sts towards neck and 3 garter sts towards armhole until piece measures 52-54-56-58-60-62 cm. Cast off with K over K and P over P. RIGHT FRONT PIECE: Cast on 45-52-59-66-73-73 sts (includes 1 edge st at the side and 6 front band sts towards mid front) on needle size 4 mm with Paris. P 1 row from WS and continue in rib as follows from mid front (first row = RS): 6 front band sts in GARTER ST, M.1A (= 25-25-25-25-32-32 sts), * P4, K3 *, repeat from *-* until 7 st remain, and finish with P4, K2 and 1 edge st in GARTER ST. When piece measures 4 cm work M.1B instead of M.1A (with remaining sts as before). REMEMBER BUTTONHOLES ON FRONT BAND - see above. When piece measures 7 cm dec as follows from RS: dec all P4 (= 2-3-4-5-5-5 times) to P3 by P tog the 2 first P sts = 43-49-55-61-68-68 sts. When piece measures 14 cm dec the same 2-3-4-5-5-5 P-sections (from RS) from P3 to P2 by P tog the last 2 P sts = 41-46-51-56-63-63 sts. When piece measures 22-23-24-25-26-27 cm inc as follows from RS: Inc all P2 to P3 (2-3-4-5-5-5 times) by making 1 YO between the 2 P sts = 43-49-55-61-68-68 sts. On next row K YO into back of loop to avoid a hole. NOW READ ALL OF THE FOLLOWING SECTION BEFORE CONTINUING! When piece measures approx 31-32-33-34-35-36 cm (approx 1 cm after last buttonhole on front band) K 2 rows back and forth on the 6 front band sts only. Continue on all sts as before, AT THE SAME TIME on first row from RS dec 1 st towards mid front for neck – see DECREASING TIP-2, and repeat the dec on every other row a total of 10-10-17-17-16-16 times and then on every 4th row a total of 6-6-4-4-5-5 times. AT THE SAME TIME when piece measures 32-33-34-35-36-37 cm work garter st on 6-6-6-12-12-12 sts at the side (work remaining sts as before). Continue like this until piece measures 34-35-36-37-38-39 cm (adjust so that next row is from WS). Now cast off 3-3-3-9-9-9 sts at the side for armhole. On next row (from RS) cast off 1 st to shape the armhole – see DECREASING TIP-1, and repeat the dec on every row from RS a total of 0-6-6-6-6-6 times. When all dec for armhole and neck are complete there are 24-24-25-25-32-32 sts left on shoulder. Continue with K over K, P over P, 6 garter sts towards neck and 3 garter sts towards armhole until piece measures 51-53-55-57-59-61 cm. Now dec 1 st each of the 2-2-2-2-3-3 cables in M.1 = 22-22-23-23-29-29 sts left on needle. Cast off with K over K and P over P when piece measures 52-54-56-58-60-62 cm. LEFT FRONT PIECE: Like right front piece but mirrored and work M.2 instead of M.1 in order to mirror the pattern mid front. ASSEMBLY: Sew shoulder seams. Sew side seams - sew in outer loops of sts. Sew on buttons. |
||||||||||||||||
Diagram explanations |
||||||||||||||||
|
||||||||||||||||
 |
||||||||||||||||
Have you finished this pattern?Tag your pictures with #dropspattern #oceanmistcardigan or submit them to the #dropsfan gallery. Do you need help with this pattern?You'll find 16 tutorial videos, a Comments/Questions area and more by visiting the pattern on garnstudio.com. © 1982-2026 DROPS Design A/S. We reserve all rights. This document, including all its sub-sections, has copyrights. Read more about what you can do with our patterns at the bottom of each pattern on our site. |
||||||||||||||||


With over 40 years in knitting and crochet design, DROPS Design offers one of the most extensive collections of free patterns on the internet - translated to 17 languages. As of today we count 325 catalogues and 12298 patterns translated into English (UK/cm). 12298
We work hard to bring you the best knitting and crochet have to offer, inspiration and advice as well as great quality yarns at incredible prices! Would you like to use our patterns for other than personal use? You can read what you are allowed to do in the Copyright text at the bottom of all our patterns. Happy crafting!
Post a comment to pattern DROPS 120-21
We would love to hear what you have to say about this pattern!
If you want to leave a question, please make sure you select the correct category in the form below, to speed up the answering process. Required fields are marked *.