
Popular categories
Looking for a yarn?


Comments / Questions (214)
![]() Carole wrote:
Carole wrote:
Bonjour je n'ai pas compris par exemple pour le dos si je dois commencer les diminutions des le 1 er rang ou faire 2 cms point mousse et ne faire les diminutions qu'apres ces 2cms je vous remercie
04.01.2021 - 03:11DROPS Design answered:
Bonjour Carole, au tout début du dos, tricotez d'abord 2 cm point mousse sur toutes les mailles, placez ensuite un marqueur au milieu et continuez au point mousse en commençant les diminutions comme indiqué aux rangs 1 à 10. Bon tricot!
05.01.2021 - 10:09
![]() Rita Fernandes wrote:
Rita Fernandes wrote:
Hjælp mig! Jeg har lavet ryg del 1 to gang og den bliver ved med at bliver kun 17cm! Med forstyr bliver ca. 20 cm! Jeg ved ikke hvad er problemet.
21.12.2020 - 21:31DROPS Design answered:
Hej Rita, har du 24 masker i bredden OG 48 pinde i højden på 10x10 cm?
22.12.2020 - 09:39
![]() Noel Piper wrote:
Noel Piper wrote:
1. what part of the sweater is "domino square"? ---- 2. Domino Square: Row 1 K all sts. Row 2: work row until 1 st before marker. Where is marker? There has been no instruction to add marker.
04.12.2020 - 02:56DROPS Design answered:
Hi Noel, You need to read the beginning of the pattern, further down, where the marker is mentioned just after you cast on the stitches for the jacket. It also describes the working of the domino square within the jacket pattern. Happy knitting!
04.12.2020 - 07:20
![]() KrisPer wrote:
KrisPer wrote:
Rückteil 3: Bei mir läuft das halbe Quadrat spitz aus, und bildet keine Gerade. Was läuft falsch?
05.11.2020 - 11:11DROPS Design answered:
Liebe KrisPer, das halbe Quadrat vom Rückenteil-3 sollte wie in diesem Video gestrickt werden - bringen Sie Ihr Strickstück Ihr DROPS Laden oder senden Sie ihn ein Foto per Mail, damit man Ihnen weiterhelfen kann. Beim DROPS Workshop können Sie auch Ihr Foto zeigen, so können Sie Hilfe von anderen Strickerinnen bekommen. Viel Spaß beim stricken!
05.11.2020 - 13:10
![]() Christine wrote:
Christine wrote:
Merci pour votre précédente réponse. Maintenant, je dois relever les mailles entre le dos 1 et le devant. Y -t-il une video pour relever les mailles dans le biais. Je n'ai pas tout à fait les 21 cm et j'ai peur de relever trop de mailles. Une vidéo pour remonter les mailles dans le biais me serait bien utile, mais je ne la trouve pas, il n'y a que des vidéo sur un carré. Merci pour la réponse.
02.01.2020 - 20:44DROPS Design answered:
Bonjour Christine, le long du biais, vous pouvez utiliser cette technique en veillant à bien relever suffisamment de mailles pour ne pas resserrer le début de la partie suivante, Relevez plutôt plus de mailles que pas assez, et, au 1er rang, diminuez à intervalles réguliers pour ajuster au nombre de mailles indiqué pour votre taille. Bon tricot!
03.01.2020 - 10:10
![]() Christine wrote:
Christine wrote:
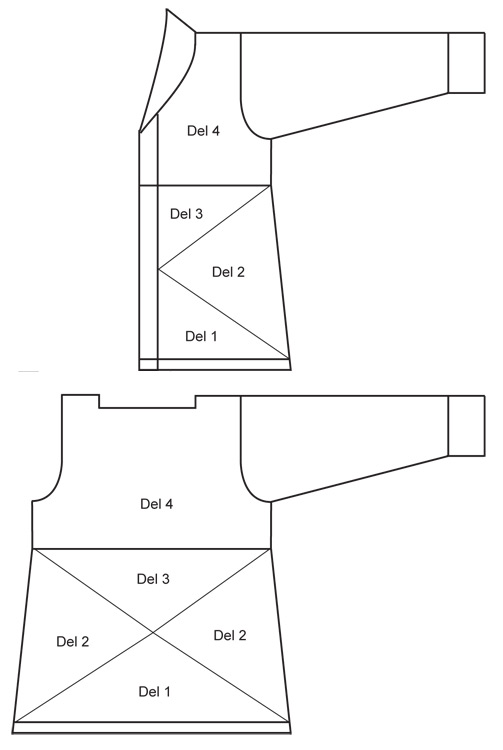
Bonjour, Je pense que vous devriez modifier vos explications concernant le dos car on ne comprend pas pourquoi il faut mettre un marqueur si ce n'est pour faire les diminutions de chaque côté.... Et si on fait les diminutions de chaque coté du marqueur cela ne correspond pas au schéma. Alors voilà ma question : Pour quoi faut-il mettre un marqueur au milieu ? Merci d'avance pour la réponse Christine
01.01.2020 - 20:11DROPS Design answered:
Bonjour Christine, on met un marqueur au milieu pour repérer le milieu du dos, mais on va diminuer de chaque côté = en début de rang et en fin de rang pour former un triangle (= Del 1 sur le schéma et 2ème photo si besoin). Bon tricot!
02.01.2020 - 15:35
![]() Andrea Blümel wrote:
Andrea Blümel wrote:
Hallo! Habe die Maschenprobe schon mit einer 3,5 er Nadel gestrickt und in der Breite habe ich 0,5 cm zu viel. Vielleicht mit einer 4er Nadel und eine Größe kleiner stricken, also anstatt M stricke ich die Größe S?! Danke für Eure Antwort
25.07.2019 - 11:01DROPS Design answered:
Liebe Frau Blümel, haben Sie die Maschenprobe in der Mitte eines Probelappens, der ein paar cm größer als 10 x 10 cm ist, gemessen? Das ist wichtig, um die exakte Maschenprobe zu erhalten. Sie können die Maschenprobe auch einmal anfeuchten, in Form ziehen und dann trocknen lassen, dann wieder messen.
26.07.2019 - 09:20
![]() Andrea wrote:
Andrea wrote:
Hallo, habe gerade die Maschenprobe fertig und ich komme nur auf 9 cm bei 42 Reihen! Würde die Strickjacke trotz des Unterschieds von 1 cm in der Höhe was werden? Da bin ich mir sehr unsicher..... Vielen Dank für die Hilfe/Antwort
24.07.2019 - 10:48DROPS Design answered:
Liebe Andrea, bei diesem Modell ist es tatsächlich wichtig, dass Sie die Maschenprobe auch in der Höhe einhalten. Probieren Sie eine etwas dickere Nadel (1/2 Nadelstärke dicker) und testen Sie, ob die Maschenprobe dann in der Höhe und in der Breite passt.
24.07.2019 - 17:07
![]() Anita Schellenberger wrote:
Anita Schellenberger wrote:
Danke,für die schnelle antwort,aber ich meinte nicht teil 1 , sondern die Markierung rückenteil/rechtes Vorderteil teil 2. Diese Markierung bleibt bei mir nicht in der Mitte .muss ich den maschenmarkierer immer nach der gestrickten Masche wieder einsetzen,oder zuvor?
14.11.2017 - 10:28DROPS Design answered:
Liebe Frau Schellenberger, der Markierer muss immer in den mittleren Maschen sein, dh immer in der Mitte von dem Viereck/Dominoquadrat - siehe VIERECK. Viel Spaß beim stricken!
14.11.2017 - 11:16
![]() Oldörp,Claudia wrote:
Oldörp,Claudia wrote:
Hi, Ich habe ein Problem mit dem Übergang von dem Rückenteil 3 zu Rückenteil 4 . Am Teil 3 sollte ich die letzten Maschen stilllegen und dann an Teil 4 auf die Nadeln tun und Maschen aufnehmen,das habe ich auch gemacht aber jetzt sind die Maschen ganz lang :-(( Auf den Bildern sieht es aber ganz anders aus ,als wenn da eine Biese ist .
13.11.2017 - 08:44DROPS Design answered:
Liebe Frau Oldörp, Sie können die stillgelegten Maschen verschränkt stricken, oder je den Faden vor der nächsten stillgelgten Maschen heben und mit dieser Maschen zusammenstricken, damit die Maschen nicht zu hoch werden. Viel Spaß beim stricken!
13.11.2017 - 10:56
|
|
Domino Effect#dominoeffectjacket |
|
 |
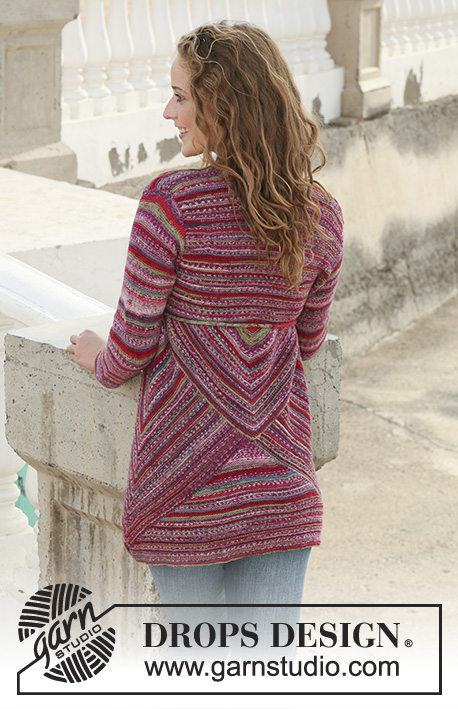 |
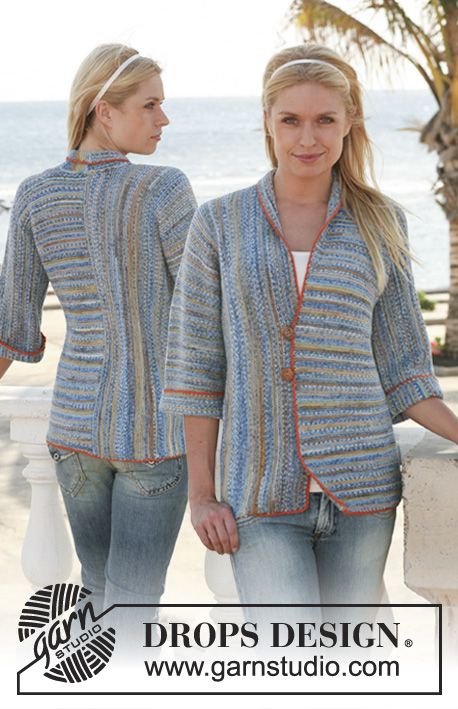
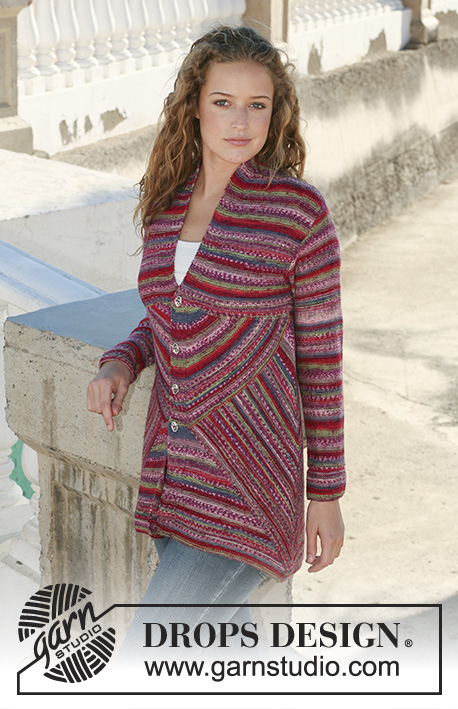
Knitted DROPS jacket with domino squares in ”Fabel”. Size S - XXXL.
DROPS 111-1 |
|
|
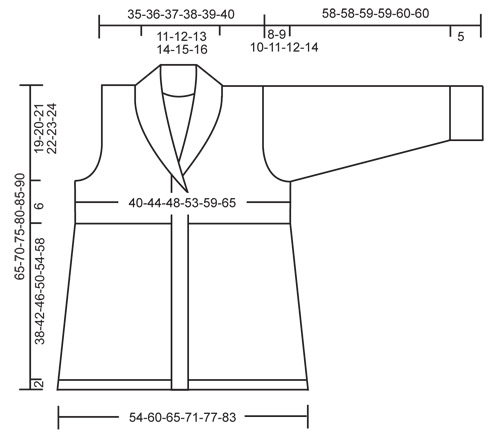
DOMINO SQUARE: 1 Domino square: (= 159-177-193-209-227-245sts): Row 1 (= WS): K all sts. Row 2 (= RS): work row until 1 st before marker, slip 1 st as if to K, K2 tog, psso, work remaining sts on row. Row 3: K all sts. Row 4: Like row 2. Row 5: Work row until 1 st before marker, K3 tog, work remaining sts on row. Row 6: Like row 2. Row 7: K all sts. Row 8: Like row 2. Row 9: K all sts. Row 10: Like row 2. Repeat row 1 to 10 until there is 1 st left on needle. Cut the thread and pull through remaining st. HALF DOMINO SQUARE: 1 Half Domino square (= 133-149-161-173-189-201 sts): Row 1 (= WS): Work row until 1 st remain, slip this st on stitch holder-1. Row 2 (= RS): Work row until 1 st before marker, slip 1 st as if to K, K2 tog, psso, work sts on row until 1 st remain, slip this st on stitch holder-2. Repeat row 1 and 2 until there is 1 st left on needle and 33-37-40-43-47-50 sts on each stitch holder. QUARTER DOMINO SQUARE: 1 quarter Domino square: Row 1 (= WS): K all sts, with 10 front band sts in P sts. Row 2 (= RS): P 10 front band sts, K2 tog, work row until 1 st remain, slip this st on stitch holder-1. Repeat row 1 and 2 until there are 11 sts left on needle (includes 10 front band sts) and 33-37-40-43-47-50 sts on stitch holder-1. BUTTONHOLES: Make buttonholes on right front band. 1 buttonhole = cast off 5th st from mid front and cast on 1 new st on return row. Make buttonholes when piece measures: SIZE S: 23, 28, 34 and 40 cm. SIZE M: 25, 31, 37 and 44 cm. SIZE L: 27, 34, 41 and 48 cm. SIZE XL: 29, 36, 44 and 52 cm. SIZE XXL: 31, 37, 43, 49 and 56 cm SIZE XXXL: 33, 39, 45, 51 and 58 cm -------------------------------------------------------- -------------------------------------------------------- BACK PIECE, PART 1: Worked in garter st throughout, i.e. K all rows. Cast on 129-143-157-171-185-199 sts on needle size 3 mm with Fabel. Work 2 cm garter st on all sts. Insert a marker in the middle st (= mid back). Continue in garter st, AT THE SAME TIME dec 1 st (by K2 tog) each side as follows: Row 1 (= RS): dec 1 st each side. Row 2 (= WS): K all sts. Row 3: dec 1 st each side. Row 4: dec 1 st each side. Row 5: dec 1 st each side. Row 6: K all sts. Row 7: dec 1 st each side. Row 8: dec 1 st each side. Row 9: dec 1 st each side. Row 10: K all sts. Repeat from row 1 to 10 a total of 9-10-11-12-13-14 times = 3 sts left on needle. Work next row from RS as follows: slip 1 st as if to K, K2 tog, psso = 1 st left on needle. Cut the thread and pull through remaining st. Piece now measures approx 21-23-25-27-29-31 cm from casting on row to the top of square. LEFT FRONT PIECE PART 1: Cast on 75-82-89-96-103-110 sts (includes 10 front band sts towards mid front) on needle size 3 mm with Fabel. Work 2 cm garter st with 10 front band sts in P sts towards mid front – P front band sts on every row throughout. Insert a marker inside the 10 front band sts. Continue in garter st, AT THE SAME TIME dec 1 st (by K2 tog) at the side as follows: Row 1 (= RS): dec 1 st at the side. Row 2 (= WS): K all sts (continue to P front band sts). Row 3: dec 1 st at the side. Row 4: dec 1 st at the side. Row 5: dec 1 st at the side. Row 6: K all sts (continue to P front band sts). Row 7: dec 1 st at the side. Row 8: dec 1 st at the side. Row 9: dec 1 st at the side. Row 10: K all sts (continue to P front band sts). Repeat from row 1 to 10 a total of 9-10-11-12-13-14 times = 12 sts left on needle. Work next row from RS as follows: K2 tog, cut thread and pull through st created by K2 tog, slip the remaining 10 front band sts on a stitch holder. Piece now measures approx 21-23-25-27-29-31 cm from cast on row to the top of square. RIGHT FRONT PIECE PART 1: Like left front piece, but mirrored. BACK PIECE/RIGHT FRONT PIECE PART 2: Pick up 79-88-96-104-113-122 sts along the side on right front piece (part 1), beg inside front band sts on stitch holder and pick up sts to where the dec at the side of Part 1 started (i.e. 2 cm at the bottom of front piece and back piece are left “open” and will be sewn tog later). Cast on 1 st between front piece and back piece, and pick up 79-88-96-104-113-122 sts along the right side on back piece (part 1) up to the point (= mid back) = a total of 159-177-193-209-227-245 sts on needle. Insert a marker in the middle st (= mid side). Now work Domino square, see above. BACK PIECE/LEFT FRONT PIECE PART 2: Beg at the point mid back on back piece. Pick up 79-88-96-104-113-122 sts along the side to where the dec at the side on Part 1 started (i.e. 2 cm at the bottom of front piece and back piece are left “open” and will be sewn tog later). Cast on 1 st between back piece and front piece, and pick up 79-88-96-104-113-122 sts along the side on front piece up to front band sts on stitch holder = a total of 159-177-193-209-227-245 sts on needle. Insert a marker in the middle st (= mid side). Now work Domino square. BACK PIECE PART 3: Pick up 66-74-80-86-94-100 sts (from RS) from the point at the top of Domino square at the right side and down along the edge to where the 2 Domino squares meet mid back, pick up 1 st between the 2 squares and pick up 66-74-80-86-94-100 sts along the side to the top of the Domino square on the left side = a total of 133-149-161-173-189-201 sts on needle. Insert a marker in the middle st. Now work Half Domino square – see above. BACK PIECE PART 4: Keep the 1 st on needle and slip sts from stitch holder-1 and stitch holder-2 back on needle. K 1 row, AT THE SAME TIME pick up 28-30-34-40-47-55 sts evenly among the sts slipped back on needle = 95-105-115-127-142-156 sts. Insert a marker in piece, now measure piece from here. Continue in garter st back and forth on needle on all sts. When piece measures approx 6 cm from marker cast off 3-3-3-4-4-4 sts each side for armhole and cast off to shape the armhole each side at the beg of every row: 3 sts 0-0-0-1-2-3 times, 2 sts 0-2-4-4-5-6 times and 1 st 2-2-2-3-4-5 times = 85-87-89-91-94-96 sts left on needle. Continue in garter st back and forth on needle until piece measures 23-24-25-26-27-28 cm from marker. Now cast off the middle 21-23-25-27-30-32 sts for neck and complete each shoulder separately. Cast off 1 st on neckline on every other row a total of 3 times = 29 sts left on shoulder. Cast off when piece measures 25-26-27-28-29-30 cm from marker, piece now measures a total of approx 65-70-75-80-85-90 cm. RIGHT FRONT PIECE PART 3: Remember BUTTONHOLES – see above. Slip 10 front band sts back on needle. Pick up (from RS) 1 st between front band and the point at the side of Domino square, then pick up 66-74-80-86-94-100 sts along the side of the Domino square up to the point at the side of jacket = 77-85-91-97-105-111 sts on needle. Insert a marker in the st between front band and Domino square. Continue to P front band sts on every row. Now work Quarter Domino square – see above. RIGHT FRONT PIECE PART 4: Keep the 11 sts on needle and slip sts from stitch holder back on needle. K 1 row, AT THE SAME TIME pick up 14-16-17-20-22-27 sts evenly among sts slipped back on needle = 58-64-68-74-80-88 sts (includes 10 front band sts). Insert a marker, and now measure piece from here. Continue in garter st back and forth on needle with front band sts as before. When piece measures approx 6 cm from marker cast off for armhole at the side as described for back piece = 53-55-55-56-56-58 sts. Continue until piece measures 25-26-27-28-29-30 cm from marker. Now cast off 29 sts from shoulder towards the neckline = 24-26-26-27-27-29 sts left on needle for collar. Continue in garter st back and forth on needle on collar sts with front band sts as before. When collar measures approx 6-7-7-8-9-9 cm from shoulder, cast off. LEFT FRONT PIECE PART 3 AND 4: Like right front piece, but mirrored and without buttonholes. SLEEVE: Worked back and forth on needle. Cast on 56-58-60-62-64-68 sts (includes 1 edge st each side) on needle size 3 mm with Fabel. Work garter st until piece measures approx 5 cm. Work 5 rows stocking st and now continue in reverse stocking st. When piece measures 8 cm inc 1 st each side and repeat the inc on every 3.5-3-2.5-2-1.5-1.5 cm a total of 12-14-15-18-21-22 times = 80-86-90-98-106-112 sts. When piece measures 50-49-49-48-48-46 cm (less for the larger sizes because of longer sleeve cap and wider shoulder) cast off for sleeve cap each side at the beg of every row: 3 sts 1 time, 2 sts 5-5-5-5-5-6 times and 1 st 1-2-4-6-7-7 times, then cast off 2 sts each side until piece measures approx 57-57-58-58-59-59 cm, now cast off 3 sts each side 1 time. Cast off remaining sts. Piece measures approx 58-58-59-59-60-60 cm. ASSEMBLY: Sew side seams and sew tog the edge (= 2 cm garter st) towards bottom edge each side. Sew in outer loops of sts. Sew sleeve seam inside 1 edge and set in sleeves. Sew collar tog mid back and sew to neckline. Sew on buttons. |
|
 |
|
 |
|
Have you finished this pattern?Tag your pictures with #dropspattern #dominoeffectjacket or submit them to the #dropsfan gallery. Do you need help with this pattern?You'll find 22 tutorial videos, a Comments/Questions area and more by visiting the pattern on garnstudio.com. © 1982-2026 DROPS Design A/S. We reserve all rights. This document, including all its sub-sections, has copyrights. Read more about what you can do with our patterns at the bottom of each pattern on our site. |
|


With over 40 years in knitting and crochet design, DROPS Design offers one of the most extensive collections of free patterns on the internet - translated to 17 languages. As of today we count 325 catalogues and 12298 patterns translated into English (UK/cm). 12298
We work hard to bring you the best knitting and crochet have to offer, inspiration and advice as well as great quality yarns at incredible prices! Would you like to use our patterns for other than personal use? You can read what you are allowed to do in the Copyright text at the bottom of all our patterns. Happy crafting!
Post a comment to pattern DROPS 111-1
We would love to hear what you have to say about this pattern!
If you want to leave a question, please make sure you select the correct category in the form below, to speed up the answering process. Required fields are marked *.