
Popular categories
Looking for a yarn?


Comments / Questions (158)
Valeria Wong wrote:
Según el patron me dicen que deje 15 puntos libres contados desde el MP y tejer los 14 puntos restantes, todo bien hasta ahí, pero luego me dice tejer los 74 puntos restantes (según la talla) con punto jersey. Para cumplir con esto tengo que tomar los 15 puntos que deje libre. Eso significaría que el tejido se cerraría como un circulo? Y otra duda para levantar los 14 puntos segun el video se hace sobre puntos cerrados como hago en esto, si en ningun momento cerre puntos????
10.08.2013 - 01:26DROPS Design answered:
Hola Valeria. Como el trabajo ahora empieza desde el centro del delantero, claro que tienes que tejer los 15 pts (que dejamos sin hacer ) pero al final de la fila, y ahora recogemos 14 pts nuevos (la cenefa izquierda) por detrás de los 14 pts primeros (cenefa derecha). No tienes pts cerrados - se recogen sobre los pts de la fila anterior. Ahora no tenemos un círculo cerrado y trabajamos ida y vuelta según el patrón.
10.08.2013 - 09:13ANGELICA SANCHEZ wrote:
Como levanto los 14 puntos si segun el video se hacen sore puntos cerrados
10.08.2013 - 01:22DROPS Design answered:
Hola Angelica. No tienes pts cerrados - se recogen sobre los pts de la fila anterior por detrás de los 14 pts de la cenefa derecha
10.08.2013 - 09:15GLORIA BASURTO wrote:
Según el patron me dicen que deje 15 puntos libres contados desde el MP y tejer los 14 puntos restantes, todo bien hasta ahí, pero luego me dice tejer los 74 puntos restantes (según la talla) con punto jersey. Para cumplir con esto tengo que tomar los 15 puntos que deje libre. Eso significaría que el tejido se cerraría como un circulo? Y otra duda para levantar los 14 puntos segun el video se hace sobre puntos cerrados como hago en esto, si en ningun momento cerre puntos????
10.08.2013 - 01:19DROPS Design answered:
Hola Gloria. Como el trabajo ahora empieza desde el centro del delantero, claro que tienes que tejer los 15 pts (que dejamos sin hacer ) pero al final de la fila, y ahora recogemos 14 pts nuevos (la cenefa izquierda) por detrás de los 14 pts primeros (cenefa derecha). No tienes pts cerrados - se recogen sobre los pts de la fila anterior. Ahora no tenemos un círculo cerrado y trabajamos ida y vuelta según el patrón.
10.08.2013 - 09:13ANGELICA SANCHEZ wrote:
Según el patron me dicen que deje 15 puntos libres contados desde el MP y tejer los 14 puntos restantes, todo bien hasta ahí, pero luego me dice tejer los 74 puntos restantes (según la talla) con punto jersey. Para cumplir con esto tengo que tomar los 15 puntos que deje libre. Eso significaría que el tejido se cerraría como un circulo? Y otra duda para levantar los 14 puntos segun el video se hace sobre puntos cerrados como hago en esto, si en ningun momento cerre puntos????
10.08.2013 - 01:16DROPS Design answered:
Hola Angelica. Como el trabajo ahora empieza desde el centro del delantero, claro que tienes que tejer los 15 pts (que dejamos sin hacer ) pero al final de la fila, y ahora recogemos 14 pts nuevos (la cenefa izquierda) por detrás de los 14 pts primeros (cenefa derecha). No tienes pts cerrados - se recogen sobre los pts de la fila anterior. Ahora no tenemos un círculo cerrado y trabajamos ida y vuelta según el patrón.
10.08.2013 - 09:12ANGELICA SANCHEZ wrote:
Según el patron me dicen que deje 15 puntos libres contados desde el MP y tejer los 14 puntos restantes, todo bien hasta ahí, pero luego me dice tejer los 74 puntos restantes (según la talla) con punto jersey. Para cumplir con esto tengo que tomar los 15 puntos que deje libre. Eso significaría que el tejido se cerraría como un circulo? Y otra duda para levantar los 14 puntos segun el video se hace sobre puntos cerrados como hago en esto, si en ningun momento cerre puntos????
10.08.2013 - 01:15DROPS Design answered:
Hola Angelica. Como el trabajo ahora empieza desde el centro del delantero, claro que tienes que tejer los 15 pts (que dejamos sin hacer ) pero al final de la fila, y ahora recogemos 14 pts nuevos (la cenefa izquierda) por detrás de los 14 pts primeros (cenefa derecha). No tienes pts cerrados - se recogen sobre los pts de la fila anterior. Ahora no tenemos un círculo cerrado y trabajamos ida y vuelta según el patrón.
10.08.2013 - 09:32ANGELICA SANCHEZ wrote:
Según el patron me dicen que deje 15 puntos libres contados desde el MP y tejer los 14 puntos restantes, todo bien hasta ahí, pero luego me dice tejer los 74 puntos restantes (según la talla) con punto jersey. Para cumplir con esto tengo que tomar los 15 puntos que deje libre. Eso significaría que el tejido se cerraría como un circulo? Y otra duda para levantar los 14 puntos segun el video se hace sobre puntos cerrados como hago en esto, si en ningun momento cerre puntos????
10.08.2013 - 01:14DROPS Design answered:
Hola Angelica. Como el trabajo ahora empieza desde el centro del delantero, claro que tienes que tejer los 15 pts (que dejamos sin hacer ) pero al final de la fila, y ahora recogemos 14 pts nuevos (la cenefa izquierda) por detrás de los 14 pts primeros (cenefa derecha). No tienes pts cerrados - se recogen sobre los pts de la fila anterior. Ahora no tenemos un círculo cerrado y trabajamos ida y vuelta según el patrón.
10.08.2013 - 09:11
![]() ANGELICA SANCHEZ wrote:
ANGELICA SANCHEZ wrote:
Según el patron me dicen que deje 15 puntos libres contados desde el MP y tejer los 14 puntos restantes, todo bien hasta ahí, pero luego me dice tejer los 74 puntos restantes (según la talla) con punto jersey. Para cumplir con esto tengo que tomar los 15 puntos que deje libre. Eso significaría que el tejido se cerraría como un circulo? Y otra duda para levantar los 14 puntos segun el video se hace sobre puntos cerrados como hago en esto, si en ningun momento cerre puntos????
10.08.2013 - 01:13DROPS Design answered:
Hola Angelica. Como el trabajo ahora empieza desde el centro del delantero, claro que tienes que tejer los 15 pts (que dejamos sin hacer ) pero al final de la fila, y ahora recogemos 14 pts nuevos (la cenefa izquierda) por detrás de los 14 pts primeros (cenefa derecha). No tienes pts cerrados - se recogen sobre los pts de la fila anterior. Ahora no tenemos un círculo cerrado y trabajamos ida y vuelta según el patrón.
10.08.2013 - 09:11GLORIA BASURTO wrote:
Gracias por responder mi pregunta, pero creo que no me entienden bien mi consulta, disculpen la insistencia pero no quiero que mi trabajo me salga mal... Yo dejo los 15 puntos libres como me indican y tejo los 14 puntos que me piden, todo bien hasta ahí, pero luego me dice tejer los 74 puntos restantes (según la talla) con punto jersey. Para cumplir con esto tengo que tomar los 15 puntos que deje libre. Eso significaría que el tejido se cerraría como un circulo????????
10.08.2013 - 01:09DROPS Design answered:
Hola Gloria. Como el trabajo ahora empieza desde el centro del delantero, claro que tienes que tejer los 15 pts (que dejamos sin hacer ) pero al final de la fila, y ahora recogemos 14 pts nuevos (la cenefa izquierda) por detrás de los 14 pts primeros (cenefa derecha). No tienes pts cerrados - se recogen sobre los pts de la fila anterior. Ahora no tenemos un círculo cerrado y trabajamos ida y vuelta según el patrón.
10.08.2013 - 09:10
![]() GLORIA BASURTO wrote:
GLORIA BASURTO wrote:
Gracias por responder mi pregunta, pero creo que no me entienden bien mi consulta, disculpen la insistencia pero no quiero que mi trabajo me salga mal... Yo dejo los 15 puntos libres como me indican y tejo los 14 puntos que me piden, todo bien hasta ahí, pero luego me dice tejer los 74 puntos restantes (según la talla) con punto jersey. Para cumplir con esto tengo que tomar los 15 puntos que deje libre. Eso significaría que el tejido se cerraría como un circulo????????
10.08.2013 - 01:08DROPS Design answered:
Hola Gloria. Como el trabajo ahora empieza desde el centro del delantero, claro que tienes que tejer los 15 pts (que dejamos sin hacer ) pero al final de la fila, y ahora recogemos 14 pts nuevos (la cenefa izquierda) por detrás de los 14 pts primeros (cenefa derecha). No tienes pts cerrados - se recogen sobre los pts de la fila anterior. Ahora no tenemos un círculo cerrado y trabajamos ida y vuelta según el patrón.
10.08.2013 - 09:09GLORIA BASURTO wrote:
Gracias por responder mi pregunta, pero creo que no me entienden bien mi consulta, disculpen la insistencia pero no quiero que mi trabajo me salga mal... Yo dejo los 15 puntos libres como me indican y tejo los 14 puntos que me piden, todo bien hasta ahí, pero luego me dice tejer los 74 puntos restantes (según la talla) con punto jersey. Para cumplir con esto tengo que tomar los 15 puntos que deje libre. Eso significaría que el tejido se cerraría como un circulo????????
10.08.2013 - 01:07DROPS Design answered:
Hola Gloria. Como el trabajo ahora empieza desde el centro del delantero, claro que tienes que tejer los 15 pts (que dejamos sin hacer ) pero al final de la fila, y ahora recogemos 14 pts nuevos (la cenefa izquierda) por detrás de los 14 pts primeros (cenefa derecha). No tienes pts cerrados - se recogen sobre los pts de la fila anterior. Ahora no tenemos un círculo cerrado y trabajamos ida y vuelta según el patrón.
10.08.2013 - 09:08
|
|
Campfire |
|
 |
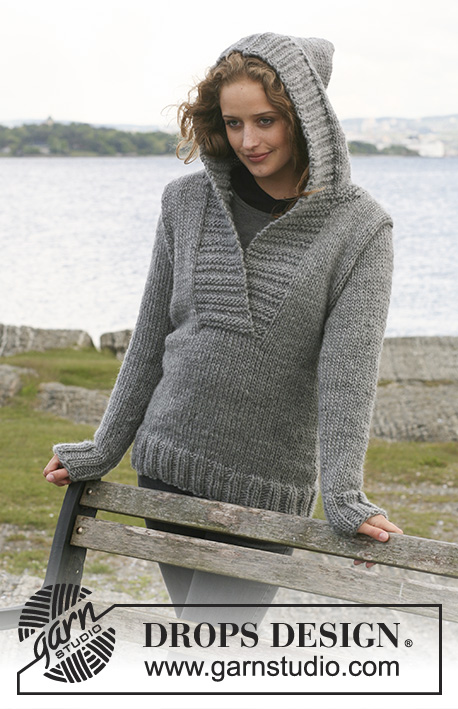 |
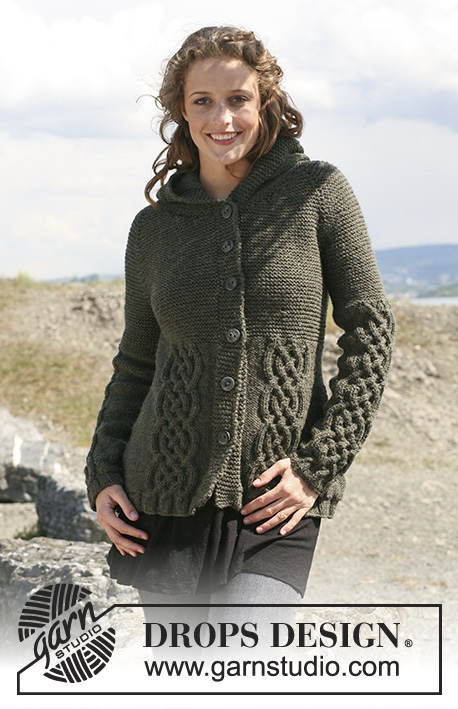
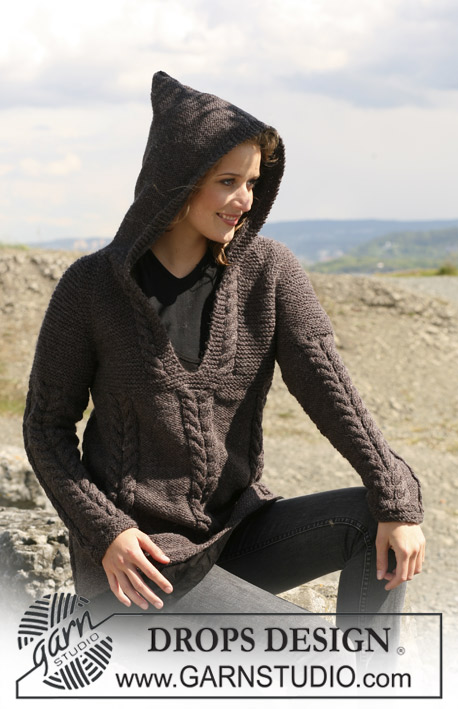
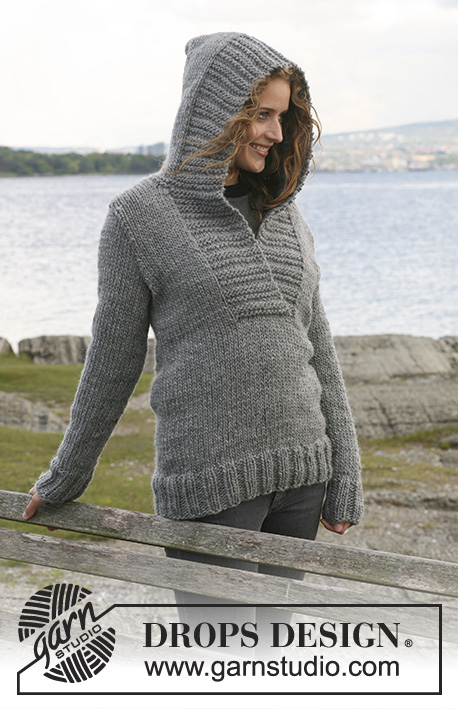
Knitted DROPS Jumper with hood in ”Snow”. Size S - XXXL.
DROPS 109-1 |
|
|
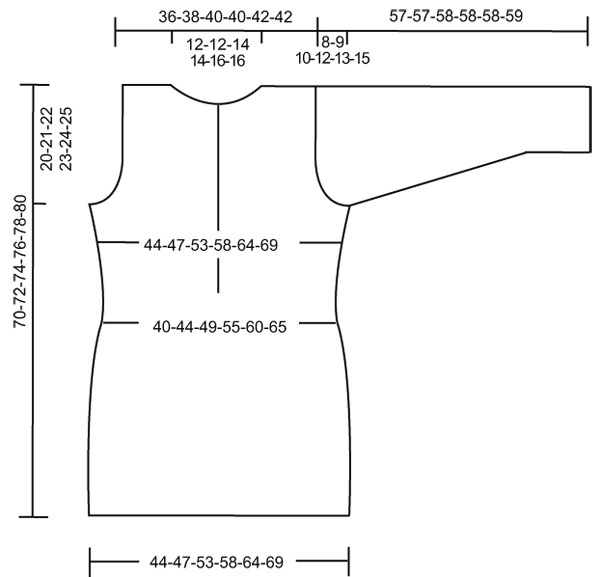
Front bands: Starting from RS: * K 4 rows, P 2 rows *, repeat from *-*. Note! Left front i.e the sts that are picked up behind the right front = pick up row counts as the first K row of the K 4 rows. Body piece: Worked in the round. Cast on 96-104-116-128-140-152 sts on needle size 8 mm with Snow. P 1 round and continue in rib, K2/P2. When piece measures 10 cm continue in stocking st. Insert 1 Marking Thread (MT) at beg of round and 1 MT after 48-52-58-64-70-76 sts (= the sides). Remember the knitting tension! When piece measures 15-16-17-18-19-20 cm dec 1 st on each side of both MT (= 4 dec per round). Repeat the dec when piece measures 30-31-32-33-34-35 cm = 88-96-108-120-132-144 sts (= 44-48-54-60-66-72 sts on back and front piece). When piece measures 33-34-35-36-37-38 cm, cut the thread. Now continue as follows: Beg after the 15-17-20-23-26-29 st from the first MT. Work 14 sts front band – see above – and stocking st on the next 74-82-94-106-118-130 sts. Now pick up 14 new sts behind the front band = 102-110-122-134-146-158 sts. Continue back and forth on needle with 14 front band sts each side. At the same time when piece measures 36-37-38-39-40-41 cm inc 1 st on both sides of each MT (= 4 inc per round). Repeat the inc when piece measures 46-47-48-49-50-51 cm = 110-118-130-142-154-166 sts. When piece measures 50-51-52-53-54-55 cm cast off 6 sts each side (i.e. 3 sts on each side of MT) for armhole = 98-106-118-130-142-154 sts. Now complete back and front pieces separately. Back piece: = 42-46-52-58-64-70 sts. Cast off to shape the armhole each side at the beg of every row: 2 sts 0-0-1-2-3-4 times and 1 st 1-2-2-3-3-4 times = 40-42-44-44-46-46 sts. When piece measures 68-70-72-74-76-78 cm cast off the middle 12-12-14-14-16-16 sts for neck and dec 1 st on neckline on next row = 13-14-14-14-14-14 sts left on each shoulder. Cast off when piece measures 70-72-74-76-78-80 cm. Right front piece: = 28-30-33-36-39-42 sts. Cast off to shape the armhole as described for back piece = 27-28-29-29-30-30 sts. When piece measures 60-62-64-66-68-70 cm slip 14 sts towards mid front on a stitch holder and now dec to shape the neckline on every other row as follows: 1 st 0-0-1-1-2-2 times = 13-14-14-14-14-14 sts left on shoulder. Cast off when piece measures 70-72-74-76-78-80 cm. Left front piece: Like right front piece, but mirrored. Sleeve: Worked in the round on double pointed needles. Cast on 28-28-28-32-32-32 sts on needle size 8 mm. Insert 1 MT at beg of round. P 1 round and continue in rib, K2/P2. When piece measures 8 cm continue in stocking st, at the same time dec 2-2-0-4-2-2 sts evenly on first round = 26-26-28-28-30-30 sts. When piece measures 10 cm inc 1 st on both sides of MT on every 6-5-5-3.5-3.5-2.5 cm a total of 7-8-8-10-10-12 times = 40-42-44-48-50-54 sts. When piece measures 49-48-48-46-45-44 cm - Note! Less on the larger sizes because of longer sleeve cap and wider shoulder – cast off 3 sts on both sides of MT for armhole, and now complete piece back and forth on needle. Cast off to shape the sleeve cap each side at the beg of every row: 2 sts 1 time and 1 st 2-3-4-5-6-7 times, then 2 sts each side until piece measures 56-56-57-57-57-58 cm, cast off 3 sts each side 1 time and cast off remaining sts. Piece measures approx 57-57-58-58-58-59 cm. Hood: Pick up approx 60 to 65 sts round neckline (incl sts on stitch holder) on needle size 8 mm with Snow. Work 4 rows garter st with front bands as before. At the same time inc 5 sts evenly (do not inc on front band sts) on the last row = 65 to 70 sts. Continue in stocking st with 14 front band sts each side as before until hood measures 35-35-36-36-37-37 cm. Cast off. Fold hood double and sew tog at top from RS. Assembly: Set in sleeves. www.garnstudio.com |
|
 |
|
Have you finished this pattern?Tag your pictures with #dropspattern or submit them to the #dropsfan gallery. Do you need help with this pattern?You'll find 21 tutorial videos, a Comments/Questions area and more by visiting the pattern on garnstudio.com. © 1982-2026 DROPS Design A/S. We reserve all rights. This document, including all its sub-sections, has copyrights. Read more about what you can do with our patterns at the bottom of each pattern on our site. |
|


With over 40 years in knitting and crochet design, DROPS Design offers one of the most extensive collections of free patterns on the internet - translated to 17 languages. As of today we count 325 catalogues and 12298 patterns translated into English (UK/cm). 12298
We work hard to bring you the best knitting and crochet have to offer, inspiration and advice as well as great quality yarns at incredible prices! Would you like to use our patterns for other than personal use? You can read what you are allowed to do in the Copyright text at the bottom of all our patterns. Happy crafting!
Post a comment to pattern DROPS 109-1
We would love to hear what you have to say about this pattern!
If you want to leave a question, please make sure you select the correct category in the form below, to speed up the answering process. Required fields are marked *.