
Popular categories
Looking for a yarn?


Comments / Questions (158)
![]() Yvonne Walter wrote:
Yvonne Walter wrote:
Danke erst einmal für die kostenlose Strickanleitung zu dem schönen Pullover!
08.02.2015 - 10:09
![]() Yvonne Walter wrote:
Yvonne Walter wrote:
Das Kommentarfeld ist so kurz, dass ich meine Fragen in mehreren Teilen stellen werde.
08.02.2015 - 10:08
![]() Yvonne Walter wrote:
Yvonne Walter wrote:
Hallo
08.02.2015 - 10:07Aline wrote:
Hello, I'm working on this sweater right now. I would like to make a hood that is not pointy. I'd like to avoid that "elfin hood"-effect. Is there another Drops sweater model I could use to adapt the hood of this sweater so that it has a nicely rounded hood? I could not find that myself. Could you post a link to such a model? Or, could you give advice on the best way to make a rounded hood?
06.12.2014 - 12:43DROPS Design answered:
Dear Aline, for any individual assistance, remember you can get help from your DROPS store they can give you tips & advices. Happy knitting!
07.12.2014 - 12:40
![]() Sarah wrote:
Sarah wrote:
Liebes Drops-Team, vielen Dank für die tolle Anleitung! Ich habe eine Verständnisfrage(Ich stricke in Größe M): Zu Beginn des Rückenteils heißt es : Auf beiden Seiten am Anfang der R. wie folgt: 2 M. 0 Mal und 1 M. 2Mal = 42 M. abk Heißt dass ich kette in der 1.&2. R. nicht ab, stricke also alle M, und kette in der 3&4.R. dann auf beiden Seiten 1 M.ab ,oder überspringe ich die R. 1 & 2 und kette gleich beidseits 1 M ab? Danke schon mal für die Antwort, Sarah
16.09.2014 - 21:16DROPS Design answered:
Liebe Sarah, Sie ketten direkt jeweils 1 M ab, ohne noch R ohne Abketten dazwischen zu stricken. Für Größe M existiert die Angabe mit den 2 M sozusagen gar nicht, die dürfen Sie einfach überlesen. :-) Sie ketten dann also insgesamt 4 M ab, d.h. an beiden Seiten jeweils 2 M, d.h. in 4 R je 1 M.
16.09.2014 - 22:03
![]() Lily wrote:
Lily wrote:
Ik zou dit patroon graag willen breien voor mijn schoondochter, maar dam met garen voor nld 4.(nld 8 vind ze te dik) Werkt het als ik met garen + nld. 4 brei en dan alle steken verdubbel? Krijg ik dan ook de juiste verhoudingen?
24.03.2014 - 13:34DROPS Design answered:
Hoi Lily. Brei een proeflapje en controleer de stekenverhouding. Pas eventueel aan waar nodig
24.03.2014 - 16:27
![]() Anna Meier wrote:
Anna Meier wrote:
Liebes Drops-Team, ich habe eine Fragewegen des Ärmels: Am Ende der Ärmel Anleitung heißt es, in jeder Reihe sollen 2 Maschen abge- normen werden. Heißt dass 2 Maschen abnehmen, Wenden, 2abnehmen, Mitte stricKen,2 M abnehmen, wenden, 2M abnehmen, Mitte stricken u.s.w? Ichhabe nämlich das Problem dass ich so innerhalb von 8 Runden von 40 M auf O(-6=34,-2x2=30,-2x=28,26,22,18,14=10,=6, alle weg. aber der Ärmel ist viel zu klein fürs Loch...
03.03.2014 - 00:14DROPS Design answered:
Liebe Anna, Sie nehmen nicht am Anfang und am Ende jeder R 2 M ab, sondern ketten nur am Anfang jeder R 2 M ab. Die Anleitung wurde gerade etwas umformuliert, damit das deutlicher wird. Gutes Gelingen!
03.03.2014 - 11:19
![]() Sabine Wlazik wrote:
Sabine Wlazik wrote:
Liebe Drops Mitarbeiter, ich habe ein Problem bei der Blende Stricken vom Modell 109-1 Denke es ist ein Denkfehler von mir, irgendwie klappt das nicht, wäre es möglich ein Video dafür zu erstellen! Vielen dank Sabine wlazik
26.02.2014 - 15:05DROPS Design answered:
Liebe Sabine, wir geben Ihren Wunsch gerne an unser Video-Team weiter, aber vielleicht wollen Sie uns vorher Ihr Problem kurz beschreiben?
26.02.2014 - 16:47
![]() Isi wrote:
Isi wrote:
Was bedeutet gegen den Hals abnehmen?
18.02.2014 - 10:14DROPS Design answered:
Liebe Isi, "gegen den Hals" bedeutet am Halsrand. Sie ketten beim Rückenteil ja erst die mittleren M für den Halsausschnitt ab und stricken dann beide Schultern einzeln weiter. In der nächsten R, die am Halsrand beginnt, ketten Sie bei beiden Schulterteilen einfach 1 M am Halsrand für den Halsausschnitt ab. Viel Spaß beim Stricken!
18.02.2014 - 10:27Nancy Basurto wrote:
Com levantar los 14 puntos?????? segun el video se hace sobre puntos cerrados como hago en esto?????, si en ningun momento cerre puntos...
10.08.2013 - 01:29DROPS Design answered:
Hola Nancy. No tienes pts cerrados - se recogen sobre los pts de la fila anterior por detrás de los 14 pts de la cenefa derecha.
10.08.2013 - 09:18
|
|
Campfire |
|
 |
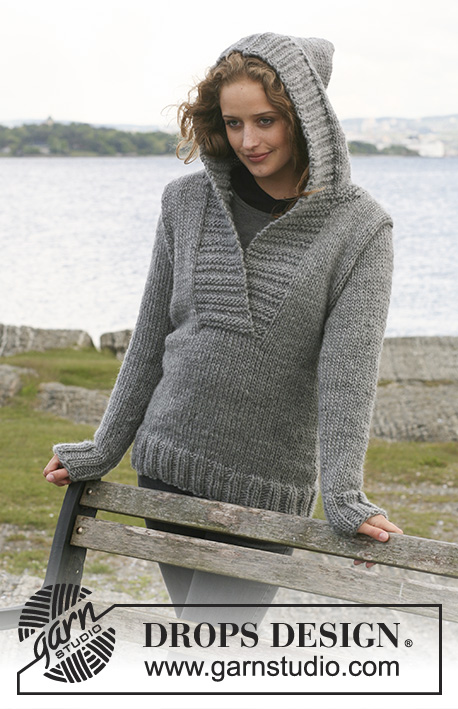 |
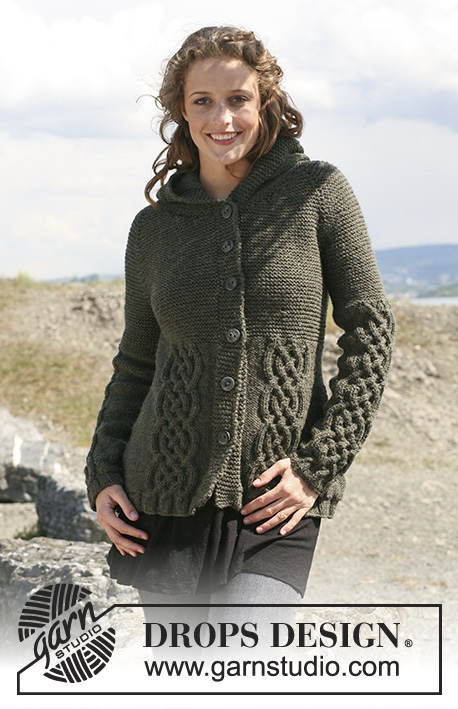
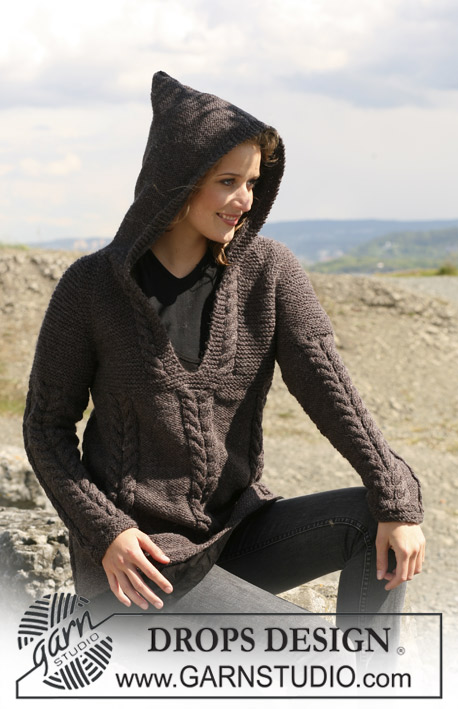
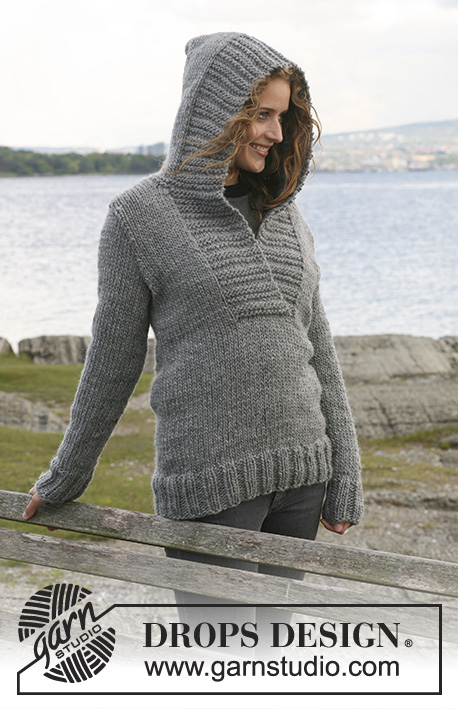
Knitted DROPS Jumper with hood in ”Snow”. Size S - XXXL.
DROPS 109-1 |
|
|
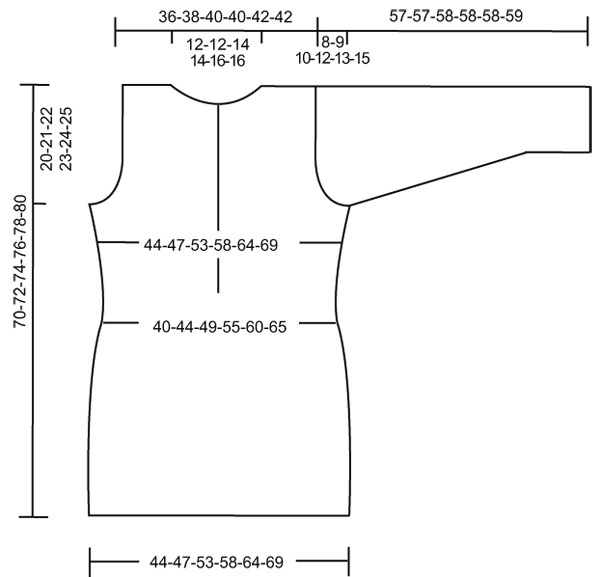
Front bands: Starting from RS: * K 4 rows, P 2 rows *, repeat from *-*. Note! Left front i.e the sts that are picked up behind the right front = pick up row counts as the first K row of the K 4 rows. Body piece: Worked in the round. Cast on 96-104-116-128-140-152 sts on needle size 8 mm with Snow. P 1 round and continue in rib, K2/P2. When piece measures 10 cm continue in stocking st. Insert 1 Marking Thread (MT) at beg of round and 1 MT after 48-52-58-64-70-76 sts (= the sides). Remember the knitting tension! When piece measures 15-16-17-18-19-20 cm dec 1 st on each side of both MT (= 4 dec per round). Repeat the dec when piece measures 30-31-32-33-34-35 cm = 88-96-108-120-132-144 sts (= 44-48-54-60-66-72 sts on back and front piece). When piece measures 33-34-35-36-37-38 cm, cut the thread. Now continue as follows: Beg after the 15-17-20-23-26-29 st from the first MT. Work 14 sts front band – see above – and stocking st on the next 74-82-94-106-118-130 sts. Now pick up 14 new sts behind the front band = 102-110-122-134-146-158 sts. Continue back and forth on needle with 14 front band sts each side. At the same time when piece measures 36-37-38-39-40-41 cm inc 1 st on both sides of each MT (= 4 inc per round). Repeat the inc when piece measures 46-47-48-49-50-51 cm = 110-118-130-142-154-166 sts. When piece measures 50-51-52-53-54-55 cm cast off 6 sts each side (i.e. 3 sts on each side of MT) for armhole = 98-106-118-130-142-154 sts. Now complete back and front pieces separately. Back piece: = 42-46-52-58-64-70 sts. Cast off to shape the armhole each side at the beg of every row: 2 sts 0-0-1-2-3-4 times and 1 st 1-2-2-3-3-4 times = 40-42-44-44-46-46 sts. When piece measures 68-70-72-74-76-78 cm cast off the middle 12-12-14-14-16-16 sts for neck and dec 1 st on neckline on next row = 13-14-14-14-14-14 sts left on each shoulder. Cast off when piece measures 70-72-74-76-78-80 cm. Right front piece: = 28-30-33-36-39-42 sts. Cast off to shape the armhole as described for back piece = 27-28-29-29-30-30 sts. When piece measures 60-62-64-66-68-70 cm slip 14 sts towards mid front on a stitch holder and now dec to shape the neckline on every other row as follows: 1 st 0-0-1-1-2-2 times = 13-14-14-14-14-14 sts left on shoulder. Cast off when piece measures 70-72-74-76-78-80 cm. Left front piece: Like right front piece, but mirrored. Sleeve: Worked in the round on double pointed needles. Cast on 28-28-28-32-32-32 sts on needle size 8 mm. Insert 1 MT at beg of round. P 1 round and continue in rib, K2/P2. When piece measures 8 cm continue in stocking st, at the same time dec 2-2-0-4-2-2 sts evenly on first round = 26-26-28-28-30-30 sts. When piece measures 10 cm inc 1 st on both sides of MT on every 6-5-5-3.5-3.5-2.5 cm a total of 7-8-8-10-10-12 times = 40-42-44-48-50-54 sts. When piece measures 49-48-48-46-45-44 cm - Note! Less on the larger sizes because of longer sleeve cap and wider shoulder – cast off 3 sts on both sides of MT for armhole, and now complete piece back and forth on needle. Cast off to shape the sleeve cap each side at the beg of every row: 2 sts 1 time and 1 st 2-3-4-5-6-7 times, then 2 sts each side until piece measures 56-56-57-57-57-58 cm, cast off 3 sts each side 1 time and cast off remaining sts. Piece measures approx 57-57-58-58-58-59 cm. Hood: Pick up approx 60 to 65 sts round neckline (incl sts on stitch holder) on needle size 8 mm with Snow. Work 4 rows garter st with front bands as before. At the same time inc 5 sts evenly (do not inc on front band sts) on the last row = 65 to 70 sts. Continue in stocking st with 14 front band sts each side as before until hood measures 35-35-36-36-37-37 cm. Cast off. Fold hood double and sew tog at top from RS. Assembly: Set in sleeves. www.garnstudio.com |
|
 |
|
Have you finished this pattern?Tag your pictures with #dropspattern or submit them to the #dropsfan gallery. Do you need help with this pattern?You'll find 21 tutorial videos, a Comments/Questions area and more by visiting the pattern on garnstudio.com. © 1982-2026 DROPS Design A/S. We reserve all rights. This document, including all its sub-sections, has copyrights. Read more about what you can do with our patterns at the bottom of each pattern on our site. |
|


With over 40 years in knitting and crochet design, DROPS Design offers one of the most extensive collections of free patterns on the internet - translated to 17 languages. As of today we count 325 catalogues and 12298 patterns translated into English (UK/cm). 12298
We work hard to bring you the best knitting and crochet have to offer, inspiration and advice as well as great quality yarns at incredible prices! Would you like to use our patterns for other than personal use? You can read what you are allowed to do in the Copyright text at the bottom of all our patterns. Happy crafting!
Post a comment to pattern DROPS 109-1
We would love to hear what you have to say about this pattern!
If you want to leave a question, please make sure you select the correct category in the form below, to speed up the answering process. Required fields are marked *.