
Popular categories
Looking for a yarn?


Comments / Questions (19)
![]() Christine wrote:
Christine wrote:
Merci de ne pas tenir compte de mon message. Tout est clair
24.10.2024 - 00:29
![]() Christine wrote:
Christine wrote:
Bonjour, Vous précisez : diminuer les 2 mailles lisières = 65 mailles (taille S/M), puis diminuer à droite au total 19 mailles et en même temps augmenter 16 mailles à gauche, soit 65-19+16 = 62 mailles. Après avoir fait les augmentations et diminutions, vous dites obtenir 55 mailles. Comment arrivez vous à ce calcul ? Y a t’il pas une erreur dans vos instructions de diminutions et augmentations ? Merci pour votre réponse
24.10.2024 - 00:09DROPS Design answered:
Bonjour Christine, on doit diminuer 26 m au total , pas 19: 2 x 3 m (= 6 m) + 6x2 m (= 12 m) + 8 x 1 m (8 m) soit 6+12+8=26. On va ainsi avoir: 65-26+16=55 mailles quand les augmentations et les diminutions sont terminées. Bon tricot!
24.10.2024 - 09:52
![]() Monier wrote:
Monier wrote:
Bonjour, Je suis à 50cm de hauteur au moment où il faut diminuer à droite et augmenter à gauche en même temps. Je fais la taille 2, je dois donc à terme avoir diminué de 28 mailles à droite. Si je diminue à partir du bord, j'élimine la première bande de 4 mailles de jersey endroit jusqu'à après la torsade de 8 mailles. Ce qui l'élimine dans le dos du coup. Est-ce normal ? Sinon où doit on faire les diminutions ? Merci MV Monier
01.10.2021 - 10:31DROPS Design answered:
Bonjour Mme Monier, c'est bien exact, si vous regardes la 2ème photo, on voit que côté col, la torsade de M.2 n'est pas complète, seule reste la grande (M.1) dans le dos). Quand vous augmenterez les mailles dans la 2èime moitié, vous tricotez de nouveau M.2 dès qu'il y aura suffisamment de mailles. Vous rabattez en début de rang sur l'endroit (= à droite de l'ouvrage) quand il y a plusieurs mailles puis vous diminuez 1 m en début de rang sur l'endroit (= à droite, vus sur l'endroit). Bon tricot!
01.10.2021 - 16:06Le Couedic wrote:
Merci en tout cas, j aime beaucoup ce site
27.02.2013 - 20:02Le Couedic wrote:
En fait je me suis mal expliquer. le diagramme je l ai compris. c est cette explication que j ai du mal a saisir : Continuer ainsi (vu sur l'endroit) : 1 m lis, 4 m end, 6-7-8 m env, M2 (=8 m), 6-7-8 m env, 4 m end,7-8-9 m env, M1 (=20 m), 1 m lis. comment fait on sur le rang envers? les 4 m end sont elles du jersey? et les mailles envers , on les tricote endroits sur l envers?ou envers sur l envers ? et est ce qu on doit continuer avec cet enchainement tout le tricot ?
27.02.2013 - 20:02DROPS Design answered:
Bonjour Madame Le Couedic, effectivement c'est tout à fait ça, les 4 m end = 4 m jersey end sur l'end, env sur l'env et les 6-7-8 m env = env sur l'end, end sur l'envers. Bon tricot !
28.02.2013 - 10:33Le Couedic wrote:
Bonjour je ne comprends pas tres bien vos explications. le motif M1 n apparait dans les explications de la partie correspondant au dos. et vous ne donné l explication d un rang que sur l endroit mais comment tricote t on les mailles sur les rangs envers? merci de me repondre
27.02.2013 - 07:40DROPS Design answered:
Bonjour Madame Le Couedic, les diagrammes montrent tous les rangs du point fantaisie, vus sur l'endroit : ceux sur l'endroit et ceux sur l'envers. Ainsi, le 1er rang = sur l'endroit, 2ème rang = sur l'envers. Bon tricot !
27.02.2013 - 10:14
![]() Sandy wrote:
Sandy wrote:
Do you have a list of all explanation to pattern diagrams? For some reason I can't get them to come up on the pattern. Thank You,
10.01.2012 - 19:03
![]() Heléne wrote:
Heléne wrote:
Hjälp! Har just påbörjat 104-37, axelvärmare med flätor. Har bara gjort resårstickningen och de två räta varven efter det. När jag börjar på mönsterstickningen kan jag inte hitta hur jag ska sticka de aviga varven där jag inte stickar diagram. Någon som vet? Jag har läst och läst, men jag måste missa något väsentligt :-/. Har fått tips om att det ska vara slätstickning där. Stämmer det?
18.08.2011 - 17:46DROPS Design answered:
Hej, du skall följa mönstret så som det står; 1 kantm, 4 rm, 6-7-8 am, M.2 (= 8 m), 6-7-8 am, 4 rm, 7-8-9 am, M.1 (= 20 m) och 1 kantm. Mönstret visas från rätsidan och du skall sticka maskorna så som det står i diagramtexten. Lycka till!
07.09.2011 - 12:13
![]() Susan Lightcap wrote:
Susan Lightcap wrote:
Is there an English translation available for the charts for this pattern? If so, where will I find it? Thank you in advance for your kind reply. The pattern is beautiful, and I would love to knit it. Best regards, Susan Lightcap
20.01.2008 - 19:27
![]() Daniela wrote:
Daniela wrote:
S il vous plait, m envoyer une liste avec les explications des abreviations. merci beaucoup
29.10.2007 - 17:37
|
||||||||||||||||
DROPS 104-37 |
||||||||||||||||
 |
 |
|||||||||||||||
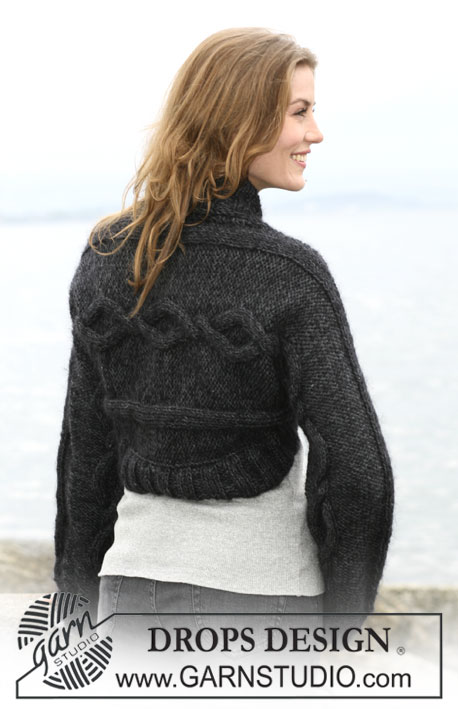
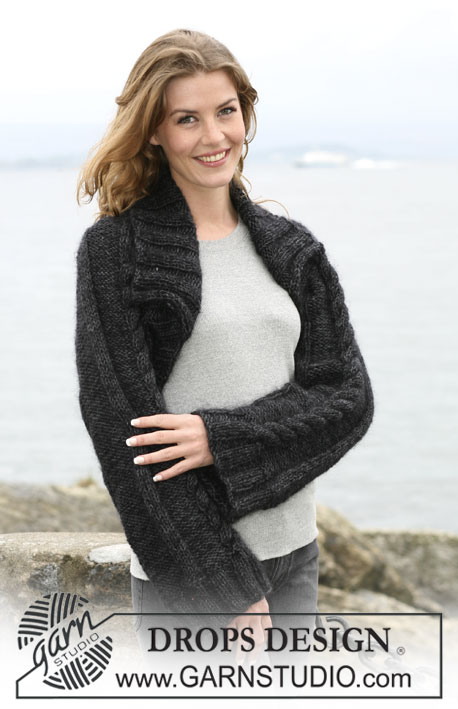
Shoulder warmer with ties in "Karisma” and “Vivaldi”
DROPS 104-37 |
||||||||||||||||
|
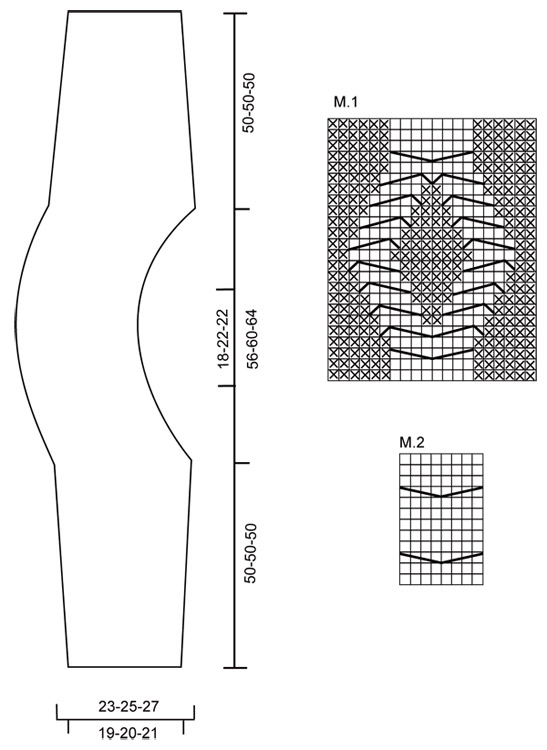
Knitting tension: 14 sts x 17 rows stocking sts with 1 thread of each quality =10 x 10 cm Pattern: See diagram M.1 and M.2. Diagrams are seen from RS. Garter st: Knit all rows. Shoulder warmer: Knit piece back and forth sideways from right sleeve to left sleeve. Cast on 56-56-62 sts (incl 1 edge sts on each side) on needle size 7 mm with 1 thread of each quality yarn. Knit as follows: 1 edge st, * K3, P3 * repeat from *-* and finish with 1 edge st. When piece measures 8 cm K2 rows garter sts – at the same time inc evenly to 57-60-63 sts on last row. Continue as follows – seen from RS: 1 edge sts, K4, P6-7-8, M.2 (= 8 sts), P6-7-8, K4, P7-8-9, M.1 (= 20 sts) and 1 edge sts. When piece measures 15 cm inc 1 sts on each side on every 7-6-5 cm 5-6-7 times in total = 67-72-77 sts – P new sts from RS. When piece measures 50 cm cast off 1 edge sts on each side = 65-70-75 sts. Dec on right side. At the same time inc on left side. Right side: Dec on every other row 3 sts 2-2-2 times, 2 sts 6-8-9 times and 1 st 8-6-7 times. Left side: Inc 1 st on every other row (within 1 sts garter sts) 16-16-18 times– knit new sts as follows as they are inc: P2, K4 and P10-10-12. After all inc and cast offs 55-58-62 should be left on needle. When piece measures 78-80-82 cm insert 1 marking thread or stitch marker. Shoulder warmer is now halfway completed and marking thread or stitch marker marks mid back, ensure pieces are equally long on each side of marking thread or stitch holder. When piece measures 87-91-93 cm inc on right side and at the same time cast off on left side. Right side: Inc 1 sts on every other row: 8-6-7 times, 2 sts 6-8-9 times and 3 sts 2-2-2 times – knit new sts as follows as they are inc: P 3-3-4, M.2, P6-7-8, K4 and P5-6-7. Left side: Cast off 1 sts on every other row 16-16-18 times in total. After all inc and cast offs 65-70-75 sts should be left on needle. When piece measures 106-110-114 cm cast on 1 edge sts on each side = 67-72-77 sts. When piece measures 113-115-119 cm cast off 1 sts on each side on every 7-6-5 cm 5-6-7 times in total = 57-60-63 sts. When piece measures approx 147-151-155 cm (adjust after one whole pattern repeat of M:1) knit 2 rows garter sts – at the same time on last row dec evenly to 56-56-62 sts. Knit Rib = K3 / P3 with 1 edge sts on every side. Cast off when piece measures 156-160-164 cm. Assembly: Sew tog sleeve seams within 1 edge st. Edge + collar: Pick up 216-228-240 sts on circular needle size 7 mm with 1 thread of each quality around opening of shoulder warmer – if less sts are picked up inc evenly to this sts number on 1st round. Knit Rib = K3 / P3 for 6 cm. Insert 1 marking thread or stitch marker mid back of neck (mid is 3 K or 3 P) count approx 42-48-54 sts out from this on each side and insert 1 new marking thread or stitch marker after nearest 3 K on each side - approx 87-93-99 sts should be between each marking thread or stitch markers back neck and approx 129-135-141 sts between marking threads on bottom edge. Continue with rib but on next round inc 3 P to 4 P between marking threads on bottom edge. Continue Rib until edge measures 8 cm, now cast off all sts loosely between marking threads on bottom edge K over K and P over P = approx 87-93-99 sts left on needle to collar. Continue Rib with 3 sts garter sts on each side over these sts another 12 cm (= 20 cm in total), cast off loosely K over K and P over P. |
||||||||||||||||
Diagram explanations |
||||||||||||||||
|
||||||||||||||||
 |
||||||||||||||||
Have you finished this pattern?Tag your pictures with #dropspattern or submit them to the #dropsfan gallery. Do you need help with this pattern?You'll find 18 tutorial videos, a Comments/Questions area and more by visiting the pattern on garnstudio.com. © 1982-2026 DROPS Design A/S. We reserve all rights. This document, including all its sub-sections, has copyrights. Read more about what you can do with our patterns at the bottom of each pattern on our site. |
||||||||||||||||


With over 40 years in knitting and crochet design, DROPS Design offers one of the most extensive collections of free patterns on the internet - translated to 17 languages. As of today we count 325 catalogues and 12291 patterns translated into English (UK/cm). 12291
We work hard to bring you the best knitting and crochet have to offer, inspiration and advice as well as great quality yarns at incredible prices! Would you like to use our patterns for other than personal use? You can read what you are allowed to do in the Copyright text at the bottom of all our patterns. Happy crafting!
Post a comment to pattern DROPS 104-37
We would love to hear what you have to say about this pattern!
If you want to leave a question, please make sure you select the correct category in the form below, to speed up the answering process. Required fields are marked *.