
Popular categories
Looking for a yarn?


Comments / Questions (35)
![]() Sharon Hunt-Edwards wrote:
Sharon Hunt-Edwards wrote:
Hello Am working on the neck of this sweater and I have taken it out one and restarted it but am still not sure 🤔 I understand the instructions. The 17 sts for the front I have bound off am I supposed to pick up sts in these sts? Also says to sew edge to edge from right side. Does this the bottom of the collar?
08.12.2023 - 21:35DROPS Design answered:
Dear Sharon, you pick up the stitches around the neck, but not at the bottom of the neckline, where you have cast off the 17 stitches. When you finished knitting the edge/corral, it will have an edge, that you should sew to the bottom of the neckline, to the cast off stitches. I hope this helps. Happy Knitting!
10.12.2023 - 21:15
![]() Sharon Hunt wrote:
Sharon Hunt wrote:
Collar: Starting at the left side of the 17 bound-off sts at center front, pick up approx. 127-163 sts (divisible by 3 + 1) on smaller circular needles around the neck, …. Dos the 125-163 included the stitches cast off for back avd from. I did not bind off these stitches because i thought the would be picked up later. Read a reply to a question which said to put the front sts on a string so I did same for the back??? S
28.11.2023 - 01:01DROPS Design answered:
Hi Sharon, Yes, the stitch count includes knitting up (or including the stitches on the stitch holder) mid-back of neck. Happy knitting!
28.11.2023 - 06:44
![]() Sharon Hunt wrote:
Sharon Hunt wrote:
Hi the armhole on the above sweater is not long enough it is shorter than on the schematic. The armhole on the sweater I like is 28 cm. Do I just knit longer after neck and shoulder shaping. Sharon
25.11.2023 - 13:39DROPS Design answered:
Dear Sharon, the armhole on the schematic starts when the piece measures approx. 36 cm from the bottom of the piece (for the shortest size). After that, it should be an armhole of approx. 20cm for the smallest size. Please check the measurements in the schematic below; if you wish to make a longer armhole you will need to bind off for the armhole earlier in the piece. You can't continue working after the neck and shoulder shaping, since you will displace the shaping. That is why it's more difficult to adjust the measurements when you are working from the bottom up. Also take into account that the model is usually wearing an M size. Happy knitting!
26.11.2023 - 22:17
![]() Sharon Hunt wrote:
Sharon Hunt wrote:
Hi the armhole on the above sweater is not long enough it is shorter than on the schematic. The armhole on the sweater I like is 28 cm. Do I just knit longer after neck and shoulder shaping. Sharon
25.11.2023 - 13:20DROPS Design answered:
Dear Sharon, the armhole on the schematic starts when the piece measures approx. 36 cm from the bottom of the piece (for the shortest size). After that, it should be an armhole of approx. 20cm for the smallest size. Please check the measurements in the schematic below; if you wish to make a longer armhole you will need to bind off for the armhole earlier in the piece. You can't continue working after the neck and shoulder shaping, since you will displace the shaping. That is why it's more difficult to adjust the measurements when you are working from the bottom up. Also take into account that the model is usually wearing an M size. Happy knitting!
26.11.2023 - 22:17
![]() Sharon Hunt wrote:
Sharon Hunt wrote:
Hi drops, i need help her. Am making size large , pullover. I have knitted up to the armhole and I have 109 sts and I have not cast off for the neck. When do I start casting off for the neck.
22.11.2023 - 20:07DROPS Design answered:
Dear Mrs Hunt, in size L you start binding off for neck when piece measures 44 cm and you start to cast off for armhole when piece measures 44 cm, this means you first divide piece for neck in this size, then cast off for neck at the beg of every row from the side/armhole + decrease for neck. Happy knitting!
23.11.2023 - 08:32
![]() Sharon Hunt - Edwards wrote:
Sharon Hunt - Edwards wrote:
Hi am making size 46- the size that has a cast on of 113 sts. An I not supposed to cast off for the shoulders at the same time as I cast off 17 sts for the front? How many sts should i have for the shoulders. My count is not the same on both sides of the middle. Thanks
22.11.2023 - 10:31DROPS Design answered:
Dear Mrs Hunt-Edwards, in size L you cast off for armhole on each side 3 sts 1 time + 2 sts 2 times + 1 stitch 5 times, at the same time, cast off the middle 17 sts for neck then decrease for neck 1 stitch 9 ganger = 125 sts (before armhole) - 24 sts (armhole, ie 12 sts on each side) = 101 sts - 17 sts for neck = 42 sts for each front piece - 9 sts decreased for neck = 33 sts remain for shoulder. Cast off when piece measures 68 cm. Happy knitting!
23.11.2023 - 08:23
![]() Sharon Hunt wrote:
Sharon Hunt wrote:
Hei drops! Making the pullover, instruction says: Neck opening: At the same time when the piece measures 36-44-44-46-46 cm bind off the center 17 sts separately. I have already cast off 3 sts on each side. I cast off 2 sts about to cast off 17 middle sts. How many should I have between these 17 sts . Right side is facing me and I have allready cast off the first 3 sts on RS and WS. I have casted off 2 sts . So the RS is facing with 2 sts cast off. Thanks for a quick reply.
22.11.2023 - 07:28DROPS Design answered:
Dear Mrs Hunt, not sure even from your previous questions which size you are working, but casting off for armhole on each side (then only towards armhole after dividing for neck) and dividing + decreasing for neck will give you 24-33-33-34-34 sts left for shoulder. Happy knitting!
22.11.2023 - 09:15
![]() Sharon Hunt wrote:
Sharon Hunt wrote:
Hi Drops will be travelling and need to know the answer to this question. I would like yo knit this sleeve top down by picking up for the sleeve cap and following the pattern as written. Is this an impossible task. I know I could knit bottom up but want to avoid seeing. Thanks for responding. Sharon
17.11.2023 - 08:30DROPS Design answered:
Dear Mrs Hunt, you can probably adapt the pattern to work the sleeve top down, but we are unfortunately not able to adjust every pattern to every single request, do not hesitate to contact your yarn store for any further assistance. Thanks for your comprehension. Happy knitting!
17.11.2023 - 08:50
![]() Sharon Hunt wrote:
Sharon Hunt wrote:
Hi, am aking the pullover size 46,5 snd it states: Pullover): When the piece measures 36-44-45-46-47 cm bind off for armhole at each side every other row: 3 sts 1 time, 2 sts 3-1-2-4-5 times and 1 st 5-3-5-4-6 times. Question was how to decrease 3 sts? Thanks for responding Sharon
16.11.2023 - 17:48DROPS Design answered:
Dear Mrs Hunt, you won't have to decrease here but to cast off the stitches at the beginning of each row on each side, ie at the beginning of a row from RS and as the beginning of a row from WS. Happy knitting!
17.11.2023 - 08:47
![]() Sharon Hunt- Edwards wrote:
Sharon Hunt- Edwards wrote:
Hi! Started this sweater and decided to make it in the round. When I started M1 over 47 sts I ended with a purl st after the first row. Since am doing this in the round and not back and forth am wondering if I should start from the left instead og the right on the chart. Thanks for your help.
16.11.2023 - 07:34DROPS Design answered:
Dear Mrs Hunt-Edwards, it looks fine as you say, the diagram worked over 47 sts will start and end with a Purl stitch on 1st row (so that pattern is symmetrical), when working in the round, just work the stitches as they should be seen from RS, ie P1, K1 on first round and K all sts on every other round. Happy knitting!
16.11.2023 - 10:28
|
|||||||
Granite Ridge |
|||||||
|
|
|||||||
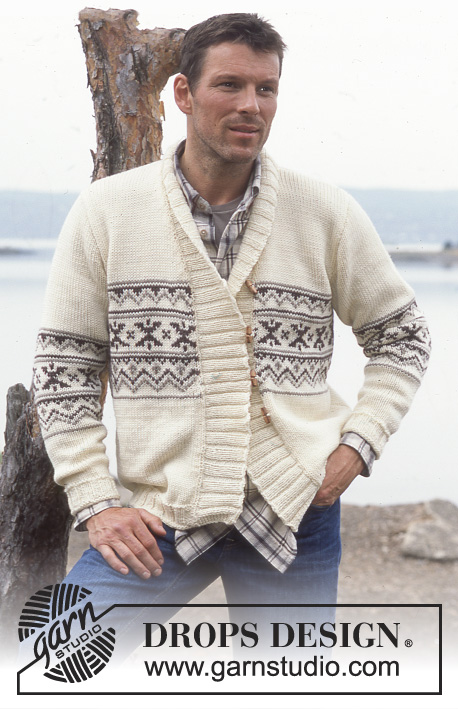
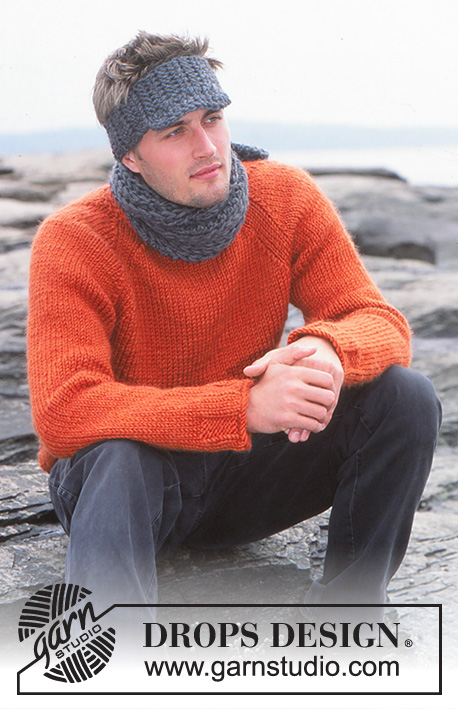
Knitted sweater or vest / slipover for men, in DROPS Karisma
DROPS 85-16 |
|||||||
|
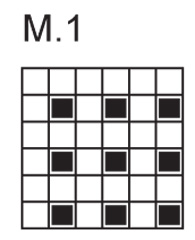
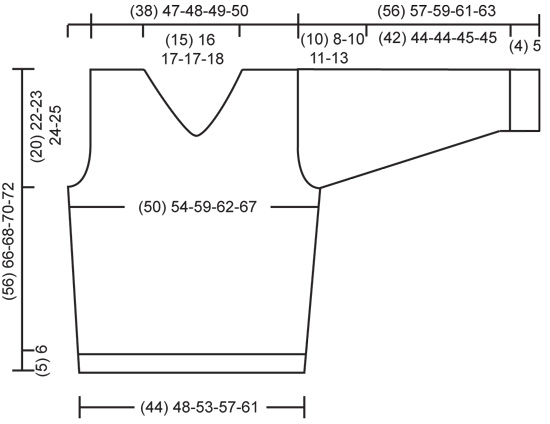
Gauge: 21 sts x 28 rows on larger needles in stockinette st = 10 x 10 cm. Rib: *K 1, P 2*, repeat from *-*. Pattern: See the chart below. The pattern is seen from the right side. Decreasing tips (for armhole on vest): All decs are made on the right side. Dec inside 7 sts knit as follows from edge (seen from the right side): K 1 (edge st knit in garter st), K 1, P 2, K 1 and P 2. Dec 1 st as follows: After 7 edge sts: Sl 1 as if to knit, K 1, psso. Before 7 edge sts: K 2 tog. FRONT Cast on 95-104-113-122-131 sts on smaller needles. P 3 rows (row 1 = wrong side), then knit rib, keeping 1 edge st at each side in garter st (see instructions above). When the piece measures 5-6-6-6-6 cm – adjust so that the next row is a right side row – K 2 rows, adjusting (inc/dec) to 95-103-113-121-131 sts on the first row. Change to larger needles and continue as follows: K 1 (edge st knit in garter st), 25-28-32-36-40 sts stockinette st, Pattern 1 over the following 43-45-47-47-49 sts, 25-28-32-36-40 sts stockinette st and K 1 (edge st knit in garter st). When the piece measures 10 cm inc 1 st at each side every 4-5-5-5-5 cm a total of 6 times = 107-115-125-133-143 sts. Read the entire section before knitting: Armhole (Vest): When the piece measures 34-42-43-44-45 cm knit as follows over the outermost 13 sts at each side (as seen from the right side): K 1 (edge st knit in garter st), *K 1, P 2*, repeat from *-* a total of 4 times (knit the remaining sts as before). When the piece measures 36-44-45-46-47 cm bind off the outermost 6 sts at each side for armhole. Continue to dec 1 st at each armhole every other row 8-2-6-9-13 times – see Decreasing tips above. Armhole (Pullover): When the piece measures 36-44-45-46-47 cm bind off for armhole at each side every other row: 3 sts 1 time, 2 sts 3-1-2-4-5 times and 1 st 5-3-5-4-6 times. Neck opening: At the same time when the piece measures 36-44-44-46-46 cm bind off the center 17 sts for the neck opening. Knit each side separately. 1st side: = (31) 41-42-43-44 sts. Continue with stockinette st and Pattern 1 over the 13-14-15-15-16 sts at the center front. When the piece measures 45-53-55-56-57 cm dec 1 st at neck edge every 4 rows 7-8-9-9-10 times. After all armhole and neck shaping is complete 24-33-33-34-34 sts remain on shoulder. Continue with stockinette st and pattern (for Vest: and 7 sts rib at armhole). Bind off when the piece measures 56-66-68-70-72 cm. 2nd side: Knit the same as the 1st, reversing all shaping. BACK: Cast on and knit the same as the front, but do not knit Pattern 1. Bind off for armhole as on front = 79-99-101-103-105 sts. When the piece measures 54-64-66-68-70 cm bind off the center 27-29-31-31-33 sts for the neck. Then dec 1 st at each neck edge every other row 2 times = 24-33-33-34-34 sts remain on each shoulder. Bind off when the piece measures 56-66-68-70-72 cm. SLEEVES(Pullover): Cast on 47-50-50-53-53 sts on smaller needles. P 3 rows (row 1 = wrong side), then knit rib, keeping 1 edge st at each side – see instructions above. When the piece measures 4-5-5-5-5 cm – adjust so that the next row is a right side row – K 2 rows. Change to larger needles and stockinette st. When the piece measures 9-13-9-9-13 cm inc 1 st at each side every 2.5-2-2-2-1.5 cm a total of 15-17-20-20-23 times = 77-84-90-93-99 sts. When sleeve measures 46-49-49-50-50 cm bind off for sleeve cap at each side every other row: 4 sts 1 time, 3 sts 2-3-3-3-3 times, 2 sts 1-1-2-2-2 times and 1 st 7-2-4-5-8 times, then bind off 2 sts at each side until the piece measures 55-56-58-60-62 cm, then bind off 3 sts at each side 1 time. Bind off the remaining sts, the piece measures approx. 56-57-59-61-63 cm. Assembly: Sew shoulder seams. Collar: Starting at the left side of the 17 bound-off sts at center front, pick up approx. 127-163 sts (divisible by 3 + 1) on smaller circular needles around the neck, ending at the right side of the 17 bound off sts. Knit back and forth on needles as follows: K 1 row from wrong side, casting on 1 new sts at each side (= edge st) = 129-165 sts. Then knit as follows (seen from the right side): K 1 (edge st knit in garter st), K 1, *P 2, K 1*, repeat from *-* and finish with K 1 (edge st knit in garter st). Put a marker in the 23-23-26-26-29th st in from each side (= K 1 as seen from the right side). When neckband measures 3.5 cm inc the P 2 at each side of sts with markers to P 3 = 133-169 sts. K 2 rows over all sts and bind off. Sew neckband at center front up to the markers – sew edge to edge from right side with small sts. Sew neckband edges to the 17 bound off sts. Pullover: Sew in sleeves. Sew sleeve and side seams using edge sts as a seam allowance. Vest: Sew side seams using edge sts as seam allowance. |
|||||||
Diagram explanations |
|||||||
|
|||||||
 |
|||||||
 |
|||||||
Have you finished this pattern?Tag your pictures with #dropspattern or submit them to the #dropsfan gallery. Do you need help with this pattern?You'll find 19 tutorial videos, a Comments/Questions area and more by visiting the pattern on garnstudio.com. © 1982-2026 DROPS Design A/S. We reserve all rights. This document, including all its sub-sections, has copyrights. Read more about what you can do with our patterns at the bottom of each pattern on our site. |
|||||||


With over 40 years in knitting and crochet design, DROPS Design offers one of the most extensive collections of free patterns on the internet - translated to 17 languages. As of today we count 325 catalogues and 12298 patterns translated into English (UK/cm). 12298
We work hard to bring you the best knitting and crochet have to offer, inspiration and advice as well as great quality yarns at incredible prices! Would you like to use our patterns for other than personal use? You can read what you are allowed to do in the Copyright text at the bottom of all our patterns. Happy crafting!
Post a comment to pattern DROPS 85-16
We would love to hear what you have to say about this pattern!
If you want to leave a question, please make sure you select the correct category in the form below, to speed up the answering process. Required fields are marked *.