
Popular categories
Looking for a yarn?


Comments / Questions (27)
![]() Emmx wrote:
Emmx wrote:
Danke für die promten Infos. Sie haben mir sehr geholfen :-) LG Emmy
08.08.2025 - 15:17
![]() Emmy wrote:
Emmy wrote:
Oh, jetzt hab ich's ! Dankeschön Nur noch eine Frage: Warum wird bei Diagrammerklärung extra auf "MASCHENPROBE BEACHTEN" hingewiesen? VlG Emmy
08.08.2025 - 11:07
![]() Emmy wrote:
Emmy wrote:
Oh, jetzt hab ich's ! Dankeschön Nur noch eine Frage: Warum wird bei Diagrammerklärung extra auf "MASCHENPROBE BEACHTEN" hingewiesen? VlG Emmy
08.08.2025 - 08:51DROPS Design answered:
Liebe Emmy, es ist nur als Erinnerung, dh genau so fest/eng stricken wie bei der Maschenprobe, so bekommen Sie die richtigen fertigen Maßnahmen wie bei der Skizze.
08.08.2025 - 12:49
![]() Emmy wrote:
Emmy wrote:
Hallo, ich habe eine Frage zu dem Modell Orchid Tea: Die Diagrammbeschreibung ist super, da kekn ich mich aus. Aber sind die am Vorder- und Rückenteil bzw. Ärmel nicht gegengleich zu stricken? Ich hoffe Sie können mir helfen. Danke im Voraus, Emmy
07.08.2025 - 09:43DROPS Design answered:
Liebe Emmy, ich verstehe nicht genau was Sie mit "gegengleich" hier meinen, die Diagramme sollen wie beschrieben gestrickt werden, damit die Zunahmen richtig sind. Es wird bei den Ärmeln und beim Vorder/Rückenteil mit einem unterschiedlichen Rythmus zugenmomen. Viel Spaß beim Stricken!
07.08.2025 - 15:03
![]() Gillian wrote:
Gillian wrote:
I’m just starting to divide for body and sleeves. I have placed the stitches on a thread for the sleeve . How do I cast on the stitches for the in Side under sleeve?
29.06.2025 - 23:21DROPS Design answered:
Dear Gillian, in this lesson, we show how to cast on new stitches on the side - see also this step in this lessson, pictures 11 and 14. Happy knitting!
30.06.2025 - 09:36
![]() Gillian Sutherland wrote:
Gillian Sutherland wrote:
Thank you for your speedy response. I did view the video. But was unable to hear the commentary. Any suggestions?
22.05.2025 - 22:08DROPS Design answered:
Dear Mrs Sutherland, our videos do not have sound, as we are a worldwide company and our videos are watched by people speaking endless of different languages; os that you have to follow the text together with the video to follow it. Happy knitting!
23.05.2025 - 08:48
![]() Gillian wrote:
Gillian wrote:
Is there a video for increase for raglan in PATTERN?
21.05.2025 - 19:25DROPS Design answered:
Dear Gillian, sure you will increase in the diagrams with a yarn over, which will be either knitted in front of loop (white oval symbol) or in back of loop (black oval symbol) - in this video you will find how to work a yarn over either in front of in back of loop - note that the video shows the wrong side, you will here knit as you work in the round, so knit either the front or the back loops of yarn overs on next round. Happy knitting!
22.05.2025 - 08:57
![]() Lenie wrote:
Lenie wrote:
Na de pas moet ik de steken verdelen over voor/achterpand en mouwen. Hoe zet ik steken op in de zijkant onder de mouw?
21.05.2025 - 17:11DROPS Design answered:
Dag Lenie,
In een van de video's die bij het patroon staat, wordt uitgelegd hoe je nieuwe steken opzet aan de zijkant. Deze techniek kun je ook gebruiken voor het opzetten van steken onder de mouw.
27.05.2025 - 20:55
![]() Siri wrote:
Siri wrote:
Er oppskriften fulgt på bildene? Jeg syns det ser ut som a1 og a2 er fulgt hele veien ned til bolen? Er det noen grunn til at man skal gå over til a3 og a4 etterhvert?
10.05.2025 - 20:58DROPS Design answered:
Hei Siri, A.1 og A.2 har hullrader (kastene er strikket rett på neste omgang slik at det blir hull) og er strikket i raglanlinjene på bærestykke. Når du er ferdig med hullradene og riktig antall rapporter av A.1 og A.2, strikker du A.3 og A.4 som ikke har slike hullrader. God fornøyelse!
12.05.2025 - 06:09
![]() Zuza wrote:
Zuza wrote:
W projekcie podane są dwa rozmiary drutów 4mm i 3mm. Na jakim rozmiarze drutów jest wykonana próbka?
13.03.2025 - 09:20DROPS Design answered:
Witaj Zuzo, próbka jest wykonywana zawsze na większych drutach (chyba że we wzorze jest napisane inaczej). Tutaj próbkę wykonujesz na drutach nr 4. Pozdrawiamy!
13.03.2025 - 15:04
|
|||||||||||||
Orchid Tea#orchidteasweater |
|||||||||||||
 |
 |
||||||||||||
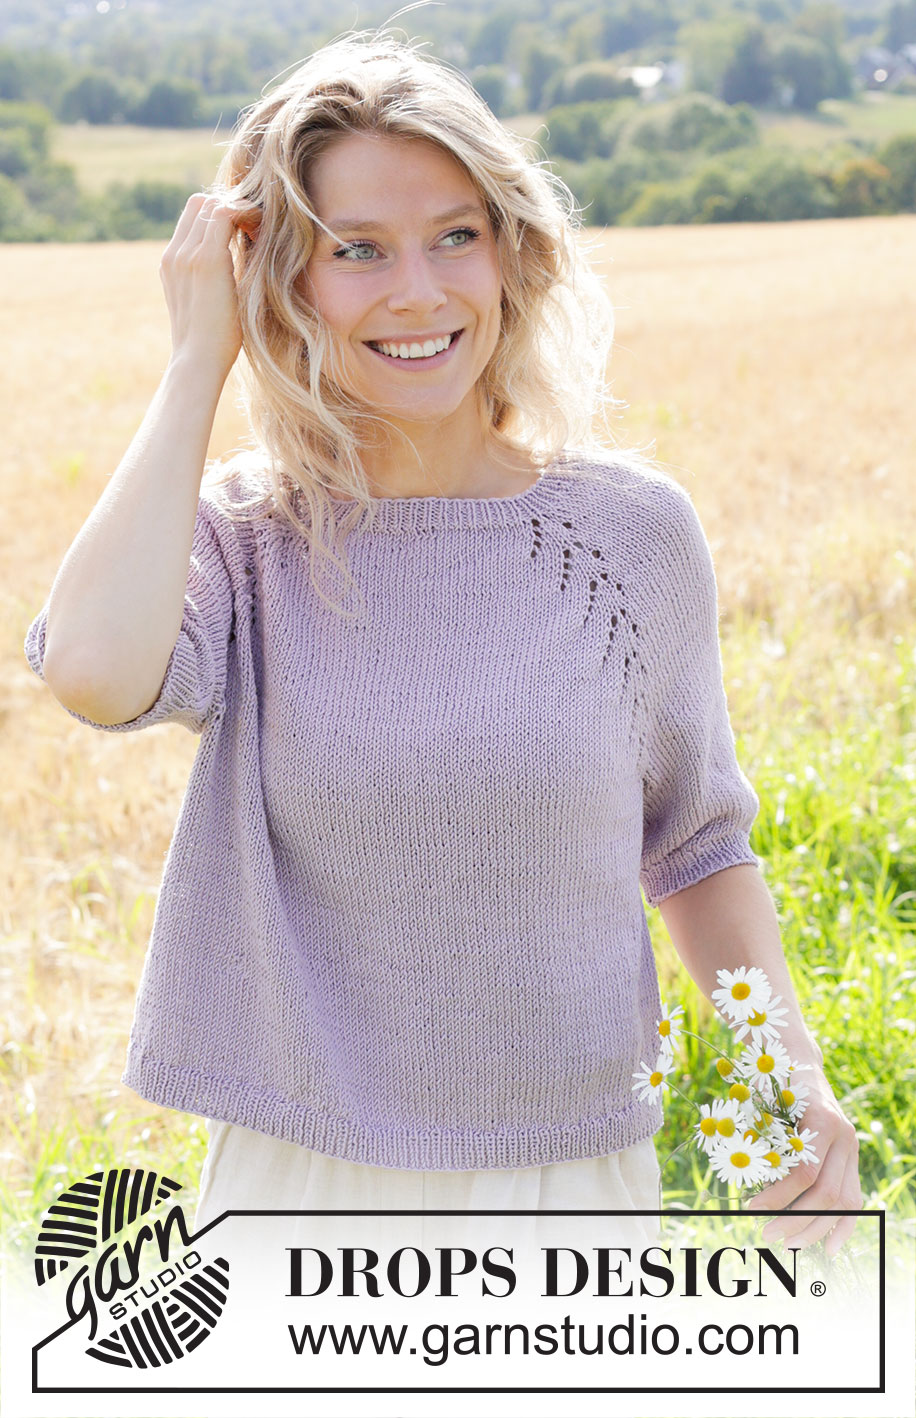
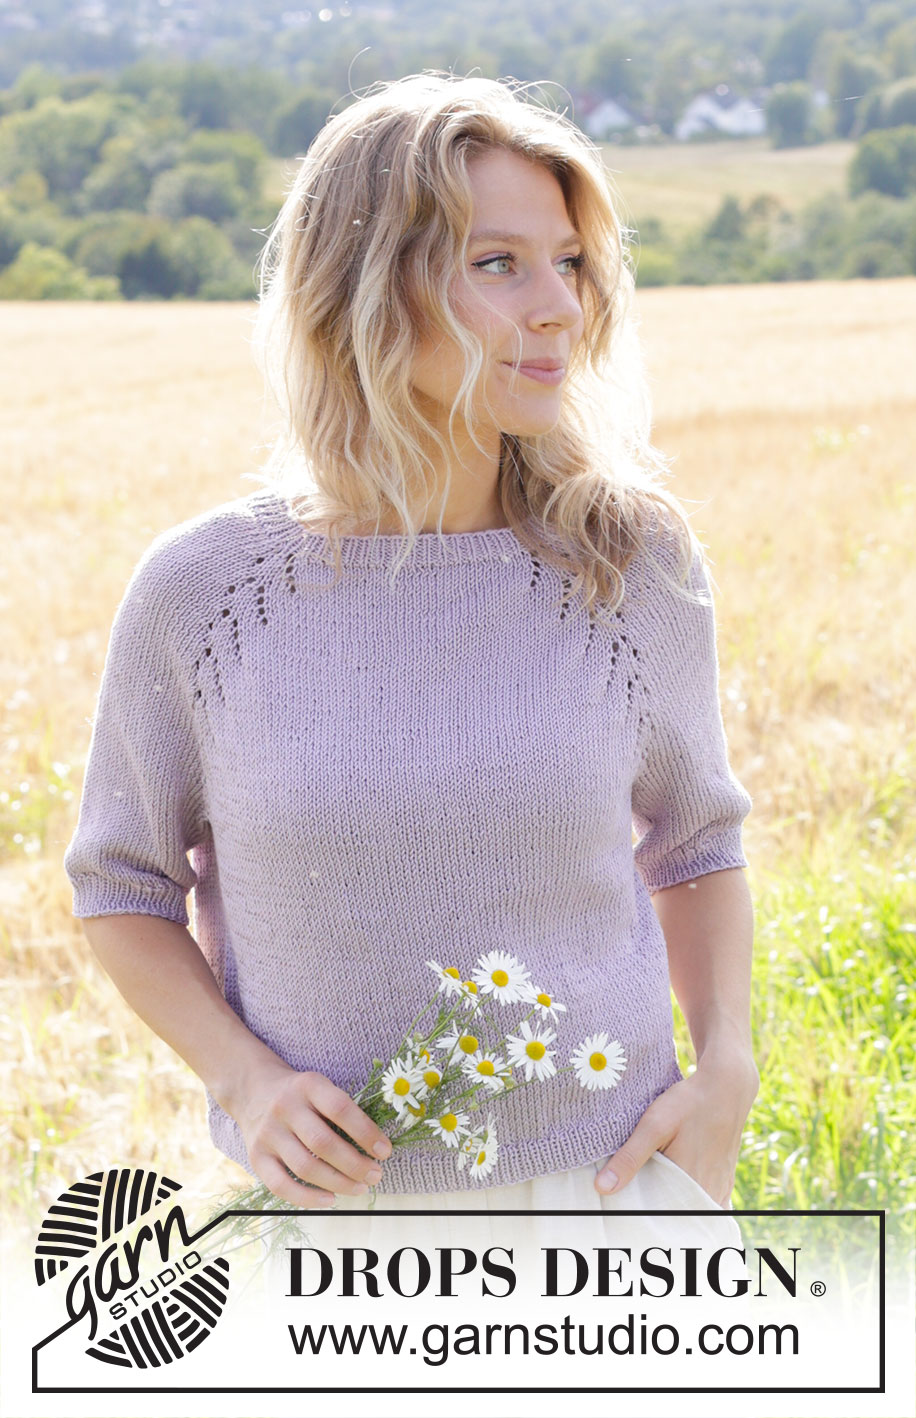
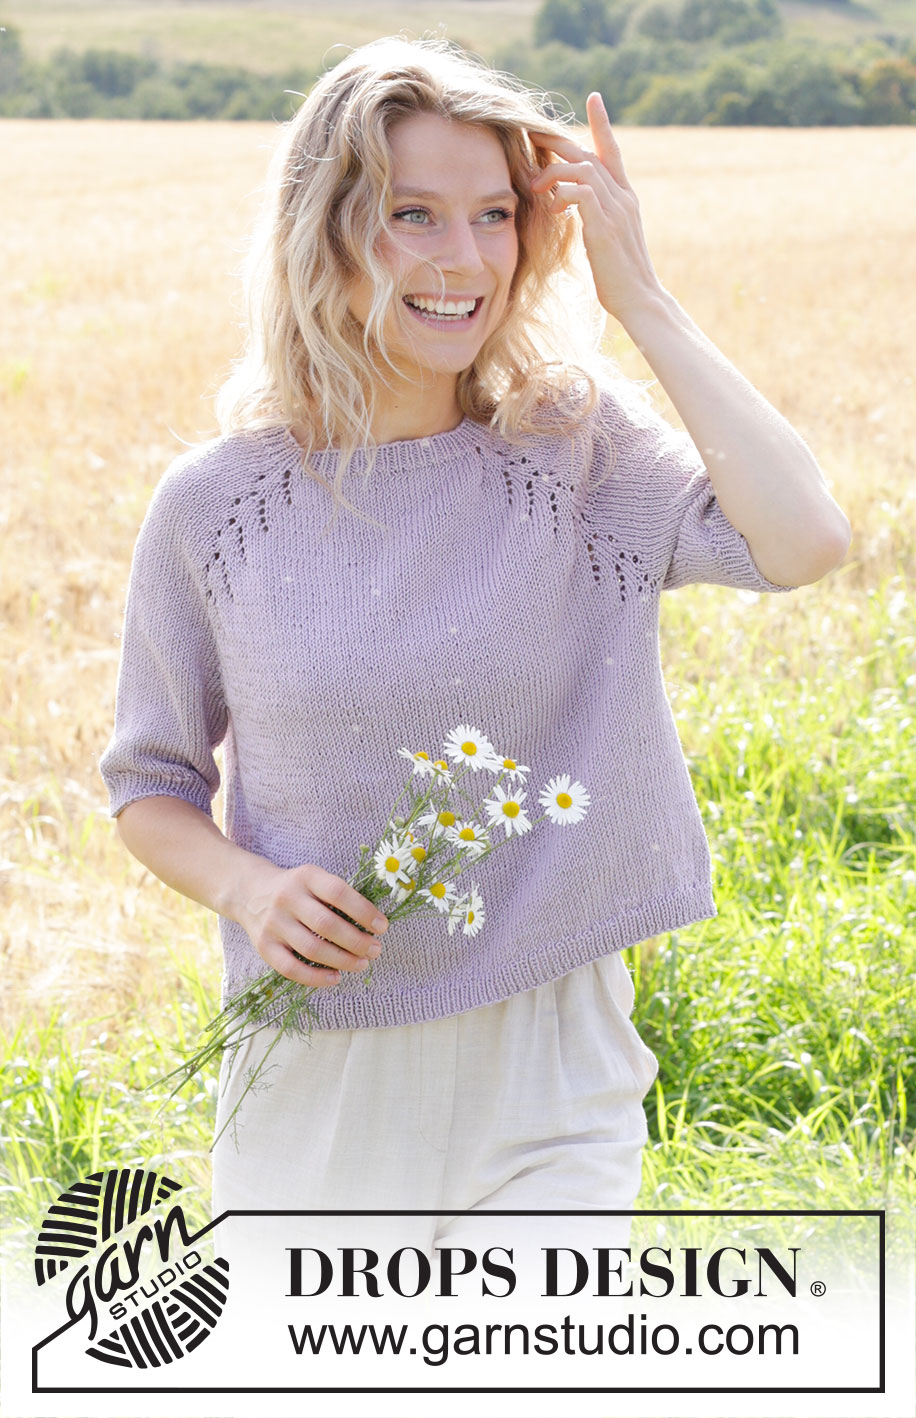
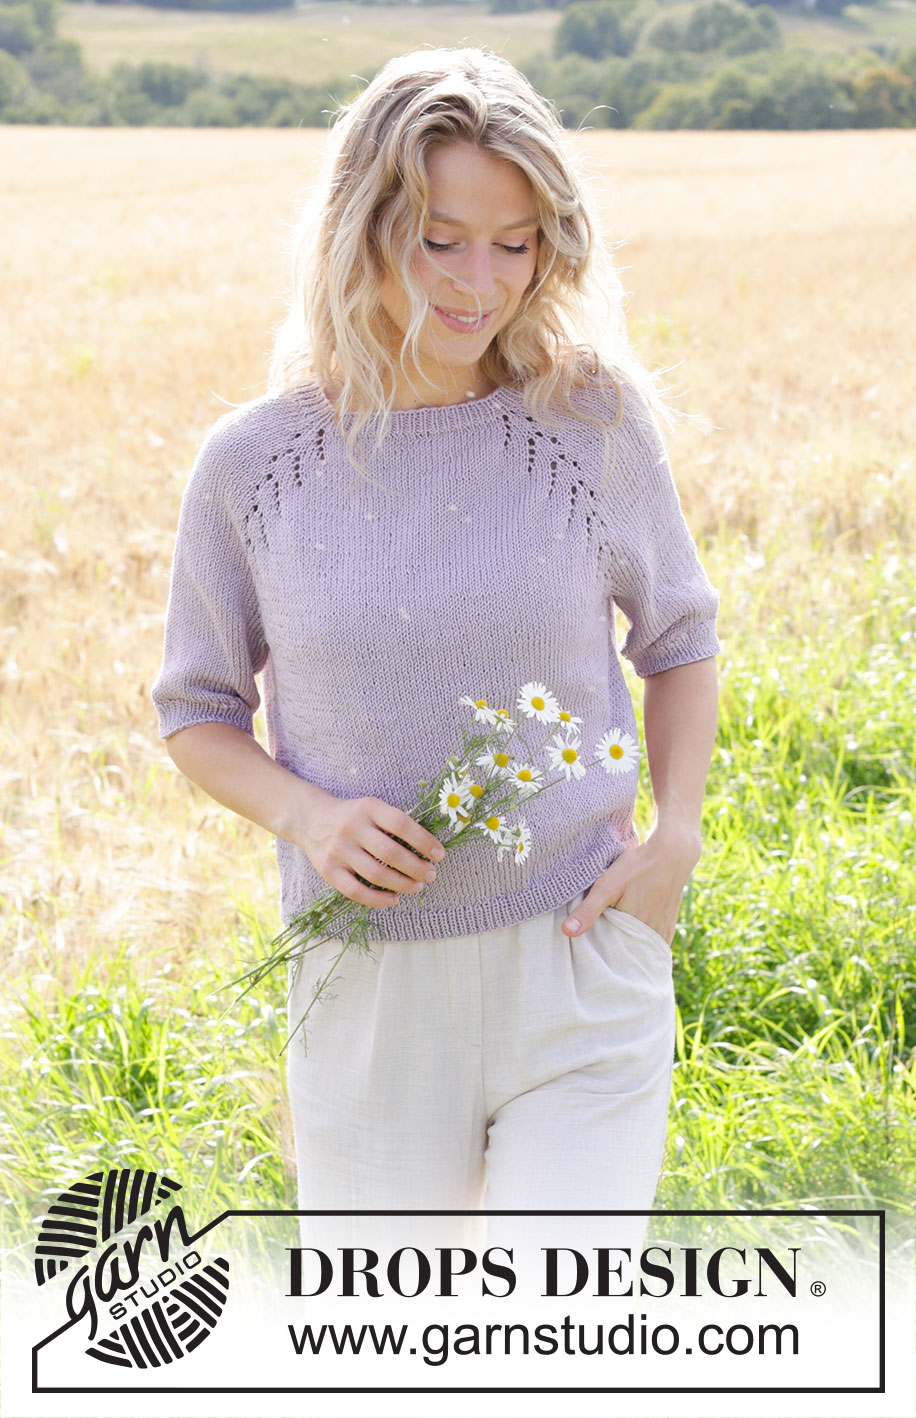
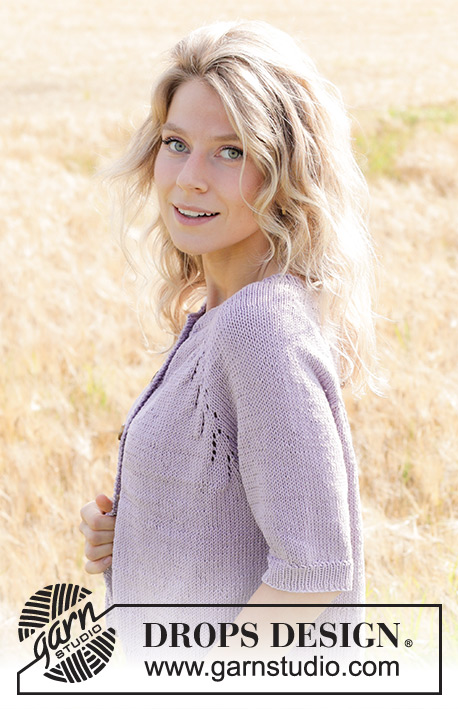
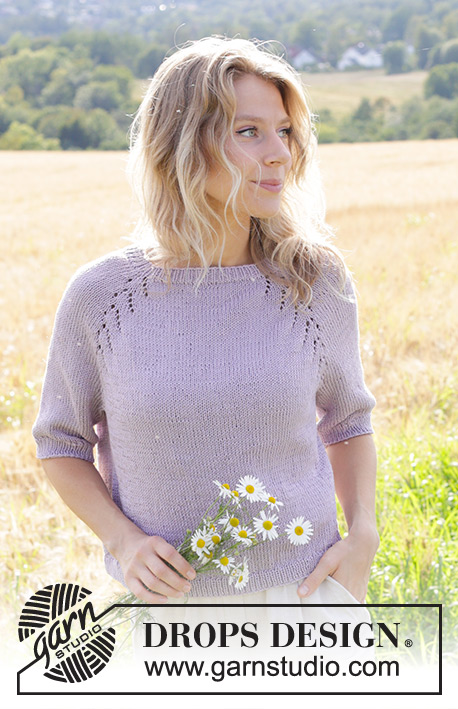
Knitted jumper in DROPS Muskat. The piece is worked top down with raglan, lace pattern and short sleeves. Sizes S - XXXL.
DROPS 250-3 |
|||||||||||||
|
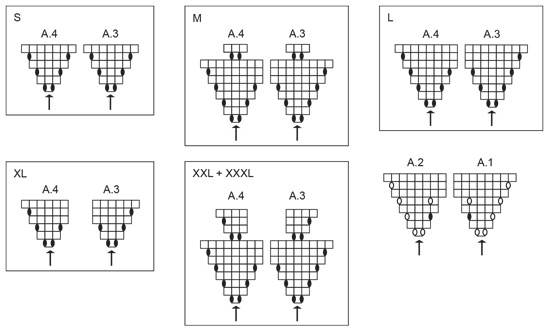
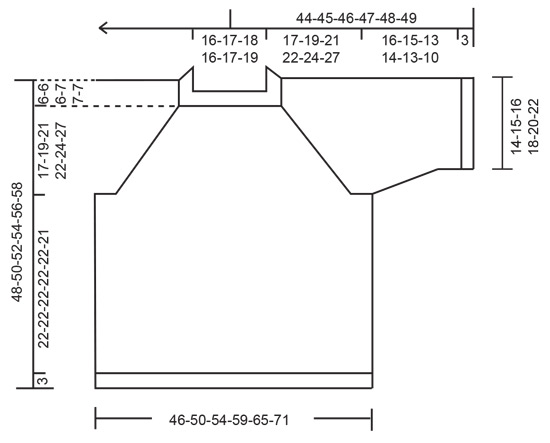
------------------------------------------------------- EXPLANATIONS FOR THE PATTERN: ------------------------------------------------------- PATTERN: See diagrams A.1 to A.4. Choose diagram for your chosen size (applies to A.3 and A.4). INCREASE TIP: Increase 1 stitch by making 1 yarn over, which is knitted twisted on the next round to avoid a hole. DECREASE TIP (for sleeves): Decrease 2 stitches on the round by decreasing on each side of the marker-thread as follows: Work until there are 3 stitches left before the marker-thread, knit 2 together, knit 2 (marker-thread sits between these 2 stitches), slip 1 stitch knit-wise, knit 1 and pass the slipped stitch over the knitted stitch (2 stitches decreased). ------------------------------------------------------- START THE PIECE HERE: ------------------------------------------------------- JUMPER – SHORT OVERVIEW OF THE PIECE: The pattern uses both long and short needles; start with the length which fits the number of stitches and change when necessary. The piece is worked in the round, top down with circular needle. When the neck and yoke are finished, the yoke is divided for the body and sleeves. The body is continued in the round, while the sleeves wait. The sleeves are worked in the round, top down. NECK: Cast on 116-120-124-128-132-140 stitches with circular needle size 3 mm and DROPS Muskat. Work rib in the round (knit 1, purl 1) for 3 cm. Insert 1 marker in this round, the yoke is measured from here. YOKE: Insert 4 markers in knitted stitches in the rib, without working the stitches: Insert marker-1 in the first stitch, count 27-27-27-29-29-29 stitches (= sleeve), Insert marker-2 in the next stitch, count 29-31-33-33-35-39 stitches (= front piece), Insert marker-3 in the next stitch, count 27-27-27-29-29-29 stitches (= sleeve), Insert marker-4 in the next stitch, there are 29-31-33-33-35-39 stitches left after the last marker (= back piece). Now increase for raglan in PATTERN – read description above. Change to circular needle size 4 mm and work the first round as follows from the right back shoulder: A.1 over marker-stitch-1, work 27-27-27-29-29-29 stocking stitches (= sleeve), A.2 over marker-stitch-2, work 29-31-33-33-35-39 stocking stitches (= front piece), A.1 over marker-stitch-3, work 27-27-27-29-29-29 stocking stitches (= sleeve), A.2 over marker-stitch-4, work 29-31-33-33-35-39 stocking stitches (= back piece). When A.1 and A.2 are finished in height, repeat the diagrams over the marker-stitches in the same way; note that increases are different on each side of the diagram so it is important the marker is in the same stitch all the time. REMEMBER THE KNITTING TENSION! Work until the diagrams have been completed 5-5-6-7-7-8 times = 256-260-292-324-328-364 stitches. Now work diagram A.3 over A.1 and A.4 over A.2. When the diagrams are finished there are 280-296-320-344-368-404 stitches and the yoke measures approx. 17-18-20-22-24-27 cm from the marker on the neck. There are 63-65-69-75-79-85 stitches between marker-stitches 1 and 2 and between marker-stitches 3 and 4, 75-81-89-95-103-115 stitches between marker-stitches 2 and 3 and between marker-stitches 4 and 1 (plus 4 marker-stitches). Continue working without further increases until the yoke measures 17-19-21-22-24-27 cm from the marker. DIVIDE FOR BODY AND SLEEVES: Knit to 3-3-2-3-5-4 stitches past marker-stitch-1 (= belongs to back piece), place the next 57-59-65-69-69-77 stitches on a thread for the sleeve, cast on 14-16-18-20-22-24 stitches (= in side under sleeve), knit 83-89-95-103-115-125 (= front piece), place the next 57-59-65-69-69-77 stitches on a thread for the sleeve, cast on 14-16-18-20-22-24 stitches (= in side under sleeve), knit to end of round (= 83-89-95-103-115-125 stitches on back piece). The body and sleeves are finished separately. The piece is now measured from here! BODY: = 194-210-226-246-274-298 stitches. Insert 1 marker in the middle of the 14-16-18-20-22-24 stitches cast on under one sleeve. Work to the marker and start the round from here. Work stocking stitch in the round until the body measures 22-22-22-22-22-21 cm from the division. Change to circular needle size 3 mm, work rib (knit 1, purl 1) AT THE SAME TIME as increasing 28-32-34-40-40-46 stitches evenly on round 1 – read INCREASE TIP = 222-242-260-286-314-344 stitches. When the rib measures 3 cm, cast off a little loosely with rib. The jumper measures approx. 48-50-52-54-56-58 cm from the shoulder. SLEEVES: Place the 57-59-65-69-69-77 sleeve-stitches from the thread on one side of the piece on short circular needle/double pointed needles size 4 mm and knit up 1 stitch in each of the 14-16-18-20-22-24 stitches cast on under the sleeve = 71-75-83-89-91-101 stitches. Insert a marker-thread in the middle of the 14-16-18-20-22-24 stitches under the sleeve. Start at the marker-thread and work stocking stitch in the round. When the sleeve measures 3-3-3-4-4-3 cm, decrease 2 stitches under the sleeve – read DECREASE TIP. Decrease like this every 2-1½-1-1-2-1 cm a total of 6-7-8-7-4-5 times = 59-61-67-75-83-91 stitches. Continue working until the sleeve measures 16-15-13-14-13-10 cm from the division. Change to double pointed needles size 3 mm. Work rib (knit 1, purl 1), AT THE SAME TIME increase 9-9-9-11-13-15 stitches evenly on the first round = 68-70-76-86-96-106 stitches. When the rib measures 3 cm, cast off a little loosely with rib. The sleeve measures approx. 19-18-16-17-16-13 cm. |
|||||||||||||
Diagram explanations |
|||||||||||||
|
|||||||||||||
 |
|||||||||||||
 |
|||||||||||||
Have you finished this pattern?Tag your pictures with #dropspattern #orchidteasweater or submit them to the #dropsfan gallery. Do you need help with this pattern?You'll find 29 tutorial videos, a Comments/Questions area and more by visiting the pattern on garnstudio.com. © 1982-2026 DROPS Design A/S. We reserve all rights. This document, including all its sub-sections, has copyrights. Read more about what you can do with our patterns at the bottom of each pattern on our site. |
|||||||||||||


With over 40 years in knitting and crochet design, DROPS Design offers one of the most extensive collections of free patterns on the internet - translated to 17 languages. As of today we count 324 catalogues and 12290 patterns translated into English (UK/cm). 12290
We work hard to bring you the best knitting and crochet have to offer, inspiration and advice as well as great quality yarns at incredible prices! Would you like to use our patterns for other than personal use? You can read what you are allowed to do in the Copyright text at the bottom of all our patterns. Happy crafting!
Post a comment to pattern DROPS 250-3
We would love to hear what you have to say about this pattern!
If you want to leave a question, please make sure you select the correct category in the form below, to speed up the answering process. Required fields are marked *.