
Popular categories
Looking for a yarn?


Comments / Questions (89)
![]() Clara wrote:
Clara wrote:
Hallo, ich möchte den Pullover gerne so stricken wie auf dem Foto abgebildet. Die Anleitung ist anders. Denn auf dem Bild ist das schwarz oben bestimmt 10cm lang. Mit der Anleitung komme ich aber auf höchstens auf 13 sichtbare Reihen. Auf dem Bild ist A1 bei der Teilung ca. Bei der vorletzten Zunahme, in der Anleitung soll die Teilung erst bei der letzten Zunahme sein. Wie kann ich die Anleitung anpassen, dass das Muster so platziert ist wie auf dem Bild? Vielen Dank!
12.02.2024 - 14:00DROPS Design answered:
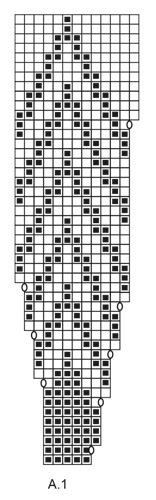
Liebe Clara, der Pullover auf dem Bild wird so gestrickt, dh zuerst Halsblende, dann je nach der Größe 1 bis 5 Runden glattrechts, dann A.1 (= 7 Runden mit schwarz am Anfang). Viel Spaß beim stricken!
13.02.2024 - 08:07
![]() Ingrid wrote:
Ingrid wrote:
Ich stricke den Pullover in Größe M. Bei derm Rumpfteil sind es wie in der Beschreibung 150 Maschen. Jedoch geht dann das Muster nicht mehr auf! Müssten es nicht 156 Maschen sein, um das Muster vorführen zu können? Also statt 10 neue Maschen 13 Maschen anschlagen? Liebe Grüße
01.01.2024 - 19:25DROPS Design answered:
Liebe Ingrid, so können Sie machen, aber hier wird das Muster nicht an den Seiten passen, dh die letzten Reihen vom Diagram stricken Sie soviel Sie können, dann stricken Sie die übrigen Maschen unter den Ärmeln mit beige. Viel Spaß beim stricken!
02.01.2024 - 12:09
![]() Martine wrote:
Martine wrote:
Bonjour je voulais savoir si les 10 mailles ajouter sous les bras se tricote dans la laine la plus claire ? Merci Martine 😁
08.12.2023 - 22:16DROPS Design answered:
Bonjour Martine, tout à fait, on va relever les mailles sous la manche avec la laine claire (en beige ici) et les tricoter aussi avec la laine claire (et les autres comme avant). Bon tricot!
11.12.2023 - 07:37
![]() Strickfan wrote:
Strickfan wrote:
Hallo, ist Ihnen bewusst, dass der Shop "KnittingPatternWorld" auf Etsy Ihre Strickanleitungen (auch die Neuen als Vintage vor 2000) für 2,88 € verkauft? Viele Grüße
05.12.2023 - 23:15DROPS Design answered:
Liebe Strickfan, danke für den Hinweis, gerne können Sie uns helfen, wenn Sie Etsy darauf hinweisen. Danke im voraus. Viel Spaß beim stricken!
06.12.2023 - 16:01
![]() Angela wrote:
Angela wrote:
In welcher Farbe werden die Umschläge gearbeitet?
01.12.2023 - 21:19DROPS Design answered:
Liebe Angela, bei der 1. Runde werden die Umschläge mit schwarz gestrickt, dann werden sie mit beige gestrickt. Viel Spaß beim stricken!
04.12.2023 - 07:45
![]() Jeanne wrote:
Jeanne wrote:
Ik heb deze trui gebreid van het garen melody. De trui ziet er heel mooi uit. Alleen is de boord aan de onderkant nogal slap en is niet flexibel. De mouwen heb ik afgekant op z'n Italiaans, maar de onderkant niet. Kan ik hier nog iets aan veranderen? Ik heb nog garen over. Alvast bedankt voor het antwoord.
28.11.2023 - 16:01DROPS Design answered:
Dag Jeanne,
Ja, je zou de afkantrand van de boord op het lijf uit kunnen hallen opnieuw afkanten, maar dan in Italiaans afkanten. Als je de boord te wijd vindt, zou je ook de hele boord uit kunnen halen en steken minderen vlak voor de boord en/of de boord met een dunnere naald breien.
29.11.2023 - 19:24
![]() Anette wrote:
Anette wrote:
The round starts in the middle of the neck, but we have placed the marker in the middle of the front. So do I knit half a round (from neck to front) before starting diagram A1?
05.10.2023 - 13:32DROPS Design answered:
Dear Anette, the rounds start on mid back but you measure the piece from marker placed on mid front. Happy knitting!
06.10.2023 - 08:47
![]() Samh wrote:
Samh wrote:
What color should the yarn loops be made with?
03.10.2023 - 12:26DROPS Design answered:
Dear Same, make the yarn overs with the background color. Happy knitting!
04.10.2023 - 07:33
![]() Anette wrote:
Anette wrote:
Omgangen starter midtpå i nakken, men vi har placeret markøren midtpå foran. Strikker jeg så en halv omgang (fra nakke til front) inden jeg starter diagram A1?
01.10.2023 - 20:09DROPS Design answered:
Hej Anette, markøren foran bruger du til at måle fra. Du starter mønsteret midt bagpå :)
11.10.2023 - 07:55
![]() Marianela Tapia wrote:
Marianela Tapia wrote:
Hola Consulta, cuando hablas de aumentar 8 puntos (talla M) al inicio, luego tejer 3 dilas con el color 1 y luego comenzar el diagrama, pero en el diagrama el siguiente aumento esta en la fila 12, suman 15 filas sin aumentos? esta eso corecto? Gracias
29.05.2023 - 02:47DROPS Design answered:
Hola Marianela, recuerda que el diagrama de punto se lee de abajo arriba (puedes ver más información en la siguiente lección:https://www.garnstudio.com/lesson.php?id=68&cid=23). El 1º aumento en el diagrama A.1 se encuentra en la 2ª fila. Por lo tanto, tendrás: la fila con aumentos, 3 filas con el color 1 y ahora empiezas A.1 y aumentas en la 2ª fila de A.1.
31.05.2023 - 20:52
|
||||||||||
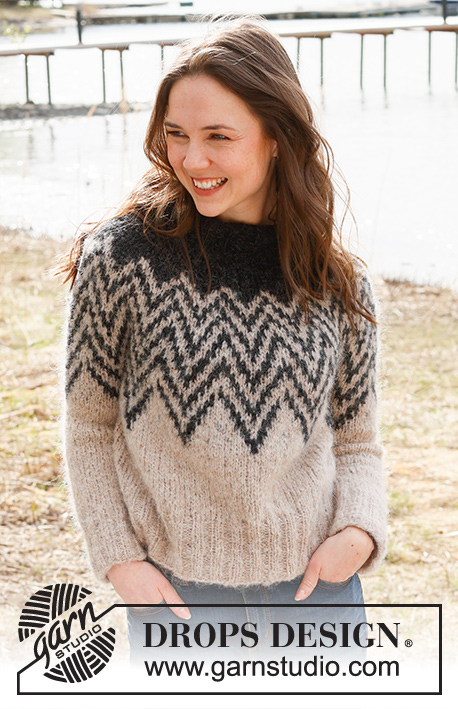
Inverted Peaks Sweater#invertedpeakssweater |
||||||||||
 |
 |
|||||||||
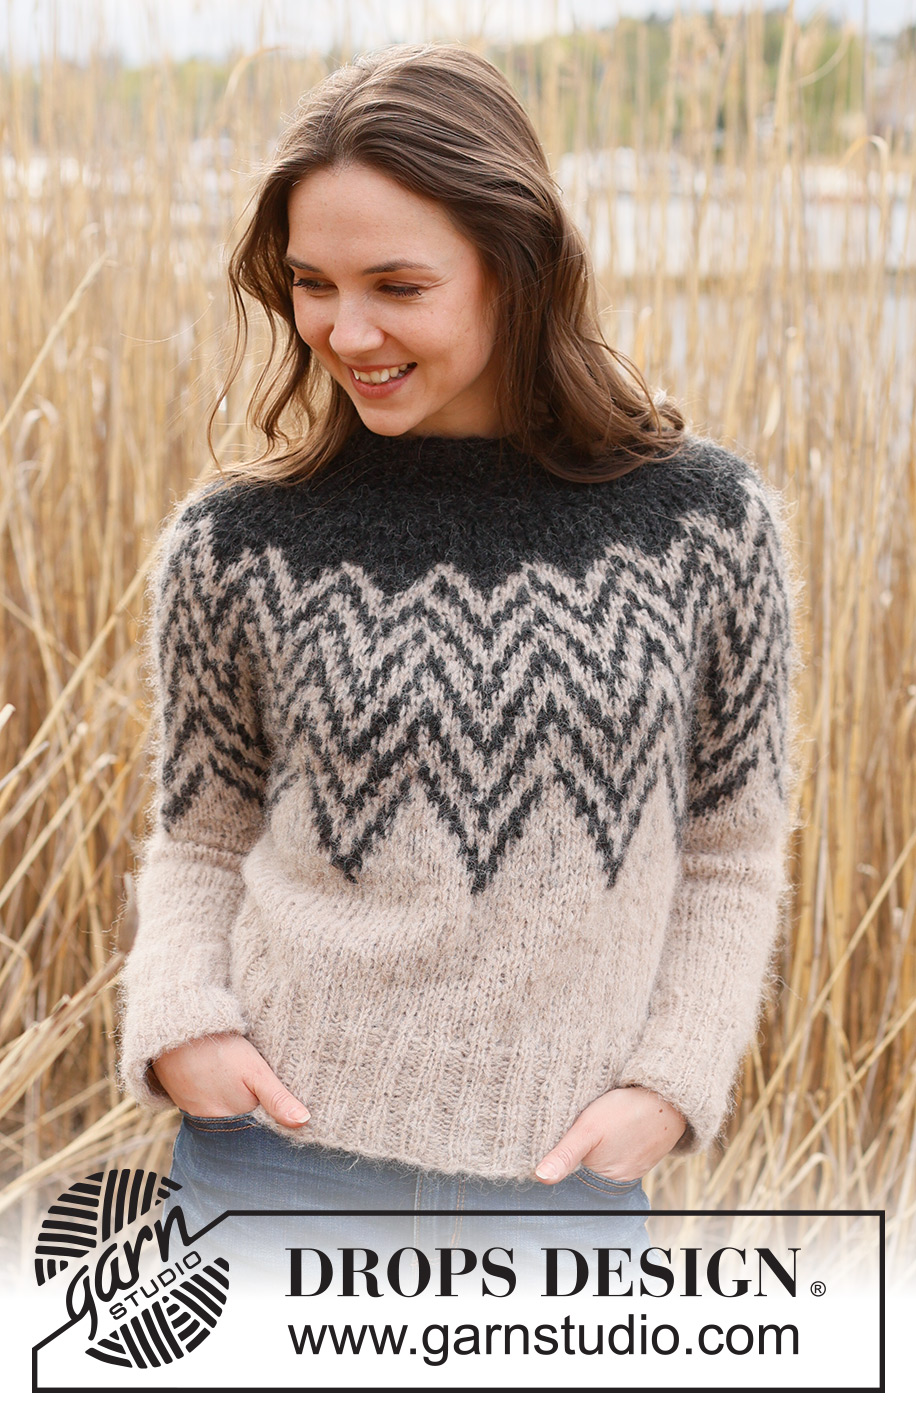
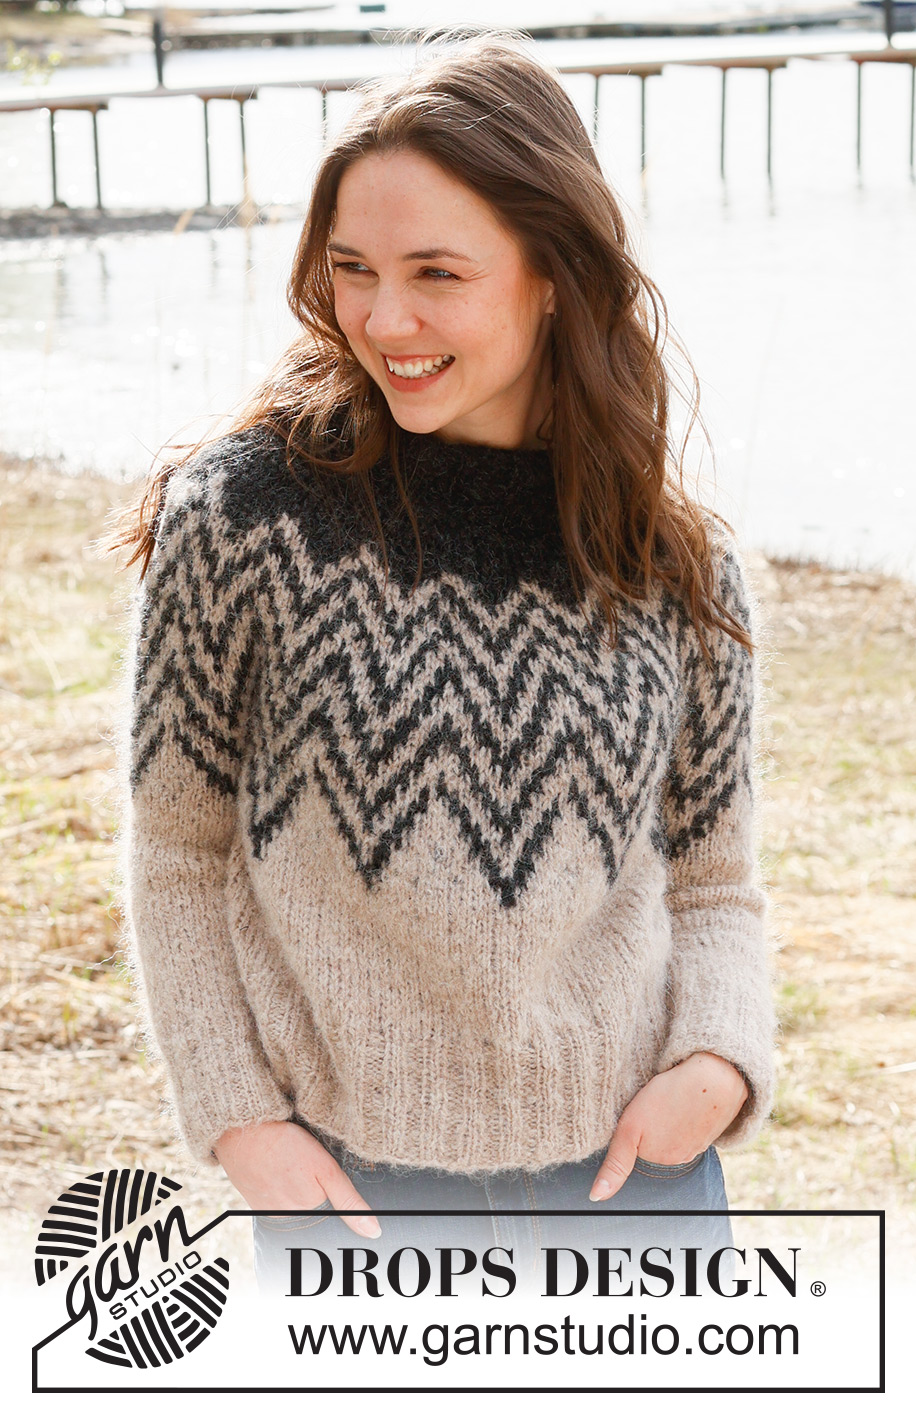
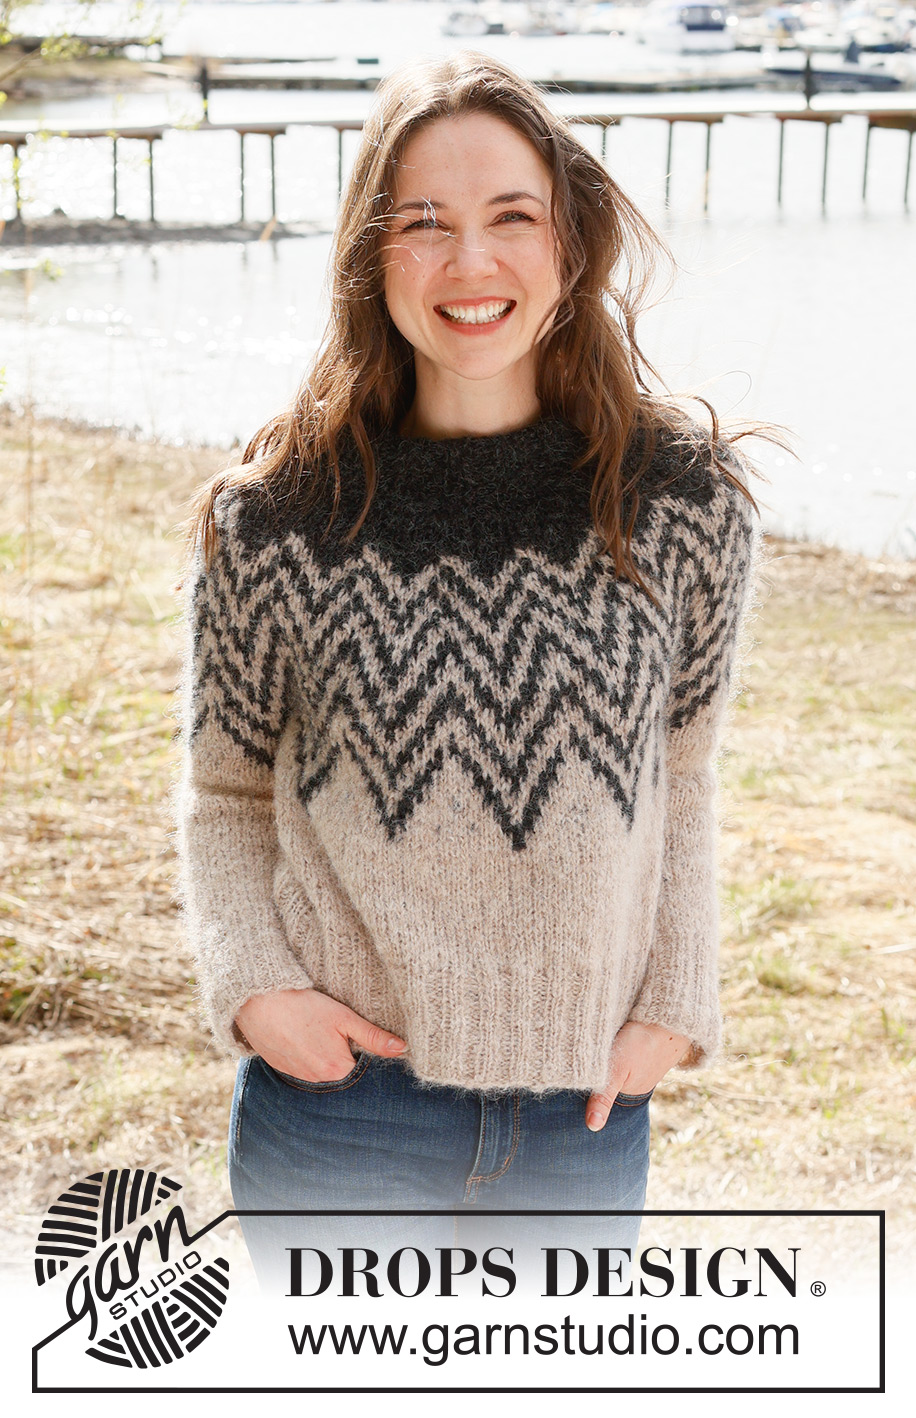
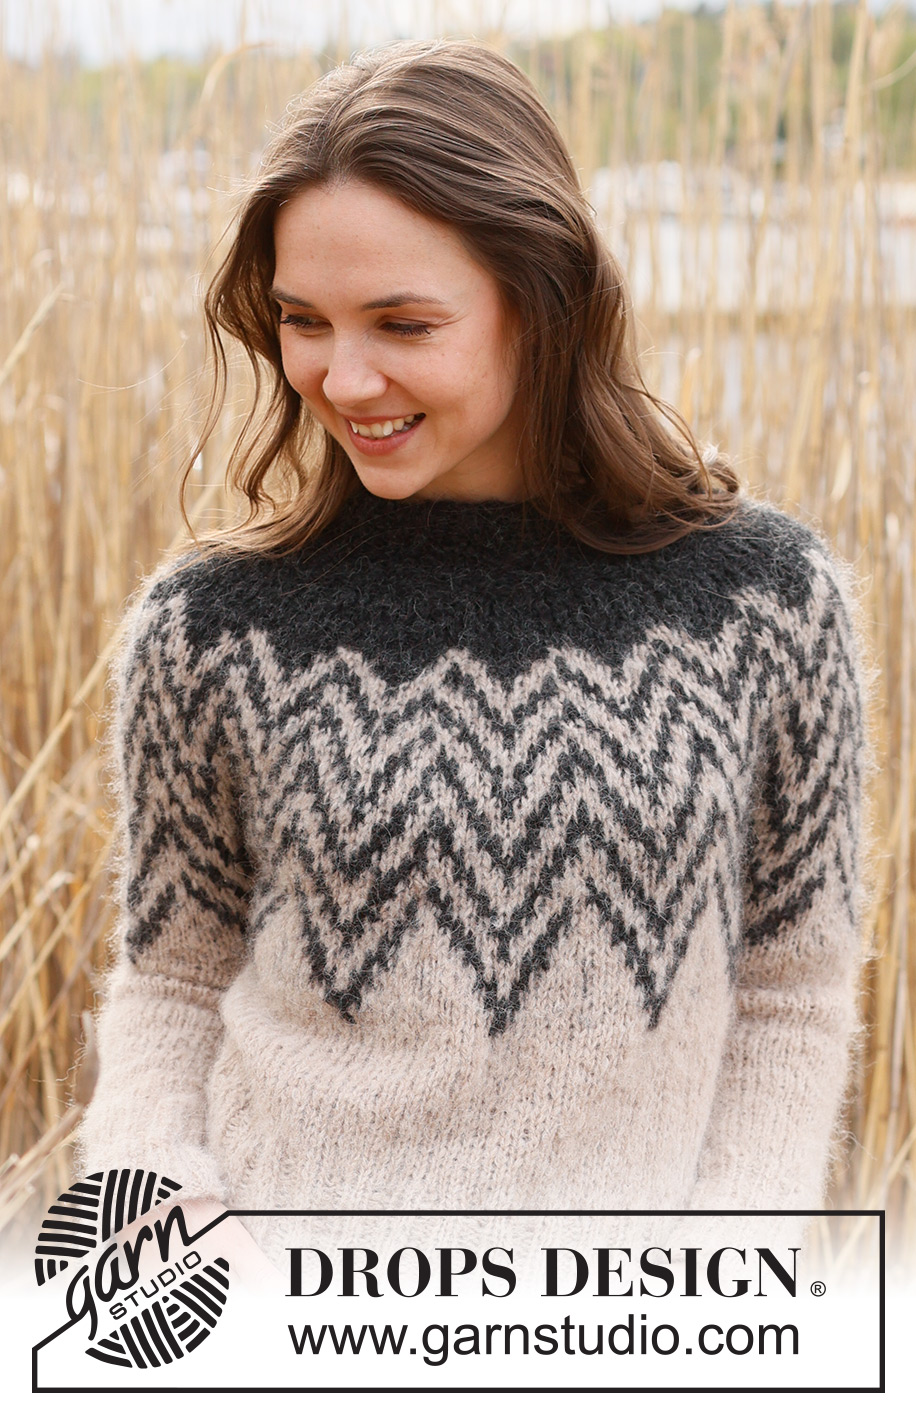
Knitted jumper in DROPS Melody. The piece is worked top down with double neck, round yoke and two-coloured pattern. Sizes S - XXXL.
DROPS 235-4 |
||||||||||
|
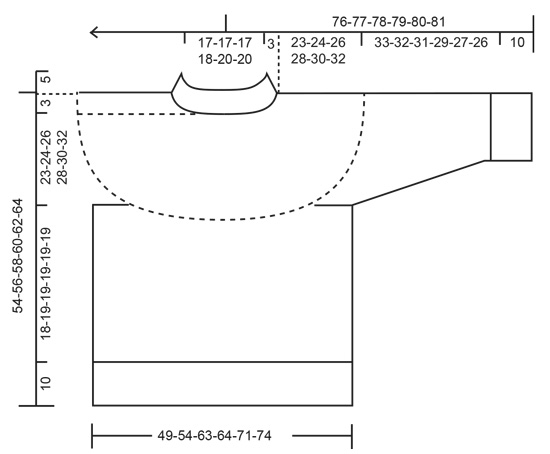
------------------------------------------------------- EXPLANATIONS FOR THE PATTERN: ------------------------------------------------------- PATTERN: See diagram A.1. The pattern is worked in stocking stitch. KNITTING TIP: To avoid the knitting tension losing its elasticity when working pattern it is important that the strands at the back are not tight. Use a size larger needle when working pattern if the piece becomes tight. DECREASE TIP (for sleeves): Work until there are 3 stitches left before the marker-thread, knit 2 together, knit 2 (marker-thread sits between these 2 stitches), slip 1 stitch as if to knit, knit 1 and pass the slipped stitch over the knitted stitch (2 stitches decreased). ------------------------------------------------------- START THE PIECE HERE: ------------------------------------------------------- JUMPER – SHORT OVERVIEW OF THE PIECE: The neck and yoke are worked in the round with circular needle, top down. The yoke is divided for body and sleeves and the body is continued in the round with circular needle, top down. The sleeves are worked with short circular needle/double pointed needles, top down. DOUBLE NECK: Cast on 72-72-72-76-84-84 stitches with colour black DROPS Melody, using short circular needles size 5 mm and 6 mm held together (doing this gives you an elastic cast-on edge). Remove the needle size 6mm and work rib in the round (knit 2, purl 2) for 10 cm. Fold the neck double to the inside and work another round of rib, at the same time as you work every 2nd stitch together with its corresponding stitch on the cast-on edge. You now have a double neck. Insert 1 marker mid-front – the yoke is measured from here. YOKE: Change to circular needle size 6 mm. Knit 1 round and increase 8-8-18-14-26-26 stitches evenly spaced = 80-80-90-90-110-110 stitches. Work 0-1-3-3-3-4 rounds of stocking stitch with colour black. Then work A.1 – read KNITTING TIP! Increase as shown in the diagram. REMEMBER THE KNITTING TENSION! Continue A.1 until the yoke measures 23-24-26-28-30-32 cm from the marker. The last increase has been worked and there are 208-208-234-234-286-286 stitches. Now divide for the body and sleeves as described below – NOTE: A.1 is not finished; it is continued on both the body and sleeves. Continue A.1 over the first 39-39-39-39-52-52 stitches (half back-piece), place the next 39-39-39-39-52-52 on 1 thread for the sleeve, cast on 4-10-10-12-8-12 stitches (in side under sleeve), continue A.1 over the next 65-65-78-78-91-91 stitches (front piece), place the next 39-39-39-39-52-52 stitches on 1 thread for the sleeve, cast on 4-10-10-12-8-12 stitches (in side under sleeve), continue A.1 over the remaining 26-26-39-39-39-39 stitches on the back piece. The body and sleeves are finished separately. BODY: = 138-150-176-178-198-206 stitches. Continue A.1 in the round; the new stitches under each sleeve are worked in colour beige. When A.1 is finished, continue with stocking stitch and colour beige until the body measures 18-19-19-19-19-19 cm from the division. Knit 1 round and increase 6-6-12-12-14-14 stitches evenly spaced = 144-156-188-190-212-220 stitches. Change to circular needle size 5 mm and work rib (knit 2, purl 2) for 10 cm. Cast off with knit over knit and purl over purl. The jumper measures approx. 54-56-58-60-62-62 cm from the shoulder down. SLEEVES: Place the 39-39-39-39-52-52 stitches from the thread on the one side of the piece on short circular needle/double pointed needles size 6 mm and knit up 1 stitch in each of the 4-10-10-12-8-12 stitches cast on under the sleeve = 43-49-49-51-60-64 stitches. Insert a marker-thread in the middle of the new stitches under the sleeve. Allow the thread to follow your work onwards; it will be used when decreasing under the sleeve. Start at the marker-thread and continue A.1 in the round ; the new stitches under the sleeve are worked in colour beige. When A.1 is finished, continue with stocking stitch and colour beige over all stitches. AT THE SAME TIME when the sleeve measures 3-3-3-4-4-4 cm from the division, decrease 2 stitches under the sleeve – read DECREASE TIP. Decrease like this every 12-6-6-7-4-3 cm a total of 3-5-5-4-6-7 times = 37-39-39-43-48-50 stitches. Continue working until the sleeve measures 33-32-31-29-27-26 cm from the division. Knit 1 round and increase 7-5-9-9-8-10 stitches evenly spaced = 44-44-48-52-56-60 stitches Change to double pointed needles size 5 mm and work rib (knit 2, purl 2) for 10 cm. Cast off with knit over knit and purl over purl. The sleeve measures approx. 43-42-41-39-37-36 cm from the division. Work the other sleeve in the same way. |
||||||||||
Diagram explanations |
||||||||||
|
||||||||||
 |
||||||||||
 |
||||||||||
Have you finished this pattern?Tag your pictures with #dropspattern #invertedpeakssweater or submit them to the #dropsfan gallery. Do you need help with this pattern?You'll find 30 tutorial videos, a Comments/Questions area and more by visiting the pattern on garnstudio.com. © 1982-2026 DROPS Design A/S. We reserve all rights. This document, including all its sub-sections, has copyrights. Read more about what you can do with our patterns at the bottom of each pattern on our site. |
||||||||||


With over 40 years in knitting and crochet design, DROPS Design offers one of the most extensive collections of free patterns on the internet - translated to 17 languages. As of today we count 325 catalogues and 12298 patterns translated into English (UK/cm). 12298
We work hard to bring you the best knitting and crochet have to offer, inspiration and advice as well as great quality yarns at incredible prices! Would you like to use our patterns for other than personal use? You can read what you are allowed to do in the Copyright text at the bottom of all our patterns. Happy crafting!
Post a comment to pattern DROPS 235-4
We would love to hear what you have to say about this pattern!
If you want to leave a question, please make sure you select the correct category in the form below, to speed up the answering process. Required fields are marked *.