
Popular categories
Looking for a yarn?


Comments / Questions (28)
Maria Santos wrote:
Ville gjerne ha et svar paa mitt spörsmaal (03.01.17) da jeg har begynt aa strikke denne lekre genseren, men har stoppet opp i paavente av et svar.
09.01.2017 - 18:10DROPS Design answered:
Hej Maria. Vi skal faa set paa alle spörgsmaal saa hurtigt vi kan. Der kan desvaerre vaere ekstra ventetid ligenu da vi har travlt med at indhente alt fra ferien :)
10.01.2017 - 13:39Maria Santos wrote:
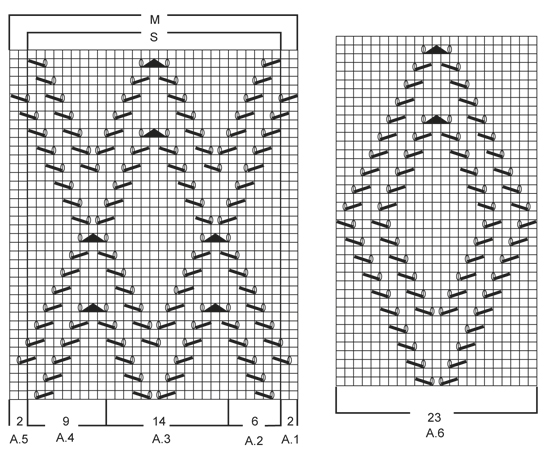
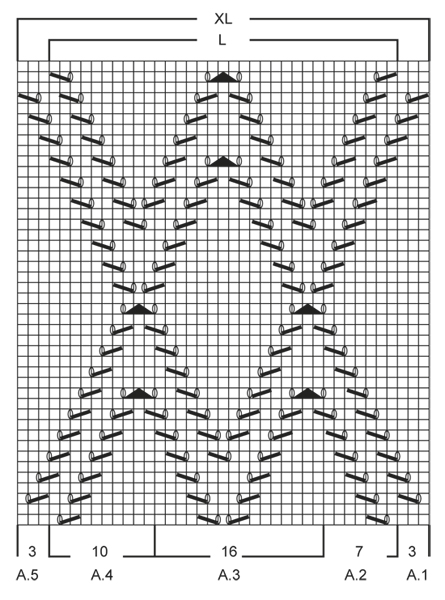
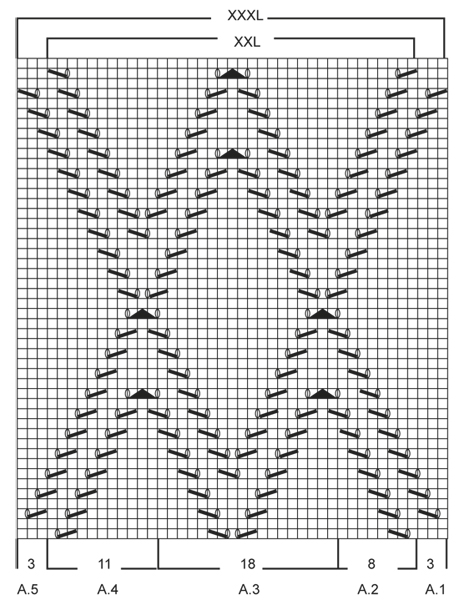
Har strikket bakstykket med höyre og venstre skulder og lagt opp 27 m tilsammen 83 m ( strörrelse L). Skal dermed begynne paa mönster: A1, A4 og A5 skal ikke strikkes i denne störrelsen, A2 og A3 tilsammen 23 m (16 + 7) skal strikkes 4 ganger. Det blir 92 m. Hvordan er det mulig da det er 83 m minus 2 kantm = 81 m igjen til mönster?
03.01.2017 - 17:19DROPS Design answered:
Hej Maria. Du strikker: Strikk 1 kant-m rille, A.1 0 gang (dvs, du strikker ikke A.1!), A.2 (= 6 m), A.3 4 ganger (= 4 x 14 m: 56) i alle str, A.4 (= 9 m), A.5 0 (altsaa ikke strikkes), 1 kant-m rille. Masker som ikke går opp i mønsteret mellom A.1 og A.2, og A.4 og A.5 strikkes i glstrikk.
12.01.2017 - 16:07
![]() Isa wrote:
Isa wrote:
Deuxième modèle qui me pose problème.... je suis pourtant une tricoteuse chevronnée, diagramme en xl est faux , des explications manquent (nombre de mailles supplémentaires à tricoter en jersey). Habituée par le passé à tricoter vos modèles j'abandonne.... avec de la laine sur les bras car rien ne correspond sur les derniers modèles : ni le numéro d'aiguille, ni les diagrammes ni même le fil (parfois utilisé en double et non précisé !). Très décue.
26.11.2015 - 16:10DROPS Design answered:
Bonjour Isa, pouvez-vous préciser les erreurs dont vous parlez pour que les vérifications soient faites. Vous trouverez à droite de la photo sous chaque modèle la tension de référence, soit pour celui-ci 15mx19 rangs jersey = 10x10 cm, avec des aiguilles 6 ou celles qui vous permettront d'obtenir votre échantillon. Quand un fil est tricoté en double, cette mention est toujours indiquée de type "avec 2 fils". Rappelez-vous que vous pouvez toujours recevoir de l'aide et une assistance auprès de votre magasin DROPS. Bon tricot!
26.11.2015 - 16:25
![]() Anne Marte Spydslaug wrote:
Anne Marte Spydslaug wrote:
Hei. Jeg klarer ikke helt å skjønne hvor rillekanten på forstykket og bakstykket skal være? Skal rillekanten være inn mot halsen eller ut mot erme? For i følge begynnelsen av oppskriften forstår jeg det slik at den skal være inn mot halsen. Men så står det etter at de to små stykkene er satt sammen med x masker i mellom "fortsett med glattstrikk og 1 kantmaske rille i hver side"....
13.07.2015 - 23:10DROPS Design answered:
Hej Anne, Kantm i rille skal være yderst mod skulderen og de nye masker slår du op ind mod halsen på begge skulderstykker. God fornøjelse!
30.07.2015 - 14:25
![]() Pat Ellis wrote:
Pat Ellis wrote:
Working on this sweater now but the graph seems to be completely wrong. If I did it the way it's graphed, there would be 2 sizes of diamonds but that's not what's pictured. Am reworking the graph using a section of the graph provided. Has anyone else noticed this problem?
13.07.2015 - 14:01DROPS Design answered:
Dear Mrs Ellis, diagrams are correct as they are, I personnally worked this sweater and it worked fine. Remember to follow diagram for your size to get correct result. Happy knitting!
27.07.2015 - 11:14
![]() Anna Rita wrote:
Anna Rita wrote:
Salve, non riesco a capire come si sviluppa il lavoro. Per il dietro, lavoro la spalla dx per 3 cm. Poi lascio in sospeso tutte le maglie , quindi mi ritrovo i ferri liberi senza maglie montate e ci avvio le maglie per la spalla sx.? Le spiegazioni dicono a specchio : cioè se la dx ho fatto diritto rovescio qui faccio rovescio dritto? Le maglie in sospeso della spalla dx quando le riprendo a lavorare? Grazie
17.04.2015 - 23:24DROPS Design answered:
Buonasera Anna Rita, lavorare a specchio sulla spalla sinistra significa sempre a m rasata ma la m di vivagno sarà all'inizio del ferro invece che alla fine. Quando la spalla sinistra misura 3 cm, deve avviare 1 nuova m alla fine del ferro sul diritto del lavoro. Alla fine del ferro successivo dal diritto del lavoro, deve avviare il n° di m indicate e lavorare le m della spalla destra e continuare il lavoro. Buon lavoro!!
18.04.2015 - 21:58
![]() Putaud Isabelle wrote:
Putaud Isabelle wrote:
Ce modèle a été réalisé avec un coton C(Drop Paris ), mais il a fallu tricoter avec des aiguilles 4.5-5 pour avoir un beau rendu; le modèle proposé nécessite soit-disant 350 g de laine en S(soit 7 pelotes de 50 g), or il a fallu 11 pelotes de 50g : les fils ne sont donc pas interchangeables, malgré les alternatives proposées ;dommage, il serait agréable d'être prévenu avant de commencer l'ouvrage . isabelle
15.03.2015 - 18:15DROPS Design answered:
Bonjour Mme Putaud, les fils sont interchangeables car ont la même tension (même échantillon), mais ces qualités ont un métrage différent pour 50 g (130 m pour Air et 75 m pour Paris) ce qui influera sur le nombre de pelotes (7 pelotes Air en taille S = 910 m soit 12 pelotes Paris) - pour calculer la quantité nécessaire quand vous choisissez une alternative, vous pouvez vous reporter ici 16.03.2015 - 10:21
![]() Malin wrote:
Malin wrote:
A2 ska bara stickas 1 gång, då blir det rätt!
05.03.2015 - 10:38
![]() Jette Zangger wrote:
Jette Zangger wrote:
Opskrift 159-7 der står i rygstykket mønster. Str. M strik A1 en gang A2 ogA3 4 gange og A41gang og A5 1 gang. Det bliver 95 masker der skal bruges, men der er kun 77 det er i starten på rygstykket.
05.03.2015 - 07:26DROPS Design answered:
Hej Jette. Jeg faar det nu til 77: Str M: 1 kantm, A.1 (= 2), A.2 (= 6), A.3 4 gange (= 56), A.4 (= 9), A.5 (= 2) og 1 kantmaske = 77
05.03.2015 - 11:26
![]() Estha wrote:
Estha wrote:
Bij het patroon tussen A2 en A3 overlappen steken in het patroon. Als je 3x A3 breidt, moet deze steken dan tussen A3 en A3 in recht breien of in patroon. Of links in patroon en rechts in recht. Ben een beginnende breister, en kom er zelf niet uit.
22.01.2015 - 09:33DROPS Design answered:
Hoi Estha. Het betreft het samenbreien van de steken in bijvoorbeeld nld 9 en 11? Je breit van A.2 direct door met A.3, dus je breit gewoon de steken zoals er wordt beschreven in de teltekening. De herhaling is ook geen probleem omdat het einde van A.3 gelijk is aan het eind van A.2 en je daarom ook hier kan doorgaan. Hetzelfde geldt in de overgang van A.3 op A.4. St die niet in het patroon passen tussen A.1 en A.2 en tussen A.4 en A.5 in tricotst breien.
22.01.2015 - 14:14
|
||||||||||||||||
Summer Diamond#summerdiamondsweater |
||||||||||||||||
 |
 |
|||||||||||||||
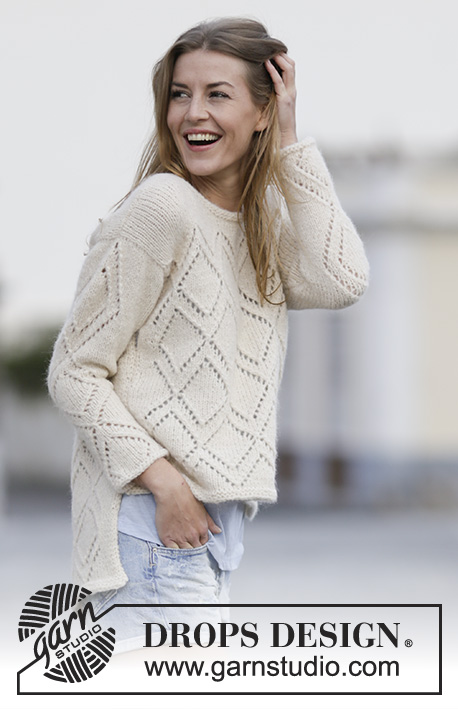
Knitted DROPS jumper with lace pattern, worked top down in ”Air”. Size S-XXXL.
DROPS 159-7 |
||||||||||||||||
|
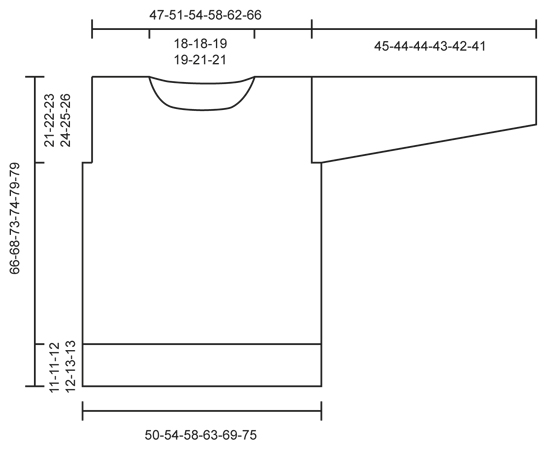
GARTER ST (worked in the round): * K 1 round and P 1 round *, repeat from *-*. 1 ridge = 2 rounds. GARTER ST (back and forth): K all rows. 1 ridge = K2 rows. PATTERN: See diagrams A.1 to A.6. The diagrams show all rows in pattern seen from RS. DECREASE TIP: Dec inside 1 edge st in garter st. All dec are done from RS! Dec before 1 edge st as follows: K 2 tog. Dec after 1 edge st as follows: Slip 1 st as if to K, K 1, psso. ---------------------------------------------------------- JUMPER: Worked back and forth, top down, in several parts and sewn tog when finished. Jumper is longer at the back than at the front. BACK PIECE: Work right shoulder as follows: Cast on 23-25-27-30-31-34 sts on circular needle size 6 mm / US 10 with Air. Work in stockinette st until 1 st remains, 1 edge st in GARTER ST - see explanation above. Continue like this back and forth until piece measures 3 cm / 1". Now cast on 1 new st at the end of next row from WS = 24-26-28-31-32-35 sts. Put piece aside and work left shoulder as follows: Cast on and work as right shoulder but reversed, i.e. work in stockinette st with 1 edge st in garter st at the beg of row from RS. When piece measures 3 cm / 1", cast on 1 new st at the end of row from RS = 24-26-28-31-32-35 sts. At the end of next row from RS cast on 25-25-27-27-29-29 sts and the work the 24-26-28-31-32-35 sts from right shoulder on to needle = 73-77-83-89-93-99 sts. REMEMBER THE KNITTING GAUGE Continue in stockinette st with 1 edge st in garter st in each side until piece measures 11-13-13-14-14-14 cm / 4½"-5"-5"-5½"-5½"-5½". Now continue with pattern - see diagram for size. NOTE: In size S, L and XL work sts that do not fit the pattern between A.1 and A.2, and A.4 and A.5 in stockinette st. Work 1 edge st in garter st, A.1 0-1-0-1-0-1 time, A.2, A.3 4 times in all sizes, A.4, A.5 0-1-0-1-0-1 time, 1 edge st in garter st. Continue like this back and forth until piece measures 21-22-23-24-25-26 cm / 8¼"-8¾"-9"-9½"-9¾"-10¼". At the end of the next 2 rows cast on 2-3-3-4-6-8 new sts for armholes = 77-83-89-97-105-115 sts. Work the new sts in stockinette st with 1 edge st in garter st in each side. Continue like this until piece measures 64-66-71-72-77-77 cm / 25¼"-26"-28"-28½"-30½"-30½" in total, adjust after one whole or half repetition vertically. Switch to circular needle size 5.5 mm / US 9 and work 2 ridges over all sts, AT THE SAME TIME on 1st row in ridge inc 5-5-6-6-7-7 sts evenly = 82-88-95-103-112-122 sts. Loosely bind off. FRONT PIECE: Work left shoulder as follows: Cast on 23-25-27-30-31-34 sts on circular needle size 6 mm / US 10 with Air. Work in stockinette st until 1 st remains, 1 edge st in GARTER ST - see explanation above. Continue like this back and forth until piece measures 5-6-6-7-7-7 cm / 2"-2½"-2½"-2¾"-2¾"-2¾". Now cast on new sts for neck at the end of next row from WS: Cast on 1 st 2-2-2-2-3-3 times, 2 sts 1 time in all sizes and 3 sts 1 time in all sizes = 30-32-34-37-39-42 sts. Put piece aside and work right shoulder as follows: Cast on and work as left shoulder but reversed. I.e. work in stockinette st with 1 edge st in garter st at the beg of row from RS and cast on sts for neck at the end of row from RS = 30-32-34-37-39-42 sts. At the end of next row from RS cast on 13-13-15-15-15-15 sts and the work the sts from left shoulder on to needle = 73-77-83-89-93-99 sts. When piece measures 11-13-13-14-14-14 cm / 4½"-5"-5"-5½"-5½"-5½", work pattern as on back piece and cast on sts for armhole in each side when piece measures 21-22-23-24-25-26 cm / 8¼"-8¾"-9"-9½"-9¾"-10¼". Continue as on back piece until piece measures 53-55-59-60-64-64 cm / 21"-21½"-23¼"-23½"-25¼"-25¼" in total, adjust after one whole or half repetition vertically. NOTE: Front piece is shorter than back piece. Switch to circular needle size 5.5 mm / US 9 and work 2 ridges over all sts, AT THE SAME TIME on 1st row in ridge inc 5-5-6-6-7-7 sts evenly = 82-88-95-103-112-122 sts. Loosely bind off. ASSEMBLY: Place front piece against back piece and sew shoulder seams. Sew inside cast-on edge and sew/graft one and one st neatly tog. Fasten off. SLEEVE: The sleeve is worked back and forth on circular needle. Pick up 65-69-71-75-77-81 sts (includes 1 edge st in each side) evenly from RS along sleeve opening on body on circular needle size 6 mm / US 10 with Air. P 1 row from WS. Now work pattern as follows: 1 edge st in garter st, 20-22-23-25-26-28 sts in stockinette st, pattern A.6 (= 23 sts), 20-22-23-25-26-28 sts in stockinette st, 1 edge st in garter st. Continue pattern like this. When piece measures 4 cm / 1½", beg dec in each side of sleeve - READ DECREASE TIP. Repeat dec every 2-2-2-2-1½-1½ cm / ¾"-¾"-¾"-¾"-½"-½" 14-15-15-17-18-19 more times = 35-37-39-39-39-41 sts. When sleeve measures 44-43-43-42-41-40 cm / 17¼"-17"-17"-16½"-16"-15¾", switch to circular needle size 5.5 mm / US 9 and work 2 ridges, AT THE SAME TIME on 1st row in ridge inc 2-2-2-3-3-4 sts evenly = 37-39-41-42-42-45 sts. Loosely bind off. ASSEMBLY: Sew underarm and side seams in one inside 1 edge st in garter st. NECK EDGE: Beg mid back and pick up approx. 70-90 sts evenly around the neck on a short circular needle size 5.5 mm / US 9 with Air. Work 2 ridges in GARTER ST in the round on circular needle - see explanation above. Loosely bind off. |
||||||||||||||||
Diagram explanations |
||||||||||||||||
|
||||||||||||||||
 |
||||||||||||||||
 |
||||||||||||||||
 |
||||||||||||||||
 |
||||||||||||||||
Have you finished this pattern?Tag your pictures with #dropspattern #summerdiamondsweater or submit them to the #dropsfan gallery. Do you need help with this pattern?You'll find 24 tutorial videos, a Comments/Questions area and more by visiting the pattern on garnstudio.com. © 1982-2026 DROPS Design A/S. We reserve all rights. This document, including all its sub-sections, has copyrights. Read more about what you can do with our patterns at the bottom of each pattern on our site. |
||||||||||||||||


With over 40 years in knitting and crochet design, DROPS Design offers one of the most extensive collections of free patterns on the internet - translated to 17 languages. As of today we count 324 catalogs and 12290 patterns - 12280 of which are translated into English (US/in).
We work hard to bring you the best knitting and crochet have to offer, inspiration and advice as well as great quality yarns at incredible prices! Would you like to use our patterns for other than personal use? You can read what you are allowed to do in the Copyright text at the bottom of all our patterns. Happy crafting!
Post a comment to pattern DROPS 159-7
We would love to hear what you have to say about this pattern!
If you want to leave a question, please make sure you select the correct category in the form below, to speed up the answering process. Required fields are marked *.