
Popular categories
Looking for a yarn?


Comments / Questions (33)
![]() Chevrot wrote:
Chevrot wrote:
Bonjour, je tricote actuellement ce modèle, mais je ne comprends pas la phrase de l'explication "tricoter ainsi jusqu'à ce que 2 côtes mousse aient été tricotées sur les 6m au-dessus des fentes côtés et continuer en jersey sur toutes les mailles". Fentes, de quelles fentes parlez-vous, et à quel hauteur les commencer ? J'avoue ne pas comprendre, merci pour votre explication.
02.03.2015 - 22:59DROPS Design answered:
Bonjour Mme Chevrot, il fallait lire "la fente d'encolure", c'est-à-dire que l'on continue désormais en rond (à 12-13 cm depuis le marqueur après la capuche) et on tricote 2 côtes mousse sur les 6 m sous la fente d'encolure (et les autres mailles comme avant), et on continue ensuite en jersey sur toutes les mailles. Bon tricot!
03.03.2015 - 09:11
![]() Monique wrote:
Monique wrote:
Bonjour, j'ai eu beaucoup de plaisir à tricoter ce modèle ravissant, qui tombe bien sur les épaules et à la longueur très pratique. Merci pour ce patron ! La capuche entraine un peu le poncho vers l'arrière quand on ne la met pas sur la tête, une attache en haut de la fente remédie à tout ça. Il est possible que j'en fasse encore un !
24.01.2015 - 14:44
![]() Susanne Juul Petersen wrote:
Susanne Juul Petersen wrote:
Hej. Dette er mit første store projekt med strikning. Jeg har lavet hætten, og jeg er nu sat de 4 mærker, og skal til at lave udtagning omkring dem. Jeg synes det er forvirrende. Jeg har lavet et bredt langt stykke, hætten. Skal jeg senere strikke rundt? hvordan sætter jeg det sammen? og skal jeg så lave om omgang ret og en omgang vrang? det synes jeg ikke giver mening hvis det er sådan jeg skal gøre. Jeg håber i kan hjælpe. Kh Susanne.
27.11.2014 - 11:31DROPS Design answered:
Hej Susanne, Det kommer helt af sig selv hvis du følger opskriften. Når du starter "raglan-udtagningerne" på hver side af de 4 mærker så strikker du frem og tilbage. Men når du er klar med slidsen midt foran, så sætter du arbejdet sammen og strikker rundt. God fornøjelse!
01.12.2014 - 15:50
![]() Eleonora wrote:
Eleonora wrote:
Mi domando cosa voglia dire "lavorare una costa a maglia legaccio". Vuol dire un ferro? Perché in italiano la "costa" è un'altra cosa... Grazie
22.11.2014 - 22:43DROPS Design answered:
Buongiorno Eleonora. Una costa a legaccio corrisponde a 2 ferri lavorati a legaccio. Nelle prime righe delle spiegazioni trova indicato come si ottiene una costa a legaccio a seconda che stia lavorando in tondo o in ferri di andata e ritorno. Buon lavoro!
23.11.2014 - 08:59
![]() Podavini wrote:
Podavini wrote:
Bonjour je souhaite réaliser ce poncho mais je ne comprend pas les explications du point fantaisie au secours !
16.11.2014 - 20:34DROPS Design answered:
Bonjour Mme Podavini, cliquez ici pour plus d'informations sur les diagrammesm - Quand vous tricotez A.1 en allers et retours, lisez le diagramme de droite à gauche sur l'endroit et de gauche à droite sur l'envers - en rond, lisez tous les tours de droite à gauche - en commençant toujours par en bas à droite. Bon tricot!
17.11.2014 - 10:54
![]() Catherine Staniforth wrote:
Catherine Staniforth wrote:
I love the look of this poncho it's similar to a baby pattern you do. I'm just wondering on the sizing. I can't see anywhere on the site a conversion.
12.10.2014 - 13:01DROPS Design answered:
Dear Mrs Staniforth, you will find at the end of the pattern a measurement chart with all measures in each size taken flat from side to side - compare these to a similar garment you like the shape to find out the matching size. Happy knitting!
13.10.2014 - 09:51
![]() RUBINO wrote:
RUBINO wrote:
Combien de pelotes il faut commander pour réaliser ce model?
23.09.2014 - 09:25DROPS Design answered:
Bonjour Mme Rubino, la quantité de laine est indiquée pour chaque taille, au poids, à droite de la photo, ainsi, en taille S, il faut 700 g Eskimo / 50 g la pelote Eskimo = 14 pelotes Eskimo. Bon tricot!
23.09.2014 - 09:29Pauline wrote:
Hi, I think there's a mistake at the point of placing markers -- no matter what size we attempt, the maximum count of stitches per the instructions come up to only 52. I've improvised by assuming the 6 stitches are a constant, but I think you should check it.
05.09.2014 - 06:07DROPS Design answered:
Dear Pauline, when you start placing markers, number of sts worked in stocking st between markers is not the same for all sizes to fit the different number of sts for each size, ie 52, 55 or 56 sts. Happy knitting!
05.09.2014 - 09:42TRACY ROBERTS wrote:
Riding hood
29.06.2014 - 16:47
![]() Nicole C; wrote:
Nicole C; wrote:
Si elle est tricotée en rouge on dirait le chapeau rouge. super
18.06.2014 - 12:05
|
|||||||
November#novemberponcho |
|||||||
|
|
|||||||
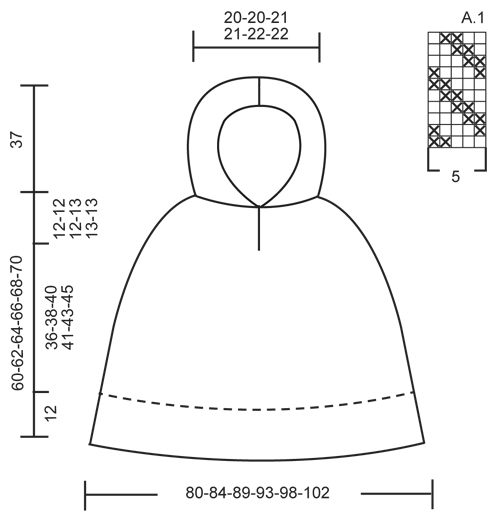
Knitted DROPS poncho with hood and vent, worked top down in ”Snow”. Size S-XXXL.
DROPS 158-32 |
|||||||
|
GARTER ST (in the round on circular needle): * K 1 round and P 1 round *, repeat from *-*. 1 ridge = 2 rounds. GARTER ST (back and forth on needle): K all rows. 1 ridge = K2 rows. PATTERN: See diagram A.1. Diagram shows all rows seen from RS. INCREASE TIP 1: All inc are done from RS. Inc 8 sts in total on every row/round with inc. Work until 1 st remains before st with marker, 1 YO, K 3 and 1 YO. Repeat at the remaining 3 sts with markers on row/round. On next row K/P YO twisted (i.e. work in back loop of st instead of front) to avoid holes. INCREASE TIP 2: Inc as follows before 1st and 3rd marker: Work until 1 st before marker, 1 YO. Inc as follows after 2nd and 4th marker: Work until marker, K 1, 1 YO. On next round K YOs twisted (i.e. work in back loop of st instead of front) to avoid holes. ---------------------------------------------------------- PONCHO: The piece is worked top down. Beg with the hood. Then work upper part of poncho back and forth until vent is done. Then work in the round. Cast on 66 sts in all sizes on circular needle size 8 mm / US 11 with Snow. Work 1 ridge in GARTER ST back and forth - see explanation above! Then work as follows from RS: 3 edge sts in garter st, PATTERN A.1 (= 5 sts) over the next 60 sts, 3 edge sts in garter st. Continue back and forth the same way. REMEMBER THE GAUGE! When piece measures 34 cm / 13½", work 1 ridge while AT THE SAME TIME dec 22-22-20-20-18-18 sts evenly = 44-44-46-46-48-48 sts remain. Then work 2 ridges more AT THE SAME TIME inc 8-8-9-10-8-8 sts evenly on last row from RS = 52-52-55-56-56-56 sts. Insert a marker here. NOW MEASURE THE PIECE FROM HERE. Then work as follows: 3 band sts in garter st, 6-6-7-7-7-7 sts in stockinette st, insert 1st marker in next st, 6 sts in stockinette st, insert 2nd marker in next st, 18-18-19-20-20-20 sts in stockinette st, insert 3rd marker in next st, 6 sts in stockinette st, insert 4th marker in next st, 6-6-7-7-7-7 sts in stockinette st, 3 band sts in garter st. P 1 row. Continue like this, AT THE SAME TIME on next row from RS beg inc on each side of sts with markers – READ INCREASE TIP 1! Repeat the same inc every other row 6-7-8-8-9-9 more times, every 4th row/round 2-2-2-3-3-4 times and every 6th round 6-6-6-6-6-7 times = 172-180-191-200-208-224 sts. AT THE SAME TIME when piece measures 12-12-12-13-13-13 cm / 4¾"-4¾"-4¾"-5⅛"-5⅛"-5⅛", work piece in the round as follows: 3 sts in GARTER ST in the round on circular needle – see explanation above, stockinette st until 3 sts remain, 3 sts in garter st. Continue like this until 2 ridges have been worked over the 6 sts at the vent. Then work piece in stockinette st over all sts. Continue with 6 rounds in stockinette st. Now inc 0-1-1-1-1-0 sts at every marker – Read INCREASE TIP 2. (= 0-4-4-4-4-0 inc on round) = 172-184-195-204-212-224 sts When piece measures 45-47-49-51-53-55 cm / 17¾"-18½"-19¼"-20"-21"-21½", inc 3-1-0-1-3-1 st evenly on round = 175-185-195-205-215-225 sts. Continue with pattern A.1 over all sts on round. Continue to work pattern for 10 cm / 4". Work 2 ridges and loosely bind off. ASSEMBLY: Fold hood and sew cast-on edge neatly tog st by st. Fasten off. |
|||||||
Diagram explanations |
|||||||
|
|||||||
 |
|||||||
Have you finished this pattern?Tag your pictures with #dropspattern #novemberponcho or submit them to the #dropsfan gallery. Do you need help with this pattern?You'll find 18 tutorial videos, a Comments/Questions area and more by visiting the pattern on garnstudio.com. © 1982-2026 DROPS Design A/S. We reserve all rights. This document, including all its sub-sections, has copyrights. Read more about what you can do with our patterns at the bottom of each pattern on our site. |
|||||||


With over 40 years in knitting and crochet design, DROPS Design offers one of the most extensive collections of free patterns on the internet - translated to 17 languages. As of today we count 324 catalogs and 12284 patterns - 12274 of which are translated into English (US/in).
We work hard to bring you the best knitting and crochet have to offer, inspiration and advice as well as great quality yarns at incredible prices! Would you like to use our patterns for other than personal use? You can read what you are allowed to do in the Copyright text at the bottom of all our patterns. Happy crafting!
Post a comment to pattern DROPS 158-32
We would love to hear what you have to say about this pattern!
If you want to leave a question, please make sure you select the correct category in the form below, to speed up the answering process. Required fields are marked *.