
Popular categories
Looking for a yarn?


Comments / Questions (52)
Nina wrote:
4th symbol in diagram makes 1 st out of 3 (you pass one over two already knitted tog.)
11.08.2014 - 14:10
![]() Cresta wrote:
Cresta wrote:
Help! I end up with a spare stitch in each block. Can you write out in standard knitting code what the steps over 4 rows should be? My version would be this: over 5 stitches: r1: p, kt (knit twisted), p, k, yo, k (ie 6 stitches now exist in place of 5) r2: k, pt (purl twisted), k, p, p, p, yo (ie 7 stitches now exist in place of 5) r3: p, kt, p, slip, k, k, psso 2 (now 6 stitches) r4: k, pt, k, p, p - ie instructions for 5 stitches, but still have a sixth one.
10.08.2014 - 20:14DROPS Design answered:
Dear Cresta, diagram is read from the right to the left from RS and from the left to the right from WS, so that row 2 will be P3, YO, K, Ptwisted, P and row 4: K2, K, P twisted, K. NB: the YO created on row 2 should be dropped off needle on row 3. Happy knitting!
12.08.2014 - 11:44
![]() Gerd wrote:
Gerd wrote:
Hej! Jag har en kund som gör den här modellen i storlek L. Det har gått 3 nystan mer än på garnåtgången. Ändå stickade hon storlek M på ärmarna. Vi ser också på kommentarena att det har hänt fler gånger. Så det vore bra om det ändrades.
28.05.2014 - 08:59Leonor wrote:
En la explicacion del punto M1 hay un simbolo q significa "este punto no existe en esta vuelta", como lo tejo entonces?
12.05.2014 - 01:27DROPS Design answered:
Hola Leonor. El símbolo "no existe" significa que no hay punto en la vta y como no hay punto - no se trabaja. Eso pasa porque tenemos que explicar la labor en un diagrama plano.
17.05.2014 - 20:33
![]() Susan Loudon wrote:
Susan Loudon wrote:
On your lace pattern, row 1 says: 1 YO between 2 sts, K YO on next row." But below, you say that row 2 is P3, YO. Where do I K the YO?, as described above? It lines up right in the middle of the P3... Also, the stitch count varies row to row, so the patterns don't line up, making the stripe pattern as shown in the photo...what am I doing wrong? Could you please describe the Lace Diagram, stitch by stitch, row by row , including the edge sts etc for one complete block?
11.05.2014 - 06:51DROPS Design answered:
Dear Mrs Loudon, you are right for row 2. The pattern should be lined up, repeat A.1 until 4 sts remain on row, P 1, K 1 twisted, P 1 and 1 edge st in garter st. Work the twisted st P twisted from WS (as the 3 first sts in A.1). From WS, work these 3 sts then repeat A.1 starting from left towards right. Happy knitting!
12.05.2014 - 09:17
![]() Susan Loudon wrote:
Susan Loudon wrote:
Thank-you for the description of the lace... but I'm still confused! You note that on R3 to slip 1 st as if to P,K2,psso the 2K sts...etc... but your pattern says" drop YO off the needle on next row (which would be Row 3),. So I'm not sure when to drop that YO because you don't mention it in your instruction.??? thanks! Susan
10.05.2014 - 00:48DROPS Design answered:
Dear Susan, the YO made on 2nd row is then dropped on 3rd row (you don't work this YO), so that on 3rd row you will: drop the yo from previous row, then slip 1 st as if to P, K 2, psso the 2 K sts (2 sts remain). Happy knitting!
10.05.2014 - 09:43
![]() Susan wrote:
Susan wrote:
Could you please send me a link to your video instruction for the complete lace pattern for IBIZA 153-12. I notice on your webpage that you have a lot of lace patterns, but you don't have this one! It seems very confusing with different stitch counts on each row. thank-you!
09.05.2014 - 05:42DROPS Design answered:
Dear Susan, your request have been forwarded. the lace pattern is worked over 3 sts as follows. R1(RS): K1,YO,K1 - R2(WS): P3,YO - R3: slip 1 st as if to P, K 2, psso the 2 K sts (2 sts remain) - R4: P2. Happy knitting!
09.05.2014 - 08:59
![]() Susan wrote:
Susan wrote:
I've just begun this challenging pattern and am having a problem with the Lace Pattern. Does the A-1 diagram read as normal, from the bottom right to the left, then up one row from left to right? I've asked the Question on other sites and have had different answers! I've completed Row 1, now want to go to Row 2 but don't know where to start .. at the P 3 end or at the K,P twist,K end?
09.05.2014 - 01:32DROPS Design answered:
Dear Susan, diagrams are read from right towards left from RS and left towards right from WS. The 1st row finished with the first 3 sts in diagram, so that you start row 2 with K, P twisted, K and then A.1 (P3, YO). Happy knitting!
09.05.2014 - 08:54
![]() Anne wrote:
Anne wrote:
Som mange av dropsoppskriftene, stemmer ikke antall garnnøster, jeg måtte kjøpe 4 ekstra nøster. maskeantallet stemmer i cm.
21.04.2014 - 21:18
![]() M. Mulder wrote:
M. Mulder wrote:
Trui is af, hij is prachtig, maar twee bollen te weinig. En dan zit je met een ander verfbad.
27.03.2014 - 16:30
|
||||||||||||||||||||||
Ibiza#ibizasweater |
||||||||||||||||||||||
|
|
||||||||||||||||||||||
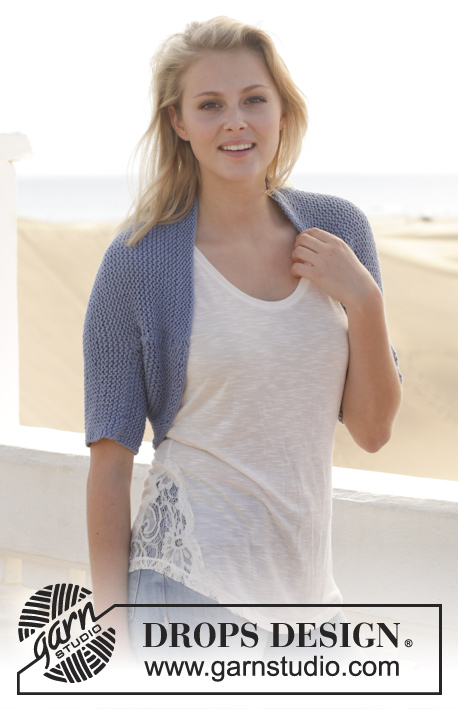
Knitted DROPS jumper with lace pattern in ”Paris”. Size: S - XXXL.
DROPS 153-12 |
||||||||||||||||||||||
|
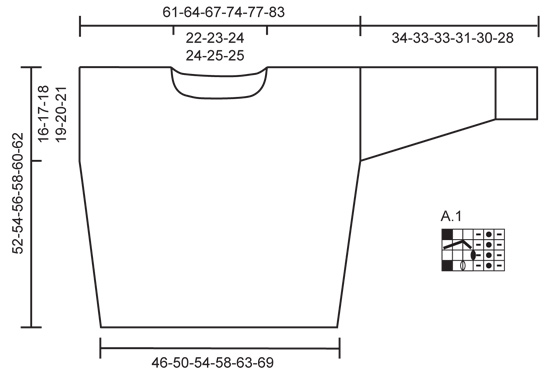
GARTER ST (back and forth on needle): K all rows. 1 ridge = K2 rows. PATTERN: See diagram A.1. The diagram shows all rows in pattern seen from RS. ---------------------------------------------------------- JUMPER: Worked back and forth on needle in parts and sewn tog when finished. FRONT PIECE: Cast on 76-83-88-94-103-113 sts (includes 1 edge st in each side) on needle size 5.5 mm / US 9 and work 3 ridges in garter st. Then work in stockinette st with 1 edge st in GARTER ST - see explanation above - in each side of piece. When piece measures approx. 2 cm / ¾", inc 1 st in each side, inc with 1 YO inside 1 edge st, work YO twisted on next row to avoid holes. Repeat inc approx. every 3-3½-3½-3-3½-3½ cm / 1"-1¼"-1¼"-1"-1¼"-1¼" 11-10-10-12-10-10 more times (= 12-11-11-13-11-11 times in total) = 100-105-110-120-125-135 sts on needle. Work until piece measures 36-37-38-39-40-41 cm / 14¼"-14½"-15"-14¼"-15¾"-16⅛", insert a marker in each side, marks where to sew in sleeves. Then work as follows from RS: 1 edge st in garter st, repeat A.1 until 4 sts remain on row, P 1, K 1 twisted, P 1 and 1 edge st in garter st. Work the twisted st P twisted from WS. Work like this until piece measures 46-48-50-52-54-56 cm / 18"-19"-19¾"-20½"-21¼"-22" adjust after one whole repetition of A.1 vertically. Work the first 35-37-39-44-46-51 sts as before, bind off the next 30-31-32-32-33-33 sts and work the rest of row as before. Work each shoulder separately - AT THE SAME TIME bind off 1 st at beg of every row from neck 3 times in total = 32-34-36-41-43-48 sts remain on each shoulder. Continue until piece measures 52-54-56-58-60-62 cm / 20½"-21¼"-22"-22¾"-23½"-24½" and bind off. BACK PIECE: Work as front piece BUT work until piece measures 50-52-54-56-58-60 cm / 19¾"-20½"-21¼"-22"-22¾"-23⅛" before binding off for neck - adjust after one whole repetition of A.1 vertically. Work as before over the first 33-35-37-42-44-49 sts, bind off the next 34-35-36-36-37-37 sts and work the rest of row as before. Work each shoulder separately - AT THE SAME TIME bind off 1 st at beg of next row from neck = 32-34-36-41-43-48 sts remain on each shoulder. Work until piece measures 52-54-56-58-60-62 cm / 20½"-21¼"-22"-22¾"-23½"-24½" and bind off. SLEEVE: Cast on 45-45-50-50-53-53 sts on needle size 5.5 mm / US 9 (includes 1 edge st in each side) and work 3 ridges back and forth on needle. Then work as follows: 1 edge st in garter st, P 0-0-0-0-2-2, A.1 until 4-4-4-4-5-5 sts remain, P 1, K 1 twisted, P 1-1-1-1-2-2 and 1 edge st in garter st. Work the twisted st P twisted from WS. Work until piece measures 12 cm / 4¾", adjust after one whole repetition of A.1 vertically. Then work in stockinette st while at the same time inc 1 st inside 1 edge st in garter st in each side, repeat inc approx. every 6½-4½-4½-3½-4-2½ cm / 2½"-1¾"-1¾"-1¼"-1½"-⅛" 3-4-4-5-4-5 more times (= 4-5-5-6-5-6 times in total) = 53-55-60-62-63-65 sts on needle. Work until piece measures 34-33-33-31-30-28 cm / 13½"-13"-13"-12 ¼"-11¾"-11" and bind off (shorter measurements in the larger sizes because of wider body). Make another sleeve the same way. ASSEMBLY AND NECK EDGE: Sew one shoulder seam, leave the other open. Pick up 80-100 sts from RS around the neck edge. Work 3 ridges back and forth on needle, bind off. Sew the other shoulder seam and side of neck edge. Sew in sleeves inside the two markers inserted on front and back piece. Sew underarm and side seams in one inside 1 edge st. |
||||||||||||||||||||||
Diagram explanations |
||||||||||||||||||||||
|
||||||||||||||||||||||
 |
||||||||||||||||||||||
Have you finished this pattern?Tag your pictures with #dropspattern #ibizasweater or submit them to the #dropsfan gallery. Do you need help with this pattern?You'll find 19 tutorial videos, a Comments/Questions area and more by visiting the pattern on garnstudio.com. © 1982-2026 DROPS Design A/S. We reserve all rights. This document, including all its sub-sections, has copyrights. Read more about what you can do with our patterns at the bottom of each pattern on our site. |
||||||||||||||||||||||


With over 40 years in knitting and crochet design, DROPS Design offers one of the most extensive collections of free patterns on the internet - translated to 17 languages. As of today we count 324 catalogs and 12285 patterns - 12275 of which are translated into English (US/in).
We work hard to bring you the best knitting and crochet have to offer, inspiration and advice as well as great quality yarns at incredible prices! Would you like to use our patterns for other than personal use? You can read what you are allowed to do in the Copyright text at the bottom of all our patterns. Happy crafting!
Post a comment to pattern DROPS 153-12
We would love to hear what you have to say about this pattern!
If you want to leave a question, please make sure you select the correct category in the form below, to speed up the answering process. Required fields are marked *.