
Popular categories
Looking for a yarn?


Comments / Questions (108)
![]() Sabrina W. wrote:
Sabrina W. wrote:
Liebes Team, Ich stecke gerade an der linken Schulter und begreife die Vorgehensweise einfach nicht, wo beginne ich mit der ersten reihe der linken Schulter und wie geht es danach weiter?
14.12.2014 - 15:14DROPS Design answered:
Die 1. R der linken Schulter besteht ja aus folgenden Bestandteilen: A.5 (die 2. R von A.5), A.2 und A.3. Sie beginnen mit einer Hin-R mitten in der R ab der Stelle, an der Sie mit A.4 bei der rechten Schulter geendet haben, und häkeln bis zum Lm-Bogen, in den Sie A.5 häkeln müssen, Kett-M. Dann häkeln Sie A.5 (d.h. die 2. R, siehe Startpfeil), A.2 und A.3. Damit sind Sie wieder am Ärmelrand angelangt. In der Mitte befinden sich nun 4 bzw. 6 Rapporte (je nach Größe) von A.2, die nicht behäkelt wurden und den Halsausschnitt bilden.
06.03.2015 - 11:56Piret wrote:
Just finished this pattern. Easy and beautiful. My sleeves are not so long as they are on that picture but i love it.
04.11.2014 - 20:31
![]() Sara wrote:
Sara wrote:
Hej. Jag förstår inte riktigt hur man ska fästa de 10 lösa lm när man ska fortsätta på bakdelen efter man klippt av tråden. Har ni några bilder eller en video på detta?
21.10.2014 - 11:14DROPS Design answered:
Hej Sara, här ökar du i varje sida till ärmen, som virkas efter A.2 enligt beskrivningen. Om det är svårt att förstå, så fråga gärna i butiken där du har köpt garnet. Lycka till!
22.10.2014 - 15:48
![]() Amanda wrote:
Amanda wrote:
I am also confused after you cut the yarn for the back. Im making a small which says to ch 10 and coninue the pattern over the back. I need to know those exact steps. Do you ch 10 with the separate yarn and then attach with the tr st? It doesnt make sense why you would even need to cut the yarn
15.10.2014 - 20:03DROPS Design answered:
Dear Amanda, when piece measures 29 cm (size S), you cut the yarn after a RS row, and start again with a new ch of 10 ch, working next row over back piece (WS row) as before, then ch 10 at the end of row. That way, both underarm will start each side exactly the same way. Happy crocheting!
16.10.2014 - 09:32
![]() Tiziana wrote:
Tiziana wrote:
Non riesco a distinguere i diagrammi 1-2-3 mi sembra un unico diagramma. Potreste gentilmente spiegarmi come dovrei fare? Grazie e' un bel modello e vorrei iniziarlo!
27.09.2014 - 19:22DROPS Design answered:
Buongiorno Tiziana. Deve lavorare il diagramma A.1 sulle prime 8 m.b, poi ripetere il diagramma A.2 (2 m.a.doppie, 2 cat, 2 m.a.doppie nella stessa m.b) finché non rimangono 8 m.b; su queste 8 m.b lavora il diagramma A.3. Buon lavoro!
28.09.2014 - 16:47
![]() Dina wrote:
Dina wrote:
I have a little question - is it necessary to block this piece after finishing? Thank you in advance, and thank you for all the wonderful patterns, I LOVE your website!
08.09.2014 - 11:02DROPS Design answered:
Dear Dina, blocking can alway been done, it enhances a finished crocheted (or knitted) piece. Happy crocheting and thank you !
08.09.2014 - 13:27
![]() Sarah wrote:
Sarah wrote:
I love this pattern, but I am stuck at the rows beginning the sleeves. Is there any way that you can have a video tutorial on this part? I am on the back. I have finished the back, and tried to start on the chain 5, connecting to the back piece to start the sleeves. I would really appreciate a quick tutorial if that is at all possible.
20.08.2014 - 01:16DROPS Design answered:
Dear Sarah, on back piece, when you have cut the yarn, crochet a new ch with 5 ch, then work A.3, A.2 and A.1 on back piece as before, and crochet 5 ch t the end of row, turn and continue as explained. Happy crocheting!
20.08.2014 - 12:14
![]() Susan wrote:
Susan wrote:
I love these patterns but I'm not sure which size to make, have you got a sizing chart which explains what small ,medium etc means
15.07.2014 - 23:44DROPS Design answered:
Dear Suzan, you will find at the bottom of the pattern a measurement chart with all measurements for each size, in cm, from side to side. Compare these to a similar garment you have and like the shape to find the matching size. Happy crocheting!
16.07.2014 - 09:24
![]() Elena wrote:
Elena wrote:
Sto realizzando questo modello ma non capisco come fare le 4 maglie per il bordo davanti: devono essere alternate 1 riga 4 m.a.d e 1 riga 4 m.a. triple oppure due righe m.a.d. e 2 righe m.a.triple? Grazie
11.07.2014 - 15:30DROPS Design answered:
Buongiorno Elena, abbiamo modificato il testo per renderlo più comprensibile, comunque deve lavorare una riga di m.a.d e una riga di m.a.t. Buon lavoro!!
12.07.2014 - 15:23
![]() Jeanne wrote:
Jeanne wrote:
Str. S Rykken: hvor mange rapporter er der af A2 på det bredest stykke? Forstykke: Hvor mange rapporter er der af A2 på det bredest stykke. Det ville også være rart at vide antallet af A2 ved skuldresømmen. Det er første gang jeg hækler et større projekt. Synes blot at der mangler disse ledetråde så man ved at man er på rette vej. Pt. kan jeg ikke få skuldresømmen til at passe med samme antal rapporter. Håber I kan hjælpe.
27.06.2014 - 16:02DROPS Design answered:
Hej igen Jeanne, Når diagam A.5 bliver rettet og du får flere grupper i selve halsen, så vil antal grupper foran på skulderen også komme til at stemme med dem du har på rygstykket så du kan sy det pænt sammen.
14.08.2014 - 12:26
|
|||||||||||||||||||
Verano#veranocadigan |
|||||||||||||||||||
|
|
|||||||||||||||||||
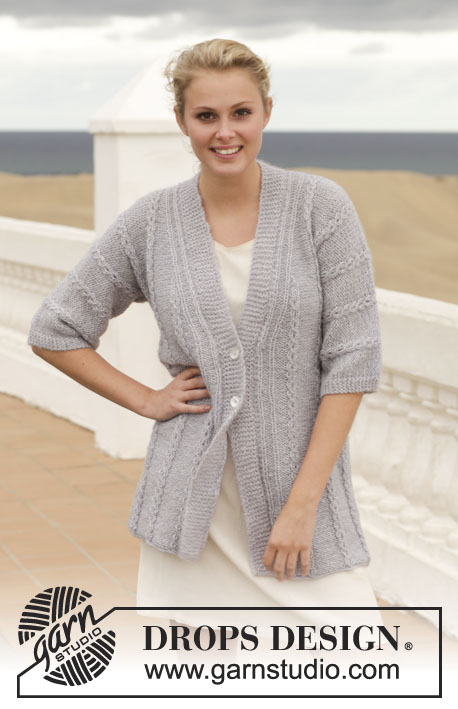
Crochet DROPS jacket with lace pattern and treble crochet in ”Cotton Merino”. Size: S - XXXL.
DROPS 153-14 |
|||||||||||||||||||
|
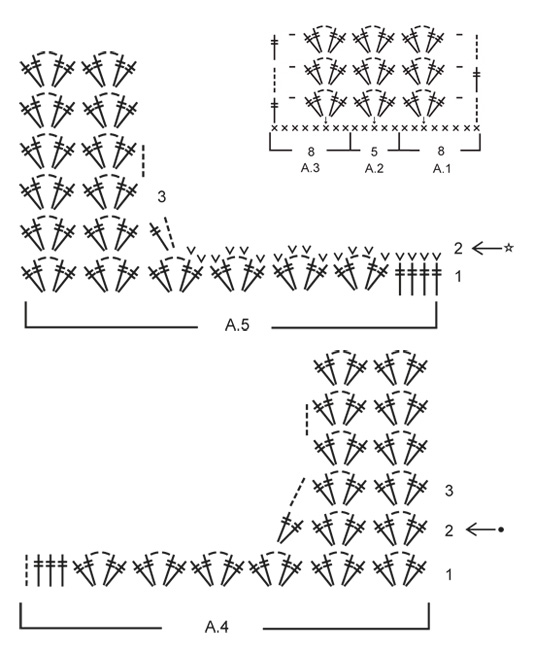
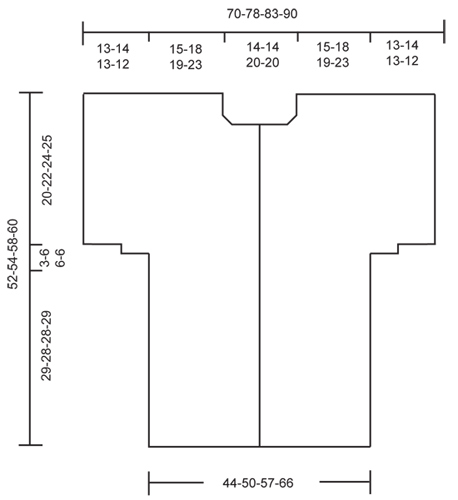
CROCHET INFO: Replace first tr at beg of every tr row with 4 ch. PATTERN: See diagrams A.1 - A.5. CROCHET TIP: ROW 1 in diagram A.4 and A.5 are not worked on back piece but on front piece. BUTTONHOLES: Do not dec for buttonholes but sew the buttons on to left band and button between two tr/dtr in right band. Sew on buttons measured from cast-on edge as follows: SIZE S/M: 12, 20, 28, 36 and 44 cm / 4¾",8",11",14¼",17¼" SIZE L/XL: 14, 22, 30, 38 and 46 cm / 5½",8¾",11¾",15",18" SIZE XXL: 10, 20, 30, 40 and 50 cm / 4",8",11¾",15¾",19¾" SIZE XXXL: 12, 22, 32, 42 and 52 cm / 4¾",8¾",12½",16½",20½" ---------------------------------------------------------- BACK PIECE: Worked back and forth. Work 83-95-108-120 ch on hook size 5 mm / H/8 with Cotton Merino. Work first row as follows (= WS): 1 sc in 2nd ch from hook = 1 sc, 1 sc in each of the next 1-3-1-3 ch, * skip ch 1, 1 sc in each of the next 4 ch *, repeat from *-* 16-18-21-23 times = 66-76-86-96 sc. Continue to work as follows: ROW 1 (= RS): Work A.1 1 time, then work A.2 until 8 sc remain (= 10-12-14-16 times in width) and finish with A.3 1 time. REMEMBER THE CROCHET GAUGE! ROW 2 (= WS): Turn piece and work A.3 1 time, A.2 (= 10-12-14-16 times in width), A.1 1 time. ROW 3 (= RS): Turn piece and work A.1 1 time, A.2 (= 10-12-14-16 times in width), A.3 1 time. Repeat 2nd and 3rd row until piece measures approx. 29-28-28-29 cm / 11½"-11"-11"-11½" - adjust to finish with 3rd row (= RS). Fasten off. Continue to work as follows: * Work 10-5-5-5 loose ch, beg from WS and continue A.3, A.2 and A.1 over back piece as before and finish with 10-5-5-5 loose ch, turn piece. Continue to work as follows: ROW 1 (= RS): Work ch 5, in 10th ch from hook work 2 tr + 2 ch + 2 tr (= 1 repetition of A.1), work A.2 2-1-1-1 time (work last repetition of A.2 around the 2 ch in A.1 from previous row). Then continue with A.2 10-12-14-16 times in total over the entire back piece as before and finish row as follows: Work A.2 around the 2 ch in A.3 from previous row, then continue with A.2 1-0-0-0 times, and then A.3 the last 1 tr will be in 1st ch on previous row. Finish with 1 tr in 1st ch on previous row. Cut the yarn and turn piece *, in size L/XL – XXL – XXXL repeat *-* 1 more time, AT THE SAME TIME work 2 extra repetitions of A.2 over back piece. I.e. work 1 extra repetition of A.2 over the inc repetition from previous row in each side of piece = 16-18-20 repetitions in total of A.2 in size L/XL – XXL – XXXL. NOTE! Do not repeat *-* in size S/M but continue as explained below: Work 13-13-13-13 loose ch, beg from WS and continue with A.2 in ch-space from A.3 on previous row, A.2 over sleeves and back piece as before, and A.2 in ch-space in A.1 on previous row and finish with 13-13-13-13 loose ch. Continue to work as follows: ROW 1 (= RS): Work A.1 and A.2 1 time over the new sts. Continue with A.2 over sleeves and back piece as before and finish with 1 repetition of A.2 and A.3. Continue this pattern until piece measures approx. 49-51-55-57 cm / 19¼"-20"-21½"-22½" - adjust to finish after a row from WS. Then finish each shoulder separately as follows: RIGHT SHOULDER: Work A.1 1 time and A.2 5-6-6-7 times in total, then work 2nd row of diagram A.4 – READ CROCHET TIP! Turn and work 3rd row of A.4, and continue row with A.2 and A.1 as before. Continue like this until piece measures 52-54-58-60 cm / 20½"-21¼"-22¾"-23½" in total. Fasten off. LEFT SHOULDER: Work left shoulder the same way but reversed, and work A.3 instead of A.1 and 2nd row of A.5 instead of A.4. Beg with 2nd row of A.5 in the middle of row, so that there are 4-4-6-6 repetitions of A.2 in width for neck. RIGHT FRONT PIECE: Worked back and forth. Work 45-52-58-64 ch on hook size 5 mm / H/8 with Cotton Merino. Work first row as follows (= WS): 1 sc in 2nd ch from hook, 1 sc in each of the next 4-1-2-3 ch, * skip ch 1, 1 sc in each of the next 4 ch *, repeat from *-* 7-9-10-11 times in total and finish with 1 sc in each of the next 4 ch = 37-42-47-52 sc. ROW 1 (= RS): 4 ch (= 1 tr), 1 tr in each of the next 3 sc (= 4 tr for band) NOTE: Work band with every other row tr and dtr. Then work A.2 5-6-7-8 times in total, finish with A.3 1 time. Repeat this pattern, with 4 tr/dtr for band towards mid front until piece measures approx. 29-28-28-29 cm / 11½"-11"-11"-11½" – adjust according to back piece and finish with a row from RS. Fasten off. Then work 10-5-5-5 loose ch for sleeve and continue as on back piece. When piece measures 42-44-46-48 cm / 16½"-17¼"-18"-19", work as follows on 1st row from WS: Pattern as before until 3 repetitions of A.2 and 4 tr remain. Work pattern according to diagram A.5 over these sts. Turn and work A.5, continue row with pattern as before. Continue like this back and forth until piece measures 52-54-58-60 cm / 20½"-21¼"-22¾"-23½" in total. Fasten off. LEFT FRONT PIECE: Work as right but reversed. Work according to diagram A.1 instead of A.3, and when neck dec beg, work according to A.4 instead of A.5. ASSEMBLY: Place front piece on top of back piece and work the shoulders as follows: * 1 sc through both layers, ch 3, skip 2 tr *, repeat from *-*. Work the sides tog as follows: 1 sc, * ch 3, 1 sc in ch-space on next row *, repeat from *-*. Work tog under sleeves as follows: * 1 sc in ch in next tr-group, 3 ch *, repeat from *-* and finish with 1 sc. Sew buttons on left band and button through two tr/dtr in right band. NECK EDGE: Work a neck edge as follows, beg from WS: ROW 1: Fasten yarn with 1 sc at the edge, * ch 3, skip approx. 2 cm / ¾", 1 sc *, repeat from *-* around the entire neck edge. Turn piece. ROW 2: ch 4, 3 tr in first ch-space, * 3 tr in next ch-space *, repeat from *-* along the entire row, and finish with 1 tr in first ch on previous row. Turn piece. ROW 3: * ch 3, skip 3 tr, 1 sc between the next two tr-groups *, repeat from *-* along the entire row. Turn piece. ROW 4: ch 2, 1 sc in first ch-space, * ch 2, 1 sc in next ch-space *, repeat from *-* along the entire row. Fasten off. |
|||||||||||||||||||
Diagram explanations |
|||||||||||||||||||
|
|||||||||||||||||||
 |
|||||||||||||||||||
 |
|||||||||||||||||||
Have you finished this pattern?Tag your pictures with #dropspattern #veranocadigan or submit them to the #dropsfan gallery. Do you need help with this pattern?You'll find 8 tutorial videos, a Comments/Questions area and more by visiting the pattern on garnstudio.com. © 1982-2026 DROPS Design A/S. We reserve all rights. This document, including all its sub-sections, has copyrights. Read more about what you can do with our patterns at the bottom of each pattern on our site. |
|||||||||||||||||||


With over 40 years in knitting and crochet design, DROPS Design offers one of the most extensive collections of free patterns on the internet - translated to 17 languages. As of today we count 324 catalogs and 12278 patterns - 12268 of which are translated into English (US/in).
We work hard to bring you the best knitting and crochet have to offer, inspiration and advice as well as great quality yarns at incredible prices! Would you like to use our patterns for other than personal use? You can read what you are allowed to do in the Copyright text at the bottom of all our patterns. Happy crafting!
Post a comment to pattern DROPS 153-14
We would love to hear what you have to say about this pattern!
If you want to leave a question, please make sure you select the correct category in the form below, to speed up the answering process. Required fields are marked *.