
Popular categories
Looking for a yarn?


Comments / Questions (37)
![]() Esther wrote:
Esther wrote:
Haben Sie einen Tipp wie ich die Ärmel am einfachsten annähen kann?
13.08.2014 - 21:38DROPS Design answered:
Liebe Esther, stecken Sie die Ärmel erst mit Stecknadeln fest, damit die Ärmel an der richtigen Stelle sitzen, achten Sie dabei darauf, dass die untere Ärmelnaht in die Seitennaht übergeht. Dann arbeiten Sie die Naht möglichst flach, d.h. Sie stechen in die äußeren M-Glieder ein.
15.08.2014 - 11:52
![]() Veronika wrote:
Veronika wrote:
Hallo, würde diese jacke gerne als pullover stricken. habt ihr da einen tipp oder auch 2 für mich?
29.06.2014 - 09:04DROPS Design answered:
Tipp 1: Schlagen Sie für das Vorderteil so viele M an wie für das Rückenteil (= 86-94-102-114-126-138 M), also insgesamt weniger als die beiden addierten Vorderteile (die Blenden fallen ja weg). Tipp 2: Stricken Sie wie beim Rücken, halten sich aber für den Beginn des Halsausschnitts bei den cm-Angaben an die Angaben der Vorderteile. Und zudem Tipp 3 ;-) : den Ausschnitt wie folgt: die mittleren 10-10-10-14-18-22 M stilllegen, dann wie beschrieben am Halsrand 4 M 1x, 2 M 2x & 1 M 1x abk.
29.06.2014 - 13:53
![]() Angie wrote:
Angie wrote:
I have a right front neck question. It says to knit the first 12 sts, then put them on a holder. I am at the beginning of row 5, and will have a DYO included in these sts - do they count as one stitch or two in this total of 12? Thanks again.
26.03.2014 - 19:40DROPS Design answered:
Dear Angie, put the first 12 sts on a st holder, ie the first 6 garter sts + the first 6 sts in pattern. Continue working in pattern, but work the sts that cannot be included in the pattern in stocking st. Happy knitting!
27.03.2014 - 10:19
![]() Angie wrote:
Angie wrote:
Instructions for right front neck say to place stitches on a holder and then work them first. From the holder, leaving the rest of shoulder hanging, to be done later, as in pieces? I don't understand. Thanks.
26.03.2014 - 18:39DROPS Design answered:
Dear Angie, work first the sts for neck before slipping them on a st holder (so that you don't have to cut the yarn). Happy knitting!
27.03.2014 - 10:16Patti wrote:
Brystmål angivet:40-44-48-53-59-65 cm. (=halve brystet)
16.03.2014 - 19:02
![]() Lykke wrote:
Lykke wrote:
Hvorfor er der ikke angivet feks brystmål så man kan vælge den korrekte størrelse ? vh Lykke
16.03.2014 - 11:40
![]() Maria wrote:
Maria wrote:
Hi, I love the pattern for this jacket/cardi. But could you give me the pattern stitches in writing as I'm not very good at deciphering the diagram.Regards Maria.
16.02.2014 - 20:14DROPS Design answered:
Dear Maria, to help you with pattern, don't forget we have knitting videos for these technique. First knit a swatch with M.1A, B and C + 1 edge st each side to follow step by step each row and get how the pattern works. Happy knitting!
17.02.2014 - 10:16Diane Andersen wrote:
I think the number of stiches for casting on the back is incorrect as the pattern is in multiples of 8 stitches eg, size med cast on 94 then there are 9 edge stitches so 94 less 18 leaves 76 which is not divisible by 8- I am struggling to find the correct number of stiches to cast on for the back in size Medium?
11.10.2013 - 22:41DROPS Design answered:
Dear Mrs Andersen, in size M, with 94 sts, you will work that way : 6 sts in garter st + 3 sts in M1A + 9.5 times the 8 sts in M1B (ie 9 times the full repeat + the first 4 sts in M1B) + 3 sts in M1C + 6 sts in garter sts. Happy knitting!
12.10.2013 - 09:03Raymonde Blain wrote:
Ce chandail est bien joli, mais le diagramme est très compliqué à suivre, voir même décourageant. Les carreaux du M.1C et du M1A ne devraient pas chevaucher le M1B, c'est trop de calcul. J'ai démissionné. merci quand même. Je suis déçue car je viens de terminer 2 chandails Drop design et j'ai trouvé les diagrammes faciles à exécuter.
26.05.2013 - 21:11DROPS Design answered:
Bonjour Mme Blain, le diagramme M.1 se décompose en 3 parties : le A qui se tricote sur les 3 premières m, le B que l'on répète jusqu'à ce qu'il reste 3 m et le C qui se tricote sur les 3 dernières mailles - vu sur l'endroit/en sens inverse sur l'envers : C,B à répéter et A. Entrainez-vous sur un petit nombre de mailles pour vous y habituer avant de commencer le gilet. Bon tricot!
27.05.2013 - 08:54Doris Farfan wrote:
El diagrama de este patrón muestra sólo las vueltas del derecho o las del derecho y revés?
16.01.2013 - 15:27DROPS Design answered:
Hola Doris, el patrón muestra todas las vueltas.
17.01.2013 - 13:39
|
|||||||||||||||||||||||||
Sunbeam#sunbeamcardigan |
|||||||||||||||||||||||||
 |
 |
||||||||||||||||||||||||
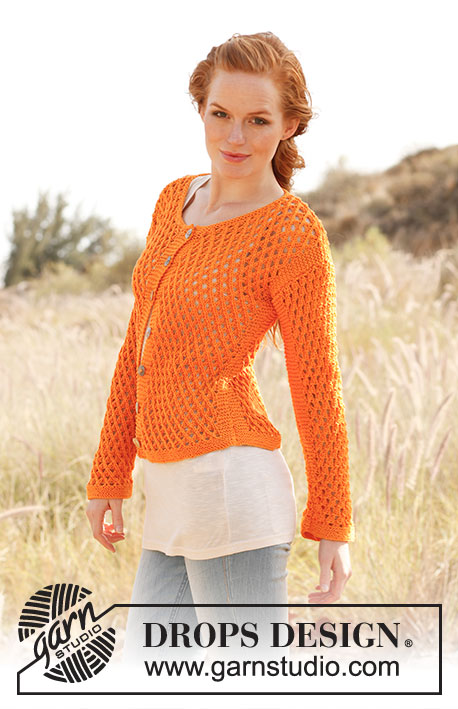
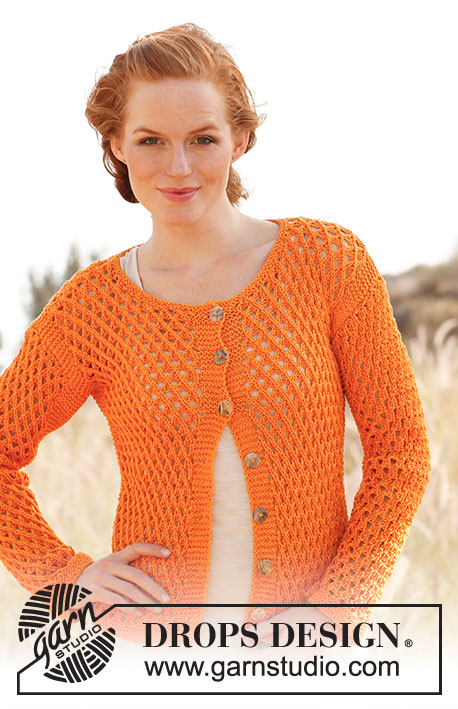
Knitted DROPS jacket with lace pattern in ”Muskat”. Size: S - XXXL
DROPS 139-12 |
|||||||||||||||||||||||||
|
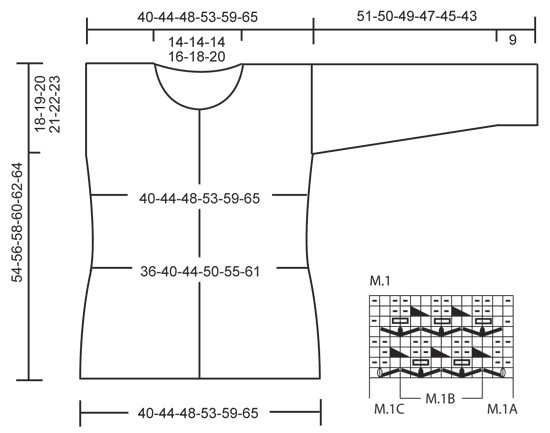
GARTER ST (back and forth on needle): K all rows. PATTERN: See diagram M.1. 1st row = RS. BUTTON HOLES: Bind off for button holes on right band from RS. 1 button hole = K tog 3rd and 4th st from mid front, then make 1 YO. Bind off for button holes when piece measures: SIZE S: 3, 10, 16, 23, 30, 37 and 43 cm / 1⅛",4",6¼",9",11¾",14½" and 17". SIZE M: 3, 10, 17, 24, 31, 38 and 44 cm / 1⅛",4",6¾",9½",12¼",15" and 17¼". SIZE L: 3, 10, 17, 24, 31, 38 and 45 cm / 1⅛",4",6¾",9½",12¼",15" and 17¾". SIZE XL: 3, 11, 18, 25, 32, 39 and 46 cm / 1⅛",4⅜",7",9¾",12½",15¼" and 18". SIZE XXL: 3, 11, 18, 25, 32, 40 and 47 cm / 1⅛",4⅜",7",9¾",12½",15¾" and 18½". SIZE XXXL: 3, 11, 18, 26, 33, 41 and 48 cm / 1⅛",4⅜",7",10¼",13",16⅛" and 19". (NOTE: bind off for last button hole when only 2 rows remain before neck dec.) -------------------------------------------------------- BACK PIECE: Worked back and forth on needle. Cast on 86-94-102-114-126-138 sts (includes 1 edge st in each side) on needle size 3 mm / US 2or3 with Muskat. Work 10 rows in GARTER ST - see explanation above. Switch to needle size 4 mm / US 6 and work as follows (seen from RS): 6 sts in garter st, diagram M.1A (= 3 sts), diagram M.1B until 9 sts remain, diagram M.1C and 6 sts in garter st. When piece measures 4 cm / 1½", dec 1 st in each side by K tog the next to last 2 sts in garter st in each side. Repeat dec every 4 cm / 1½" 3 more times = 78-86-94-106-118-130 sts (there are now only 2 sts in garter st in each side). When piece measures 20 cm / 8", inc 1 st in each side by working 2 sts in next to last st in garter st in each side. Repeat inc every 4 cm / 1½" 3 more times (work the inc sts in garter st) = 86-94-102-114-126-138 sts (there are now 6 sts in garter st in each side again). When piece measures 36-37-38-39-40-41 cm / 14¼"-14½"-15"-14¼"-15¾"-16⅛", bind off 1 st in each side for armholes = 84-92-100-112-124-136 sts. Then work diagram M.1 with 5 sts in garter st in each side. When piece measures 52-54-56-58-60-62 cm / 20½"-21¼"-22"-22¾"-23⅝"-24⅜", bind off the middle 30-30-30-34-38-42 sts for neck on next row from WS. Finish each shoulder (= 27-31-35-39-43-47 sts) separately - continue pattern as follows: LEFT SHOULDER (seen from RS): Diagram M.1A (towards neck), diagram M.1B until 8 sts remain, diagram M.1C and 5 sts in garter st towards armhole. When piece measures approx. 54-56-58-60-62-64 cm / 21¼"-22"-22¾"-23⅝"-24⅜"-25¼", bind off all sts from WS. RIGHT SHOULDER: Work as follows (seen from RS): 5 sts in garter st towards armhole, diagram M.1A, diagram M.1B until 3 sts remain, diagram M.1C (towards neck). Bind off when at the same length as left shoulder. RIGHT FRONT PIECE: Cast on 50-54-58-62-70-78 sts (includes 1 edge st in the side and 6 band sts towards mid front) on needle size 3 mm / US 2or3 with Muskat. Work 10 rows in garter st. Switch to needle size 4 mm / US 6 and work as follows (seen from RS): 6 band sts in garter st, diagram M.1A, diagram M.1B until 9 sts remain, diagram M.1C and 6 sts in garter st. Continue like this - AT THE SAME TIME when piece measures 3 cm / 1⅛", beg to bind off for BUTTON HOLES – see explanation above! When piece measures 4 cm / 1½", beg dec in the side as on back piece and when piece measures 20 cm / 8", beg inc in the side as on back piece. After all dec and inc there are 50-54-58-62-70-78 sts on the needle. When piece measures 36-37-38-39-40-41 cm / 14¼"-14½"-15"-14¼"-15¾"-16⅛", bind off 1 st in the side for armhole = 49-53-57-61-69-77 sts. Continue diagram M.1 with 5 sts in garter st towards the side and 6 sts in garter st towards mid front. When piece measures 44-45-46-47-48-49 cm / 17¼"-17¾"-18"-18½"-19"-19¼", slip the 12-12-12-12-16-20 sts towards mid front on a stitch holder for neck (work them first). Then bind off at beg of every row from neck: 4 sts 1 time, 2 sts 2 times and 1 st 2 times = 27-31-35-39-43-47 sts remain on shoulder. Continue pattern as follows (seen from RS): Diagram M.1A (towards neck), diagram M.1B until 8 sts remain, diagram M.1C and 5 sts in garter st (towards armhole). Bind off all sts from WS when piece measures approx. 54-56-58-60-62-64 cm / 21¼"-22"-22¾"-23⅝"-24⅜"-25¼". LEFT FRONT PIECE: Cast on and work as right piece but reversed. Work the shoulder as follows (seen from RS): 5 sts in garter st (towards armhole), diagram M.1A, diagram M.1B until 3 sts remain, diagram M.1C (towards neck). SLEEVE: Cast on 56-56-56-60-60-64 sts (includes 1 edge st in each side) on needle size 3 mm / US 2or3 with Muskat. Work 10 rows in garter st. Switch to needle size 4 mm / US 6 and work as follows (seen from RS): 1 st in garter st, diagram M.1A, diagram M.1B until 4 sts remain, diagram M.1C and 1 st in garter st. Continue like this. When piece measures 9 cm / 3½", inc 1 st in each side which is worked in garter st. Repeat inc every 4-3-2½-2½-2-2 cm / 1½"-1⅛"-⅞"-⅞"-¾"-¾" a total of 11-13-15-15-17-17 times (work the inc sts in garter st) = 78-82-86-90-94-98 sts. When piece measures 51-50-49-47-45-43 cm / 20"-19¾"-19¼"-18½"-17¾"-17" (shorter measurements in the larger sizes because of wider shoulders), bind off all sts. ASSEMBLY: Sew the shoulder seams. NECK EDGE: Pick up approx. 90 to 120 sts around the neck on needle size 3 mm / US 2or3 with Muskat (including sts on stitch holders at the front). K 3 rows back and forth, bind off with K. ASSEMBLY: Sew in sleeves and sew under arm and side seams in one inside 1 edge st. Sew on buttons. |
|||||||||||||||||||||||||
Diagram explanations |
|||||||||||||||||||||||||
|
|||||||||||||||||||||||||
 |
|||||||||||||||||||||||||
Have you finished this pattern?Tag your pictures with #dropspattern #sunbeamcardigan or submit them to the #dropsfan gallery. Do you need help with this pattern?You'll find 10 tutorial videos, a Comments/Questions area and more by visiting the pattern on garnstudio.com. © 1982-2026 DROPS Design A/S. We reserve all rights. This document, including all its sub-sections, has copyrights. Read more about what you can do with our patterns at the bottom of each pattern on our site. |
|||||||||||||||||||||||||


With over 40 years in knitting and crochet design, DROPS Design offers one of the most extensive collections of free patterns on the internet - translated to 17 languages. As of today we count 324 catalogs and 12290 patterns - 12280 of which are translated into English (US/in).
We work hard to bring you the best knitting and crochet have to offer, inspiration and advice as well as great quality yarns at incredible prices! Would you like to use our patterns for other than personal use? You can read what you are allowed to do in the Copyright text at the bottom of all our patterns. Happy crafting!
Post a comment to pattern DROPS 139-12
We would love to hear what you have to say about this pattern!
If you want to leave a question, please make sure you select the correct category in the form below, to speed up the answering process. Required fields are marked *.