
Popular categories
Looking for a yarn?


Comments / Questions (74)
Jennifer wrote:
I am blocked at first repeat of M2 : I have 13 stiches (after the 2 edge ones) up till the stich marker. If I do M2A over 2 stiches, then M2B over the next 8 stiches as indicated in the pattern, this does not take me to the stich marker. I hope you can explain clearly because it has been a big knit to get this far .... thank you.
01.03.2015 - 18:17DROPS Design answered:
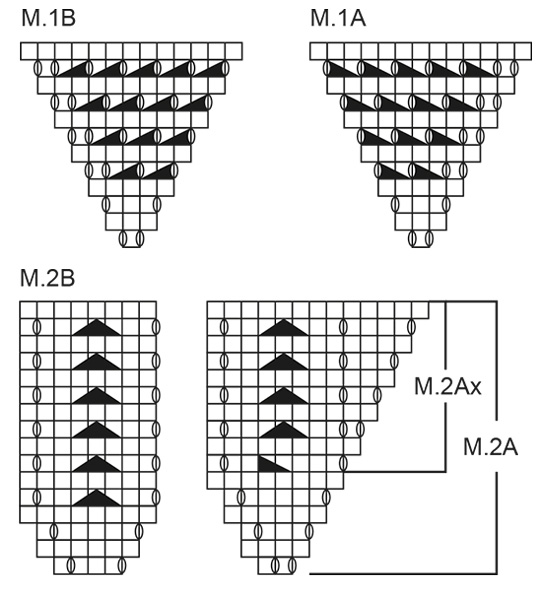
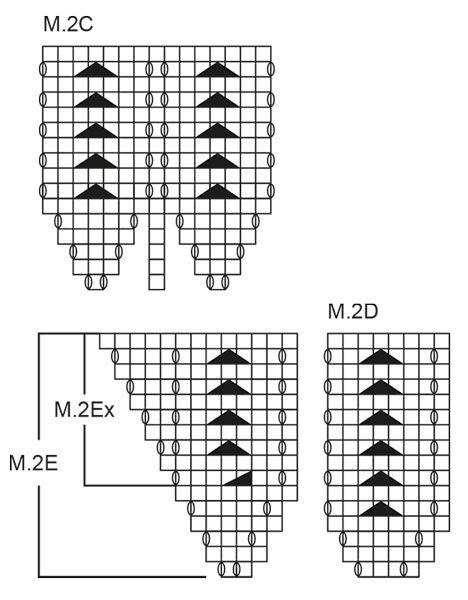
Dear Jennifer, before working M2 you should have worked M1 increasing 4 sts on every row worked from RS until shawl measures approx. 4 cm along mid back. When working then 1st repeat of M2, you first work 2 sts garter st, then M2A over the first 2 sts, then repeat M2B until 3 mid sts (= the middle st + 1 st each side), work M2C over these 3 sts, repeat M2D over the next sts until 4 sts remain, work M2E over the next 2 sts and finish with 2 sts in garter st. Happy knitting!
02.03.2015 - 10:00
![]() Adelina wrote:
Adelina wrote:
Buonasera! Nel pattern dice " intrecciare con due capi", quindi bisogna utilizzare il filato messo doppio? Grazie!
27.01.2015 - 01:25DROPS Design answered:
Buongiorno Adelina. Sì è corretto: bisogna intrecciare le m con il filato messo doppio. Buon lavoro!
27.01.2015 - 08:58Grethe Hansen wrote:
Jeg er lige blevet færdig med Rosita, opskrift 139-2. Der skal tages ud hele vejen i mønster M2C, og de nye masker strikkes med i mønsteret. Dette er ikke forklaret i opskriften, og det var først efter jeg havde kigget på den engelske oversættelse, at jeg forstod, hvordan det skulle gøres
26.08.2014 - 11:22
![]() Wiegand wrote:
Wiegand wrote:
1x heißt es Länge 60 cm und dann wieder Länge 75 cm, beide Male leicht gespannt. Was stimmt denn nun?
27.04.2014 - 11:48DROPS Design answered:
Liebe Frau Wiegand, die 75 cm beziehen sich auf das Endergebnis, nachdem Sie das Tuch wie beschrieben gespannt haben. Die 60 cm beziehen sich auf das Maßnehmen während des Strickens, hierbei strecken Sie das Tuch leicht. Beim abschließenden Spannen wird das Tuch noch weiter gedehnt.
28.04.2014 - 00:07
![]() Erika wrote:
Erika wrote:
Ich habe M1 beendet, nun steht in einem Kommentar, daß aus der Mittelmasche nur 3 anstelle von 5 M.aufgenommen werden, ist das richtig und warum wird das nicht im Strickmuster geändert? Ich warte mit dem Weitermachen besser auf eine -hoffentlich- schnelle Antwort und vielen Dank dafür. Gruß Erika
27.03.2014 - 07:56DROPS Design answered:
Liebe Erika, die Anleitung sollte stimmen, wie sie ist - Sie müssen vor M.2 aus der mittleren M 5 M herausstricken (also 4 Zunahmen machen), damit das Muster M.2 dann aufgeht.
30.03.2014 - 12:10
![]() Erika Wiegand wrote:
Erika Wiegand wrote:
Wer kann mir sagen, wieviel Maschen (in etwa) nach 42 cm auf der Nadel sein müssen? Allein kann man das schlecht messen. Danke und viele Grüße E. Wiegand
24.02.2014 - 16:23DROPS Design answered:
Liebe Frau Wiegand, die Maschenanzahl ist nicht so wichtig, Sie stricken das Tuch so lange, bis es die passende Größe hat. Die Musterfolge, die Sie nach 42 cm stricken, passt zu jeder Maschenzahl, denn Sie nehmen ja in jeder Hin-R 4 M zu, sodass immer genügend M für M.2B und M2.D vorhanden sind. Viel Spaß beim Weiterstricken!
25.02.2014 - 13:50
![]() LONE wrote:
LONE wrote:
Skal jeg starte forfra på mønster M2A med pind 1 og fortsætte videre til M2B også fra pind 1 osv
03.10.2013 - 11:37
![]() LONE wrote:
LONE wrote:
Hvordan starter jeg mønster 2 efter de første 16 pinde
03.10.2013 - 08:21DROPS Design answered:
Du fortsætter på nøjagtig samme måde som på de første 14 pinde, samtidig som du fortsætter med at tage ud som du har gjort hele tiden.
03.10.2013 - 10:58
![]() Johanna wrote:
Johanna wrote:
Is there a mistake in the finnish pattern? If you work in the beginning first M1 A and then M1 B, you won't get a similar look as in the picture. Shouldn't it be the other way round?
15.08.2013 - 11:59DROPS Design answered:
Hi! The pattern is correct. You start with pattern M1 A, then work M1 B.
19.08.2013 - 13:51
![]() Nicci wrote:
Nicci wrote:
Aha, maar de M.2A plaats ik dan wel vóór die tricotsteken? Dus toer 17: M.2A (= 2st.), 3 tricot; toer 19: M.2A, 4 tricot enz.?
28.03.2013 - 15:40DROPS Design answered:
Ja, dat klopt. Het is een heel goed idee om hier met de markeerders te werken zo je precis weet waar de scheiding tussen de motieven zijn.
03.05.2013 - 16:52
|
||||||||||||||||
Rosita#rositashawl |
||||||||||||||||
 |
 |
|||||||||||||||
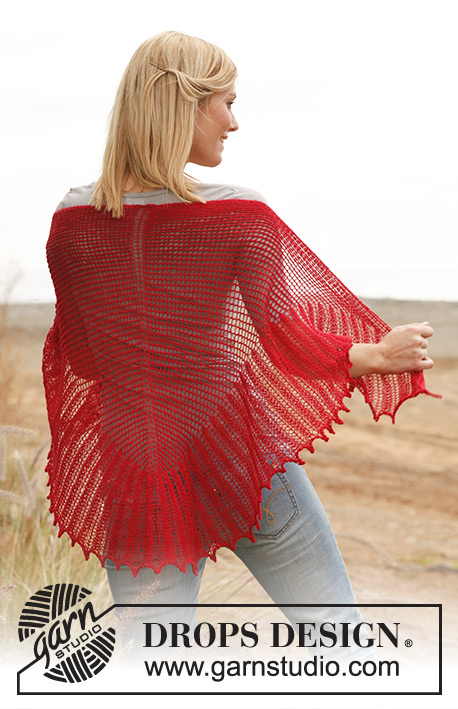
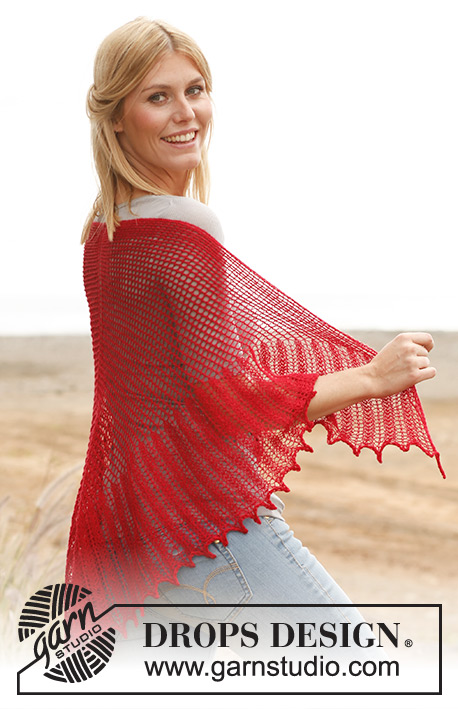
Knitted DROPS shawl with lace pattern in "Lace".
DROPS 139-2 |
||||||||||||||||
|
KNITTING GAUGE: This garment is to be soaked and blocked/stretched to size afterwards so the knitting gauge is not that important but to get a sense of whether you are working too loose/tight, work a test on needle size 3.5 mm / US 4 in stockinette st and get approx. 23 sts x 30 rows = 10 x 10 cm / 4" x 4". GARTER ST (back and forth on needle): K all rows. PATTERN: See diagrams M.1 and M.2. Diagrams show pattern from RS. Pattern in diagram M.1A is reversed from pattern in diagram M.1B. INCREASE TIP: Work 5 sts in 1 st as follows: K 1, 1 YO, K 1, 1 YO, K 1. NOTE: To avoid a "fragile" middle st when inc 5 sts in this st, knit up sts both through middle st on needle and middle st from previous row at the same time. --------------------------------------------------------- SHAWL: Worked back and forth on circular needle, work from mid back of neck and down. Cast on 3 sts on circular needle size 3.5 mm / US 4 with Lace. Work as follows: Row 1: K 2 sts in 1st and 2nd st, and K 1 st in 3rd st = 5 sts. Row 2: K all sts. Row 3: K 1, K 2 sts in next st, insert a marker in next st (mid st), K 2 sts in next st, K 1 = 7 sts. Row 4: K all sts. Row 5 (WS): K 2 (= edge sts), P 3 and K 2 (= edge sts). Continue as follows: 2 edge sts in GARTER ST - see explanation above, diagram M.1A, 1 mid st in stockinette st, diagram M.1B and 2 edge sts in garter st. When diagram M.1 has been worked, continue inc and pattern the same way, i.e. inc 4 sts on every row from RS. Work until the shawl measures approx. 42 cm/ 16½" – measure mid back and lightly pull when measuring (finish after 1 row from WS). Continue in pattern and on next row (= from RS) inc mid st to 5 sts (4 sts inc) – SEE INCREASE TIP. Work one more row from the WS – purl the inc sts. Continue with diagram M.2 as follows: 2 sts in garter st, diagram M.2A over the first 2 sts, insert a marker, then diagram M.2B until the 3 sts in the middle (the middle st and 1 st on each side of this st), insert a marker, work the 3 middle sts in diagram M.2C, insert a marker, continue with diagram M.2D until 4 sts remain, insert a marker, work diagram M.2E over 2 sts and the last 2 sts in garter st. Continue pattern like this until a total of 20 rows of M.2 have been worked. Continue as follows: 2 sts in garter st, diagram M.2Ax over the next 8 sts, continue the rest of the pattern as before until 10 sts remain, work M.2Ex over the next 8 sts, 2 sts in garter st. Continue like this, incorporating new sts each side in pattern until piece measures approx. 60 cm / 23½" mid back (with a light pull). Bind off with 2 strands as follows: K 2 sts, slip them back on left needle and K them twisted tog (i.e. work in back loop of st instead of front). * Work 1 more st (= 2 sts on right needle), slip them back on the left needle, K them twisted tog *, repeat from *-* until all sts have been bind off. This is done to make the edge elastic for blocking. BLOCKING: Place the shawl in lukewarm water until it is soaking wet. Carefully squeeze the water out of the shawl - do not twist the shawl - then roll the shawl in a towel and squeeze to remove more water - the shawl will now only be moist. Place the shawl on a carpet or mattress - carefully stretch it out to size and fasten it with pins. Leave to dry. Repeat the process when the garment has been washed. |
||||||||||||||||
Diagram explanations |
||||||||||||||||
|
||||||||||||||||
 |
||||||||||||||||
 |
||||||||||||||||
Have you finished this pattern?Tag your pictures with #dropspattern #rositashawl or submit them to the #dropsfan gallery. Do you need help with this pattern?You'll find 8 tutorial videos, a Comments/Questions area and more by visiting the pattern on garnstudio.com. © 1982-2026 DROPS Design A/S. We reserve all rights. This document, including all its sub-sections, has copyrights. Read more about what you can do with our patterns at the bottom of each pattern on our site. |
||||||||||||||||


With over 40 years in knitting and crochet design, DROPS Design offers one of the most extensive collections of free patterns on the internet - translated to 17 languages. As of today we count 324 catalogs and 12290 patterns - 12280 of which are translated into English (US/in).
We work hard to bring you the best knitting and crochet have to offer, inspiration and advice as well as great quality yarns at incredible prices! Would you like to use our patterns for other than personal use? You can read what you are allowed to do in the Copyright text at the bottom of all our patterns. Happy crafting!
Post a comment to pattern DROPS 139-2
We would love to hear what you have to say about this pattern!
If you want to leave a question, please make sure you select the correct category in the form below, to speed up the answering process. Required fields are marked *.