
Popular categories
Looking for a yarn?


Comments / Questions (132)
![]() Nichole wrote:
Nichole wrote:
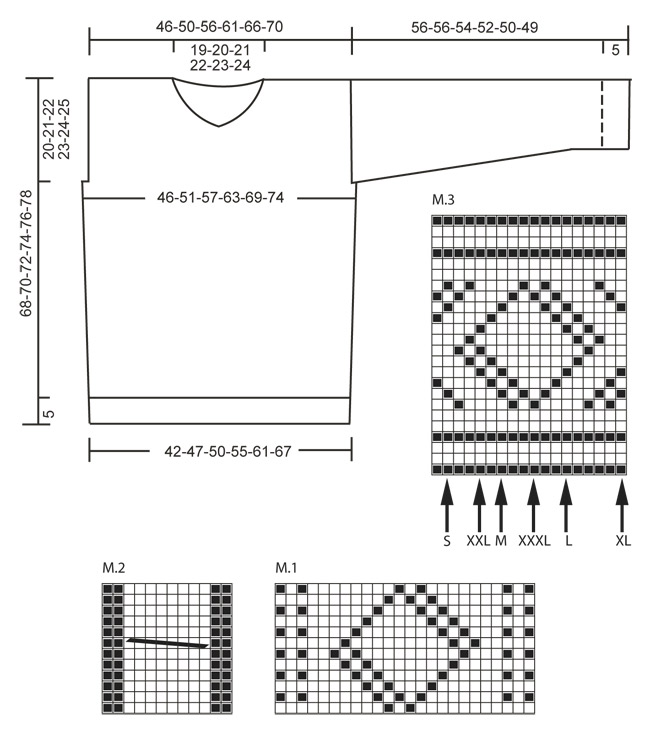
Hey there! I'm working on the back piece(doing size L) and I'm having a very hard time making diagram M.3 work. Is there a tutorial video I can watch? I've gone to a knitting store owner for help and tried everything I can think of but it just doesn't want to line up correctly. Help! :) Thanks.
04.07.2014 - 03:43DROPS Design answered:
Dear Nichole, start diagram at the arrow for your size and read from RS towards the left, at the end of diagram repeat diagram from the beg (still from the right towards the left.) and mark the st you end with. When working from WS, start on this st reading from the right towards the left and repeat diagram same way. Happy knitting!
04.07.2014 - 08:42
![]() De Gueldre Annelies wrote:
De Gueldre Annelies wrote:
Bij de beschrijving staat dat de teleprocessing de goede kant van het werk aangeven maar bij heen en weer breien geeft dat wel problemen gemakkelijker om met rondbreinaalden te breien anders pas om de 18 naalden pas een kabel en de tekening van de ruiten was ook niet zo mooi daarom heb ik met rondbreinaalden gewerkt
23.05.2014 - 10:25
![]() Erika wrote:
Erika wrote:
Hallo,ich habe den Pullover auch in der Grösse XXXL gestrickt.Sieht super aus!Ich habe aber die Ärmeln um 5 cm verlängert.Hat mir trotzdem 1000 gr Wolle gereicht.Danke für die Anleitung.
07.04.2014 - 14:25
![]() Katia wrote:
Katia wrote:
Buonasera, è possibile realizzare questo modello con i ferri circolari o è sconsigliato? Nel caso in che modo dovrei modificare l'esecuzione? Grazie
11.03.2014 - 21:08DROPS Design answered:
Buonasera Katia, la maggior parte dei modelli DROPS è lavorata in tondo senza cuciture; a volte i modelli vengono lavorati a pezzi e poi cuciti alla fine: questo serve per capi che hanno bisogno di più struttura, il modello cucito è più resistente rispetto ad un modello lavorato in tondo. Può comunque decidere di lavorare il modello senza cuciture. Buon lavoro!!
12.03.2014 - 14:19
![]() Birgit wrote:
Birgit wrote:
Sorry, natürlich für die Größe "XXXL"
24.01.2014 - 10:14
![]() Birgit wrote:
Birgit wrote:
Der Pullover ist jetzt fertig und sieht toll aus! Für die Größe XXL habe ich insgesamt 1150g Wolle benötigt.
24.01.2014 - 10:13
![]() Jolanda wrote:
Jolanda wrote:
Bij de mouwen moet je bij maat XL 18x meerderen. Dit betekent dat je op een gegeven moment weer in het oatroon komt dat je de kabel moet breien. Wanneer begin je met de kabel, als je 10 steken hebt gemeerderd of eerder of later?
17.01.2014 - 21:49DROPS Design answered:
Hoi Jolanda. Je breit alleen de kabel 1 keer op de mouw (zie foto). brei de gemeerderde st in tricotst.
22.01.2014 - 17:25
![]() Kim Fay wrote:
Kim Fay wrote:
Diagram M3 has arrows to indicate where to start knitting when the jumper reaches the shaping. Once I've knit the remaining 7 stitches of pattern, do I start again from the far right, repeating the whole block or do I only knit the 7 stitches? Thank you, Kim in Hampshire UK.
11.01.2014 - 12:20DROPS Design answered:
Dear Mrs Fay, diag is read from RS from right towards left and from WS from left towards right. Mark in the diagram where you stopped and start again from this point, reading towards the right from WS. Happy knitting!
13.01.2014 - 08:54
![]() Jolanda wrote:
Jolanda wrote:
Ik heb het achterpand klaar. De boord krult erg naar binnen. Hoort dit of doe ik iets niet goed? Is dit nog te verhelpen?
09.01.2014 - 11:55DROPS Design answered:
Hoi Jolanda. Is de boord te strak of te kort kan het gaan krullen. Maar vaak zal dit verdwijnen als het model klaar is en gewassen.
09.01.2014 - 12:23
![]() Birgit wrote:
Birgit wrote:
Danke für die schnelle Antwort. Die Maschenzahl und die Zentimeterangabe stimmen überein und ich habe das Originalgarn (sogar die gleiche Farbe) verwendet!
20.12.2013 - 07:05DROPS Design answered:
Liebe Birgit, bitte schreiben Sie uns, wie viel Material Sie insgesamt benötigt haben, wir werden das dann an unsere Designabteilung weiterleiten.
20.12.2013 - 15:10
|
||||||||||
Sir Lancelot#sirlancelotsweater |
||||||||||
|
|
||||||||||
Men's knitted sweater with textured pattern and v-neck, in DROPS Karisma. Sizes S to XXXL
DROPS 135-36 |
||||||||||
|
GARTER ST (back and forth on needle): K all rows. PATTERN: See diagrams M.1 to M.3 – diagrams show pattern from RS. M.1 = 24 sts in width, M.2 = 12 sts in width and M.3 = 18 sts in width. -------------------------------------------------------- BACK PIECE: Worked back and forth on needle. Cast on 110-122-134-146-158-170 sts (includes 1 edge st in each side) on needle size 3 mm / US 2or3 with Karisma. Work rib as follows (seen from from RS): 1 edge st in GARTER ST - see explanation above, * K 1, P 3 *, repeat from *-*, finish with 1 edge st in garter st. When rib measures approx. 5 cm / 2" (adjust so that next row is worked from WS), switch to needle size 4 mm / US 6. P 1 row from WS while at the same time dec 12 sts evenly = 98-110-122-134-146-158 sts. Work next row as follows (from RS): SIZE S: 1 edge st in garter st, diagram M.1, M.2, M.1, M.2, M.1 and 1 edge st in garter st. SIZE M: 1 edge st in garter st, 6 sts in stockinette st, diagram M.1, M.2, M.1, M.2, M.1, 6 sts in stockinette st and 1 edge st in garter st. SIZE L: 1 edge st in garter st, diagram M.2, M.1, M.2, M.1, M.2, M.1, M.2 and 1 edge st in garter st. SIZE XL: 1 edge st in garter st, 6 sts in stockinette st, diagram M.2, M.1, M.2, M.1, M.2, M.1, M.2, 6 sts in stockinette st and 1 edge st in garter st. SIZE XXL: 1 edge st in garter st, 12 sts of diagram M.1 – start in the 13th st from the right side in diagram, diagram M.2, M.1, M.2, M.1, M.2, M.1, M.2 and 12 sts of diagram M.1 – start in first st in diagram - and 1 edge st in garter st. SIZE XXXL: 1 edge st in garter st, 18 sts of diagram M.1 – start in the 7th st from the right side in diagram, diagram M.2, M.1, M.2, M.1, M.2, M.1, M.2 and 18 sts of diagram M.1 – start in first st in diagram - and 1 edge st in garter st. ALL SIZES: Continue to work the same way until piece measures 48-49-50-51-52-53 cm / 19"-19¼"-19¾"-20"-20½"-21". REMEMBER THE GAUGE! Now bind off 1-2-2-3-4-5 sts in each side for armholes (i.e. Bind off at the beg of the next 2 rows) = 96-106-118-128-138-148 sts. Continue the pattern as before with 1 edge st in garter st in each side. When piece measures approx. 58-60-62-64-66-68 cm / 22¾"-23⅝"-24⅜"-25¼"-26"-26¾" (adjust after 1 half repetition or 1 whole repetition of diagram M.1 and M.2 vertically), work 2 rows in stockinette st, then continue with diagram M.3 over all sts (except edge st) – see arrow for your size; this marks the stitch in witch to begin in the diagram. AT THE SAME TIME when 4 rows remain of diagram M.3, bind off the middle 36-38-40-42-44-46 sts for neck and finish each shoulder separately. Continue to bind off 2 sts on next row from neck = 28-32-37-41-45-49 sts remain on the shoulder. When diagram M.3 has been worked, work approx. 1 cm / ⅜" in stockinette st, then bind off. Piece measures approx. 68-70-72-74-76-78 cm / 26¾"-27½"-28⅜"-29⅛"-30"-30¾". FRONT PIECE: Cast on and work as back piece. Bind off for armhole each side as on back piece and continue until piece measures approx. 58-60-62-64-66-68 cm / 22¾"-23⅝"-24⅜"-25¼"-26"-26¾". On next row from RS K1 row over all sts and on this row bind off the middle 4 sts for neck. Now finish each shoulder separately. From WS P back and then work pattern as on back piece (make sure that diagram M.3 is worked the same way on each side of neck) – AT THE SAME TIME bind off on every row starting from neck: 2 sts 5-6-7-8-9-10 times and then 1 st 8-7-6-5-4-3 times = 28-32-37-41-45-49 sts remain on shoulder. Bind off when same no of rows has been worked as on back piece. SLEEVE: Worked back and forth on needle. Cast on 62 sts for all sizes (includes 1 edge st in each side) on needle size 3 mm / US 2or3 with Karisma. Work rib as follows (seen from from RS): 1 edge st in garter st, * K 1, P 3 *, repeat from *-*, finish with 1 edge st in garter st. When piece measures approx. 5 cm / 2" (adjust so that next row is worked from WS), switch to needle size 4 mm / US 6. P 1 row from WS. Work next row as follows: 1 edge st in garter st, diagram M.1, M.2, M.1 and 1 edge st in garter st, continue like this. When piece measures 9 cm / 3½", inc 1 st in each side. Repeat inc every 9th-8th-6th-5th-4th-4th row a total of 12-14-16-18-20-21 times - work the inc sts in stockinette st = 86-90-94-98-102-104 sts. When piece measures approx. 46-46-44-42-40-39 cm / 18"-18"-17¼"-16½"-15¾"-15¼" (adjust after 1 half or 1 whole repetition of diagram M.1 and M.2 vertically, inc should be finished), work 2 rows in stockinette st, then continue with diagram M.3 – start in first st on right side of diagram (the pattern will not fit at the end of row). After diagram M.3 work (if there is room) in stockinette st until piece measures 56-56-54-52-50-49 cm / 22"-22"-21¼"-20½"-19¾"-19¼" (shorter measurements in the larger sizes because of broader shoulder width), bind off. ASSEMBLY: Sew the shoulder seams. NECK: Pick up approx. 119 to 139 sts (divisible by 4 + 3) around the neck on circular needle size 3 mm / US 2or3 with Karisma – beg mid front. Then the piece is worked back and forth from mid front. First row from WS is worked as follows: 1 edge st in garter st, * P 1, K 3 *, repeat from *-* and finish with P 1 and 1 edge st in garter st. Continue with K over K and P over P and edge st in garter st until neck edge measures approx. 6 cm / 2½". Bind off with K over K and P over P. Place the neck on top of each other mid front, left side over right, fasten with neat stitches from both WS and RS. Sew the sleeves inside 1 edge st. Sew sleeve and side seams in one inside 1 edge st. |
||||||||||
Diagram explanations |
||||||||||
|
||||||||||
 |
||||||||||
Have you finished this pattern?Tag your pictures with #dropspattern #sirlancelotsweater or submit them to the #dropsfan gallery. Do you need help with this pattern?You'll find 18 tutorial videos, a Comments/Questions area and more by visiting the pattern on garnstudio.com. © 1982-2026 DROPS Design A/S. We reserve all rights. This document, including all its sub-sections, has copyrights. Read more about what you can do with our patterns at the bottom of each pattern on our site. |
||||||||||


With over 40 years in knitting and crochet design, DROPS Design offers one of the most extensive collections of free patterns on the internet - translated to 17 languages. As of today we count 324 catalogs and 12290 patterns - 12280 of which are translated into English (US/in).
We work hard to bring you the best knitting and crochet have to offer, inspiration and advice as well as great quality yarns at incredible prices! Would you like to use our patterns for other than personal use? You can read what you are allowed to do in the Copyright text at the bottom of all our patterns. Happy crafting!
Post a comment to pattern DROPS 135-36
We would love to hear what you have to say about this pattern!
If you want to leave a question, please make sure you select the correct category in the form below, to speed up the answering process. Required fields are marked *.