
Popular categories
Looking for a yarn?


Comments / Questions (94)
![]() Susanna wrote:
Susanna wrote:
Hej, Jag känner mig osäker på vilken storlek jag ska välja och hittar ingen storleksguide på siten, kan ni vägleda mig? Vänliga hälsningar Susanna
18.08.2013 - 11:57DROPS Design answered:
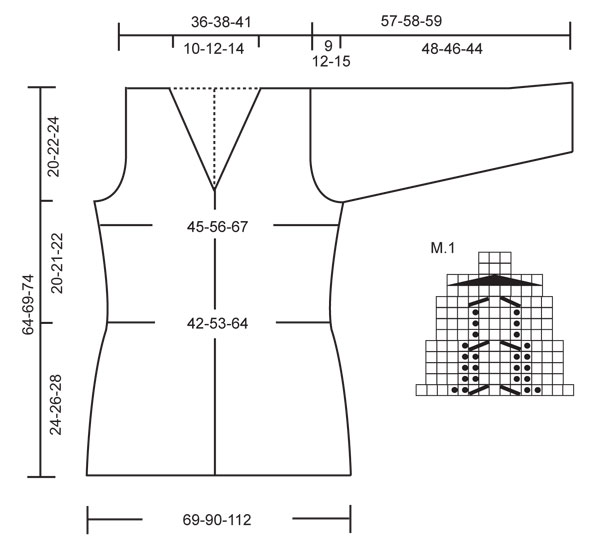
Du hittar måttskissen med cm-mått nederst under beskrivningen.
19.08.2013 - 10:22
![]() DiAnne wrote:
DiAnne wrote:
Hi, I have recently started this pattern and the garter button band is pulling upwards at the bottom edge. I noticed yours hangs nice and straight at the hemline. How did you get it to do this ? Thanks !
19.07.2013 - 19:52DROPS Design answered:
Dear DiAnne, you can block it before wearing, add enough pins to get the shape and checking measurement chart at the same time. Happy knitting!
20.07.2013 - 09:45
![]() Susanne wrote:
Susanne wrote:
Hallo Drops Design, also sollte man direkt nach dem letzten Mal M1 diese Zunahmen machen? Eigentlich heisst es doch: Re. über re. und li. über li. weiterfahren und nach ca. 17-18-19 cm kommen erst die Umschläge. Ich habe jetzt das erste M1 hinter mir und bin bei ca. 6 cm angelangt. Ich muss also noch 6 R weiterstricken bis das nächste M1 dran ist. Daher gehe ich davon aus, dass das nach dem dritten M1 auch so ist, richtig? Viele Grüße Susanne
08.07.2013 - 09:08DROPS Design answered:
Liebe Susanne, die 17-18-19 sind die Gesamthöhe. Wir haben das zur Verdeutlichung nun ergänzt.
10.07.2013 - 08:04
![]() Susanne wrote:
Susanne wrote:
Hallo zusammen, ich verstehe nicht ganz, warum man nach 18 cm (Größe L) soviele Umschläge machen soll. Das sind 48M oder 20 cm mehr. Laut der Zeichnung ist man bis 26 cm noch in Abnehmphase für die Taille, oder nicht?? Und nach 26 cm nimmt alle diese M wieder ab? Ich würde gerne den Sinn des Ganzen verstehen. Danke & Gruß Susanne
03.07.2013 - 12:48DROPS Design answered:
Lliebe Susanne, durch das Muster M1 wurde sehr stark abgenommen, diese Maschen werden an dieser Stelle wieder ausgeglichen. Durch das Rippenmuster wird es trotzdem nicht zu weit.
04.07.2013 - 16:00
![]() Susanna wrote:
Susanna wrote:
Vielen dank. Hatte nicht begriffen, was mit M1 gemeint war. Dann leg ich nun mal los und hoffe die Jacke gelingt mir, denn das Modell ist Zauberhaft schön.
13.05.2013 - 12:11
![]() Susanna wrote:
Susanna wrote:
Zum Ärmel. 91 M anschlagen, 18 mal 2 M aufnehmen, ergibt 91 M. sollten ev. 55 M angeschlagen werden, das gäbe dann einen Umfang von 22.5 cm. Danke schon mal für ihre Rückmeldung.
12.05.2013 - 23:15DROPS Design answered:
Liebe Susanne, ich verstehe leider Ihre Frage nicht ganz. Sie schlagen 91 M und nehmen 2 x 18 = 36 M auf, aber Sie nehmen auch durch das Stricken von M1 wieder insgesamt 36 M ab = 91 M. Ich hoffe, das war Ihre Frage.
13.05.2013 - 07:41
![]() Carina Engman wrote:
Carina Engman wrote:
Svårighet med maskantalet i M.1 som ger minskning av maskor. Svartfärgade triangeln varv 11 är orimligt för mig; förklaringen, 3 maskor framför och 3 m bakom, stickas ihop parvis... kan väl inte ge minus 6 maskor??? Jag får det till 3 minskade maskor. Det blir osymetriskt och 3 maskor till ska minskas för att ha minskat 156 m efer M1 stickats färdigt. Hur ska v 11 stickas så det blir 3 maskor kvar?
02.04.2013 - 11:37DROPS Design answered:
jo, enligt beskrivningen stickar du ihop 3m (=minskar 2) 3 ggr (du minskar då totalt 6 m)
03.04.2013 - 10:53
![]() Linda wrote:
Linda wrote:
När man skriver ut det här mönstret så saknas ett par av raderna i början efter uppläggningen.
28.01.2013 - 11:25DROPS Design answered:
Skriv ut mönstret med "skriv ut: Oppskrift" knappen mitt på mönstersidan.
29.01.2013 - 09:37
![]() Judith Van Genderen wrote:
Judith Van Genderen wrote:
Bij dit patroon begin je met 699 steken voor maat S/M. MAAR wat bleek de breedte van het gebreide was 270 cm. (!), dat is 2x zo veel als aangegeven in het patroon staat (nl. 2x 69=138 cm.) Ik heb indruk dat het aantal op te zetten steken veel te veel is. Bij patroon 108-13 met dezelfde naald en ook van Alcapa(108-3), moeten voor achter en 2 voorpanden bij elkaar 242 steken op te moeten zetten. Wel een heel groot verschil. Heb ik iets van patroon 123-1 niet goed begrepen?
09.12.2012 - 16:12DROPS Design answered:
Het patroon klopt. Je moet beginnen met 699 st breien zoals beschreven. Omdat je in boordsteek breit zal het werk gaan samentrekken en de juiste afmetingen krijgen. Houd je de juiste stekenverhouding aan voor het patroon (24 st x 32 nld in tricot), dan komt het ook goed met de afmeting hier.
11.12.2012 - 14:25Inger wrote:
Endelig ferdig, jakken blir utrolig lekker!
15.11.2012 - 20:04
|
||||||||||||||||
Niagara Falls |
||||||||||||||||
|
|
||||||||||||||||
Knitted DROPS jacket with rib-pattern in ”Alpaca”. Size S - XXXL.
DROPS 123-1 |
||||||||||||||||
|
GARTER ST, back and forth on needle: K all rows. PATTERN: See diagram M.1. Diagram shows the pattern from RS. DECREASING TIP: Dec as follows after front band + K3 + P3: Slip 1 st as if to K, K1, psso. Dec as follows before P3 + K3 + front band: K2 tog. BUTTONHOLES: Make buttonholes on right front band. 1 buttonhole = bind off 3rd and 4th st from mid front and cast on 2 new sts on next row. Make buttonholes when piece measures: SIZE S/M: 8, 14, 20, 26, 32, 38, 44 cm / 3⅛",5½",8",10¼",12½",15",17¼". SIZE L/XL: 10, 16, 22, 28, 34, 40, 46 cm / 4",6¼",8¾",11",13⅜",15¾",18". SIZE XXL/XXXL: 8, 15, 22, 29, 36, 43, 50 cm / 3⅛",6",8¾",11⅜",14¼",17",19¾". -------------------------------------------------------- JACKET: Worked back and forth on circular needle from mid front. Cast on 699-915-1131 sts (includes 6 front band sts each side) on circular needle size 3 mm / US 2or3 with Alpaca. Work front bands in GARTER ST – see above – throughout. P 1 row from WS with 6 front band sts each side and continue in rib as follows (from RS): 6 front band sts, * K3, P3 *, repeat from *-* and finish with K3 and 6 front band sts. Continue like this until piece measures approx 2-3-4 cm / ¾"-1⅛"-1½". Now continue as follows (from RS): 6 front band sts, 12 sts in rib as before, * M.1, 39 sts in rib as before *, repeat from *-* and finish with M.1, 12 sts in rib as before and 6 front band sts. After 1 vertical repeat of M.1 there are 543-711-879 sts on needle. Continue with K over K and P over P until piece measures 7-8-9 cm / 2¾"-3⅛"-3½". Now continue as follows (from RS): 6 front band sts, 6 sts in rib as before, * M.1, 27 sts in rib as before *, repeat from *-* and finish with M.1, 6 sts rib as before and 6 front band sts. Remember BUTTONHOLES - see above. After M.1 there are 387-507-627 sts on needle. Continue with K over K and P over P until piece measures 12-13-14 cm / 4¾"-5⅛"-5½". Now continue as follows (from RS): 6 front band sts, * M.1, 15 sts in rib as before *, repeat from *-* and finish with M.1 and 6 front band sts. After M.1 there are 231-303-375 sts on needle. Continue with K over K and P over P until piece measures approx 17-18-19 cm / 6¾"-7"-7½". On next row from RS inc 1 st in each P-section by making 1 YO after P3 = 267-351-435 sts. On next row (from WS) work all YO into back of loop to avoid a hole. Continue with K over K and P over P until piece measures 24-26-28 cm / 9½"-10¼"-11". On next row from RS dec 1 st in each P-section by P tog the last 2 P sts = 231-303-375 sts. Work 1 row from WS with K over K and P over P. Now insert a marker in the 62nd-80th-98th st from each side (back piece = 107-143-179 sts). Continue as follows (from RS): 6 front band sts, K3, P3, stockinette st on the next 39-57-75 sts AT THE SAME TIME dec 4-8-13 sts evenly, P3, K3, P3, K3 (marker sits in the middle of these sts), P3, K3, P3, stockinette st on the next 87-123-159 sts AT THE SAME TIME dec 6-15-25 sts evenly, P3, K3, P3, K3 (marker sits in the middle of these sts), P3, K3, P3, stockinette st on the next 39-57-75 sts AT THE SAME TIME dec 4-8-13 sts evenly, P3, K3 and 6 front band sts. There are now 217-272-324 sts on needle. Continue with K over K, P over P and stockinette st over stockinette st, and front bands as before. When piece measures 27-29-31 cm / 10⅝"-11⅜"-12¼" inc 1 st before and after rib-section (= 21 sts) each side (= 4 inc). Inc by making 1 YO. On next row work YO into back of loop and continue to work inc sts in stockinette st. Repeat the inc on every 6 cm / 2⅜" a total of 3 times = 229-284-336 sts. Continue as before until piece measures 44-47-50 cm / 17¼"-18½"-19¾". Now bind off 9 sts each side (i.e. st with markers + 4 sts each side of marker) for armhole and complete each piece separately. BACK PIECE: = 99-126-152 sts. Continue back and forth on needle with K over K, P over P and stockinette st over stockinette st. AT THE SAME TIME bind off for armhole at beg of every row each side: 2 sts 2-4-8 times and 1 st 2-9-11 times = 87-92-98 sts. Now continue in stockinette st on all sts. When piece measures 62-67-72 cm / 24⅜"-26⅜"-28⅜" bind off the middle 19-24-30 sts for neck and complete each shoulder separately. Continue in stockinette st and bind off to shape the neckline at the beg of every row from mid front: 1 st 2 times = 32 sts left on shoulder. Piece measures approx 64-69-74 cm / 25¼"-27⅛"-29⅛". Bind off remaining sts. RIGHT FRONT PIECE: = 56-70-83 sts. Continue back and forth on needle with K over K, P over P and stockinette st over stockinette st. AT THE SAME TIME bind off for armhole at the side as described for back piece. AT THE SAME TIME when piece measures 46-48-52 cm / 18"-19"-20½" work 2 rows back and forth on the 6 front band sts only. Now dec for neck and inc for collar as follows: Inc 1 st by making 1 YO inside 6 front band sts, on next row K YO into back of loop to avoid a hole, and then include inc sts in garter st on front band. Dec 1 st inside front band + K3/P3 - See DECREASING TIP! Inc 1 st and dec 1 st on approx every 1 cm / ⅜" a total of 12-15-18 times = 18-21-24 front band sts. When piece measures 64-69-74 cm / 25¼"-27⅛"-29⅛" bind off 32 sts for shoulder, work the 18-21-24 front band sts and now continue with collar as follows (Row 1 = from RS): * Work back and forth on 8-10-12 sts only, work back and forth on all sts *, repeat from *-* until collar measures approx 6-7-8 cm / 2⅜"-2¾"-3⅛" (measured where shortest). Bind off. LEFT FRONT PIECE: Like right front piece, but mirrored. SLEEVE: Worked in the round. Cast on 91-103-103 sts on circular needle size 3 mm / US 2or3 with Alpaca. K 1 round. Insert a marker at beg of round = mid under sleeve. Continue as follows: P2, * K3, P3 *, repeat from *-* and finish with K3 and P2. Continue like this until piece measures 2-3-4 cm / ¾"-1⅛"-1½". Now continue as follows: 17-23-23 stockinette sts, rib as before on the next 21 sts, M.1, rib as before on the next 21 sts and 17-23-23 stockinette sts. AT THE SAME TIME when piece measures approx 3 cm / 1⅛" inc 2 sts mid under sleeve (i.e. 1 st each side of marker). Repeat the inc on every 2.5-2-1.5 cm / 1"-¾"-½" a total of 18-19-25 times (work inc sts in stockinette st). After M.1 continue with K over K, P over P and stockinette st over stockinette st until piece measures 7-8-9 cm / 2¾"-3⅛"-3½". Now continue as follows: stockinette st to the rib, 15 sts in rib as before, M.1, 15 sts in rib as before and stockinette st to the end of round. After M.1 continue with K over K, P over P and stockinette st over stockinette st until piece measures 12-13-14 cm / 4¾"-5⅛"-5½". Now continue as follows: stockinette st to the rib, 9 sts in rib, M.1, 9 sts in rib and stockinette st to the end of round. After M.1 continue with stockinette st each side and 21 sts in rib mid upper sleeve. When all inc and dec are complete there are 91-105-117 sts on needle. Continue until piece measures 48-46-44 cm / 19"-18"-17¼" (less for the larger sizes because of longer sleeve cap and wider shoulders). Now bind off 8 sts mid under sleeve (i.e. 4 sts each side of marker) and continue back and forth on needle. AT THE SAME TIME bind off for sleeve cap at the beg of every row each side: 2 sts 4-5-5 times and 1 st 4-8-13 times, then 2 sts each side until sleeve measures 56-57-58 cm / 22"-22½"-22¾". Now bind off 4 sts at beg of the next 2 rows and bind off remaining sts. Piece measures approx 57-58-59 cm / 22½"-22¾"-23¼". ASSEMBLY: Sew shoulder seams. Set in sleeves. Sew tog collar mid back and sew to neck on back piece. Sew on buttons. |
||||||||||||||||
Diagram explanations |
||||||||||||||||
|
||||||||||||||||
 |
||||||||||||||||
Have you finished this pattern?Tag your pictures with #dropspattern or submit them to the #dropsfan gallery. Do you need help with this pattern?You'll find 21 tutorial videos, a Comments/Questions area and more by visiting the pattern on garnstudio.com. © 1982-2026 DROPS Design A/S. We reserve all rights. This document, including all its sub-sections, has copyrights. Read more about what you can do with our patterns at the bottom of each pattern on our site. |
||||||||||||||||


With over 40 years in knitting and crochet design, DROPS Design offers one of the most extensive collections of free patterns on the internet - translated to 17 languages. As of today we count 324 catalogs and 12290 patterns - 12280 of which are translated into English (US/in).
We work hard to bring you the best knitting and crochet have to offer, inspiration and advice as well as great quality yarns at incredible prices! Would you like to use our patterns for other than personal use? You can read what you are allowed to do in the Copyright text at the bottom of all our patterns. Happy crafting!
Post a comment to pattern DROPS 123-1
We would love to hear what you have to say about this pattern!
If you want to leave a question, please make sure you select the correct category in the form below, to speed up the answering process. Required fields are marked *.