
Popular categories
Looking for a yarn?


Comments / Questions (23)
![]() Sandrine wrote:
Sandrine wrote:
Bonjour Je fais ce modèle en taille S. Je suis bloquée pour commencer le motif A3. L'ouvrage a 174 mailles et le motif en fait 17. Et 174 ne se divise pas par 17. Il me reste 4 mailles à la fin du rang. Je ne sais pas quoi faire. Avez-vous svp une suggestion ? Merci Sandrine
25.11.2025 - 14:35
![]() Sandrine wrote:
Sandrine wrote:
Bonjour Je crochète le modèle en taille S et je suis bloquée pour commencer le motif A3. Mon ouvrage fait 174 mailles ce qui n'est pas divisible par 17 (le nombre de mailles de A3). A la fin du rang il me reste 4 mailles hors motif et je sais pas quoi faire. Avez-vous svp une solution à me proposer ? Merci Sandrine
25.11.2025 - 14:31DROPS Design answered:
Bonjour Sandrine, je transfère votre question à nos stylistes, en attendant, vous pouvez sauter 4 mailles à intervalles réguliers pour éviter de rester avec 4 mailles à la fin du 1er tour. Bon crochet!
26.11.2025 - 08:41
![]() Luisi wrote:
Luisi wrote:
A que grupo perteneceria hilo Katia Comet y como se las medidas de las tallas?gracias. Yo normalmente M o L pero como puedo saber las medidas. Gracias
18.11.2025 - 16:47DROPS Design answered:
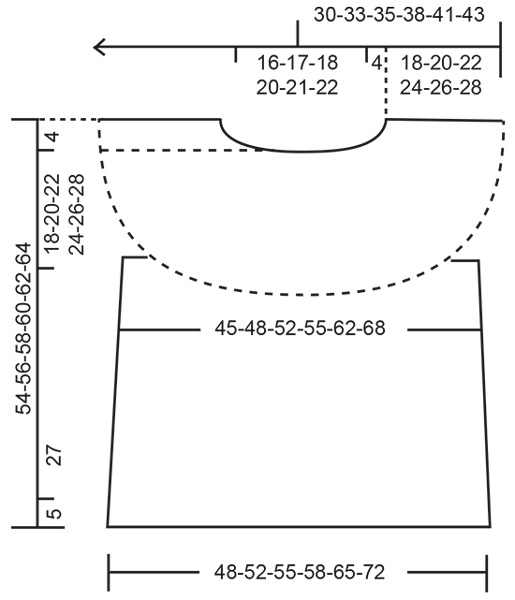
Hola Luisi, al final del patrón puedes encontrar un esquema de medidas con las medidas finales de la prenda en cm. Cada número de cada secuencia se corresponde a una talla, siendo S el 1º número y XXXL el último en este caso. Puedes comparar las medidas de la prenda a tus prendas y ver si la talla M o L se acerca más; si estás entre 2 tallas es mejor elegir la talla más grande. Katia Comet no es uno de nuestros hilos. Puedes comparar la tensión de la muestra y el metraje a nuestros hilos y buscar a qué grupo se acerca más; aquí puedes ver todos nuestros hilos clasificados en grupos.
24.11.2025 - 01:00
![]() Line Kristin wrote:
Line Kristin wrote:
Det må være en rad som mangler mellom rad 4 og 5 i forhold til bildet jeg ser i diagram A3. Kan dere sende meg det riktige?
20.06.2025 - 19:04DROPS Design answered:
Hei Line Kristin. Hva er det du mener mangler? Ut i fra bildet stemmer det som diagram A.3 viser. mvh DROPS Design
23.06.2025 - 12:51
![]() Rita wrote:
Rita wrote:
Does the chain 3 count as a stitch? Thanks
19.11.2024 - 21:26DROPS Design answered:
Dear Rita, the first 3 chain stitches at the beginning of the round do not count as the first stitch. Happy crocheting!
20.11.2024 - 07:54
![]() Mette Schmidt wrote:
Mette Schmidt wrote:
Er det korrekt forstået, at billedet allernederst viser mål for de forskellige størrelser? Hvordan kan det i så fald være, at der er så stort spring fra XL til XXL?
07.07.2024 - 16:41DROPS Design answered:
Hei Mette. Ja, målskissen viser målene for de ulike str. Det blir ulike cm for å få masketallet / rapporter av diagram(mer) til å gå opp, men det er ikke større spring fra XL til XXL enn hva det er fra L til XL. mvh DROPS Design
09.07.2024 - 11:00
![]() Rocio C Torres MURILLO wrote:
Rocio C Torres MURILLO wrote:
Hola. No entiendo la secuencia de aumentos ni en canesú ni en la parte de abajo. No hay algún tutorial en video de este diseño?? Me sería mucho más útil. No entiendo cuántos aumentos en cada vuelta 2 y 4. Primero habla de un número de aumentos y luego de otro pero no especifica luego en cuáles. Preferiría si me explican con número de fila de 1 en adelante.
27.11.2023 - 16:37DROPS Design answered:
Hola Rocio, todos los videos relevantes para este patrón se encuentran en la sección de videos tutoriales, después del patrón escrito y los diagramas. En cuanto a los aumentos, en el TIP PARA LOS AUMENTOS especifican que se aumentan puntos repartidos trabajando 2 puntos altos en el mismo punto cada cierto número de puntos. Una vez comenzados los diagramas, aumentas cada vuelta 2 y 4 21-21-21-21-21-24 puntos altos 6-6-7-7-8-8 veces en total ( es decir, en 3 vueltas 2 y 3 vueltas 4) y después 21-30-21-27-24-24 puntos altos 1 vez en la siguiente vuelta 2 o 4, dependiendo de la talla.
03.12.2023 - 19:31
![]() Elise wrote:
Elise wrote:
Jeg klarer ikke å få M3 til å stemme overens med bildet. Kan det være noe feil i mønsteret?
07.09.2023 - 20:04
![]() Tiina Rauta wrote:
Tiina Rauta wrote:
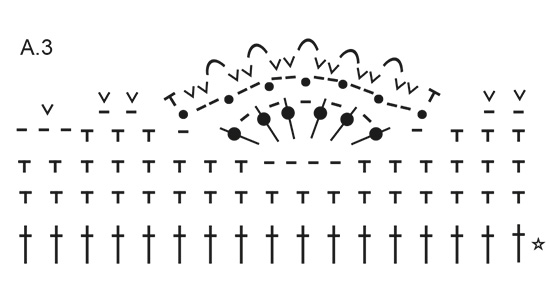
Piirroksen a3 ohje ei vastaa kuvassa olevaa reunuspitsiä. Ohjeessa puhutaan piilosilmukoista mutta kuvassa on selkeästi 3 pylvään popcorn.
29.06.2023 - 19:47
![]() Asun wrote:
Asun wrote:
Hola, muchas gracias por este patrón tan bonito. Ya estoy terminándolo y por lo visto en el diagrama de las ondas del final esta incompleto. En la 5ª fila no se cómo seguir después de las dos ultimas cadenetas.
09.04.2023 - 13:21DROPS Design answered:
Hola Asun, la última fila se trabaja como sigue: (2 puntos bajos alrededor del arco de cadenetas, punto bajo en el punto,* 2 puntos bajos alrededor del siguiente arco, 1 cadeneta*, repetir de * a * 4 veces más, 2 puntos bajos en el siguiente arco, 1 punto bajo en el siguiente punto, 2 puntos bajos en el siguiente arco). Repite las instrucciones entre paréntesis toda la vuelta.
10.04.2023 - 17:24
|
||||||||||||||||||||||
Beige Desert#beigedeserttop |
||||||||||||||||||||||
 |
 |
|||||||||||||||||||||
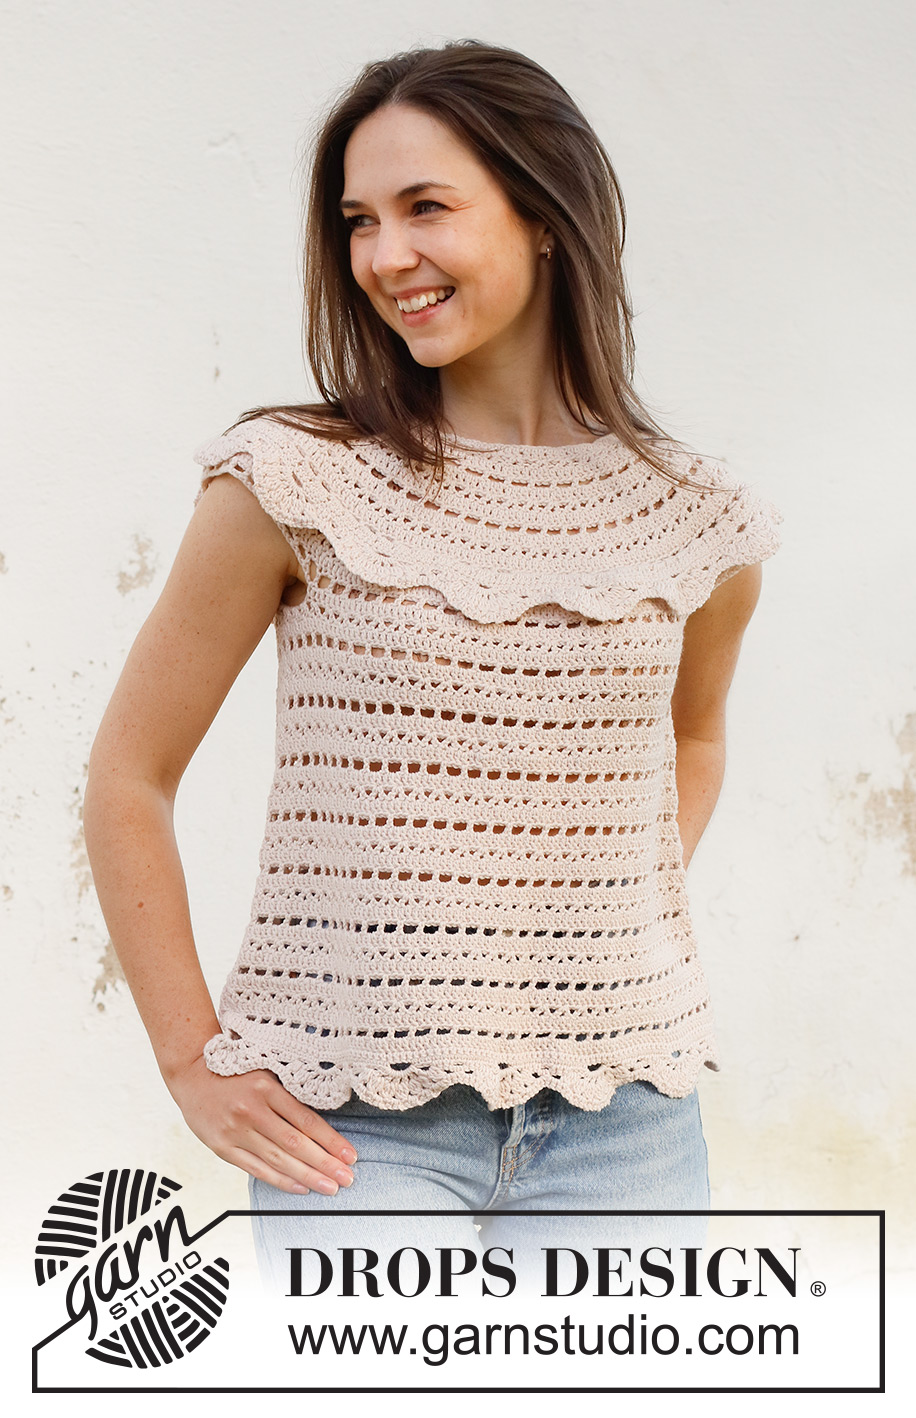
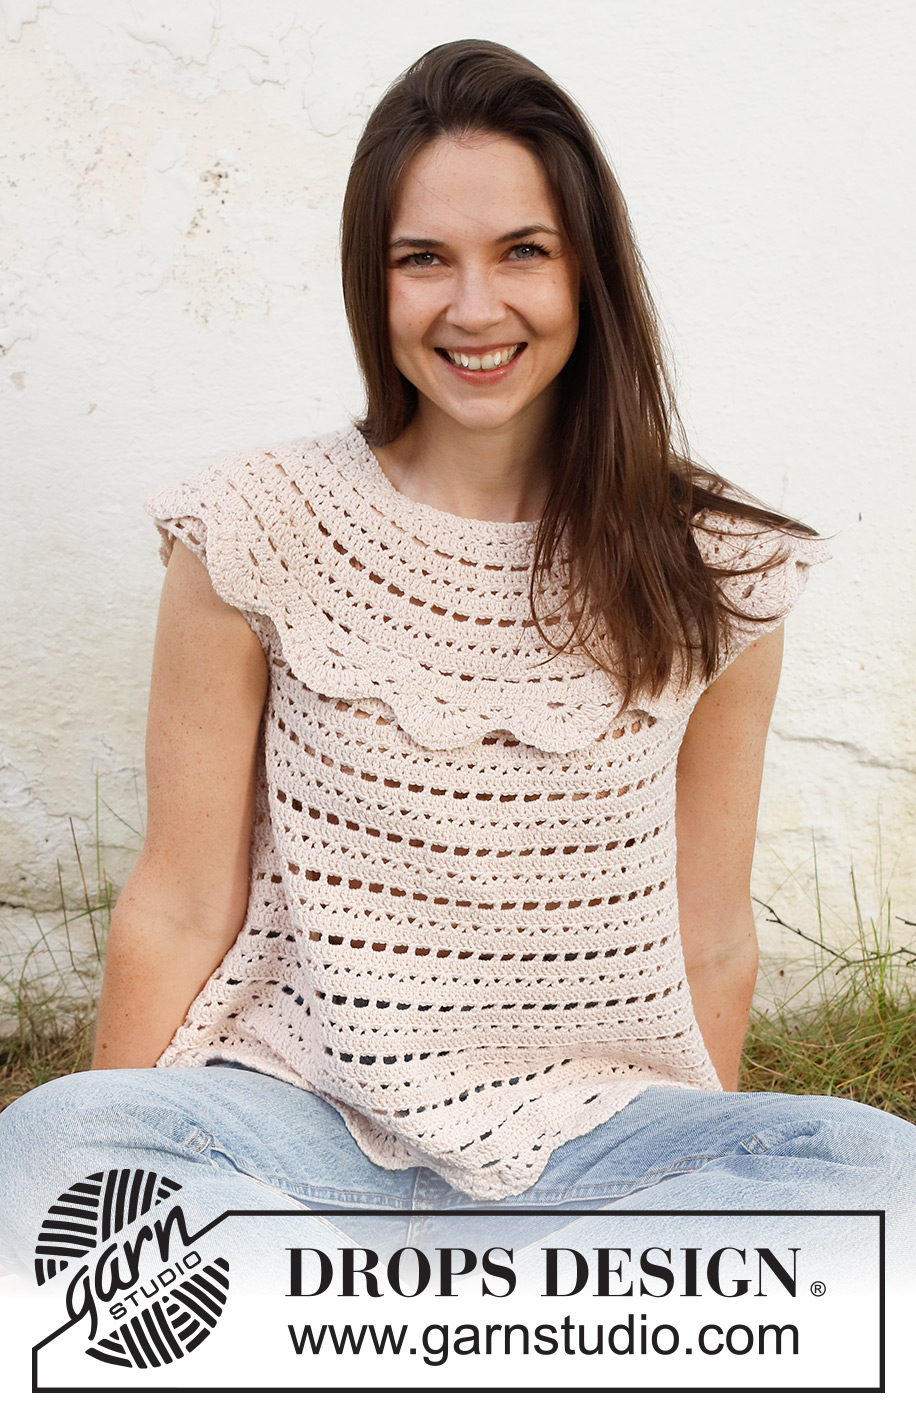
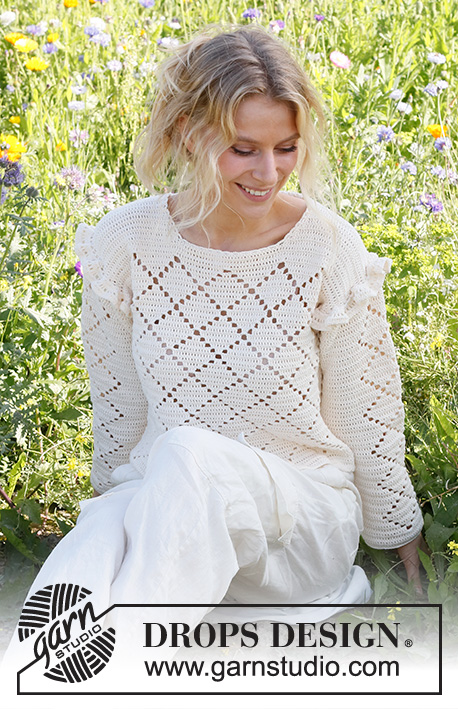
Crocheted top in DROPS Cotton Merino. The piece is worked top down with round yoke, lace pattern and a laced edge on the yoke. Sizes S - XXXL.
DROPS 231-45 |
||||||||||||||||||||||
|
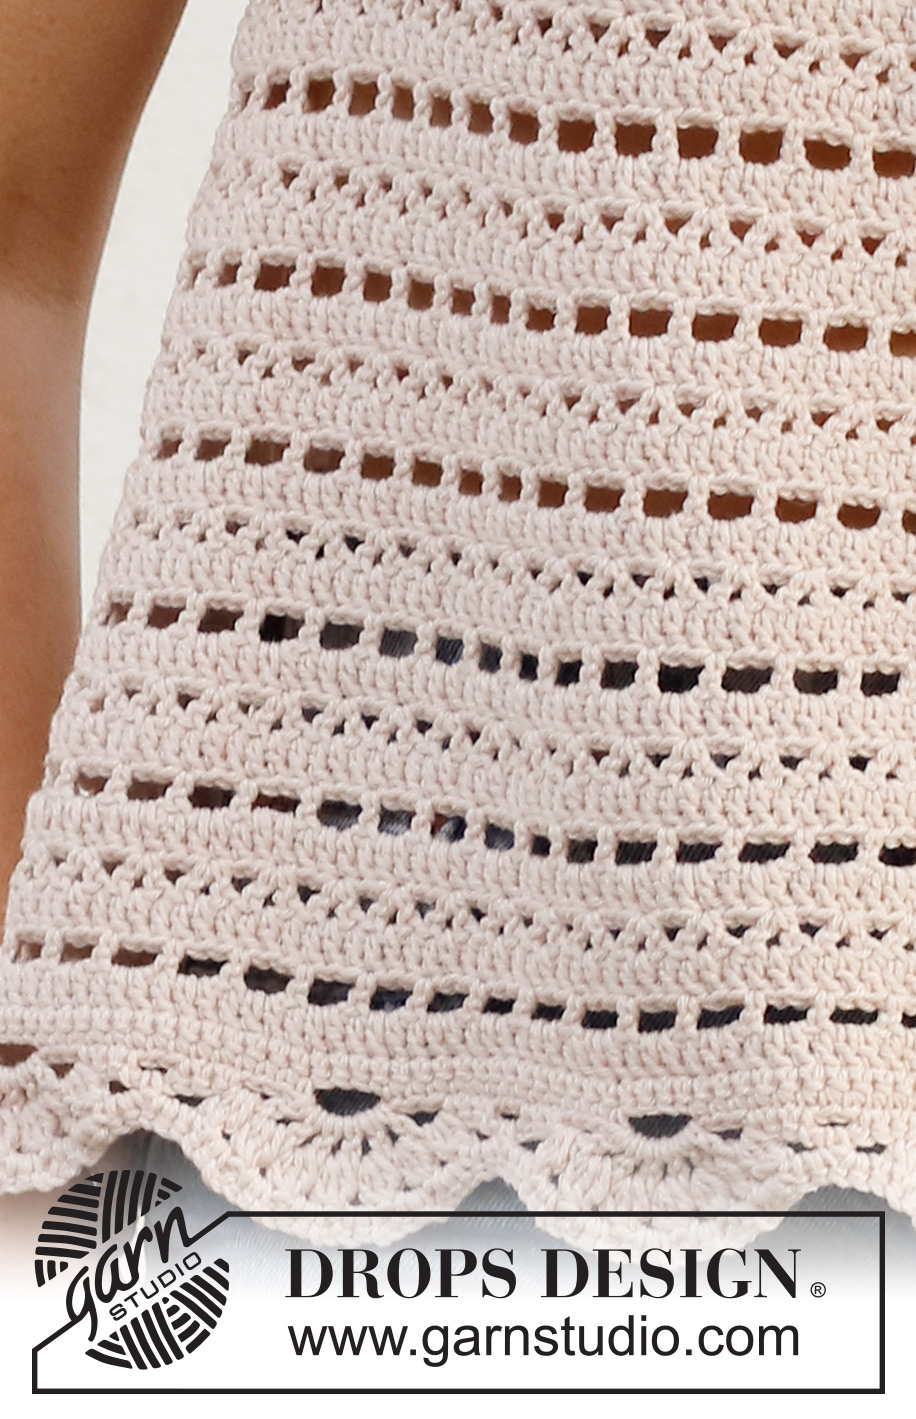
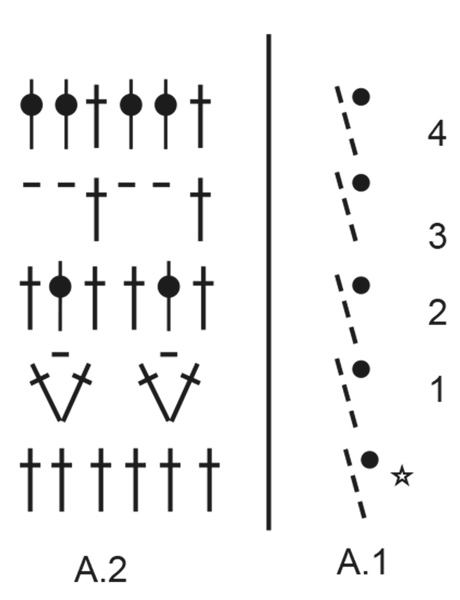
------------------------------------------------------- EXPLANATIONS FOR THE PATTERN: ------------------------------------------------------- PATTERN: See diagrams A.1 to A.3. Diagram A.1 shows how the rounds start and finish. CHAIN STITCH: If you work outermost on the hook the chain stitch will often be too tight; 1 chain stitch should be as long as 1 double crochet is wide. INCREASE TIP: (evenly spaced): To work out how to increase evenly, count the number of stitches (e.g. 86 stitches) and divide by the number of increases to be made (e.g. 25) = 3.4. In this example, increase by working 2 double crochets in approx. every 3rd stitch. ------------------------------------------------------- START THE PIECE HERE: ------------------------------------------------------- TOP - SHORT OVERVIEW OF THE PIECE: The piece is worked in the round, top down. A laced edge is worked around the yoke to finish. YOKE: Work 86-90-94-100-104-108 CHAIN STITCHES – read description above, with hook size 4 MM = US 6 and DROPS Cotton Merino. Form them into a ring with 1 slip stitch in the first chain stitch. Work 3 chain stitches, then 1 double crochet in each chain stitch = 86-90-94-100-104-108 stitches. Work 1 round with 1 double crochet in each double crochet and increase 25-30-26-32-34-36 double crochets evenly spaced – read INCREASE TIP = 111-120-120-132-138-144 double crochets. REMEMBER THE CROCHET GAUGE! Work A.1, then A.2 to the end of the round. A.1 shows how the round starts and finishes and is in addition to the stitches in A.2. Each time rounds 2 and 4 in A.2 are worked, increase 21-21-21-21-21-24 double crochets evenly spaced. Increase 6-6-7-7-8-8 times, then increase 21-30-21-27-24-24 double crochets 1 time = 258-276-288-306-330-360 stitches. Continue with A.1 and A.2 until the piece measures 18-20-22-24-26-28 cm = 7"-8"-8¾"-9½"-10¼"-11"; finish after round 1 or 3. Now divide the piece as follows: Work 1 double crochet in each of the first 75-81-84-90-99-111 stitches (back piece), work 6-6-9-9-12-12 chain stitches under the sleeve, skip 54-57-60-63-66-69 stitches, work 1 double crochet in each of the next 75-81-84-90-99-111 stitches (front piece), work 6-6-9-9-12-12 chain stitches under the sleeve, skip 54-57-60-63-66-69 stitches. BODY: Work the next round in A.2 as well as 1 double crochet in each chain stitch under the sleeves = 162-174-186-198-222-246 stitches. Continue in the round with A.1 and A.2 until the piece measures 10 cm = 4" from the division. The next time you work round 2 or 4 in A.2, increase 6 double crochets evenly spaced in all sizes = 168-180-192-204-228-252 stitches. Continue with A.1 and A.2 until the piece measures approx. 20 cm = 8" from the division. The next time you work round 2 or 4 in A.2, increase 6 double crochets evenly spaced in all sizes = 174-186-198-210-234-258 stitches. Continue working until the piece measures 27 cm = 10⅝" from the division, finish after round 2 or 4 in A.2. Work A.3 over all stitches, starting on round 2 in pattern, while adjusting the number of stitches on first round to 170-187-204-221-238-255 double crochets.. Cut and fasten the strand. LACED EDGE: The laced edge is worked approx. 13-17 cm = 5⅛"-6¾" from the neck-line. The first round is worked in round 2 or 4 in A.2 as follows: ROUND 1: Work 1 single crochet around a double crochet, * work 2 chain stitches, skip 2 double crochets, work 1 single crochet around the next double crochet *, repeat from *-* to the end of the round. ROUND 2: Work 3 double crochets around each chain-space, AT THE SAME TIME increase evenly so the number of stitches is divisible by 17. Continue working as shown in A.3, starting on round 2. Cut and fasten the strand. |
||||||||||||||||||||||
Diagram explanations |
||||||||||||||||||||||
|
||||||||||||||||||||||
 |
||||||||||||||||||||||
 |
||||||||||||||||||||||
 |
||||||||||||||||||||||
Have you finished this pattern?Tag your pictures with #dropspattern #beigedeserttop or submit them to the #dropsfan gallery. Do you need help with this pattern?You'll find 11 tutorial videos, a Comments/Questions area and more by visiting the pattern on garnstudio.com. © 1982-2026 DROPS Design A/S. We reserve all rights. This document, including all its sub-sections, has copyrights. Read more about what you can do with our patterns at the bottom of each pattern on our site. |
||||||||||||||||||||||


With over 40 years in knitting and crochet design, DROPS Design offers one of the most extensive collections of free patterns on the internet - translated to 17 languages. As of today we count 324 catalogs and 12290 patterns - 12280 of which are translated into English (US/in).
We work hard to bring you the best knitting and crochet have to offer, inspiration and advice as well as great quality yarns at incredible prices! Would you like to use our patterns for other than personal use? You can read what you are allowed to do in the Copyright text at the bottom of all our patterns. Happy crafting!
Post a comment to pattern DROPS 231-45
We would love to hear what you have to say about this pattern!
If you want to leave a question, please make sure you select the correct category in the form below, to speed up the answering process. Required fields are marked *.