
Popular categories
Looking for a yarn?


Comments / Questions (20)
![]() Conny Holm wrote:
Conny Holm wrote:
Ups! Har været inde på Bolero de-151 og set, at garnet er flerfarvet, sorry. VH CH
12.07.2018 - 14:38
![]() Conny Holm wrote:
Conny Holm wrote:
Skal ruderne sys eller hækles sammen eller begge dele. Og er den lille og den store kant, de kanter der skal hækles efter ruderne er hæklet? sammen?
11.07.2018 - 12:48DROPS Design answered:
Hei Conny. Ja det skal hekles en liten og en bred kant etter at rutene er heklet sammen, som forklart i oppskriften. God fornøyelse
13.07.2018 - 15:09
![]() Conny Holm wrote:
Conny Holm wrote:
Hvor meget garn skal jeg bruge til denne opskrift? I angiver kun en enkelt farve? VH Conny
11.07.2018 - 12:07
![]() Laura wrote:
Laura wrote:
Buona sera. Vorrei avere conferma per quanto riguarda gli aumenti sui quadrati una volta cuciti. Se ho capito bene al termine del II giro della taglia S ci dovrebbero essere 79m.a. sul lato schiena.47 sui lati corti e 73 sotto.ma compreso le 2 più 2 maglia alte agli angoli ?o esclusi i gruppi agli angoli ? Grazie.
23.04.2018 - 22:10DROPS Design answered:
Buongiorno Laura. Sono comprese le maglie alte lavorate intorno agli archi di catenelle negli angoli. Buon lavoro!
24.04.2018 - 10:08
![]() Laura wrote:
Laura wrote:
Buona sera. Vorrei avere conferma per quanto riguarda gli aumenti sui quadrati una volta cuciti. Se ho capito bene al termine del II giro della taglia S ci dovrebbero essere 79m.a. sul lato schiena.47 sui lati corti e 73 sotto.ma compreso le 2 più 2 maglia alte agli angoli ?o esclusi i gruppi agli angoli ? Grazie.
23.04.2018 - 22:08
![]() Saskia wrote:
Saskia wrote:
Hallo, Ik heb de vierkantjes aan elkaar gehaakt maar wat word bedoeld met de 19-19-23 stuk haken op elk vierkant? Ik lees nog verder in het patroon dat ik 53-57-71 l haken dat het een armsgat moet worden Is dat niet wat veel lossen? Groetjes
23.06.2017 - 15:53DROPS Design answered:
Je haakt 19-19-23 stokjes op elk vierkant de drie getallen staan respectievelijk voor de drie maten, dus 19 stokjes voor S/M, 19 stokjes voor L/XL en 23 voor XXL/XXXL. Voor de drie getallen die je aan lossen moet haken bij het armsgat geldt hetzelfde. Kies het aantal voor jouw maat.
25.06.2017 - 21:50
![]() Margherita wrote:
Margherita wrote:
Ho appena iniziato il modello Sweet Gretel e c'è una parte che non comprendo: dopo aver unito i quadrati e dopo aver fatto il primo giro di bordo a maglia alta con gli aumenti in alto e in basso, le ripetizioni di questo bordo sono divise per taglia?cioè per una s è sufficiente fare un altro giro con gli aumenti o comunque ne vanno eseguiti altri 3 a prescindere dalla taglia?Grazie Margherita
23.03.2017 - 14:46DROPS Design answered:
Buongiorno Margherita. Per la taglia S, dopo aver unito i quadrati, lavora 1 giro di bordo, poi ne lavora un altro come indicato (alla fine del giro avrà 79 m.a in alto, 47 m.a ai lati e 73 m.a sul lato in basso). Poi prosegue con le indicazioni riportate nel paragrafo: ampio bordo all’uncinetto. Buon lavoro!
23.03.2017 - 15:41A Ryerson wrote:
Re pattern Sweet Gretel bolero Crochet square Size xxl First corner says *2tr 2ch 2ch around ch space in corner" Should that be 2tr 2ch 2tr?
07.07.2016 - 20:20DROPS Design answered:
Dear Mrs A.Ryerson, you are correct, pattern will be edited as soon as possible. Happy crocheting!
08.07.2016 - 10:37
![]() Marja Knops wrote:
Marja Knops wrote:
Ik ben de bolero van drops extra 0-1258 aan het maken maat xxl/xxxl.Na het omhaken van de 4kantjes met de meerderingen heb ik meer dan de aangegeven stokjes en wel 115 ipv 105.Zit er een fout in de beschrijving?
27.06.2016 - 22:14DROPS Design answered:
Hoi Marja. Ik zie niet dat je meer zou krijgen. Heb je misschien te veel stk gemeerderd.
29.06.2016 - 13:03
![]() Pernilla Karlsson wrote:
Pernilla Karlsson wrote:
Hej Ska virka boleron Sweet Gretel , brukar använda storlek m/l. Mönstret är s/m eller l/xl. Finns det någon mått tabell? Mvh Pernilla
14.06.2016 - 14:39DROPS Design answered:
Hej Pernilla. Jeg ved ikke om der er en maalskitse til denne model. Jeg har spurgt om der er. Ellers kan du bedst udregne hvor stor den ca bliver med hjaelp af strikkefastheden og str paa firkanterne.
23.06.2016 - 15:38
|
|||||||||||||||||||||||||||||||||||||
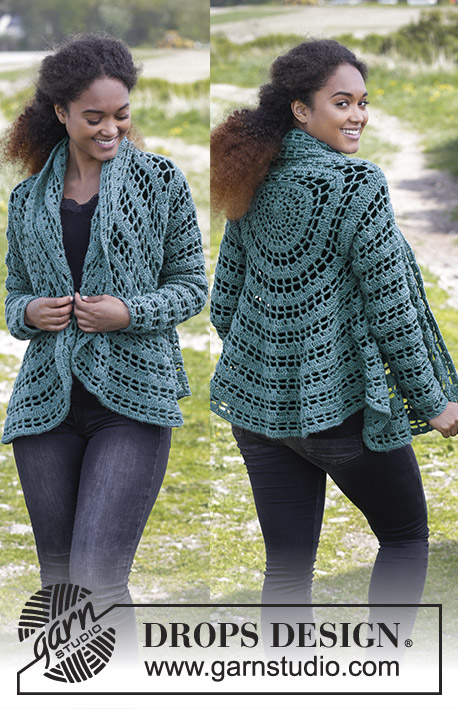
Sweet Gretel |
|||||||||||||||||||||||||||||||||||||
 |
 |
||||||||||||||||||||||||||||||||||||
Crochet DROPS bolero with squares on the back and a wide crochet edge around in ”Delight”. Size: S - XXXL.
DROPS Extra 0-1258 |
|||||||||||||||||||||||||||||||||||||
|
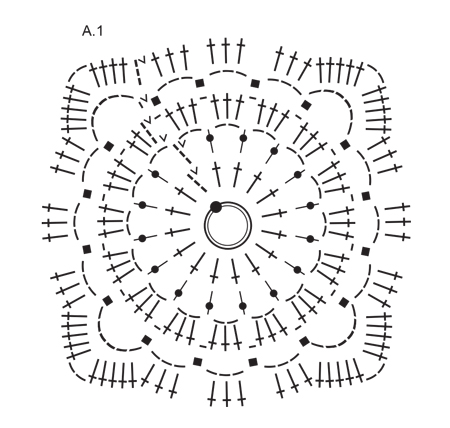
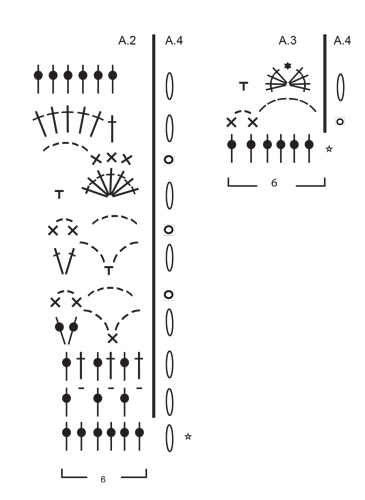
PATTERN: See diagrams A.1 to A.4. Diagram A.4 shows how round beg and ends. TIP FOR CHANGING YARN: To make the color transitions in Delight pretty when switching ball, it is important to find a ball that starts with the same color last ball ended with. CROCHET INFO: Replace first dc on every dc round with 3 ch. Finish every dc round with 1 sl st in 3rd ch from beg of round. INCREASE TIP: Inc 1 dc by working 2 dc in same st. ---------------------------------------------------------- BACK PIECE: Work 6 squares and fasten them to at the end. Then work a small edge around the back piece before working a wide edge. CROCHET SQUARE (Size S/M - L/XL): Work 6 ch on hook size 3.5 mm/E/4 with Delight and form a ring with 1 sl st in first ch. Continue on diagram A.1 - READ CROCHET INFO, REMEMBER CROCHET GAUGE. When A.1 is done, fasten off. Work 5 more squares. CROCHET SQUARE (Size XXL/XXXL): Work 6 ch on hook size 3.5 mm/E/4 with Delight and form a ring with 1 sl st in first ch. Continue on diagram A.1 - READ CROCHET INFO, REMEMBER CROCHET GAUGE. When A.1 is done, work next round as follows: Work 3 ch (= 1 dc), 1 dc in each of the next 4 dc, * 2 dc + 2 ch + 2 dc around ch-space in the corner, 1 dc in each of the next 19 dc *, repeat from *-* 3 more times, 2 dc + 2 ch + 2 dc around corner, 1 dc in each of the next 14 dc, finish with 1 sl st in 3rd ch at beg of round. Fasten off. Work 5 more squares. Place the squares with 3 squares in width and 2 squares in height. Crochet squares tog with Delight - crochet squares tog alongside and then across as follows: Place 2 squares tog WS against WS and work tog from RS as follows: 1 sc in corner of first square, ch 1, 1 sc in corner of next square, ch 1, 1 sc in next st on first square, ch 1, 1 sc in next st on second square, ch 1, 1 sc in next st on first square, ch 1, 1 sc in next st on second square etc., finish when 1 sc has been worked in the last corner on both squares, fasten off. NOTE: Make sure that the transitions between every square are pretty when the squares are worked tog alongside. Then work 2 round with dc around the entire back piece (start at the top in the right corner) as follows: Work 1 sc around ch-space in corner, 3 ch (= 1 dc), 1 dc + 2 ch + 2 dc around same space, then work 1 dc in each of the 19-19-23 dc on each square + 1 dc between each square at the top of back piece AT THE SAME TIME inc 6 dc evenly along this side (i.e. inc 2 dc over each square - READ CROCHET TIPS) = 65-65-77 dc, work 2 dc + 2 ch + 2 dc around next corner, work 1 dc in each of the 19-19-23 dc on each square + 1 dc between the 2 squares down along short side = 39-39-47 dc, work 2 dc + 2 ch + 2 dc around next corner, work 1 dc in each of the 19-19-23 dc on each square + 1 dc between each square at the bottom of back piece AT THE SAME TIME inc 3 dc evenly along this side (i.e. inc 1 dc over each square) = 62-62-74 dc, work 2 dc + 2 ch + 2 dc around next corner, work 1 dc in each of the 19-19-23-dc on each square + 1 dc between the 2 square up along the other short side = 39-39-47 dc, and finish with 1 sl st in 3rd ch at beg of round. Work 1-2-3 more rounds this way, i.e. 1 dc in every dc, 2 dc + 2 ch + 2 dc around ch-space in each corner, inc 6 dc along edge at the top and 3 dc along the edge at the bottom - NOTE: Size XXL/XXXL is not inc along the edge at the top on last round. After last round there are 79-89-105 dc at the top, 47-51-63 dc in each side, 73-80-99 dc along the edge at the bottom and 4 corner spaces. Fasten off. WIDE CROCHET BORDER: Beg at the top on back piece with 1 sl st in the middle st, work 3 ch (= 1 dc), then work 1 dc in each of the 39-44-52 dc at the top along back piece, work 53-57-71 ch (= armhole), 1 dc in each of the 73-80-99 dc at the bottom along back piece, 53-57-71 ch (= armhole), 1 dc in each of the remaining 39-44-52 dc at the top along back piece and finish with 1 sl st in 3rd ch at beg of round. On next round work 1 dc in every dc at the top and at the bottom of back piece and around every ch-space along armholes work 47-51-63 dc = 246-271-330 dc on round. Then work pattern according to diagram A.2 (A.4 shows how round beg and ends. NOTE: Crochet info only applies to 1st round but not further) the entire round AT THE SAME TIME inc as follows: ROUND 2: Inc 31-36-31 dc evenly - READ INCREASE TIP = 277-307-361 dc. ROUND 10: Inc 30 dc evenly = 307-337-391 dc. SIZE S/M - L/XL: Repeat round 3 to 10 1 more time AT THE SAME TIME inc as follows: ROUND 10: Inc 30 dc evenly = 337-367 dc. SIZE XXL/XXXL: Repeat round 3 to 10 1 more time AT THE SAME TIME inc as follows: ROUND 10: Inc 30 dc evenly = 421 dc. Repeat rounds 3 to 5 1 more time = 421 dc. Then work pattern according to diagram A.3 (A.4 shows how round beg and ends. When diagram is done, fasten off. |
|||||||||||||||||||||||||||||||||||||
Diagram explanations |
|||||||||||||||||||||||||||||||||||||
|
|||||||||||||||||||||||||||||||||||||
 |
|||||||||||||||||||||||||||||||||||||
 |
|||||||||||||||||||||||||||||||||||||
Have you finished this pattern?Tag your pictures with #dropspattern or submit them to the #dropsfan gallery. Do you need help with this pattern?You'll find 10 tutorial videos, a Comments/Questions area and more by visiting the pattern on garnstudio.com. © 1982-2026 DROPS Design A/S. We reserve all rights. This document, including all its sub-sections, has copyrights. Read more about what you can do with our patterns at the bottom of each pattern on our site. |
|||||||||||||||||||||||||||||||||||||


With over 40 years in knitting and crochet design, DROPS Design offers one of the most extensive collections of free patterns on the internet - translated to 17 languages. As of today we count 325 catalogs and 12291 patterns - 12281 of which are translated into English (US/in).
We work hard to bring you the best knitting and crochet have to offer, inspiration and advice as well as great quality yarns at incredible prices! Would you like to use our patterns for other than personal use? You can read what you are allowed to do in the Copyright text at the bottom of all our patterns. Happy crafting!
Post a comment to pattern DROPS Extra 0-1258
We would love to hear what you have to say about this pattern!
If you want to leave a question, please make sure you select the correct category in the form below, to speed up the answering process. Required fields are marked *.