
Popular categories
Looking for a yarn?


Comments / Questions (56)
![]() Liguori Evelyne wrote:
Liguori Evelyne wrote:
Bonjour Pour les emmanchures la réalisation est elle différente en fonction de la taille . Pour S/M entre les emmanchures il y a 34 cm et (1B +2ml) x 21 fois soit 21 ponts entre les 2 emmanchures partie du haut. mais pour les autres tailles rien n'est précisé à ce niveau et pour 38 cm entre les épaules j'ai 23 ponts .cela vous semble t'il bon ? pouvez vous m'expliquer ? merci pour vos réponses Evelyne
25.06.2016 - 06:13DROPS Design answered:
Bonjour Mme Liguori, en taille S/M, sur les 80 B du tour précédents, vous devez avoir: 20 B (+ les 2 ml entre chaque), 22 ml pour la 1ère emmanchure (= sautez 10 B), 40 B (+2 ml entre chaque) pour le bas du gilet, 24 ml pour la 2ème emmanchure (= sautez 10 B) = 60 B + les 2 chaînettes des emmanchures. Bon crochet!
27.06.2016 - 08:57
![]() Avis wrote:
Avis wrote:
Bonjour, j'ai crocheter jusqu'au picot du diagramme A1, est ce je doit continuer avec le diagramme A2 ?
24.05.2016 - 11:17DROPS Design answered:
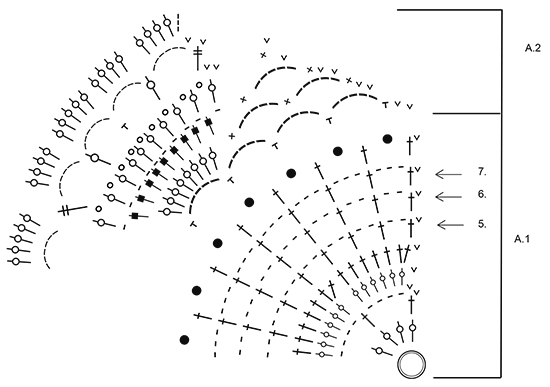
Bonjour Mme Avis, tout à fait, quand vous avez crocheté 1 fois le diagramme A.1 (= jusqu'au 8ème tour inclus), crochetez le diagramme A.2, mais celui-ci se répète 7 fois en largeur (au lieu de 4 fois pour A.1). Bon crochet!
24.05.2016 - 11:44
![]() Avis wrote:
Avis wrote:
Bonjour, Pouvez vous m'expliquer après le 1er picot . est ce que je doit continuer le diagramme A2 ? allez vous faire une vidéo tutorial d'explication ?
23.05.2016 - 19:06DROPS Design answered:
Bonjour Mme Avis, pouvez-vous être plus précise? À quel picot pensez-vous? Merci - bon crochet!
24.05.2016 - 08:30Sherie wrote:
I am new to the drops design patterns but I dont understand how to read the diagrams at all although I understand the symbols. Can you explain how to read the diagrams are they line by line or for instance is A1 to be done in a complete round.
12.05.2016 - 03:37DROPS Design answered:
Dear Sherie, start reading A.1 from the bottom right, from the right towards the left on every round. And repeat the sts in each round a total of 4 times in width in the round, ie on 1st round, you will work 4 tr around ch-ring x 4 = 16 tr at the end of 1st round. Happy crocheting!
12.05.2016 - 09:08
![]() Marian Blichsted wrote:
Marian Blichsted wrote:
Kort efter ærmegabene siger opskriften: Gentag 7. omgang 8-7-6 gange opover. Hvad menes der med "opover"?
24.03.2016 - 18:22DROPS Design answered:
Hej Marian, du fortsætter bare med at hækle 7. omg som du hele tiden har gjort. God fornøjelse!
06.04.2016 - 10:19
![]() Audrey Lindsey wrote:
Audrey Lindsey wrote:
I do not quite understand what you mean by repeating A 1 in width. Which row is next after I complete A 1 the first time ?
24.03.2016 - 01:34DROPS Design answered:
Dear Mrs Lindsey, on row 1 in A.1 you have to work 4 dc around ch-space (= ch-ring), repeat 4 times A.1 in width means to work 4 times (4 dc around ch-space) = 16 dc at the end of round. And continue that way repeating each row in A.1 a total of 4 times on the round. Happy crocheting!
24.03.2016 - 09:09
![]() Judy wrote:
Judy wrote:
I might not be understanding the directions, but it says to work Pattern A1 4 repetitions, the picture looks entirely different from my 4 repeats of these 8 rows, thanks
21.03.2016 - 06:14DROPS Design answered:
Dear Judy, you have to repeat A.1 a total of 4 times in width - check legend to each symbol to be sure you are making fine (read starting on the right side towards the left on every round). Happy crocheting!
21.03.2016 - 10:46
![]() Gillian Thomas wrote:
Gillian Thomas wrote:
Looking at the photo it appears the jacket is finished after the 4th round in A.2 but the pattern simply says to work according to A.2 & then fasten off. What is correct? I think it may look better to finish after round 4 with the picot edge which is what it looks like in the photo.
16.03.2016 - 18:14DROPS Design answered:
Dear Mrs Thomas, your feedback has been forwarded, but you can off course fasten off when you think it looks better for you. Happy crocheting!
16.03.2016 - 23:55
![]() Y Vis wrote:
Y Vis wrote:
Patroon deel A.1 is een kwart van de ronde? Aantal steken klopt hier nog. Daarna snap ik t patroon niet meer.hier wordt niet een kwart van de ronde aangegeven. Hoe moet ik nu verder? Heb al een keer door gehaakt maar had aan einde van patroondeel A.2 ongeveer 36 steken te veel. Dus geen 160 stk maar 196. Wat doe ik verkeerd?
01.03.2016 - 20:12DROPS Design answered:
Hoi Y Vis. Ja, het is een kwart. Ook A.2 is een kwart en in de laatste toer van A.2 haak je 23 stk per herhaling: 7 keer herhalen in de rondte = 161 stk en in de laatste toer minder je 1 stk = 160 stk
09.03.2016 - 10:02
![]() Claudia wrote:
Claudia wrote:
Buongiorno a tutto lo staff! In questo momento ho terminato lo schema A1 e vorrei sapere se, x la taglia S/M, devo saltare quei 2 passaggi dello schema A2 che si trovano in alto a dx e proseguire con le maglie alte nell'arco di catenelle. Grazie Claudia
01.03.2016 - 08:20DROPS Design answered:
Buongiorno Claudia, la prima parte del lavoro fino agli scalfi è identica per tutte le taglie: dopo aver lavorato il diagramma A.1 deve lavorare tutto il diagramma A.2 in altezza e poi riprendere con il giro 5 di A.1 e seguire le spiegazioni indicate. Buon lavoro!
01.03.2016 - 10:48
|
||||||||||||||||||||||||||||||||||
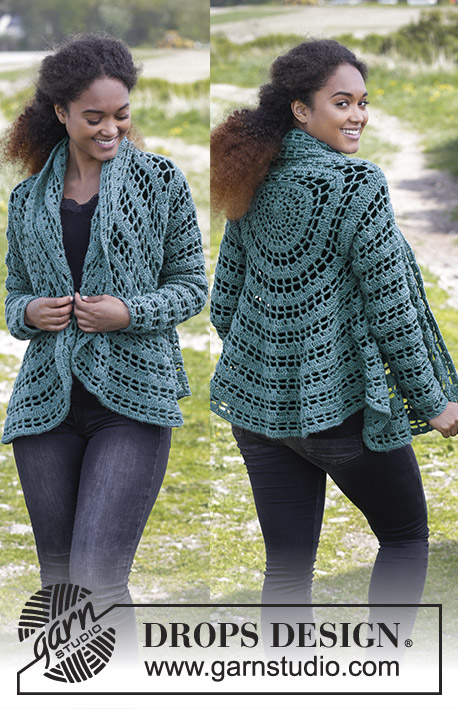
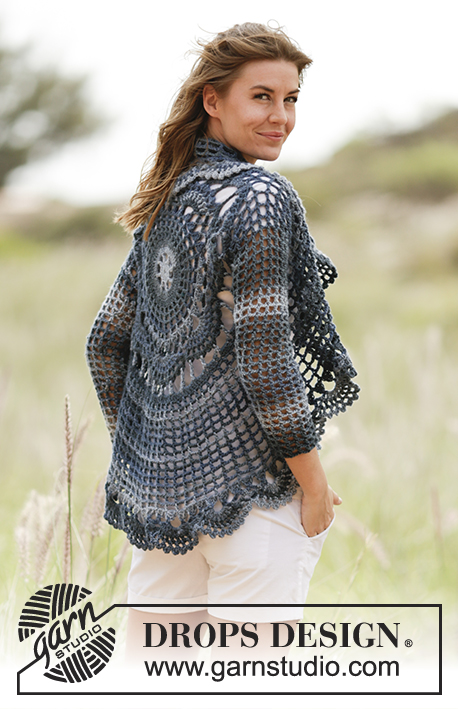
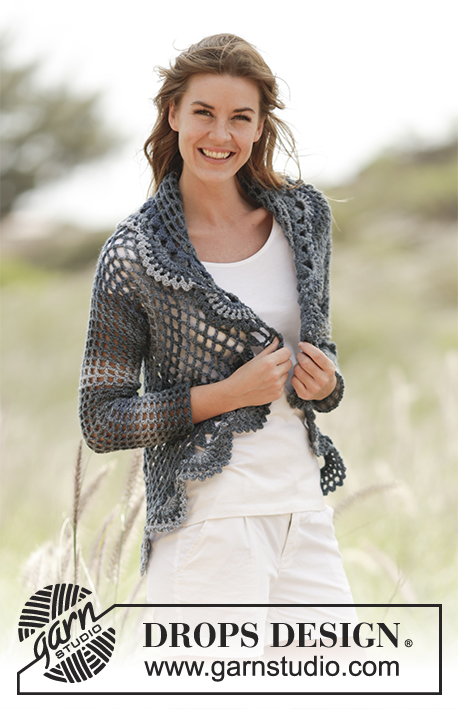
Evening Tide#eveningtidejacket |
||||||||||||||||||||||||||||||||||
 |
 |
|||||||||||||||||||||||||||||||||
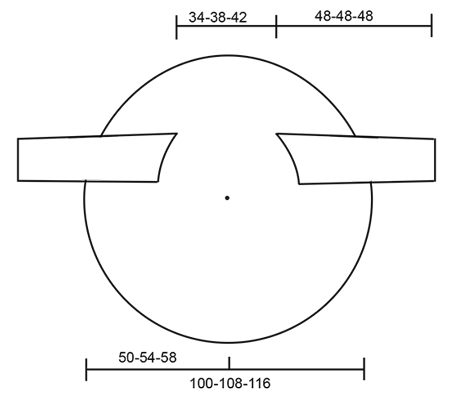
Crochet DROPS jacket worked in a circle in "Big Delight". Size S-XXXL.
DROPS 168-27 |
||||||||||||||||||||||||||||||||||
|
MAGIC CIRCLE: To avoid hole in the middle beg with this technique: Hold yarn end in the left hand and make a loop around left index finger (from left to right). Hold the loop with left thumb and index finger. Insert hook through loop, get the yarn from ball, pull yarn through loop, make 1 YO on hook and pull YO through st on hook = 1 sc, work ch 3, then work 15 dc around loop, finish with 1 sl st in 3rd ch = 16 dc. Continue as explained in pattern – AT THE SAME TIME pull yarn end so that loop is tighten tog and the hole disappears. PATTERN: See diagrams A.1 and A.2. CROCHET INFO: Replace first dc from beg of round with 3 ch. Finish round with 1 sl st in 3rd ch from beg of round. Replace first tr on beg of round with 4 ch. Finish round with 1 sl st in 4th ch on beg of round. ---------------------------------------------------------- JACKET WORKED IN A CIRCLE: Work a MAGIC CIRCLE - see explanation above, on hook SIZE 5.5 mm/US 9 with Big Delight. Then work according to A.1 - NOTE: First round in A.1 is explained in magic circle, work 4 repetitions of A.1 in width. Sl sts at beg of A.1 are only worked at beg of round. READ CROCHET INFO! REMEMBER THE CROCHET GAUGE! When A.1 has been worked, continue according to A.2, work 7 repetitions of A.2 in width, on last round in A.2 dec 1 dc = 160 dc. Continue to work according to A.1, now beg on 5th round - see arrow in diagram. Work 1-2-3 rounds as 5th round in diagram (= 80 dc + 2 ch), then work armholes as follows: Work * 1 dc + 2 ch in first dc *, repeat from *-* over the first 20 dc, work 22-24-26 ch, skip 10-11-12 dc (=1st armhole), work * 1 dc + 2 ch in next dc *, repeat from *-* over the next 40-38-36 dc, work 22-24-26 ch, skip 10-11-12 dc (=2nd armhole), finish with 1 sl st at beg of round. Then work as 6th round in diagram as follows: Work 1 dc + 2 ch in every dc until 1st armhole, * work 1 dc + 2 ch around ch-space *, repeat from *-* 10-11-12 more times, continue with 1 dc + 2 ch until 2nd armhole, * work 1 dc + 2 ch around ch-space *, repeat from *-* 10-11-12 more times = 82 dc with 2 ch between each. Then repeat 7th round 8-7-6 times upwards. Work 7th round 1-3-5 more times, AT THE SAME TIME inc 2 dc evenly on every row, i.e. two times on every round work as follows: 1 dc + 3 ch + 1 dc + 3 ch in 1 dc = 84-88-92 dc with 3 ch between each. Piece measures approx. 80-88-96 cm / 31½"-34½"-38" in diameter (= 40-44-48 cm / 15¾"-17¼"-19" from middle). Work last round in A.1, then work according to A.2 (= 21-22-23 repetitions in width). Fasten off. SLEEVES: Work in the round from armhole and down. Work 1 dc + 2 ch in every dc skipped, and 1 dc + 2 ch in bottom edge of every dc from the other side of armhole = 21-23-25 dc with 2 ch between each. Insert a marker mid under sleeve. Continue with 1 dc + 2 ch in every dc. When piece measures 4 cm / 1½", dec 1 dc + 2 ch mid under sleeve as follows: Work last dc before marker but wait with last pull through, work next dc (do not work 2 ch between), on last pull through, pull yarn through all 3 loops on hook (= 1 dc + 2 ch dec). Dec every 5 cm / 2" 7 more times, dec alternately before and after marker = 13-15-17 dc with 2 ch between each. Continue until piece measures 48 cm / 19" in all sizes, fasten off. Work another sleeve the same way. |
||||||||||||||||||||||||||||||||||
Diagram explanations |
||||||||||||||||||||||||||||||||||
|
||||||||||||||||||||||||||||||||||
 |
||||||||||||||||||||||||||||||||||
 |
||||||||||||||||||||||||||||||||||
Have you finished this pattern?Tag your pictures with #dropspattern #eveningtidejacket or submit them to the #dropsfan gallery. Do you need help with this pattern?You'll find 8 tutorial videos, a Comments/Questions area and more by visiting the pattern on garnstudio.com. © 1982-2026 DROPS Design A/S. We reserve all rights. This document, including all its sub-sections, has copyrights. Read more about what you can do with our patterns at the bottom of each pattern on our site. |
||||||||||||||||||||||||||||||||||


With over 40 years in knitting and crochet design, DROPS Design offers one of the most extensive collections of free patterns on the internet - translated to 17 languages. As of today we count 325 catalogs and 12291 patterns - 12281 of which are translated into English (US/in).
We work hard to bring you the best knitting and crochet have to offer, inspiration and advice as well as great quality yarns at incredible prices! Would you like to use our patterns for other than personal use? You can read what you are allowed to do in the Copyright text at the bottom of all our patterns. Happy crafting!
Post a comment to pattern DROPS 168-27
We would love to hear what you have to say about this pattern!
If you want to leave a question, please make sure you select the correct category in the form below, to speed up the answering process. Required fields are marked *.