
Suositut kategoriat
Etsitkö tiettyä lankaa?


|
||||||||||||||||||||||||||||||||||
Evening Tide |
||||||||||||||||||||||||||||||||||
 |
 |
|||||||||||||||||||||||||||||||||
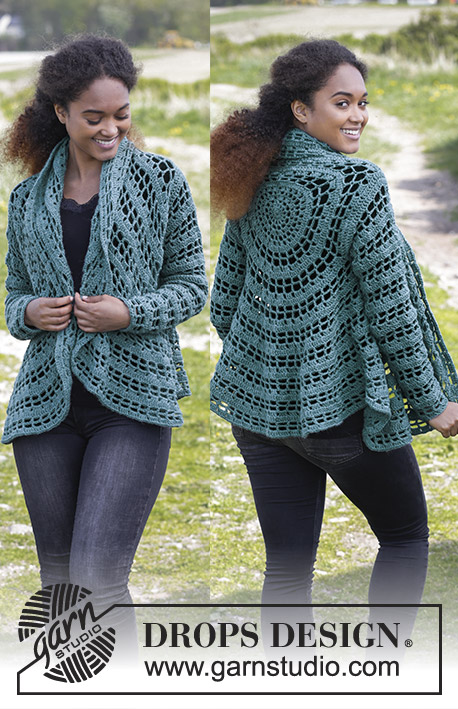
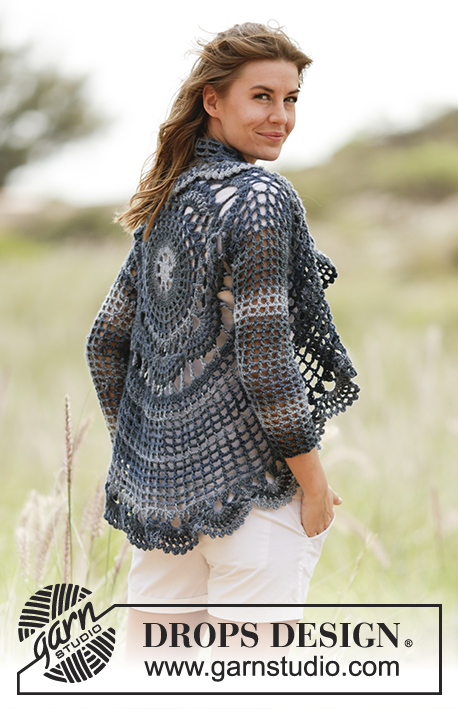
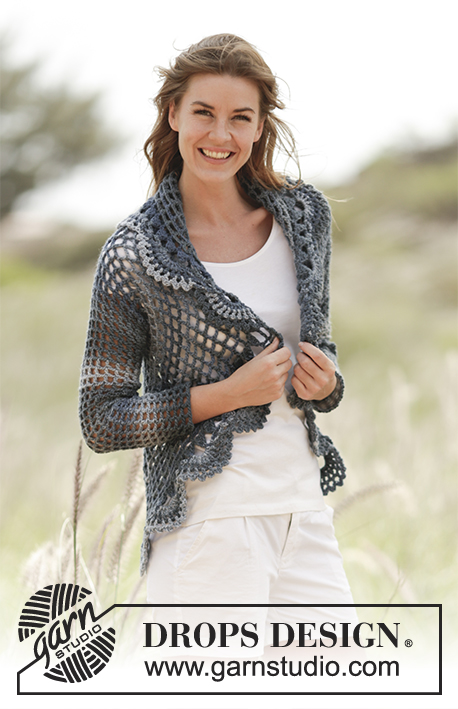
Virkattu DROPS pyöröjakku ”Big Delight” -langasta. Koot S-XXXL.
DROPS 168-27 |
||||||||||||||||||||||||||||||||||
|
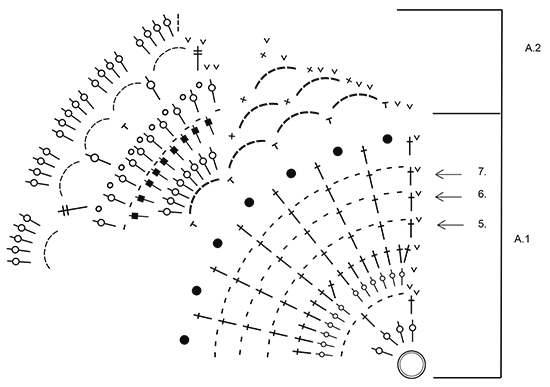
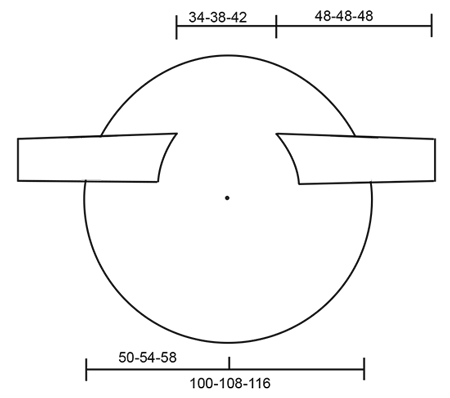
ALOITUSYMPYRÄ: Aloita suljettua virkkausta tällä tekniikalla, jottei työn alkuun jäisi reikä: Pidä kiinni langanpäästä vasemmalla kädellä ja kierrä lanka kerran vasemman käden etusormen ympärille (vasemmalta oikealle). Pidä muodostunut silmukka vasemman käden peukalon ja etusormen välissä. *Vie koukku silmukkaan, ota lanka koukulle ja vedä lanka silmukan läpi, ota lanka koukulle ja vedä lanka koukulla olevien silmukoiden läpi = 1 ks, virkkaa 3 kjs, virkkaa sitten silmukkaan 15 p, virkkaa lopuksi 1 ps 3. kjs:aan = 16 p. Jatka virkkaamista ohjeen mukaisesti ja kiristä langan avulla silmukka umpeen. MALLIVIRKKAUS: Katso piirrokset A.1 ja A.2. VIRKKAUSINFO: Kerroksen ensimmäinen p korvataan korvataan 3 kjs:lla. Virkkaa lopuksi 1 ps krs:n 3. kjs:aan. Kerroksen ensimmäinen kp korvataan korvataan 4 kjs:lla. Virkkaa lopuksi 1 ps krs:n 4. kjs:aan. ---------------------------------------------------------- YMPYRÄJAKKU: Virkkaa ALOITUSYMPYRÄ (kts. selitys yllä) koukulla nro 5,5 ja Big Delight -langalla. Jatka virkkaamalla mallivirkkausta piirroksen A.1 mukaisesti. HUOM! Piirroksen A.1 ensimmäinen krs selitetään aloitusympyrässä. Toista piirroksen A.1 mallikertaa 4 kertaa krs:lla. Piirrosten A.1 ja A.2 alussa oleva ps virkataan vain krs:n alussa. LUE VIRKKAUSINFO! TARKISTA VIRKKUUTIHEYS! Kun olet virkannut piirroksen A.1 loppuun, jatka virkkaamalla mallivirkkausta piirroksen A.2 mukaisesti. Toista piirroksen A.2 mallikertaa 7 kertaa krs:lla. Kavenna piirroksen A.2 viimeisellä krs:lla 1 p = 160 p. Virkkaa sitten mallivirkkausta piirroksen A.1 mukaisesti, aloita nyt piirroksen 5. krs:lta (kts. piirroksen nuoli). Virkkaa 1-2-3 krs piirroksen 5. krs:n mukaisesti (= 80 p + 2 kjs). Virkkaa sitten kädentiet seuraavasti: Virkkaa *1 p + 2 kjs ensimmäiseen p:seen*, toista *-* ensimmäisten 20 p:ään kohdalla, virkkaa 22-24-26 kjs, jätä 10-11-12 p väliin (= ensimmäinen kädentie), virkkaa *1 p + 2 kjs seuraavaan p:seen*, toista *-* seuraavien 40-38-36 p:ään kohdalla, virkkaa 22-24-26 kjs, jätä 10-11-12 p väliin (= toinen kädentie), virkkaa lopuksi 1 ps krs:n alkuun. Virkkaa sitten mallivirkkausta piirroksen 6. krs:n mukaisesti näin: Virkkaa 1 p + 2 kjs jokaiseen p:seen, kunnes olet ensimmäisen kädentien kohdalla, *virkkaa 1 p + 2 kjs kjs-kaareen*, toista *-* vielä 10-11-12 kertaa, jatka virkkaamalla 1 p + 2 kjs, kunnes olet toisen kädentien kohdalla, *virkkaa 1 p + 2 kjs kjs-kaareen*, toista *-* vielä 10-11-12 kertaa = 82 p ja 2 kjs jokaisen p:ään välissä. Toista sitten 7. krs:ta 8-7-6 kertaa. Toista 7. krs:ta vielä 1-3-5 kertaa ja lisää SAMALLA jokaisella krs:lla tasavälein 2 p, eli virkkaa jokaisella krs:lla 2 kertaa seuraavasti: 1 p + 3 kjs + 1 p + 3 kjs samaan p:seen = 84-88-92 p ja 3 kjs jokaisen p:ään välissä. Työn halkaisija on n. 80-88-96 cm (= 40-44-48 cm keskeltä mitattuna). Virkkaa piirroksen A.1 viimeinen krs. Virkkaa sitten mallivirkkausta piirroksen A.2 mukaisesti (= 21-22-23 mallikertaa krs:lla). Kun olet virkannut piirroksen A.2 loppuun, katkaise lanka ja päättele langanpäät. HIHAT: Virkataan suljettuna virkkauksena kädentieltä alaspäin. Virkkaa 1 p + 2 kjs jokaiseen väliin jätettyyn p:seen ja 1 p + 2 kjs kädentien toisen reunan jokaisen p:ään alareunaan = 21-23-25 p ja 2 kjs jokaisen p:ään välissä. Kiinnitä 1 merkkilanka keskelle hihan alle. Jatka virkkaamalla 1 p + 2 kjs jokaiseen p:seen. Kun työn pituus on 4 cm, kavenna keskellä hihan alla 1 p + 2 kjs seuraavasti: Virkkaa viimeinen merkkilankaa edeltävä p, mutta jätä viimeinen läpiveto vielä tekemättä, virkkaa seuraava p (mutta älä virkkaa p:iden väliin 2 kjs), vedä lanka viimeisellä läpivedolla kaikkien koukulla olevien 3 s:n läpi (työstä kapeni 1 p + 2 kjs). Toista tällaiset kavennukset 5 cm välein vielä 7 kertaa (kavenna vuorotellen ennen merkkilankaa ja merkkilangan jälkeen) = 13-15-17 p ja 2 kjs jokaisen p:ään välissä. Jatka virkkaamista, kunnes työn pituus kaikissa koissa on 48 cm. Katkaise lanka ja päättele langanpäät. Virkkaa toinen hiha samoin. |
||||||||||||||||||||||||||||||||||
Ruutupiirroksen selitykset |
||||||||||||||||||||||||||||||||||
|
||||||||||||||||||||||||||||||||||
|
||||||||||||||||||||||||||||||||||
|
||||||||||||||||||||||||||||||||||
|
Oletko tehnyt tämän mallin, tai jonkun muun malleistamme? Jaa kuvia sosiaalisissa medioissa ja merkitse ne #dropsdesign, jotta voimme nähdä ne! Tarvitsetko apua tämän ohjeen kanssa?Löydät ohjevideota, kommentteja/kysymyksiä ja muuta osoitteessa www.garnstudio.com © 1982-2024 DROPS Design A/S. Pidätämme kaikki oikeudet. Tämä tiedosto ja kaikki sen alatiedostot on suojattu tekijänoikeuslailla. Lue lisää siitä, mitä voit tehdä ohjeillamme, verkkosivujemme jokaisen ohjeen alaosasta. |
||||||||||||||||||||||||||||||||||


DROPS Design on toiminut neule- ja virkkausalalla yli 40 vuotta ja meillä on yksi kaikkein laajin valikoima ilmaisia ohjeita verkossa - käännettynä 17 kielelle. Tänään meiltä löytyy 304 lehteä ja 11422 ohjetta - joista 10678 ohjetta on käännetty suomeksi.
Työskentelemme ahkerasti, jotta voisimme antaa teille kaikkein parhaimpia neule- ja virkkausohjeita, inspiraatiota ja neuvoja sekä korkealaatuisia lankoja todella edulliseen hintaan! Haluaisitko käyttää ohjeitamme muuhun kuin henkilökohtaiseen käyttöön? Voit lukea säännöistä ohjeiden Tekijänoikeus -tekstissä, joka löytyy kaikkien ohjeidemme alapuolelta. Hauskoja hetkiä käsitöiden parissa!
Kommentit / Kysymykset (47)
Buonasera, non riesco a capire perché da 160 maglie si passa a lavorare su 80m + 2 cat. Dopo aver finito lo schema A2 mi potete spiegare meglio cosa devo fare per realizzare gli scaldi? Grazie mille. Patrizia
29.06.2023 - 00:47Hi, I finished A1 than went to A2 which completed the big round design on the last picture..how many times do I do A2..it says 7 repitions?.do i keep doing all the rows of A2 than go back to A1 starting at row 5?..this pattern not clear.. thank you
04.06.2023 - 10:30DROPS Design answered:
Dear Aziza, you have 7 repeats of A.2 on the round. That is, to work over all of the stitches of A.1 in the previous round, you need to repeat the first round of A.2 7 times in the same round. Continue working the chart. When you finish working A.2 once, work A.1 again, now starting on the 5th round of the chart (marked with an arrow). Happy crocheting!
04.06.2023 - 17:39Hello! Me again! Thanks for earlier reply, now clear regarding slip stitches at beginning of rounds. I am now nearly at :Work 7th Round 1-3-5 times, AT THE SAME TIME inc 2 tr evenly on every row, i.e. two times on every row. Is there a best place to put these increases? I assume NOT in the arm hole areas, as this would alter the stitches for the arms? Or it may not! This pattern is challenging me, but with your help I will finish it ! Thank you.
26.02.2023 - 14:35DROPS Design answered:
Dear Susan, as long as they are not adjacent/next to each other you can work the increases anywhere in the row, even in the armhole areas. Happy crocheting!
26.02.2023 - 23:55Thanks for answering my 1st question. I have now started this pattern & it is the first time I have used a diagram pattern. I can work out the stitches needed from the key, but am struggling with working out which stitches in the diagram are in which row at the beginning of the rows, mainly slip stitches in A2. Did row 3 of A2 OK, but when I started row 5 found I had got row 4 wrong 1 extra picot put in. Can you give me written instructions for rows 4 and 5, is start row 4 sl st, dc,sl st,tr?
22.02.2023 - 19:32DROPS Design answered:
Dear Mrs Richardson, the slip stitches at the beginning of A.2 helps at the beg of round to start on correct place - at the beg of row 4 start with 1 slip st in first ch-space, *1 dc around ch-space, then (1 tr, 1 picot) x 9, 1 tr = 9 picots (10 tr with 1 picot between each), then repeat from * all the round - you should have 7 repeats of A.2 in total. Finish 4th round with 1 slip st in the first dc, then sl st to the first picot (= 3 sl sts), and start with 1 tr (= 4ch) + 6 chains, etc... Happy crocheting!
23.02.2023 - 13:30I am using Bomull lin for this pattern. Checked & believe it is an equivalent weight yarn. I am crocheting tension squares to check tension. 1st square made with 5.5 mm hook gives measurement of 9cm wide x 13 cm high, 13tr x 8 rows. 2nd square with 5 mm hook gives measurement of 8cm wide x 12cm high , 13tr x 8 rows. So neither correct. I am unsure what to do. I f I use smaller hook, I will end up with an even narrower width, & maybe reach 11 cm height. My tension is not giving a Square!
18.02.2023 - 17:44DROPS Design answered:
Dear Susan, in these cases, it's more important the width (with the right amount of stitches) than the height (the amount of rows), since you could always work a few less rows, but it's more difficult to adjust the number of stitches. Therefore, you can work with a 5.5mm hook or even try if the width will match with a 6mm hook. Then, you will need to adjust the amount of rows to work (making rules of 3 of the length indicated for your size in a specific point in the pattern and the rows you have worked and have yet to work). Happy crocheting!
19.02.2023 - 19:27Looking at the picture, it looks like the last 2 rounds of A2 were not completed. According to the picture, the last round completed was the picot between dc around chain space. Am I correct?
23.09.2021 - 06:12DROPS Design answered:
Hi Denise, All the rounds in A.2 are completed. Happy crocheting!
28.09.2021 - 14:48Hello, What size is this pattern making? How do you adjust to make S or XXXL? Does the hook size determine the size of the finished jacket? Thank you!
10.04.2019 - 20:15DROPS Design answered:
Dear Patricia, for the finished size, please refer to the scematics at the bottom of the pattern. And yes, the sice of the hook does change the size of the finished item (the crocheted fabric will be thighter and the piece will be smaller with a smaller hook, and it will be looser and bigger with a bigger hook). Happy Crafting!
11.04.2019 - 08:57Hallo! Ich würde diese Kreisjacke gerne mit einem Farbwechsel-Bobbel häkeln. Sind da 750 m Lauflänge (3-fädig, 150 g) ausreichend? Danke.
17.07.2018 - 07:59DROPS Design answered:
Liebe Frau Kaufmann, wir bitten um Verständnis, dass wir nicht Produkte unserer Konkurrenz empfehlen können und dass der Kauf des Materials uns hilft, weiterhin kostenlose Anleitungen zur Verfügung stellen zu können.
17.07.2018 - 09:28Salve, vorrei un chiarimento sul punto, dopo gli scalfi, non ho capito bene cosa si intende in verticale; mi viene da pensare che devo lavorare fin sopra gli scalfi, ma non lavorare il collo; qualcuno può aiutarmi per favore?
26.04.2018 - 13:59DROPS Design answered:
Buongiorno Gilda. Abbiamo corretto il testo. Deve ripetere il giro 7 il numero di volte indicato per la sua taglia. Buon lavoro!
26.04.2018 - 14:10Bonjour, Je viens de terminer le dernier rang de A2 et je ne comprends pas lorsqu'il est écrit " au dernier tour de A.2 diminuer 1 B = 160 B". Je dois effectuer des diminutions avant d'entamer la partie disant de reprendre A1 au 5eme rang ?
19.01.2018 - 16:17DROPS Design answered:
Bonjour Chou-coulate, au dernier rang de A.2, vous avez 23 brides dans chaque A.2 x 7 A.2 = 161 brides, diminuez 1 m (crochetez par ex 4 brides au lieu de 5 autour d'un arceau) pour que vous ayez bien 160 brides à la fin de A.2. Bon crochet!
22.01.2018 - 08:44