
Popular categories
Looking for a yarn?


Comments / Questions (57)
![]() Sarah wrote:
Sarah wrote:
Guten Tag! Ich verstehe den Teil mit den Raglanzunahmen nicht ganz. Wenn ich nur in jeder 4 Reihe zunehme verändert sich doch das Lochmuster. Ist das so gewollt?
24.02.2015 - 09:45DROPS Design answered:
Das stimmt, das Lochmuster ändert sich dann. Sie können die Raglanzunahmen aber auch verschränkt abstricken, dann ergibt sich gar kein Loch und die einzige Loch-R ist die von A.2. Ich habe eine Anfrage an die Designerinnen gesendet, wie die Raglanzunahmen abgestrickt werden sollen und hoffe, dass das bald präzisiert wird.
09.03.2015 - 09:59
![]() Tina wrote:
Tina wrote:
Erst mal vielen Dank für dieses tolle Teil! Leider komme ich mit der Anleitung nicht weiter :-( Wie verteilen sich denn die jeweils zugenommenen 8 Maschen beim Raglanteil auf das Muster?
06.02.2015 - 16:24DROPS Design answered:
Die zugenommen M stricken Sie einfach kraus re. Diese M befinden sich ja rechts und links von A.2 und müssen nicht in A.2 eingestrickt werden, sondern gehören zu den kraus re gestrickten Bereichen des Pullis. Viel Spaß beim Weiterstricken!
08.02.2015 - 15:18
![]() Maria Jose wrote:
Maria Jose wrote:
Hola!! Es un jersey muy bonito para la primavera.Mi pregunta es si el jersey se teje de arriba para abajo, como se lee el patron..de arriba a abajo? de izquierda a derecha? O de forma habitual de abajo a arriba?? Gracias por adelantado
02.02.2015 - 21:16DROPS Design answered:
Hola María José, se trabaja de arriba abajo y los diagramas se leen como siempre de derecha a izquierda y de abajo arriba
04.02.2015 - 20:57
![]() Maria Jose wrote:
Maria Jose wrote:
Hola!! Es un jersey muy bonito para la primavera.Mi pregunta es si el jersey se teje de arriba para abajo, como se lee el patron..de arriba a abajo? de izquierda a derecha? O de forma habitual de abajo a arriba?? Gracias por adelantado
02.02.2015 - 21:12DROPS Design answered:
Hola María José, se trabaja de arriba abajo y los diagramas se leen como siempre de derecha a izquierda y de abajo arriba
04.02.2015 - 20:30Gabriela Vladie wrote:
Pretty
28.01.2015 - 11:26
![]() Tina wrote:
Tina wrote:
Wow, ist der Pulli schön! Bitte, bitte, bitte mit ins neue Heft nehmen!
13.01.2015 - 21:44
![]() Benedetta wrote:
Benedetta wrote:
Molto bello e di facile realizzazione
11.01.2015 - 18:42
![]() Michaela Hochfeld wrote:
Michaela Hochfeld wrote:
Den Pulli mache ich als erstes! Kann man jetzt dann auch schon toll anziehen zu Jeans! Super
08.01.2015 - 16:55Despina wrote:
Just love the back! Would definately knit it.
08.01.2015 - 10:08
![]() Monica Migliori wrote:
Monica Migliori wrote:
Graziosissimo e femminile. Sembra facile da realizzare…. Bello!!!
04.01.2015 - 17:57
|
|||||||||||||
Summer in Paris#summerinparissweater |
|||||||||||||
 |
 |
||||||||||||
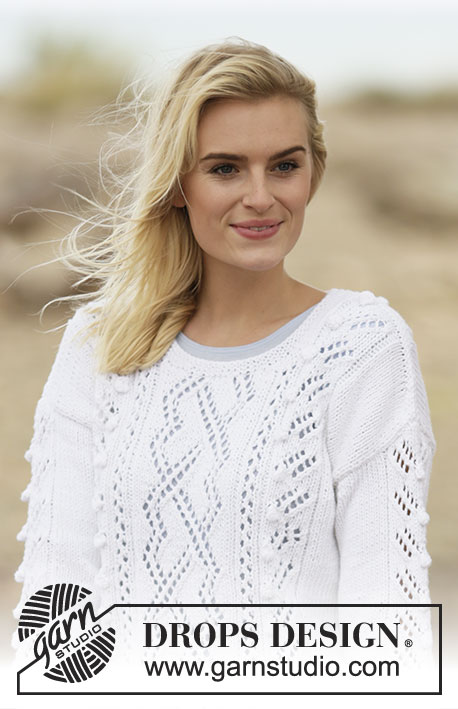
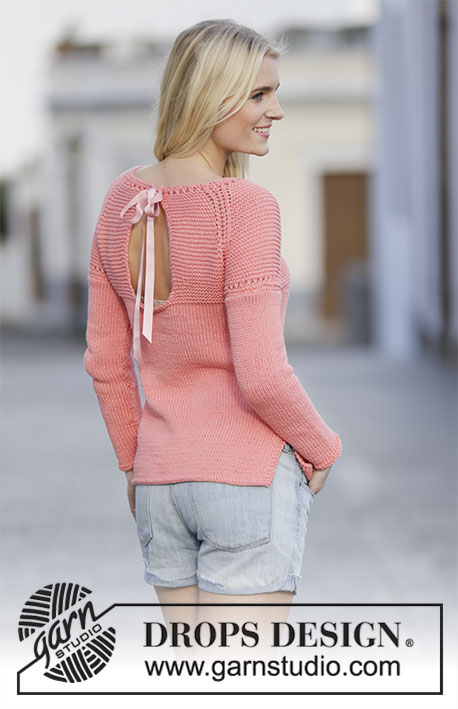
Knitted DROPS jumper with lace pattern, vent and raglan in ”Paris”. Worked top down. Size: S - XXXL.
DROPS 159-10 |
|||||||||||||
|
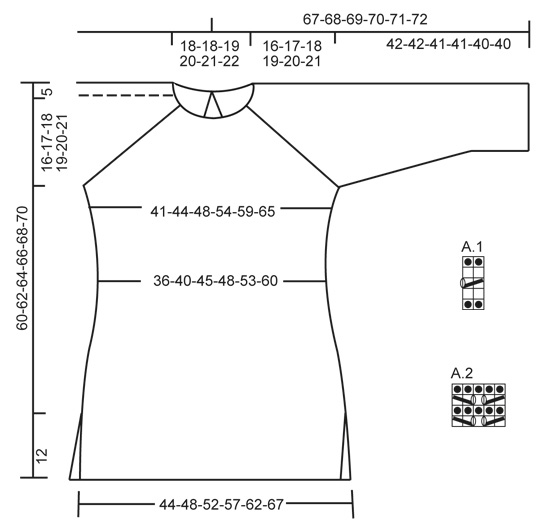
GARTER ST (worked in the round): * K 1 round and P 1 round *, repeat from *-*. 1 ridge = 2 rounds. GARTER ST (back and forth): K all rows. 1 ridge = K2 rows. PATTERN: See diagrams A.1-A.2. The diagrams show all rows in pattern seen from RS. Do not work YOs twisted on next round/row, they should make holes. DECREASE TIP-1 (applies to vent): All dec are done from RS. Dec before 1 edge st as follows: K 2 tog. Dec after 1 edge st as follows: Slip 1 st as if to K, K 1, psso. DECREASE TIP-2 (applies to body and sleeves): All dec are done from RS! Dec as follows before marker: Work until 3 sts remain before marker, K 2 tog, K 1. Dec as follows after marker: K 1, slip 1 st as if to K, K 1, psso. INCREASE TIP (applies to body): Work until 1 st remains before marker, 1 YO, K 2, 1 YO = 2 sts inc. On next round K YOs twisted (i.e. work in back loop of st instead of front) to avoid holes. ---------------------------------------------------------- YOKE: Piece is worked back and forth from mid back, then worked in the round on circular needle. Cast on 76-76-80-84-88-92 sts on circular needle size 5 mm / US 8 with Paris. K 1 row while AT THE SAME TIME inc 24-24-32-32-32-36 sts evenly = 100-100-112-116-120-128 sts. Work next row as follows: 2 sts in garter st, A.1 (= 2 sts) until 2 sts remains, finish with 2 sts in garter st. Then work in GARTER ST - see explanation above. REMEMBER THE KNITTING GAUGE READ ALL OF THE FOLLOWING SECTION BEFORE CONTINUING! Inc for raglan AT THE SAME TIME dec for vent mid back. RAGLAN: On next row (= RS) inc for raglan as follows: K 15-15-17-19-20-22, 1 YO, A.2 (= 5 sts), 1 YO, K 10-10-12-10-10-10, 1 YO, A.2, 1 YO, K 30-30-34-38-40-44, 1 YO, A.2, 1 YO, K 10-10-12-10-10-10, 1 YO, A.2, 1 YO, K 15-15-17-19-20-22 (= 8 sts inc). YOs that are not included in A.2 are K twisted on next row, they should not make holes. Repeat inc every other row 3-5-8-12-16-20 more times, then every 4th row 8-8-7-6-5-4 times, then every 6th row 1 time. VENT: Dec for vent mid back AT THE SAME TIME inc for raglan. All dec are done from RS! On first row from RS dec 1 st inside 1 edge st in each side of piece - Read DECREASE TIP-1! Repeat dec every 8th row 6 more times. When raglan inc and vent are done, work next row as follows from RS: K 21-23-27-32-36-41, K the next 3 (= the first 3 sts in A.2), slip the next 40-44-50-54-60-66 sts on a stitch holder for sleeve, cast on 8 sts under sleeve, insert 1 marker in the middle of these 8 sts, K the next 62-66-74-84-92-102 sts (= front piece), slip the next 40-44-50-54-60-66 sts on a stitch holder for sleeve, cast on 8 sts under sleeve, insert 1 marker in the middle of these 8 sts, K the next 3 (= last 3 sts of A.2), K 21-23-27-32-36-41, cast on 14 sts at the end of row (over vent). BODY: Work around on circular needle. = 140-148-164-184-200-220 sts. Work 2 ridges in GARTER ST - see explanation above. There are now 70-74-82-92-100-110 sts on each side of each marker in the sides. Now continue piece in stockinette st. When piece measures 3 cm / 1" from new sts under arms, dec 1 st on each side of each markers (= 4 sts dec) - READ DECREASE TIP-2! Repeat dec every 3-4-4-3-3-4 cm / 1"-1½"-1½"-1"-1"-1½" 3-2-2-4-4-3 more times = 124-136-152-164-180-204 sts. When piece measures 37-39-41-43-45-47 cm / 14½"-15¼"-16⅛"-17"-17¾"-18½" in total, inc 1 st on each side of each marker (= 4 sts inc) – see INCREASE TIP. Repeat inc every 2-1½-2-1½-1-2 cm / ¾"-½"-¾"-½"-⅜"-¾" 5-6-5-6-7-5 more times = 148-164-176-192-212-228 sts. When piece measures 48-50-52-54-56-58 cm / 19"-19¾"-20½"-21¼"-22"-22¾", work 1 ridge over 3 sts on each side of each marker (= 6 sts in garter st in each side of piece), work the other sts in stockinette st. Then divide the piece at each marker and finish front and back piece separately. FRONT PIECE: = 74-82-88-96-106-114 sts. Continue in stockinette st with 3 sts in garter st in each side of piece. When piece measures 59-61-63-65-67-69 cm / 23¼"-24"-24¾"-25½"-26⅜"-27⅛" in total, work 1 ridge over all sts. Bind off. BACK PIECE: Work as front piece. SLEEVE: Work sleeves in the round on double pointed needles. Slip the 40-44-50-54-60-66 sts from stitch holder back on double pointed needles size 5 mm / US 8. Insert 1 marker in piece, NOW MEASURE PIECE FROM HERE. Cast on 8 new sts under sleeve, insert 1 marker in the middle of these 8 sts = 48-52-58-62-68-74 sts. Work A.1. Then work piece in stockinette st. When piece measures 6 cm / 2⅜", dec 1 st on each side of marker - READ DECREASE TIP-2. Repeat dec every 7-4-3-2½-2-1½ cm / 2¾"-1½"-1⅛"-⅞"-¾"-½" 4-6-8-9-11-13 more times = 38-38-40-42-44-46 sts. When piece measures 41-41-40-40-39-39 cm / 16⅛"-16⅛"-15¾"-15¾"-15¼"-15¼", work 2 ridges. Bind off. Work the other sleeve the same way. ASSEMBLY: Sew the opening under the sleeves. Divide the silk ribbon in two, fold the cutting edge inwards and fasten it at the top of vent, tie a bow. |
|||||||||||||
Diagram explanations |
|||||||||||||
|
|||||||||||||
 |
|||||||||||||
Have you finished this pattern?Tag your pictures with #dropspattern #summerinparissweater or submit them to the #dropsfan gallery. Do you need help with this pattern?You'll find 18 tutorial videos, a Comments/Questions area and more by visiting the pattern on garnstudio.com. © 1982-2026 DROPS Design A/S. We reserve all rights. This document, including all its sub-sections, has copyrights. Read more about what you can do with our patterns at the bottom of each pattern on our site. |
|||||||||||||


With over 40 years in knitting and crochet design, DROPS Design offers one of the most extensive collections of free patterns on the internet - translated to 17 languages. As of today we count 324 catalogs and 12267 patterns - 12257 of which are translated into English (US/in).
We work hard to bring you the best knitting and crochet have to offer, inspiration and advice as well as great quality yarns at incredible prices! Would you like to use our patterns for other than personal use? You can read what you are allowed to do in the Copyright text at the bottom of all our patterns. Happy crafting!
Post a comment to pattern DROPS 159-10
We would love to hear what you have to say about this pattern!
If you want to leave a question, please make sure you select the correct category in the form below, to speed up the answering process. Required fields are marked *.