
Popular categories
Looking for a yarn?


Comments / Questions (205)
Adela wrote:
"Hola Adela, antes de las vtas cortas siempre se trabaja una fila/vuelta entera " Por favor ,esta respuesta no la comprendo.En que momento del recorrido hago la v.completa?
17.11.2015 - 19:33DROPS Design answered:
Hola Adela. Es muy difícil explicar y solucionar los fallos on-line sin ver el trabajo. Te recomiendo acudir a la tienda más cercana de Drops donde vas a recibir ayuda cualificada . En este apartado resolvemos las dudas para solucionar posibles fallos en los patrones. Sobre las filas acortadas - por cada 3 filas acortadas trabajamos una fila en todos los pts.
21.11.2015 - 18:20Adela wrote:
¿esta correcto ,así?:Talle 4: con 96 pts en agja (* 1ªtejo 42py vuelvo sobre 42P; Tjo 65p y vuelvo,s/65P; tjo 90 pt y vuelvo s/90pts; tjo 96pts y v,s/96pts*)Repito de*a *Adela
11.11.2015 - 13:37DROPS Design answered:
Hola Adela, efectivamente se trabajan así las filas acortadas.
15.11.2015 - 10:44Adela wrote:
Talle 4-Tengo los 96 pts en agj.¿en la primera fila tejo una fila completa ida y regreso, antes de comenzar con el patrón? Gracias saludo Adela
09.11.2015 - 19:09Adela wrote:
Tal vez el error mio es no tejer una vuelta completa ,incl. el diagrama, y después comenzar la simultaneidad de v. cortas y diagrama.Error provocado por no observar que el video así lo muestra.Por favor sácame de la duda.GraciasAdela
05.11.2015 - 10:11DROPS Design answered:
Hola Adela, antes de las vtas cortas siempre se trabaja una fila/vuelta entera
08.11.2015 - 10:16Adela wrote:
" Cont de la manera sig: tejer 41-45-52 (60-65) pts de derecho (tejer estos pts de derecho en todas las vtas), diagrama M.1 (= 23 pts), 6-8-11 (13-16) pts derechos (tejer estos pts de derecho en todas las vueltas " disculpame que te moleste tanto,pero esto encomillado,:es una indicación preventiva general ?me podes aclarar este párrafo ?Abrazo Adela
03.11.2015 - 19:11DROPS Design answered:
Hola Adela, esta parte del texto indica como se debe trabajar toda la labor.
08.11.2015 - 10:13Adela wrote:
Talle 3)Mi duda es:tejo el diagrama completo una ida y una vuelta(sólo 2 líneas) y luego comienzo con v. acortadas,haciendo los 5pts primero,y luego el resto del diagrama? Mi duda es por la indicación"Cont de la manera sig :tejer(60pts de derecho...etc..diag.M1(=23p etc..etc.Gracias
02.11.2015 - 23:59DROPS Design answered:
Hola Adela. Veo que tienes varias dudas con la labor. Las vueltas cortas quieren decir que unas partes de la prenda tiene más filas que otra.(en este caso la parte inferior). Cada vez que llegas a la parte del diagrama tienes que trabajar la fila sig. de M.1 (no puedes saltar ni repetir ninguna fila). Antes de empezar a trabajar la prenda te recomiendo hacer una muestra con esta técnica.
03.11.2015 - 09:34Adela wrote:
T3, voy con 65 pt:tejo los primeros 5 pts diag.Regreso..Cuando tejo los 90p y llego al diag ( ¿,cuales pts del dg tejo?los mismos 5pts que tejí o ( los 5pts de la 2°linea del diag con los 18pts de la primera línea del dg? )Vi el video y no lo entiendo
31.10.2015 - 15:45Adela wrote:
Teji las 8 v derecho..Comprendo el diagrama y se hacer las vueltas cortas.No entiendo en que momento hago cada cosa.Talle 3/4añosPor favor tu ayuda es mi salvación. Gracias Adela
30.10.2015 - 21:33
![]() Christel Peters wrote:
Christel Peters wrote:
Ich verstehe an folgender Stelle die Arbeitsweise nicht: (hier dreht man nach den ersten 5 M. im Muster, die Arbeit drehen und zurück stricken,)..... wann wird der Mustersatz ( restliche 18 Maschen) vervollständigt?) ... weiter: über die ersten 64-70-80 (90-98) M. stricken): welche Reihe des Mustersatzes stricke ich hier? die Arbeit drehen und zurück stricken, über die ersten 70-76-86 (96-104) M. stricken.... Vielen Dank für eine Antwort, Christel Peters
20.09.2015 - 22:24
![]() Patricia wrote:
Patricia wrote:
Habe die Gr. 74/80 gestrickt. Hier wäre der Kragen schöner geworden wenn man bei den Ärmeln die verkürzten Reihen wie folgt strickt: erst 23 M (statt 25) und dann alle 31. Wenn man nämlich erst 25 M strickt sind am Ende der Reihe nur 6 M übrig. Beim Rest des Jäckchens sind es immer 8 M. Das gibt eine Unterbrechung des Musters.
12.08.2015 - 13:06
|
||||||||||||||||||||||
Nova#novajacket |
||||||||||||||||||||||
 |
 |
|||||||||||||||||||||
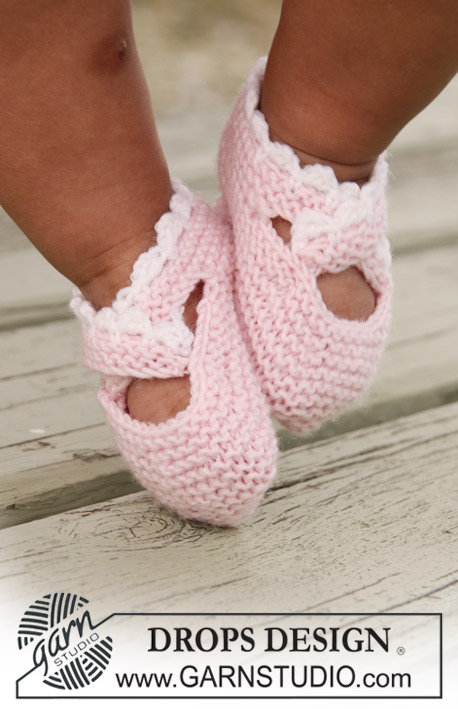
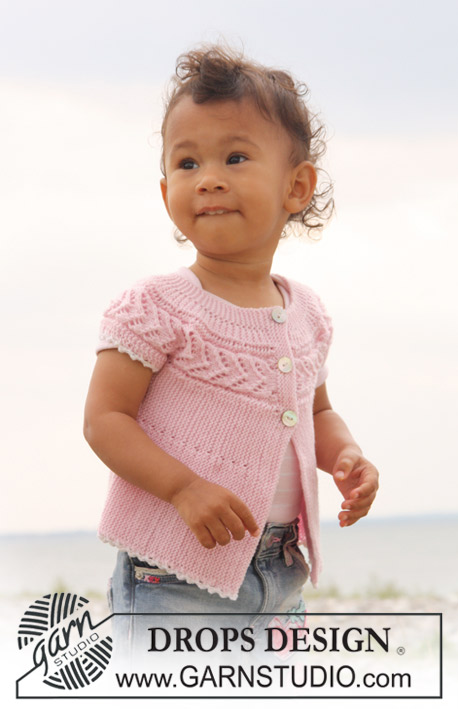
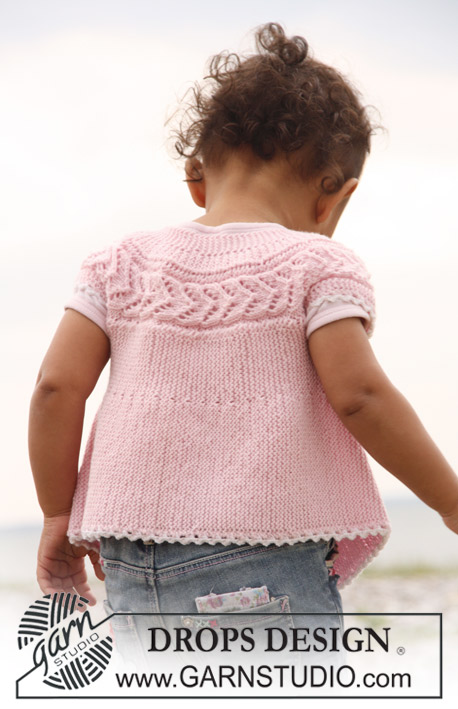
Short sleeve cardigan knitted from side to side in garter st and lace pattern for baby and children in DROPS BabyMerino
DROPS Baby 20-14 |
||||||||||||||||||||||
|
SLEEVELESS TOP: PATTERN: See diagram M.1. Diagram shows the pattern from RS. KNITTING TIP: When turning mid piece, slip first st as if to K, tighten thread and work return row in order to avoid a hole in transition. -------------------------------------------------------- -------------------------------------------------------- SLEEVELESS TOP: Beg on left front piece and work towards the armhole, work wide shoulder, work back piece, the other shoulder and then right front piece. LOOSELY cast on 62-68-78 (88-96) sts on needle size 2.5 mm / US 1 with light pink and K 8 rows for front band (first row = RS). Work next row as follows from RS: K 41-45-52 (60-65) sts, K the next 15 sts AT THE SAME TIME inc 8 sts evenly (inc 1 st by making 1 YO), K the last 6-8-11 (13-16) sts = 70-76-86 (96-104) sts. K 1 row on all sts (work YO into back of loop to avoid a hole). Continue as follows: K 41-45-52 (60-65) sts (K these sts on all rows), chart M.1 (= 23 sts), K 6-8-11 (13-16) sts (K these sts on all rows). AT THE SAME TIME work shortened rows as follows - SEE KNITTING TIP: * work the first 30-32-38 (42-47) sts, turn piece and work return row, work the first 46-50-57 (65-70) sts, turn (for all sizes this will be after 5 sts in M.1)and work return row, work the first 64-70-80 (90-98) sts, turn and work return row, work all 70-76-86 (96-104) sts, turn and work return row *, repeat from *-* until piece measures approx 16-18-19 (20,5-22) cm / 6¼"-7"-7½" (8⅛"-8¾") from cast on row, measured where widest (= bottom edge). Cut the thread. Now slip the first 41-45-52 (60-65) sts towards bottom edge on a stitch holder (= the side) = 29-31-34 (36-39) sts left on needle for wide shoulder. Continue with shortened rows as follows (first row = from RS): * Work in pattern on the first 23-25-28 (30-33) sts, turn and work return row, work in pattern on all 29-31-34 (36-39) sts, turn and work return row *, repeat from *-* until piece measures 16-17-18 (18-20) cm / 6¼"-6¾"-7" (7"-8") from where sts were put on stitch holder. Cut the thread. Slip the 41-45-52 (60-65) sts from stitch holder at the side back on needle for back piece and insert a marker in piece. Continue from bottom edge of jacket (first row = RS) in pattern and with shortened rows as described for front piece. When piece measures 28-31-35 (37-40) cm / 11"-12¼"-13¾" (14½"-15¾") from marker at the side, measured where widest (= bottom edge) cut the thread. Slip the first 41-45-52 (60-65) sts from bottom edge on a stitch holder (= the side). Continue on remaining sts for wide shoulder as described for the first shoulder until shoulders are the same length. Cut the thread. Slip the 41-45-52 (60-65) sts from stitch holder at the side back on needle and continue as described for the other front piece. When right front piece is the same length as left front piece (without front band) work next row from RS as follows: work 41-45-52 (60-65) sts, work the next 23 sts AT THE SAME TIME dec 8 sts evenly (dec by K2 tog), work the last 6-8-11 (13-16) sts = 62-68-78 (88-96) sts. Now work front band as follows: K 3 rows on all sts. On next row from RS make 3 buttonholes as follows (i.e. from bottom edge towards the top): K 41-45-53 (61-65) sts, 1 YO, K2 tog, K 7-8-9 (10-12) sts, 1 YO, K2 tog, K 7-8-9 (10-12) sts, 1 YO, K2 tog and finish with K1. Turn and K all sts. K 5 rows on all sts and bind off loosely. CROCHET BORDER: Crochet a border round bottom edge of jacket and round shoulder edges with crochet hook size 3 mm / C with white as follows: 1 sc, * ch 3, 1 dc in the first of the 3 ch, skip approx 1 cm / ⅜", 1 sc *, repeat from *-*. Cut and fasten thread. ASSEMBLY: Sew on buttons. |
||||||||||||||||||||||
Diagram explanations |
||||||||||||||||||||||
|
||||||||||||||||||||||
 |
||||||||||||||||||||||
Have you finished this pattern?Tag your pictures with #dropspattern #novajacket or submit them to the #dropsfan gallery. Do you need help with this pattern?You'll find 16 tutorial videos, a Comments/Questions area and more by visiting the pattern on garnstudio.com. © 1982-2026 DROPS Design A/S. We reserve all rights. This document, including all its sub-sections, has copyrights. Read more about what you can do with our patterns at the bottom of each pattern on our site. |
||||||||||||||||||||||


With over 40 years in knitting and crochet design, DROPS Design offers one of the most extensive collections of free patterns on the internet - translated to 17 languages. As of today we count 324 catalogs and 12285 patterns - 12275 of which are translated into English (US/in).
We work hard to bring you the best knitting and crochet have to offer, inspiration and advice as well as great quality yarns at incredible prices! Would you like to use our patterns for other than personal use? You can read what you are allowed to do in the Copyright text at the bottom of all our patterns. Happy crafting!
Post a comment to pattern DROPS Baby 20-14
We would love to hear what you have to say about this pattern!
If you want to leave a question, please make sure you select the correct category in the form below, to speed up the answering process. Required fields are marked *.