
Popular categories
Looking for a yarn?


Comments / Questions (205)
![]() Brigitte wrote:
Brigitte wrote:
Heel erg bedankt voor de uitleg over de mouwkop. Het zou makkelijker zijn om ook in het patroon te zeggen dat na de losse mouwkop alle steken weer op de naald moeten. Nog een foutje in het figuur M: bij de 7e nld is het teken voor het samenbreien te klein waardoor je denkt dat er daarna nog drie steken gebreid moeten worden maar dat zijn er maar twee.
06.06.2024 - 17:37
![]() Brigitte wrote:
Brigitte wrote:
Het js jammer dat ik er geen foto bij kan zetten want ik begrijp niet hoe de mouw uit het patroon gaat komen. Ik heb het voorpand gebreid en daarna een splitsing gemaakt door de onderkant op een hulpdraad te zetten en de bovenkant met het Mpatroon verder te breien voor 20 cm. Er komt nu dus een split van 20 cm. Is dit het mouwgat? Daarna ga ik het bovendeel weer opnemen maar vind ik vreemd want dan had ik dat net zo goed door kunnen breien. Ik zie niet waar het geheel weer aan elkaar komt.
05.06.2024 - 09:18DROPS Design answered:
Dag Brigitte,
Nadat je de splitsing hebt gemaakt en alleen over de bovenkant hebt gebreid, zet je vervolgens de steken weer bij elkaar om over alle steken te breien. Het achterpand brei je vervolgens over alle steken en als je dan weer bij de andere zijkant bent, brei je weer een stukje alleen over het bovenste deel.
05.06.2024 - 19:52
![]() Margaret Tigchelaar wrote:
Margaret Tigchelaar wrote:
I asked the question yesterday, but I think I have the answer: use all the short rows the pattern suggests. That seems to make the most sense to me. Will you let me know if I am correst? I love your patterns!
03.09.2023 - 22:32
![]() Margaret Tigchelaar wrote:
Margaret Tigchelaar wrote:
Hello!(second size) continue from bottomedge in pattern "and with shortened rows as for front," so I do 32 sts.in row 1, 50 sts in row 2, etc. or do I do only the short rows in the yoke par of the pattern, e.g. 31 in row 1, etc.?I love knitting this pattern, but just have that question. I have also knitted # 213-21 and love it!
02.09.2023 - 17:49DROPS Design answered:
Dear Margaret, yes, you work all the short rows. Happy knitting!
03.09.2023 - 23:22
![]() Jeanette wrote:
Jeanette wrote:
I den danske udgave står denne linie kun 1 gang. “strik over alle 70-76-86 (96-104) m, vend og strik tilbage” I den norske udgave står den skrevet 2 gange. Og dette er korrekt for at mønsteret bliver færdiggjort med spids. Jeg har strikket mit arbejde foredrag 3 gange før det gik op for mig, at der mangler en linie i den danske udgave og sikkert også på de andre sprog, fir jeg kan se, at mange får samme problem.
10.08.2023 - 10:13
![]() Jayne McClenaghan wrote:
Jayne McClenaghan wrote:
Very confused. When you turn is that a new row on the pattern or the same row in reverse? So for example when I work 46 I have completed the first 5 stitches of the pattern and then turn, do I then go to the second row of the pattern or the first town in reverse?
11.03.2023 - 12:52DROPS Design answered:
Dear Jayne, when turning and working the "return row" you work the next row in the chart. You can also check the following video for more details: https://www.garnstudio.com/video.php?id=187&lang=en. Happy knitting!
12.03.2023 - 17:12
![]() Catherine wrote:
Catherine wrote:
So ein schönes Modell aber auch mit Videotutorial nicht zu schaffen. Warum springt man mitten im Muster immer auf die Linie davor? Schade ☹️
13.02.2023 - 19:48
![]() Keth wrote:
Keth wrote:
Bonjour Je ne comprends pas l’explication suivante pour l’épaule : tricoter les 23-25-28 (30-33) premières m, tourner et tricoter le rang suivant à l'end ; tricoter toutes les 29-31-34 (36-39) premières m, tourner et tricoter le rang suivant à l'end*. Faut-il tricoter toutes les mailles à l’endroit quand on tourne ou faut-il respecter M1.
12.05.2022 - 16:53DROPS Design answered:
Bonjour Keth, effectivement, il faut continuer à tricoter comme avant, point mousse et M.1 pendant ces rangs raccourcis, la mention "à l'endroit" a été supprimée, merci pour votre retour. Bonne continuation!
13.05.2022 - 07:57
![]() Janet Odell wrote:
Janet Odell wrote:
Hello ! Is there an English version of this lovely pattern please?
10.04.2022 - 19:46DROPS Design answered:
Dear Janet, you can select the language under the photos of the pattern. Here is the link to the Eng/UK version: https://www.garnstudio.com/pattern.php?id=4910&cid=19 (there is another version with the US terms as well). Happy knitting!
10.04.2022 - 19:50
![]() Gerda Verheecke wrote:
Gerda Verheecke wrote:
Heel mooi model Heb de uitleg 2 à 3 keer moeten lezen alvorens ik de volledige breimethode begreep! Maar dan ging het vanzelf! Ik heb het in streepjes gebreid, om de 16 rijen een andere kleur met 5 verschillende kleuren! ( allemaal restjes wol!) Jammer dat ik hier geen foto kan mee sturen! Het is voor mijn kleindochterje, kindje van mijn dochter en haar Rwandeese echtgenoot: dus met een bruin huidje! Daardoor komen de kleuren nog beter tot hun recht! Bedankt voor dit gratis patroon 👍
28.02.2022 - 10:18
|
||||||||||||||||||||||
Nova#novajacket |
||||||||||||||||||||||
 |
 |
|||||||||||||||||||||
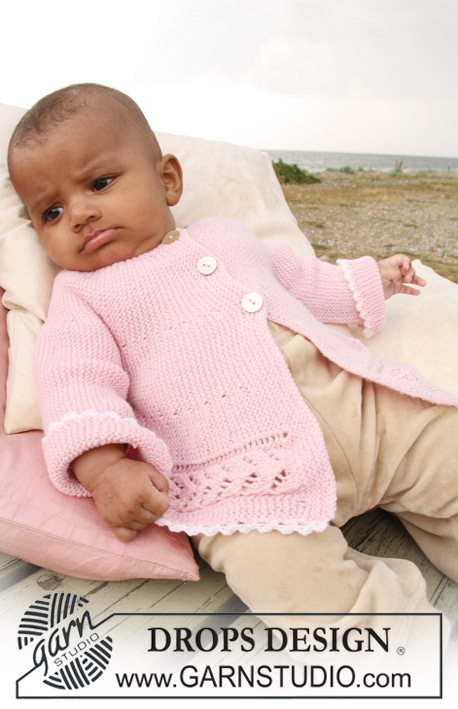
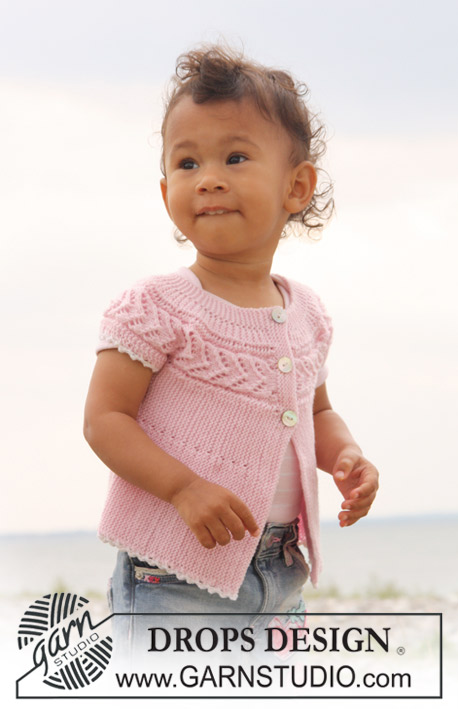
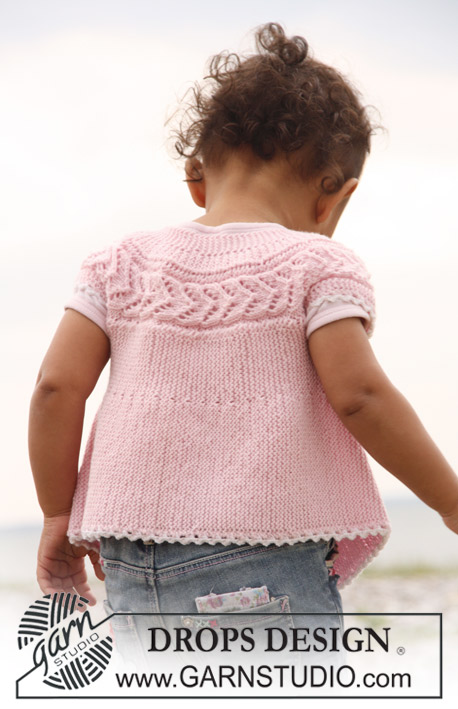
Short sleeve cardigan knitted from side to side in garter st and lace pattern for baby and children in DROPS BabyMerino
DROPS Baby 20-14 |
||||||||||||||||||||||
|
SLEEVELESS TOP: PATTERN: See diagram M.1. Diagram shows the pattern from RS. KNITTING TIP: When turning mid piece, slip first st as if to K, tighten thread and work return row in order to avoid a hole in transition. -------------------------------------------------------- -------------------------------------------------------- SLEEVELESS TOP: Beg on left front piece and work towards the armhole, work wide shoulder, work back piece, the other shoulder and then right front piece. LOOSELY cast on 62-68-78 (88-96) sts on needle size 2.5 mm / US 1 with light pink and K 8 rows for front band (first row = RS). Work next row as follows from RS: K 41-45-52 (60-65) sts, K the next 15 sts AT THE SAME TIME inc 8 sts evenly (inc 1 st by making 1 YO), K the last 6-8-11 (13-16) sts = 70-76-86 (96-104) sts. K 1 row on all sts (work YO into back of loop to avoid a hole). Continue as follows: K 41-45-52 (60-65) sts (K these sts on all rows), chart M.1 (= 23 sts), K 6-8-11 (13-16) sts (K these sts on all rows). AT THE SAME TIME work shortened rows as follows - SEE KNITTING TIP: * work the first 30-32-38 (42-47) sts, turn piece and work return row, work the first 46-50-57 (65-70) sts, turn (for all sizes this will be after 5 sts in M.1)and work return row, work the first 64-70-80 (90-98) sts, turn and work return row, work all 70-76-86 (96-104) sts, turn and work return row *, repeat from *-* until piece measures approx 16-18-19 (20,5-22) cm / 6¼"-7"-7½" (8⅛"-8¾") from cast on row, measured where widest (= bottom edge). Cut the thread. Now slip the first 41-45-52 (60-65) sts towards bottom edge on a stitch holder (= the side) = 29-31-34 (36-39) sts left on needle for wide shoulder. Continue with shortened rows as follows (first row = from RS): * Work in pattern on the first 23-25-28 (30-33) sts, turn and work return row, work in pattern on all 29-31-34 (36-39) sts, turn and work return row *, repeat from *-* until piece measures 16-17-18 (18-20) cm / 6¼"-6¾"-7" (7"-8") from where sts were put on stitch holder. Cut the thread. Slip the 41-45-52 (60-65) sts from stitch holder at the side back on needle for back piece and insert a marker in piece. Continue from bottom edge of jacket (first row = RS) in pattern and with shortened rows as described for front piece. When piece measures 28-31-35 (37-40) cm / 11"-12¼"-13¾" (14½"-15¾") from marker at the side, measured where widest (= bottom edge) cut the thread. Slip the first 41-45-52 (60-65) sts from bottom edge on a stitch holder (= the side). Continue on remaining sts for wide shoulder as described for the first shoulder until shoulders are the same length. Cut the thread. Slip the 41-45-52 (60-65) sts from stitch holder at the side back on needle and continue as described for the other front piece. When right front piece is the same length as left front piece (without front band) work next row from RS as follows: work 41-45-52 (60-65) sts, work the next 23 sts AT THE SAME TIME dec 8 sts evenly (dec by K2 tog), work the last 6-8-11 (13-16) sts = 62-68-78 (88-96) sts. Now work front band as follows: K 3 rows on all sts. On next row from RS make 3 buttonholes as follows (i.e. from bottom edge towards the top): K 41-45-53 (61-65) sts, 1 YO, K2 tog, K 7-8-9 (10-12) sts, 1 YO, K2 tog, K 7-8-9 (10-12) sts, 1 YO, K2 tog and finish with K1. Turn and K all sts. K 5 rows on all sts and bind off loosely. CROCHET BORDER: Crochet a border round bottom edge of jacket and round shoulder edges with crochet hook size 3 mm / C with white as follows: 1 sc, * ch 3, 1 dc in the first of the 3 ch, skip approx 1 cm / ⅜", 1 sc *, repeat from *-*. Cut and fasten thread. ASSEMBLY: Sew on buttons. |
||||||||||||||||||||||
Diagram explanations |
||||||||||||||||||||||
|
||||||||||||||||||||||
 |
||||||||||||||||||||||
Have you finished this pattern?Tag your pictures with #dropspattern #novajacket or submit them to the #dropsfan gallery. Do you need help with this pattern?You'll find 16 tutorial videos, a Comments/Questions area and more by visiting the pattern on garnstudio.com. © 1982-2026 DROPS Design A/S. We reserve all rights. This document, including all its sub-sections, has copyrights. Read more about what you can do with our patterns at the bottom of each pattern on our site. |
||||||||||||||||||||||


With over 40 years in knitting and crochet design, DROPS Design offers one of the most extensive collections of free patterns on the internet - translated to 17 languages. As of today we count 324 catalogs and 12285 patterns - 12275 of which are translated into English (US/in).
We work hard to bring you the best knitting and crochet have to offer, inspiration and advice as well as great quality yarns at incredible prices! Would you like to use our patterns for other than personal use? You can read what you are allowed to do in the Copyright text at the bottom of all our patterns. Happy crafting!
Post a comment to pattern DROPS Baby 20-14
We would love to hear what you have to say about this pattern!
If you want to leave a question, please make sure you select the correct category in the form below, to speed up the answering process. Required fields are marked *.