
Popular categories
Looking for a yarn?


Comments / Questions (128)
![]() Simona Campus wrote:
Simona Campus wrote:
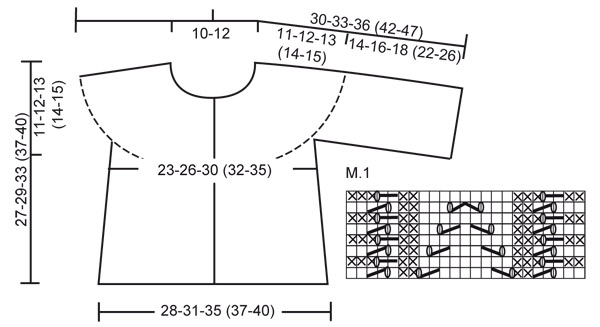
Scusate, avrei un'altra domanda. Questa volta sul diagramma. Mi è chiaro che si debba procedere da destra verso sinistra e dal basso verso l'alto. La prima riga corrisponde al primo ferro nel dritto del lavoro, ma il secondo corrisponde al secondo ferro al rovescio giusto (da leggere da sinistra verso destra)? Grazie
29.11.2019 - 17:30DROPS Design answered:
Buongiorno Simona. Sì, la seconda riga corrisponde al secondo ferro, lavorato sul rovescio del lavoro e si legge da sinistra verso destra. Buon lavoro!
29.11.2019 - 22:58
![]() Simona Campus wrote:
Simona Campus wrote:
Gentilissimi, quando scrivete all'inizio "Lavorare il ferro successivo, sul diritto del lavoro, come segue: lavorare le prime 15 m a dir, ALLO STESSO TEMPO, aumentare 8 m in modo uniforme (aumentare 1 m facendo 1 m gettata), lavorare le restanti m a dir = 70-76-86 (96-104) m" , vuol dire che gli aumenti devono essere ripartiti nelle prime 15 maglie? Grazie
29.11.2019 - 15:05DROPS Design answered:
Buongiorno Simona. Sì, vengono aumentate 8 maglie sulle prime 15 m del ferro. Buon lavoro!
29.11.2019 - 16:08
![]() Fryal wrote:
Fryal wrote:
Sorry for my question but I really love this pattern in m1 pattern should I work it from right or left ? and does it depend if I work on right side or left side of work mean that I should work it from right to left when I on right side of work and work it from left to right when I on left side of work ??? or I should work it from right to left always or from left to right always ???
02.10.2019 - 09:52DROPS Design answered:
Dear Fryal, start working M.1 at the bottom corner on the right side from RS and read from the right towards the left on every RS row, read diagram from the left towards the right from RS. Read more about diagrams here. Happy knitting!
02.10.2019 - 10:33
![]() Fryal wrote:
Fryal wrote:
Hello,in short rows what do you mean by knit first 30 stitches then turn you mean 30stitches after m1 pattern so after 53 I should turn or you mean from the beginning of the row ??
30.09.2019 - 15:48DROPS Design answered:
Dear Fryal, counting stitches for teh short rows should start at the beginning of the row. Happy Knitting!
30.09.2019 - 22:20
![]() Fryal wrote:
Fryal wrote:
Work the first 30-32-38 (42-47) sts, turn piece and work return row, work the first 46-50-57 (65-70) sts, turn piece and work return row, work the first 64-70-80 (90-98) sts, in this pattern you mean I work 30 stitches then work return row to the end of the row then in next row work 46 stitches then turn and work return row to the end of it or you mean work 30 stitches then turn work 46 stitches then turn work 64stitch like that
26.09.2019 - 10:15DROPS Design answered:
Dear Mrs Fryal, you first work 2 rows over the first 30 stitches (work the first 30 sts, turn and work the row back over these 30 sts), work 2 rows over the first 46 sts (work the first 46 sts, turn and work the row back over these 46 sts) etc... remember to continue working pattern as before. Happy knitting!
26.09.2019 - 10:46
![]() Bükki Márta wrote:
Bükki Márta wrote:
A minta leírása magyarul hibás, az utolsó előtti ábra helyesen: 1 szemet simán leemelűnk, 2 szemet simán összekötünk, és a leemelt szemet a lekötött szemen áthúzzuk.
15.03.2019 - 13:56DROPS Design answered:
Kedves Márta köszönjük, hogy felhívta a figyelmünket a hibára, ami így javításra került. További sikeres kézimunkázást!
16.03.2019 - 20:13
![]() Gunnelin Fusciardi wrote:
Gunnelin Fusciardi wrote:
Når mønsteret ( M1) strikkes og samtidig forkortede pinner skal jeg da strikke etter neste rad på mønsteret fra vrangen eller skal jeg strikke som anvist i diagramforklaringen, jeg strever med dette.
11.03.2019 - 23:55DROPS Design answered:
Hei Gunnelin. Over de 23 første maskene på pinnen (fra rettsiden) strikkes det etter diagrammet oppover, annenhver pinne fra retten og annenhver pinne fra vrangen. Symbolforklaringen forteller deg hvordan det strikkes. De forkortede pinnene påvirker ikke mønsteret, da det strikkes over hele diagrammet på alle pinner. God fornøyelse
13.03.2019 - 08:46
![]() A-C Edgren wrote:
A-C Edgren wrote:
Hej! Vill ha hela koftan i rätstickning utan mönsterbården nertill. Hur stickar jag då på mönsteravsnittet för att få vidden nertill och behålla längden?
24.01.2019 - 11:12DROPS Design answered:
Hei A-C. Det er ikke noen betydelig viddeforskjell på rettstrikkningen og mønsteret i M.1, så du kan helt fint strikke rettstrikk over de maskene isteden for å følge diagrammet. Følg ellers oppskriften som anvist. God fornøyelse.
25.01.2019 - 07:51
![]() Katrina wrote:
Katrina wrote:
Hej Jag undra om jag kan virka vit kant när jag stickat koftan i blått (färg 30)tänkte om det färgar.
27.08.2018 - 20:28DROPS Design answered:
Hei Katrina. I utgangspunktet skal ikke garnet farge av, men vi kan dessverre ikke garantere at det ikke er noe overskuddsfarge i det. Om du gjerne vil hekle hvit kant kan du jo prøve å strikke en liten prøvelapp, og vaske etter anvisning for å se om det farger av. Eventuelt kan du strikke genseren og vaske den 1 gang før du hekler kanten med hvit etterpå. God fornøyelse
28.08.2018 - 14:46
![]() Elo wrote:
Elo wrote:
Bonjour, je suis entrain de le réaliser en 3-4 ans, je dois avoir 22 cm à partir de juste avant M1, mais je dois mesurer sur le bas du gilet ( la partie la plus grande)?
13.06.2018 - 00:08DROPS Design answered:
Bonjour Elo, mesurez depuis le rang de montage, juste avant le 1er rang raccourci, autrement dit, au-dessus de M.1. Bon tricot!
13.06.2018 - 08:14
|
||||||||||||||||||||||
DROPS Baby 20-12 |
||||||||||||||||||||||
 |
 |
|||||||||||||||||||||
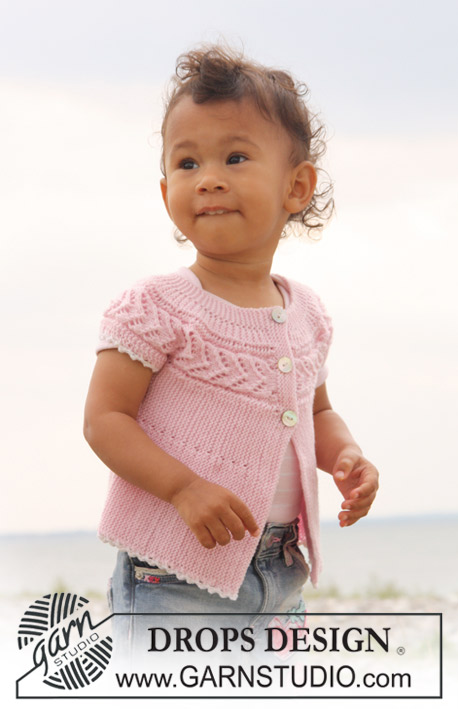
Jacket knitted from side to side in garter st and lace pattern for baby and children in DROPS BabyMerino
DROPS Baby 20-12 |
||||||||||||||||||||||
|
JACKET: PATTERN: See diagram M.1. Diagram shows the pattern from RS. KNITTING TIP: When turning mid piece, slip the first st as if to K, tighten thread and continue as before, do this to avoid a hole in transition. -------------------------------------------------------- -------------------------------------------------------- JACKET: Beg on left front piece, work towards the sleeve, back piece, the other sleeve and finish with right front piece. Loosely cast on 62-68-78 (88-96) sts on needle size 2.5 mm / US 1 with Baby Merino and K 8 rows for front band (first row = RS). Work next row as follows from RS: K the first 15 sts, AT THE SAME TIME inc 8 sts evenly (inc1 st by making 1 YO), K remaining sts on needle = 70-76-86 (96-104) sts. K 1 row from WS on all sts, work YO into back of loop to avoid a hole. Continue as follows: work the first 23 sts on needle in M.1, and K remaining sts on every row. AT THE SAME TIME work shortened rows as follows – see KNITTING TIP: * work the first 30-32-38 (42-47) sts, turn piece and work return row, work the first 46-50-57 (65-70) sts, turn piece and work return row, work the first 64-70-80 (90-98) sts, turn piece and work return row, work all 70-76-86 (96-104) sts, turn and work return row *, repeat from *-* until piece measures approx 16-17.5-19.5 (20.5-22) cm / 6¼"-6⅞"-7¾" (8⅛"-8¾") from cast on row (measured just before the first turn, i.e. over M.1). Cut the thread. Now slip the first 41-45-52 (60-65) sts towards bottom edge on a stitch holder (= the side). Cast on 36-42-46 (60-70) new sts over sts on stitch holder (i.e. before the 29-31-34 (36-39) sts left on needle) for sleeve and now continue as follows (first row = from RS): * work the first 41-47-51 (65-75) sts, turn piece and work return row, work the first 59-67-74 (90-103) sts, turn piece and work return row, work all 65-73-80 (96-109) sts, turn and work return row *. Repeat from *-*. When piece measures 16-17-18 (18-20) cm / 6¼"-6¾"-7" (7"-8") from where sts for sleeve were cast on (measured where widest, i.e. along bottom edge) bind off 36-42-46 (60-70) sts from sleeve edge towards body piece. Cut the thread. Slip the 41-45-52 (60-65) sts from stitch holder at the side back on needle and insert a marker in piece. Continue from bottom of body piece as before from *-* as described for front piece (first row = from RS). When piece measures 28-31-35 (37-40) cm / 11"-12¼"-13¾" (14½"-15¾") from marker (measured just before the first turn, i.e. over M.1) cut the thread. Slip the first 41-45-52 (60-65) sts towards bottom edge on a stitch holder (= the side). Cast on 36-42-46 (60-70) new sts over sts on stitch holder (i.e. before the 29-31-34 (36-39) sts left on needle) for sleeve and continue as before from *-* as described for the other sleeve. When sleeve measures the same as the left sleeve bind off 36-42-46 (60-70) sts from sleeve edge towards body piece. Cut the thread. Slip the 41-45-52 (60-65) sts from stitch holder at the side back on needle and continue from bottom of body piece as before from *-* as described for front piece (first row = RS). When right front piece measures the same as left front piece (less front band) work next row from RS as follows: K the first 23 sts, AT THE SAME TIME dec 8 sts evenly (dec 1 st by K2 tog) and K remaining 47-53-63 (73-81) sts on row = 62-68-78 (88-96) sts. Now work front band as follows (first row = from WS): K 3 rows on all sts, on next row from RS make 3 buttonholes as follows (i.e. from bottom edge towards neckline): K 41-45-53 (61-65) sts, 1 YO, K2 tog, K 7-8-9 (10-12) sts, 1 YO, K2 tog, K 7-8-9 (10-12) sts, 1 YO, K2 tog and finish with K1. Turn and K all sts on return row. Now K 5 rows on all sts and bind off loosely from RS. ASSEMBLY: Sew under arm seams, edge to edge. Sew on buttons. CROCHET BORDER: Crochet a border along bottom edge with crochet hook size 3 mm / C and white as follows: 1 sc, * ch 3, 1 dc in the first of the 3 ch, skip approx 1 cm / ⅜", 1 dc *, repeat from *-*. Crochet a similar border round both sleeves. |
||||||||||||||||||||||
Diagram explanations |
||||||||||||||||||||||
|
||||||||||||||||||||||
 |
||||||||||||||||||||||
Have you finished this pattern?Tag your pictures with #dropspattern or submit them to the #dropsfan gallery. Do you need help with this pattern?You'll find 15 tutorial videos, a Comments/Questions area and more by visiting the pattern on garnstudio.com. © 1982-2026 DROPS Design A/S. We reserve all rights. This document, including all its sub-sections, has copyrights. Read more about what you can do with our patterns at the bottom of each pattern on our site. |
||||||||||||||||||||||


With over 40 years in knitting and crochet design, DROPS Design offers one of the most extensive collections of free patterns on the internet - translated to 17 languages. As of today we count 324 catalogs and 12285 patterns - 12275 of which are translated into English (US/in).
We work hard to bring you the best knitting and crochet have to offer, inspiration and advice as well as great quality yarns at incredible prices! Would you like to use our patterns for other than personal use? You can read what you are allowed to do in the Copyright text at the bottom of all our patterns. Happy crafting!
Post a comment to pattern DROPS Baby 20-12
We would love to hear what you have to say about this pattern!
If you want to leave a question, please make sure you select the correct category in the form below, to speed up the answering process. Required fields are marked *.