
Popular categories
Looking for a yarn?


Comments / Questions (128)
![]() Elisabeth wrote:
Elisabeth wrote:
Was bedeutet bitte beim Ärmel über den Maschen am Hilfsmaßnahmen neue Maschen anschlagen danke lg
18.02.2025 - 07:26DROPS Design answered:
Liebe Elisabeth, schlagen Sie zuerst diese Maschen für den Ärmel, dann stricken Sie die 29-39 Maschen auf der Nadel mit verkürzten Reihen (dh bei der 1. Reihe stricken Sie nicht alle Maschen). Viel Spaß beim Stricken!
18.02.2025 - 10:08
![]() Ann Rasmussen wrote:
Ann Rasmussen wrote:
Hej. Ifølge opskriften skal man strikke kant og herefter begynde mønster M1 på de første 23 masker af retpinden. På billedet ser det ud som om der er strikket ca 5-6 retmasker INDEN der er strikket mønster M1. så at der bliver en bred bundkant inden mønsterstart. Har jeg mon overset noget i opskriften eller vil I være venlige at forklare mig hvordan den bundkant med retstrikning opstår. På forhånd tak Mvh Ann Rasmussen
30.07.2024 - 17:42DROPS Design answered:
Hej Ann, de første masker i diagrammet bliver til den lille retstrikkede kant nederst på cardiganen :)
06.08.2024 - 13:12
![]() Sonja Santesson wrote:
Sonja Santesson wrote:
Drops Baby 20-12 Behövs endast 4 nystan även till största storleken??? Ar stickat första ärmen o börjas på 3:e nystanet. Tror ni det behövs mer?? Stickar bara räta maskor o inget mönster i nederkant. Bara 4 nystan till största storlek när minsta också är 4???? Färgbad 52012 Färg 54.. Hör gärna från er snarast
19.03.2024 - 16:57DROPS Design answered:
Hei Sonja. Til den minste str. bruker man 3 nøster / 150 gram til den største str. bruker man 4 nøster / 200 gram av DROPS Baby Merino. Usikker på hvor du ser at det er samme garnmengde i disse størrelsene. Bruker du dette garnet og overholder den oppgitte strikkefastheten skal 4 nøster/ 200 gram være nok. mvh DROPS Design
02.04.2024 - 09:49
![]() Karen wrote:
Karen wrote:
I'm working the back section now and I have 45 stitches on my needle if I increase by 8 stitches I'll only have 53 stitches. Work next row as follows from RS: K the first 15 sts, AT THE SAME TIME inc 8 sts evenly. K remaining sts on needle 76. How do I get to 76 stitches when I'm doing the back right side.
16.03.2024 - 21:32DROPS Design answered:
Dear Karen, the sentence you stated is only used for the very beginning: you cast on 68 stitches, then increase 8, so you have 76 stitches. If you have slipped the 45 stitches for the back piece then you start working the front piece from the *, that is, from the shortened rows: * work the first 30-32-38 (42-47) sts, turn piece and work return row, work the first 46-50-57 (65-70) sts, turn piece and work return row, etc...) Happy knitting!
18.03.2024 - 00:10
![]() Sonja Santesson wrote:
Sonja Santesson wrote:
Mönster 20-12. M.1 beskriver från rätsidan första mönsterraden. När arbetet vänts o man är på avigsidan, börjar man då från vänster på beskrivningen???? Hjälp!
05.03.2024 - 15:59DROPS Design answered:
Hej Sonja. Ja det stämmer. När du är på avigsidan så läser du diagrammet från vänster till höger. Mvh DROPS design
06.03.2024 - 09:14
![]() Karen wrote:
Karen wrote:
I'm on the section of continue from bottom of body piece as before from *-* as described for front piece (first row = RS). I have no ball of knitting wool attached since I cut the thread. I have 45 stitches on the needle and both sleeves are completed. Just wondering where I can cast on my ball of wool again so I can continue that back piece.
28.02.2024 - 22:46DROPS Design answered:
Dear Karen, start from right side again and work the stitches slipped aside at the bottom of jacket + the stitches worked at the top of sleeve and continue the short rows as before over all stitches. Happy knitting!
29.02.2024 - 08:24
![]() Karen wrote:
Karen wrote:
Im confused about this section. Continue from bottom of body piece as before from as described for front piece. So I'm back on my side stitches at the bottom do I now need to do m1 again until I reach 31cm?
16.02.2024 - 00:44DROPS Design answered:
Dear Karen, you will now work M.1 and short rows as you worked from *to* on front piece, until piece measures 31 cm from marker. Happy knitting!
16.02.2024 - 07:58
![]() Karen wrote:
Karen wrote:
Hi I am stuck on this part. Sl Hi im stuck on this part. Slip the 45 sts from stitch holder at the side back on needle and insert a marker in piece. Continue from bottom of body piece. So I have added those stitches and I now have 75 stitches in total on the needle. It now resembles the right sleeve which is connected to the main body of the cardigan. Is this correct.
03.01.2024 - 22:38DROPS Design answered:
Dear Karen, in 2nd size you are supposed to have 76 stitches: after you have slipped the bottom 45 sts on a thread, 31 sts remain on needle, then you cast on for bottom of sleeve 42 sts and work the remaining 31 sts = 73 stitches for sleeve. Note that the bottom edge on sleeve will be folded towards RS (see photo). Happy knitting!
04.01.2024 - 08:32
![]() Karen wrote:
Karen wrote:
Hi I have knitted my 17.5cm and cut the thread. The end stitches are on another needle. I have cast on 41 stitches in the middle do I need to join these two sections together when I knit my first row.
15.12.2023 - 22:55DROPS Design answered:
Dear Karen, after cutting off the yarn, the first 41 stitches on the piece are slipped onto a stitch holder. Then cast on the new 42 stitches before the 31 stitches left on the needle. Now work over all of the stitches in short rows as indicated: first over 41 stitches (over the new cast on stitches), work back and work over the first 67 stitches (the 42 new stitches + some of the 31 sts from before), work back and then work over all of the 73 stitches. You join them as you work over them. Happy knitting!
17.12.2023 - 18:34
![]() Karen wrote:
Karen wrote:
Hi I have repeated M1 twice but my piece only measures 6.5cm do I need to keep repeating the M1 pattern to reach the 17cm length.
19.11.2023 - 23:44DROPS Design answered:
Hi Karen, Yes, you repeat M.1 until the piece measures 17.5 cm, then continue as explained in the text. Happy knitting!
20.11.2023 - 06:42
|
||||||||||||||||||||||
DROPS Baby 20-12 |
||||||||||||||||||||||
 |
 |
|||||||||||||||||||||
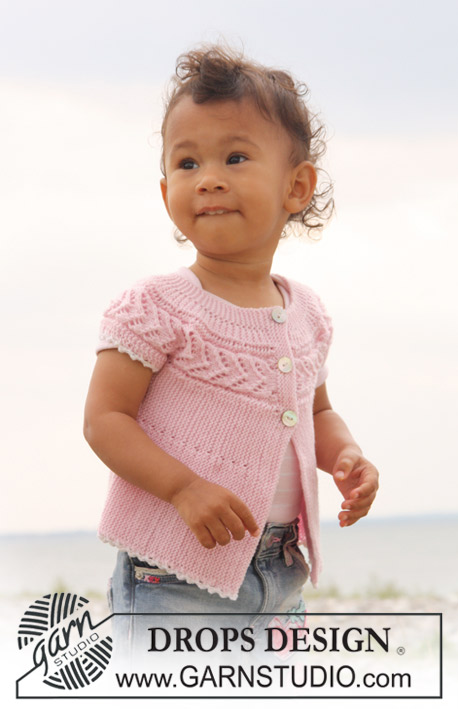
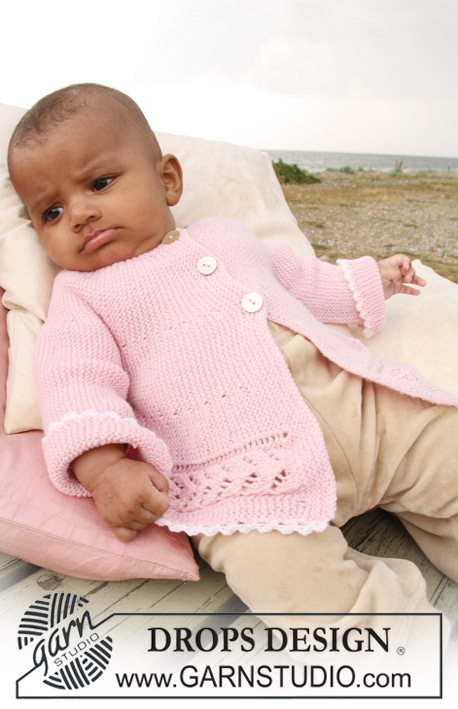
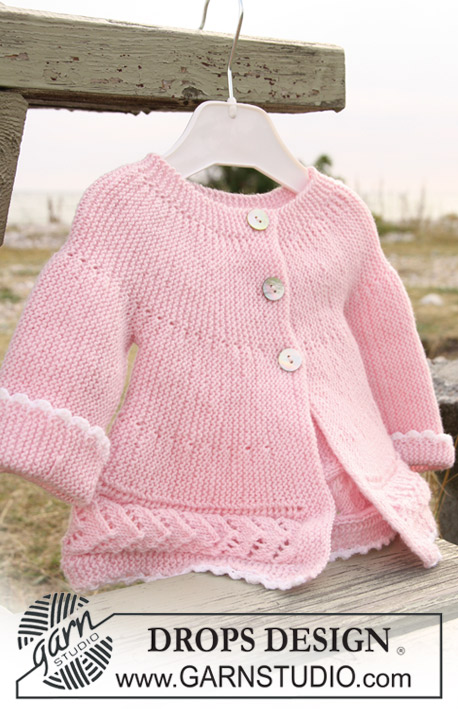
Jacket knitted from side to side in garter st and lace pattern for baby and children in DROPS BabyMerino
DROPS Baby 20-12 |
||||||||||||||||||||||
|
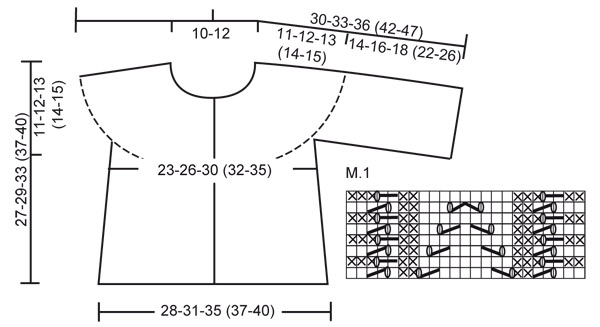
JACKET: PATTERN: See diagram M.1. Diagram shows the pattern from RS. KNITTING TIP: When turning mid piece, slip the first st as if to K, tighten thread and continue as before, do this to avoid a hole in transition. -------------------------------------------------------- -------------------------------------------------------- JACKET: Beg on left front piece, work towards the sleeve, back piece, the other sleeve and finish with right front piece. Loosely cast on 62-68-78 (88-96) sts on needle size 2.5 mm / US 1 with Baby Merino and K 8 rows for front band (first row = RS). Work next row as follows from RS: K the first 15 sts, AT THE SAME TIME inc 8 sts evenly (inc1 st by making 1 YO), K remaining sts on needle = 70-76-86 (96-104) sts. K 1 row from WS on all sts, work YO into back of loop to avoid a hole. Continue as follows: work the first 23 sts on needle in M.1, and K remaining sts on every row. AT THE SAME TIME work shortened rows as follows – see KNITTING TIP: * work the first 30-32-38 (42-47) sts, turn piece and work return row, work the first 46-50-57 (65-70) sts, turn piece and work return row, work the first 64-70-80 (90-98) sts, turn piece and work return row, work all 70-76-86 (96-104) sts, turn and work return row *, repeat from *-* until piece measures approx 16-17.5-19.5 (20.5-22) cm / 6¼"-6⅞"-7¾" (8⅛"-8¾") from cast on row (measured just before the first turn, i.e. over M.1). Cut the thread. Now slip the first 41-45-52 (60-65) sts towards bottom edge on a stitch holder (= the side). Cast on 36-42-46 (60-70) new sts over sts on stitch holder (i.e. before the 29-31-34 (36-39) sts left on needle) for sleeve and now continue as follows (first row = from RS): * work the first 41-47-51 (65-75) sts, turn piece and work return row, work the first 59-67-74 (90-103) sts, turn piece and work return row, work all 65-73-80 (96-109) sts, turn and work return row *. Repeat from *-*. When piece measures 16-17-18 (18-20) cm / 6¼"-6¾"-7" (7"-8") from where sts for sleeve were cast on (measured where widest, i.e. along bottom edge) bind off 36-42-46 (60-70) sts from sleeve edge towards body piece. Cut the thread. Slip the 41-45-52 (60-65) sts from stitch holder at the side back on needle and insert a marker in piece. Continue from bottom of body piece as before from *-* as described for front piece (first row = from RS). When piece measures 28-31-35 (37-40) cm / 11"-12¼"-13¾" (14½"-15¾") from marker (measured just before the first turn, i.e. over M.1) cut the thread. Slip the first 41-45-52 (60-65) sts towards bottom edge on a stitch holder (= the side). Cast on 36-42-46 (60-70) new sts over sts on stitch holder (i.e. before the 29-31-34 (36-39) sts left on needle) for sleeve and continue as before from *-* as described for the other sleeve. When sleeve measures the same as the left sleeve bind off 36-42-46 (60-70) sts from sleeve edge towards body piece. Cut the thread. Slip the 41-45-52 (60-65) sts from stitch holder at the side back on needle and continue from bottom of body piece as before from *-* as described for front piece (first row = RS). When right front piece measures the same as left front piece (less front band) work next row from RS as follows: K the first 23 sts, AT THE SAME TIME dec 8 sts evenly (dec 1 st by K2 tog) and K remaining 47-53-63 (73-81) sts on row = 62-68-78 (88-96) sts. Now work front band as follows (first row = from WS): K 3 rows on all sts, on next row from RS make 3 buttonholes as follows (i.e. from bottom edge towards neckline): K 41-45-53 (61-65) sts, 1 YO, K2 tog, K 7-8-9 (10-12) sts, 1 YO, K2 tog, K 7-8-9 (10-12) sts, 1 YO, K2 tog and finish with K1. Turn and K all sts on return row. Now K 5 rows on all sts and bind off loosely from RS. ASSEMBLY: Sew under arm seams, edge to edge. Sew on buttons. CROCHET BORDER: Crochet a border along bottom edge with crochet hook size 3 mm / C and white as follows: 1 sc, * ch 3, 1 dc in the first of the 3 ch, skip approx 1 cm / ⅜", 1 dc *, repeat from *-*. Crochet a similar border round both sleeves. |
||||||||||||||||||||||
Diagram explanations |
||||||||||||||||||||||
|
||||||||||||||||||||||
 |
||||||||||||||||||||||
Have you finished this pattern?Tag your pictures with #dropspattern or submit them to the #dropsfan gallery. Do you need help with this pattern?You'll find 15 tutorial videos, a Comments/Questions area and more by visiting the pattern on garnstudio.com. © 1982-2026 DROPS Design A/S. We reserve all rights. This document, including all its sub-sections, has copyrights. Read more about what you can do with our patterns at the bottom of each pattern on our site. |
||||||||||||||||||||||


With over 40 years in knitting and crochet design, DROPS Design offers one of the most extensive collections of free patterns on the internet - translated to 17 languages. As of today we count 324 catalogs and 12285 patterns - 12275 of which are translated into English (US/in).
We work hard to bring you the best knitting and crochet have to offer, inspiration and advice as well as great quality yarns at incredible prices! Would you like to use our patterns for other than personal use? You can read what you are allowed to do in the Copyright text at the bottom of all our patterns. Happy crafting!
Post a comment to pattern DROPS Baby 20-12
We would love to hear what you have to say about this pattern!
If you want to leave a question, please make sure you select the correct category in the form below, to speed up the answering process. Required fields are marked *.