
Popular categories
Looking for a yarn?


Comments / Questions (31)
![]() Winifred Waite wrote:
Winifred Waite wrote:
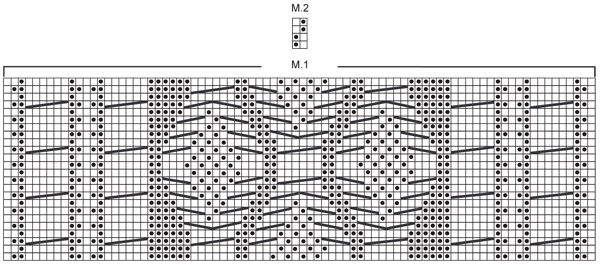
You need to make it clear in the guide to the diagrams that on the wrong side rows the knit stitches are purled & the purl stitches are knitted.
17.01.2013 - 01:39
![]() Jeanette Van Den Born wrote:
Jeanette Van Den Born wrote:
Volgens mij moeten de steken die recht gebreid moeten worden aan de goede kant, averecht gebreid worden aan de verkeerde kant en andersom. Nadat ik een stukje op weg was zag ik dat het patroon er niet zo uit zag als op het plaatje. Klopt dat?
08.01.2013 - 16:24DROPS Design answered:
Je moet de teltekening lezen als volgt: 1e rij, goede kant, lees van rechts naar links en 2e rij, verkeerde kant, lees van links naar rechts. Je moet dan inderdaad rechts breien op de goede kant en averechts op de verkeerde kant. Ik heb de beschrijving voor de teltekening aangepast om het duidelijker te maken.
11.01.2013 - 13:20
![]() Christinna wrote:
Christinna wrote:
If "Diagrams show the pattern from RS", what do I do for the WS?
13.12.2012 - 21:48DROPS Design answered:
Dear Christina, 1 square in diagram = 1 st x 1 row, see from RS. For WS, purl the sts that should be K from RS and K the sts that should be P from RS. Happy knitting !
14.12.2012 - 09:43
![]() Natalie Mayer wrote:
Natalie Mayer wrote:
Sehr geehrte Damen und Herren, habe Probleme mit dem Muster. Werden in ihrem Muster alle Reihen aufgezeigt also Hin und Rückreihe??? und wenn ja wie stricke ich die rückreihe des Musters. Es ist sehr ärgerlich dass so wie ich es sehe ihre Strickschrift von den anderen abweicht und dazu kein Kommentar in ihrer Anleitung steht. Ich würde mich freune um eine schnelle Antwort
25.11.2012 - 12:10DROPS Design answered:
Sehr geehrte Frau Mayer, es sind in der Strickschrift alle Reihen dargestellt. Somit beantwortet sich Ihre zweite Frage (wie Sie die Rückreihe stricken). Viel Spaß beim Stricken.
26.11.2012 - 11:09
![]() Laura wrote:
Laura wrote:
Avrei bisogno di un chiarimento riguardo al punto in cui a 48 cm devo distribuire 24 diminuzioni. Il lavoro mi si stringe. Perché dopo aver fatto il segno/filo non proseguo fino a 102 cm con gli stessi punti dei primi 48cm? Vi ringrazio anticipatamente e COMPLIMENTI per il Vs. lavoro Laura
22.11.2012 - 23:09DROPS Design answered:
Buongiorno. All'inizio (1° ferro) ha aumentato da 86 a 110 m (24m). Gli aumenti vengono fatto là dove si lavorano le trecce perché le trecce tendono a stringere molto il lavoro. A 48 cm (1° lato del cuscino) finisce la treccia e per evitare che si allarghi il lavoro in quel punto (dove non si lavora più la treccia) bisogna ridiminuire le m che ha aumentato all'inizio. Dalla parte posteriore del cuscino non c'è la treccia quindi si continua con le stesse maglie (86m).
24.11.2012 - 07:52
![]() Carina Lindström wrote:
Carina Lindström wrote:
Hur läser man ett diagram ? Fr hö till vä på rätsidan men sen? Hur gör jag på tillbakavarvet på avigsidan? Andra raden på diagramet el am på am och rm på rm? Mvh Carina
14.07.2012 - 22:36DROPS Design answered:
Diagram: Om du inte har stickat efter diagram förut så gör man så här; starta från första rutan i nedersta högra hörnet och sticka mot vänster. Är det ritat en startpil så startar man från den och stickar mot vänster. Maskorna visas från rätsidan. 1 ruta = 1 maska x 1 varv, om inte annat är angivet.
18.07.2012 - 08:47
![]() Ria V D Ploeg wrote:
Ria V D Ploeg wrote:
Hoe veel steken moet je breien voor je aanhrt patroon begind grt.ria
08.07.2012 - 20:42DROPS Design answered:
Dit staat er in het patroon: Brei de volgende nld als volgt: 2 kant st in ribbelst, M.2 over de volgende 12 st, M.1 (= 82 st), M.2 over de volgende 12 st en eindig met 2 kant st in ribbelst.
09.07.2012 - 14:41
![]() Elisabeth wrote:
Elisabeth wrote:
Elegant pude :)
02.07.2009 - 20:57
![]() Lecoq wrote:
Lecoq wrote:
Bien pensé et digne d'un travail d'experte!
28.06.2009 - 10:05Funy wrote:
Il est magnifique,poré en bandouillère.j'adore ce modèle et j'espere vraiment qu'il sera dans les modèles choisis
17.06.2009 - 19:44
|
||||||||||||||||
Cabled Hide Away#cabledhideawaypillow |
||||||||||||||||
 |
 |
|||||||||||||||
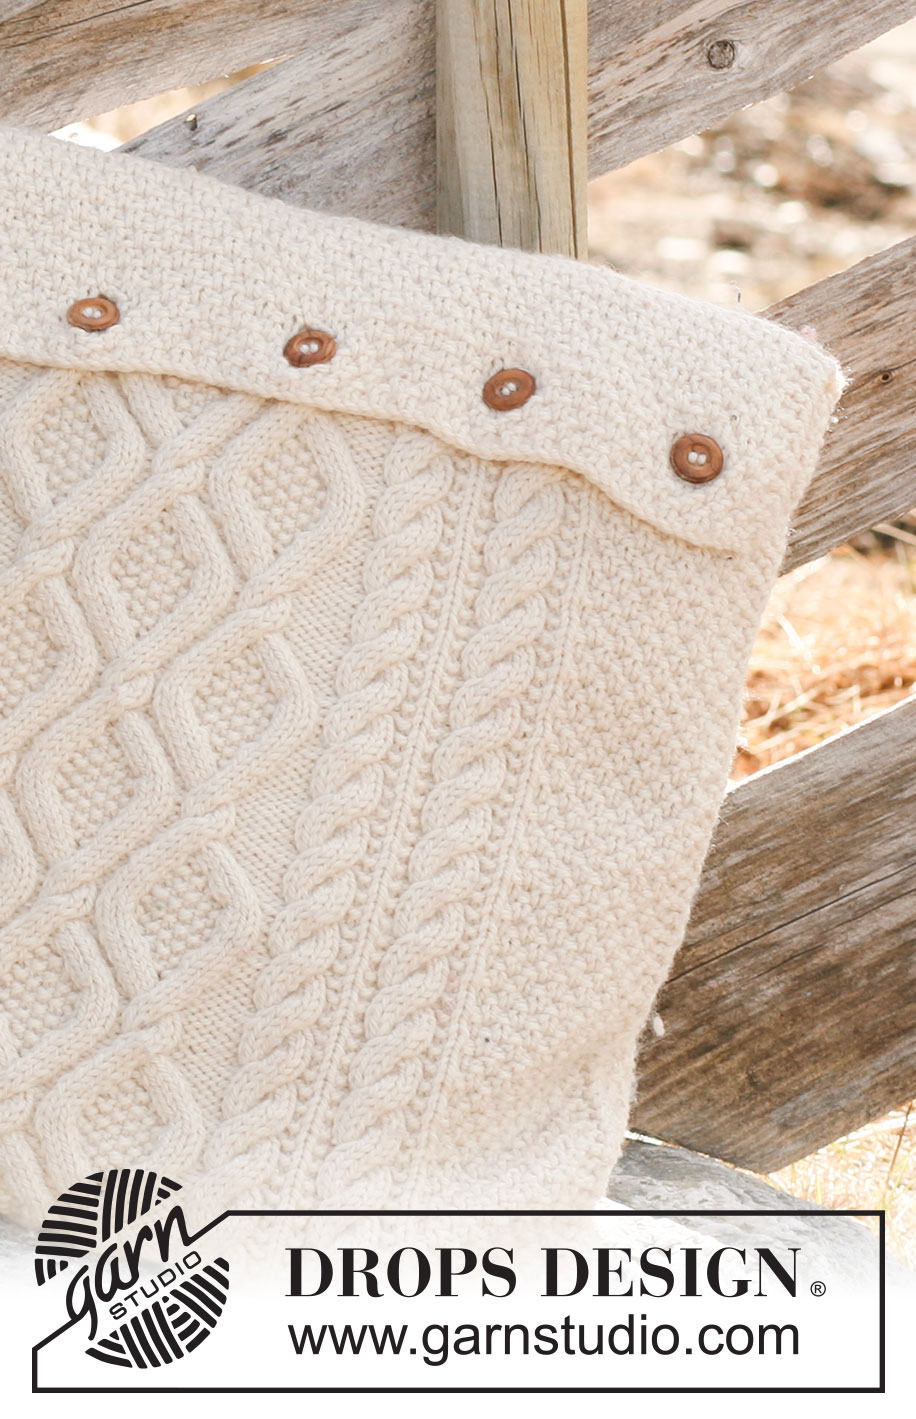
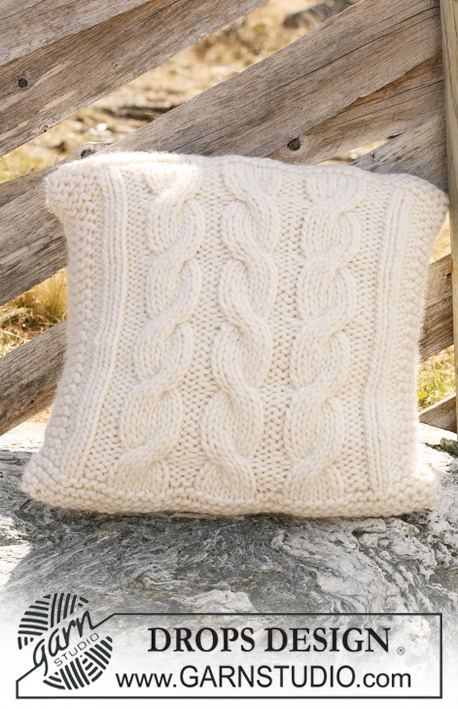
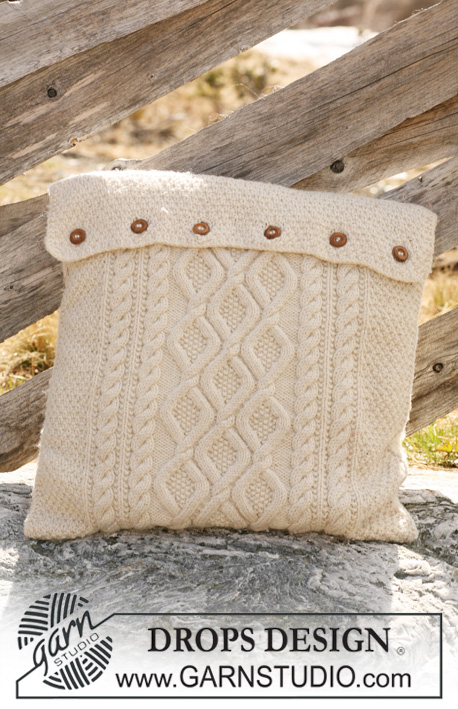
Knitted DROPS cushion cover with cables in ”Alaska”.
DROPS 117-50 |
||||||||||||||||
|
GARTER ST (back and forth on needle): K all rows. PATTERN: See diagrams M.1 and M.2. Diagrams show the pattern from RS. -------------------------------------------------------- CUSHION COVER: Worked back and forth on needle. Cast on 86 sts on needle size 5 mm / US 8 with Alaska and work 2 rows garter st, AT THE SAME TIME on last row inc 24 sts evenly on the middle 58 sts = 110 sts. Work next row as follows: 2 edge sts in garter st, M.2 on the next 12 sts, M.1 (= 82 sts), M.2 on the next 12 sts and finish with 2 edge sts in garter st. Continue in pattern like this. REMEMBER THE GAUGE! When piece measures 48 cm / 19" work 2 rows garter st on all sts (= folding edge), AT THE SAME TIME on first row dec 24 sts evenly on the middle 82 sts = 86 sts. Now continue in M.2 with 2 edge sts in garter st each side. When piece measures 96 cm / 37¾" insert a marker in piece, and when piece measures 102 cm / 40" make 6 buttonholes as follows: 2 garter sts, M.2 on the next 5 sts, bind off 2 sts for buttonhole, * work M.2 on the next 12 sts, bind off 2 sts for buttonhole *, repeat from *-* a total of 5 times, and finish with M.2 on the next 5 sts and 2 garter sts. Cast on 2 new sts over bind off sts on next row. Continue in M.2 with 2 garter sts each side until piece measures 104 cm / 41". Work 2 rows garter st on all sts and bind off. Piece measures approx 105 cm / 41⅜". ASSEMBLY: Fold piece by the garter st rows at 48 cm / 19" and by marker so that buttonholes are on the outside of cover. Sew side seams from RS through all layers. Sew on buttons. |
||||||||||||||||
Diagram explanations |
||||||||||||||||
|
||||||||||||||||
 |
||||||||||||||||
Have you finished this pattern?Tag your pictures with #dropspattern #cabledhideawaypillow or submit them to the #dropsfan gallery. Do you need help with this pattern?You'll find 9 tutorial videos, a Comments/Questions area and more by visiting the pattern on garnstudio.com. © 1982-2026 DROPS Design A/S. We reserve all rights. This document, including all its sub-sections, has copyrights. Read more about what you can do with our patterns at the bottom of each pattern on our site. |
||||||||||||||||


With over 40 years in knitting and crochet design, DROPS Design offers one of the most extensive collections of free patterns on the internet - translated to 17 languages. As of today we count 324 catalogs and 12291 patterns - 12281 of which are translated into English (US/in).
We work hard to bring you the best knitting and crochet have to offer, inspiration and advice as well as great quality yarns at incredible prices! Would you like to use our patterns for other than personal use? You can read what you are allowed to do in the Copyright text at the bottom of all our patterns. Happy crafting!
Post a comment to pattern DROPS 117-50
We would love to hear what you have to say about this pattern!
If you want to leave a question, please make sure you select the correct category in the form below, to speed up the answering process. Required fields are marked *.