
Popular categories
Looking for a yarn?


Comments / Questions (14)
![]() Kelly Tyler wrote:
Kelly Tyler wrote:
Why do you only need 350 grams of the safran but 500 grams of the cotton viscose? A quick response would be much appreciated!
05.05.2013 - 00:27DROPS Design answered:
Dear Mrs Tyler, Safran is 160 m for 50 g and Cotton Viscose only 110, that is the reason why you don't need the same amount in balls of both qualities. Happy knitting!
06.05.2013 - 07:50
![]() Fourgeaud wrote:
Fourgeaud wrote:
J'ai fait ce tricot avec 2 fils d'alpaga, et je suis assez déçue, parce que, toutes les mesures étant bonnes par ailleurs, les devants ne sont pas assez larges, et se recouvrent à peine.Y a-t-il une erreur dans le modèle ?
16.06.2012 - 15:38DROPS Design answered:
Bonjour Fourgeaud, le dos a 72-78-86-94-102 m en largeur pour la mesure indiquée dans le diagramme. Pour le devant, vous montez 22-25-29-33-37 m, puis vous augmentez pour le devant, on monte 22-25-29-33-37 m et on augmente 1 m + 4-5-6-7-8x1 m tous les 4 rangs puis tous les 2 rangs 10-9-8-7-6 x 1 m + sur le côté 3 x 1 m = on a un total de 40-43-47-51-55 m au plus large. Si vous avez l'échantillon exact en largeur et en hauteur, les devants vont donc se chevaucher.
19.06.2012 - 09:45
![]() Scandinavian Knitting Design wrote:
Scandinavian Knitting Design wrote:
The buttonband is the front edge and the neckband is the neck shaping/line. You dec to shape the neckline from the right side inside the front edge as follows: after front edge: slip 1 st as if to knit, K1, psso before front edge: K2 tog Hope this helps. Karen Scandinavian Knitting Design
16.06.2006 - 22:03
![]() shiori wrote:
shiori wrote:
Please teach concerning the button band and the difference of the neckband. Is the button band the edge under from the buttonhole? Is the neckband the edge to the shoulder from the buttonhole? When the increasing eye with the button band is done, the hole opens. If there is a capture method, please advise.
16.06.2006 - 19:13
|
|
DROPS 87-3 |
|
|
|
|
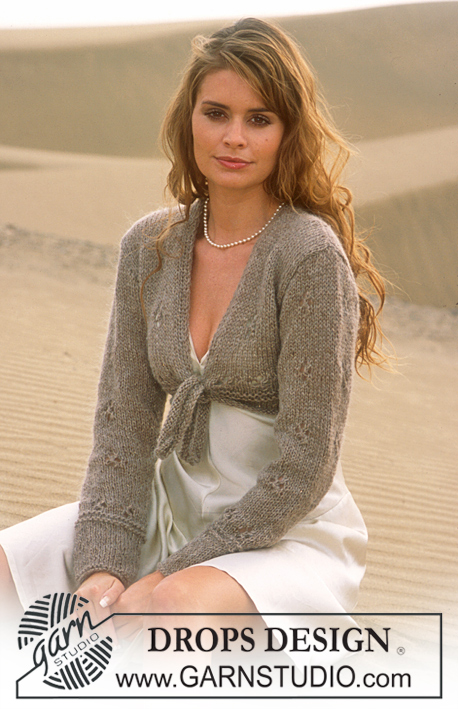
DROPS Cardigan in Safran and Cotton Viscose
DROPS 87-3 |
|
|
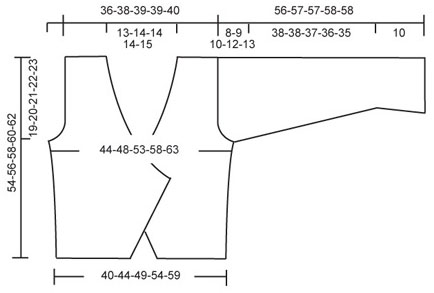
Gauge: 16 sts x 20 rows on larger needles with 1 strand of each yarn (= 2 strands) in stockinette st = 10 x 10 cm. Button band: Knit the button bands as follows: * K 1 row (right side), P 1 row (wrong side), but the outermost 3 sts at the center front edge K all sts, then K 1 row, P 1 row but the outermost 4 sts at the center front edge K all sts*, repeat * - * to finished measurements. Increasing tips (for button bands): Make all incs on right side rows. Inc inside of button bands by making a yo. On the next row, twist and P the yo. Knitting tips (for neckband): Bind off inside of button bands on front and inside of 4 sts in garter st on back. All decs are made on right side. Bind off as follows: After button bands/4 garter sts: Sl 1 st as if to knit, K 1, psso. Before button bands/4 garter sts: K 2 tog. Back: Cast on 66-72-80-88-96 sts on smaller needles with 1 strand of each yarn (= 2 strands) and knit 2 rows garter st. Change to larger needles and stockinette st. When the piece measures 10 cm inc 1 st at each side every 10 cm a total of 3 times = 72-78-86-94-102 sts. When the piece measures 35-36-37-38-39 cm bind off for armhole at each side every other row: 3 sts 1 time, 2 sts 1-2-3-4-5 times and 1 st 2-2-3-5-6 times = 58-60-62-62-64 sts. When the piece measures 50-52-54-56-58 cm knit 4 rows garter st over the center 24-26-26-26-28 sts (knit the remaining sts as before). Then bind off the center 16-18-18-18-20 sts for the neck. Continue to dec 1 st at each neck edge every other row 2 times – see knitting tips = 19-19-20-20-20 sts remain on each shoulder. Bind off when the piece measures 54-56-58-60-62 cm. Left front: Cast on 22-25-29-33-37 sts on smaller needles with 1 strand of each yarn (= 2 strands). Read the entire next section before knitting: Inc at the center front: knit 2 rows garter st at the same time increasing 1 st at the center front on the 1st row – see increasing tips above. Change to larger needles and continue in stockinette st – see instructions for button bands above. Then inc 1 st every 4 rows – see increasing tips: 4-5-6-7-8 times, then every other row: 10-9-8-7-6 times. Side inc: When the piece measures 10 cm inc at the side as on back. Neck shaping: After all incs at the center front are complete knit 3 rows stockinette st (the button bands are knit as before) – the piece measures approx. 19-20-21-22-23 cm. Now dec 1 st at the center front every 4 rows – see knitting tips: 8-10-9-8-10 times, then every 6 rows: 6-5-6-7-6 times. Continue with stockinette st and button bands as before to finished measurements. Armhole: At the same time when the piece measures 35-36-37-38-39 cm bind off for armhole at the side as on back. After all shaping is complete 19-19-20-20-20 sts remain on shoulder. Bind off when the piece measures 54-56-58-60-62 cm. Right front: Cast on and knit the same as the left reversing shaping. Sleeve: Cast on 51-53-53-55-55 sts on larger needles with 1 strand of each yarn (= 2 strands). K 1 row (right side), decreasing 5 sts evenly distributed on the row = 46-48-48-50-50 sts. Then K 1 row (wrong side row), then continue in stockinette st. When the piece measures 5 cm dec 5 sts evenly distributed on the row. Repeat dec when the piece measures 10 cm = 36-38-38-40-40 sts. When the piece measures 16-15-15-16-17 cm inc 1 st at each side every 3.5-3-2.5-2-1.5 cm a total of 9-11-13-14-17 times = 54-60-64-68-74 sts. When sleeve measures 48-48-47-46-45 cm bind off for sleeve cap at each side every other row: 3 sts 1 time, 2 sts 2-2-3-3-3 times and 1 st 2-3-2-4-5 times, then bind off 2 sts at each side until the piece measures 55-56-56-57-57 cm, then bind off 3 sts 1 time at each side. Bind off the remaining sts, the piece measures approx. 56-57-57-58-58 cm. Assembly: Sew shoulder seams. Sew sleeve and side seams in one, using edge sts as seam allowance. Crocheted buttonhole: Crochet on right center front edge at the widest part with 1 strand Cotton Viscose as follows: 1 sc, ch 4, fasten with 1 sc approx. 1 cm below, turn and crochet 5 sc in ch-loop back, finish with 1 sl st in first sc from previous row. Sew button approx. 8 cm in from the center front of left side at the widest part so that the right front buttonhole matches up. Crocheted 5-petal blossoms in 3 layers: 1st row: Ch 4 with Cotton Viscose and join into a ring with 1 sl st. 2nd row: 1 sc in the ring, * ch 2, 1 sc *, repeat * - * a total of 4 times and finish with ch 2 and 1 sl st in first sc at start of row = 5 ch-loops. 3rd row: Ch 1, crochet as follows in first ch-loop: * 1 sc, 3 dc, 1 sc *, repeat * - * in all ch-loops and finish with 1 sl st in first sc at start of row. Finish with ch 1. Turn piece and complete from other side. 4th row: * 1 sc in sc from 2nd row (crochet on the back side around sts from 3rd row, pull yarn tight), ch 4 *, repeat * - * a total of 5 times and finish with 1 sl st in first sc at start of row. 5th row: Ch 1, crochet as follows in first ch-loop: * 1 sc, 5 dc, 1 sc *, repeat * - * in all ch-loops and finish with 1 sl st in first sc at start of row.6th row: * 1 sc in sc from 4th row (crochet on the back side of the 2 petals around sts from 5th row, pull yarn tight), ch 5 *, repeat * - * a total of 5 times and finish with 1 sl st in first sc at start of row. 7th row: Ch 1, crochet as follows in first ch-loop: * 1 sc, 2 dc, ch 1, 3 tc, ch 1, 2 dc, 1 sc *, repeat * - * in all ch-loops and finish with 1 sl st in first sc at start of row. Cut and fasten yarn. Make a total of 3 flowers in this manner. Crocheted 5-petal blossoms in 2 layers: These blossoms are crocheted the same as the 3-layer blossoms but work only rows 1 - 5. Make a total of 2 flowers in this manner. Crocheted 5-petal blossoms in 1 layer: 1st row: Ch 4 and join into a ring with 1 sl st. 2nd row: 1 sc in the ring, * ch 3, 1 sc *, repeat * - * a total of 4 times and finish with ch 3 and 1 sl st in first sc at start of row = 5 ch-loops. 3rd row: Ch 1, crochet in first ch-loop: * 1 sc, 1 dc, ch 1, 2 tc, ch 1, 1 dc, 1 sc *, repeat * - * in all ch-loops and finish with 1 sl st in first sc at start of row. Cut and fasten yarn. Make a total of 2 flowers in this manner. Fasten a safety pin on the back side of one of the 5-petal/3 layer flowers and use this to close the cardigan. Sew the remaining flowers on left shoulder – see photo for placement. |
|
 |
|
Have you finished this pattern?Tag your pictures with #dropspattern or submit them to the #dropsfan gallery. Do you need help with this pattern?You'll find 23 tutorial videos, a Comments/Questions area and more by visiting the pattern on garnstudio.com. © 1982-2026 DROPS Design A/S. We reserve all rights. This document, including all its sub-sections, has copyrights. Read more about what you can do with our patterns at the bottom of each pattern on our site. |


With over 40 years in knitting and crochet design, DROPS Design offers one of the most extensive collections of free patterns on the internet - translated to 17 languages. As of today we count 324 catalogs and 12245 patterns - 12235 of which are translated into English (US/in).
We work hard to bring you the best knitting and crochet have to offer, inspiration and advice as well as great quality yarns at incredible prices! Would you like to use our patterns for other than personal use? You can read what you are allowed to do in the Copyright text at the bottom of all our patterns. Happy crafting!
Post a comment to pattern DROPS 87-3
We would love to hear what you have to say about this pattern!
If you want to leave a question, please make sure you select the correct category in the form below, to speed up the answering process. Required fields are marked *.