
Popular categories
Looking for a yarn?


Comments / Questions (8)
![]() Thuan Hao VU wrote:
Thuan Hao VU wrote:
Pourriez vous m'indiquer comment faire au crochet une boutonnière. Merci
19.04.2025 - 13:52DROPS Design answered:
Bonjour Mme Vu, les boutonnières sont décrites à la fin des explications, marquez la hauteur des boutonnières avec un marqueur/une épingle de sûreté ou autre système, puis, sur l'envers, crochetez 1 maille serrée dans la maille marquée, 5 mailles en l'air, sautez 1 à 1,5 cm et crochetez 1 maille serrée dans la maille suivante, tournez l'ouvrage et, sur l'endroit, crochetez 5 mailles serrées autour de l'arceau de 5 mailles en l'air, coupez et rentrez le fil. Bon crochet!
22.04.2025 - 14:44
![]() Gitte wrote:
Gitte wrote:
Hvordan spejlvender jeg M1? på V. forstykke. På forhånd tak.
19.09.2012 - 16:37DROPS Design answered:
Da sørger du for at få de 4 m som strikkes retstrik mod midt foran som på det andet forstykke osv...
04.12.2012 - 14:27
![]() DROPS Design NL wrote:
DROPS Design NL wrote:
Hallo. Het patroon klopt. Er staat in het patroon dat je daarna steeds 2 st moet afkanten aan weerskanten tot een totale hoogte van 55 cm, dan 1 x 3 st afkanten en de resterende st afkanten. Totale hoogte is dan ca 56 cm (mouwkop begon op 48 cm = dus ca 8 mouwkop). Heb ik dit ook niet in een aparte mail verstuurd ongeveer 1 week geleden? Succes. Gr. Tine
14.12.2009 - 15:59
![]() K. De Vries wrote:
K. De Vries wrote:
De steekverhouding van dit model is 17 st x 22 nld = 10 x 10 cm. Voor het armsgat (achterpand) wordt (voor het gemak even uitgaande van maat S) geminderd: 1 x 3, 1 x 2 en 2 x 1 st = 7 st. Dit is omgerekend ca. 4 cm. Volgens de tekening moet het armsgat echter 8 cm diep zijn, het dubbele dus. Klopt dit wel?
14.12.2009 - 14:27
![]() Admin NL wrote:
Admin NL wrote:
Hoi Wilma. Ik heb tekens toegevoegd bij de vertaling van de teltekening. Er miste ook één van de vertalingen. Maar nu is het goed volgens mij. Ik hoop dit je verder helpt? Gr. Tine
06.01.2007 - 13:03
![]() Wilma wrote:
Wilma wrote:
Er staat bv. = r op de heeng nld. Maar ik weet niet bij welke tekens die uitleg horen. Er staan geen tekens voor. Graag hoor ik er iets over. Groetjes Wilma Francke
05.01.2007 - 12:20
![]() Scandinavian knitting design wrote:
Scandinavian knitting design wrote:
Hello Dottie! Please click diagrams and this gives you the measures in cm. Should you wish it in inc. divide the measures with 2.54. Birgitte Scandinavian Knitting Design
25.04.2006 - 20:43
![]() Dottie Blair wrote:
Dottie Blair wrote:
How do I tell what size in inches this pattern is? ex: xl and xxl
25.04.2006 - 17:40
|
||||||||||||||||||||||
DROPS 92-12 |
||||||||||||||||||||||
|
|
||||||||||||||||||||||
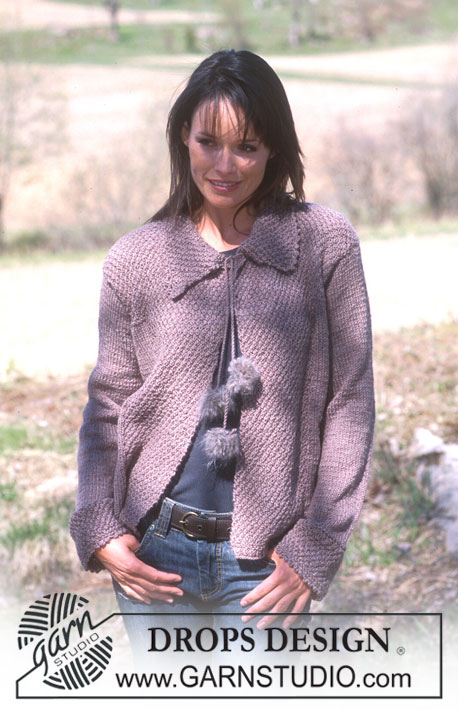
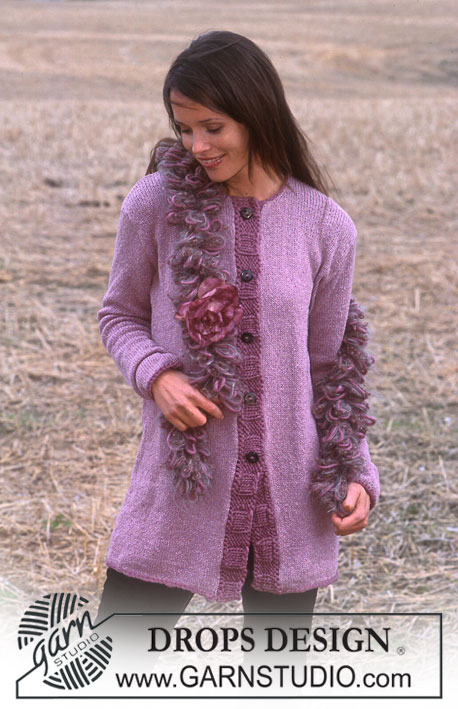
Cardigan in Alaska with pompoms in Vienna
DROPS 92-12 |
||||||||||||||||||||||
|
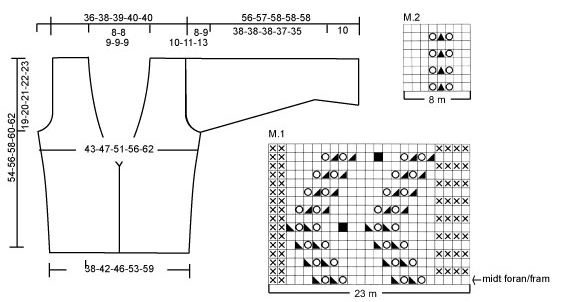
Gauge: 17 sts x 22 rows on larger needles in stockinette st = 10 x 10 cm. Knitting tips (for neckband): All decs are made on right side rows. Dec 1 st inside 4 edge sts at back neck edge and inside 23 pattern sts at front edge as follows: After 4 or 23 edge sts: Slip 1 st as if to knit, K 1, psso. Before 4 or 23 edge sts: K 2 tog. Pattern: See the charts for Model No. 12 on page 33 of Drops No. 92. The pattern is seen from the right side. «Midt foran/fram = center front.» Back: Cast on 67-74-81-92-102 sts on smaller needles with Alaska and knit 4 rows garter st (row 1 = right side). Change to larger needles and stockinette st. When the piece measures 16 cm inc 1 st at each side every 4-4-4-7-7 cm a total of 4-4-4-3-3 times = 75-82-89-98-108 sts. When the piece measures 35-36-37-38-39 cm bind off for armhole at each side every other row: 3 sts 1-1-1-2-2 times, 2 sts 1-1-2-3-4 times and 1 st 2-4-4-3-6 times = 61-64-67-68-68 sts. When the piece measures 51-53-55-57-59 cm knit 4 rows with garter st over the center 19-20-21-22-22 sts (remaining sts in stockinette st as before). Then bind off the center 11-12-13-14-14 sts for the neck. On the next row dec 1 st at each neck edge – see knitting tips = 24-25-26-26-26 sts remain on each shoulder. Bind off when the piece measures 54-56-58-60-62 cm. Right front: Cast on 38-41-45-50-55 sts on smaller needles with Alaska and knit 4 rows garter st (row 1 = right side). Change to larger needles and knit 2 rows stockinette st, keeping the 4 outermost sts at the center front edge in garter st. Then continue in stockinette st and Pattern 1 on the outermost 23 sts at the center front edge to finished measurements (row 1 in chart = right side). Read the entire next section before knitting Side inc: When the piece measures 16 cm inc at the side as on back. Neck shaping: When the piece measures 20-21-22-23-24 cm dec 1 st inside the outermost 23 Pattern sts at the center front – see knitting tips: every 4 rows 5 times and then every 6 rows 6-6-7-7-7 times. Armhole: When the piece measures 35-36-37-38-39 cm bind off for armhole at the side as on back. After all shaping is complete 24-25-26-26-26 sts remain on shoulder. Continue Pattern 1 as before with 1-2-3-3-3 sts in stockinette st at armhole until piece measures 54-56-58-60-62 cm, bind off. Left front: Cast on and knit the same as the right, reversing shaping and Pattern 1, so that the pattern will be a mirror image of right front. Sleeve: Cast on 50-50-50-58-58 sts on smaller needles with Alaska and knit 4 rows garter st (row 1 = right side), change to larger needles and knit 2 rows stockinette st. Then knit Pattern 2, keeping 1 edge st at each side in garter st (not in Pattern). When the piece measures 8 cm – adjust so that the next row is a right side row – dec 3-3-3-4-4 sts evenly distributed on row (dec only in the stockinette st parts). When the piece measures 10 cm dec 3 sts evenly distributed (for all sizes) in the same manner = 44-44-44-51-51 sts. K 1 row (right side row), P 1 row. Then knit the next row as follows: K 1 (edge st knit in garter st), K 3, * in the next sts knit 1 Bobble (as in Pattern 1), K 6 *, repeat from * - * and finish with K 4 and K 1 (edge st knit in garter st). Continue in stockinette st over all sts, adjusting (inc or dec as needed) to 43-43-45-48-50 sts on 1st row. When the piece measures 13-13-14-15-13 cm inc 1 st at each side every 4.5-3.5-3-2.5-2.5 cm a total of 8-10-11-12-13 times = 59-63-67-72-76 sts. When sleeve measures 48-48-48-47-45 cm bind off for sleeve cap at each side every other row: 4 sts 1 time, 3 sts 1 time, 2 sts 1-1-1-2-2 times and 1 st 3-4-5-5-6 times, then bind off 2 sts at each side until piece measures 55-56-57-57-57 cm, then bind off 3 sts 1 time at each side. Bind off the remaining sts, the piece measures approx. 56-57-58-58-58 cm. Assembly: Sew shoulder seams. Sew in sleeves using edge sts as seam allowance. Sew sleeve and side seams using edge sts as a seam allowance. Buttonholes: Crochet 4 buttonhole loops evenly distributed along right button band. The bottom one should be approx. 2 cm from bottom edge and the top one approx. 20-21-22-23-24 cm from bottom edge (where neck shaping begins). 1 buttonhole loop = start from wrong side and crochet 1 sc in st, ch 5, skip over approx. 1-1.5 cm and fasten with 1 sc in the next st. Turn piece and crochet 5 sc in loop, cut yarn and fasten. Sew on buttons. Pompoms: Make 2 pompoms in Vienna – see instructions on page 3 of Drops No. 92. Each pompom should measure approx. 6-7 cm in diameter. Cut 2 strands Vienna approx. 70 cm long. Twist together until tight, fold in half and let twist up on itself, tie a knot at each end. The cord will be approx. 25-30 cm long. Fasten 1 pompom at each end and fasten a small safety pin in the center of cord. Fasten cord and pompoms as decoration on the cardigan. |
||||||||||||||||||||||
Diagram explanations |
||||||||||||||||||||||
|
||||||||||||||||||||||
 |
||||||||||||||||||||||
Have you finished this pattern?Tag your pictures with #dropspattern or submit them to the #dropsfan gallery. Do you need help with this pattern?You'll find 22 tutorial videos, a Comments/Questions area and more by visiting the pattern on garnstudio.com. © 1982-2026 DROPS Design A/S. We reserve all rights. This document, including all its sub-sections, has copyrights. Read more about what you can do with our patterns at the bottom of each pattern on our site. |
||||||||||||||||||||||


With over 40 years in knitting and crochet design, DROPS Design offers one of the most extensive collections of free patterns on the internet - translated to 17 languages. As of today we count 324 catalogs and 12245 patterns - 12235 of which are translated into English (US/in).
We work hard to bring you the best knitting and crochet have to offer, inspiration and advice as well as great quality yarns at incredible prices! Would you like to use our patterns for other than personal use? You can read what you are allowed to do in the Copyright text at the bottom of all our patterns. Happy crafting!
Post a comment to pattern DROPS 92-12
We would love to hear what you have to say about this pattern!
If you want to leave a question, please make sure you select the correct category in the form below, to speed up the answering process. Required fields are marked *.