
Popular categories
Looking for a yarn?


Comments / Questions (18)
![]() Carina wrote:
Carina wrote:
Hallo, ich bin jetzt bei den Schulterabnahmen und verstehe die komplette Anleitung nicht mehr. Hab die 12 M beider Schultern und die 25M Rückseite still gelegt. Wie soll ich nun die Abnahmen machen, wenn die Schultern still gelegt sind? Wie strickt man vorne und hinten getrennt? Auf welcher Seite fängt man an und legt man die still gelegten M nachher alle wieder auf einer Nadel? Was bedeutet "Halsschrägung: Weiter gegen den Hals auf alle 2.Ndl abketten: 1 M 2 Mal."?
02.06.2024 - 18:17DROPS Design answered:
Liebe Carina, beim Vorderteil stricken Sie zuerst jede Schulter separat in Hin- und Rückreihen; gleichzeitig, am Anfang jeder Hin-Reihe für rechte Schulter bzw jeder Rückreihe für linke Schulter ketten Sie für den Halsausschnitt ab; und gleichzeitig stricken Sie den Armausschnitt an der Seite (Anfang einer Rückreihe/Ende einer Hin-Reihe bei der rechten Schulter und Anfang einer Hinreihe/Ende einer Rückreihe bei der linken Schulter - siehe Tipp für das Abketten-2:. Viel Spaß beim Stricken!
03.06.2024 - 08:07
![]() Kajsa wrote:
Kajsa wrote:
Hej! Vill sticka denna tröja. Cotton viskos har utgått. Vill inte använda de garner som konverteraren föreslår - ull kliar och finns inte i helvitt. Är oxå orolig att bara använda bomull, det blir stumt och tungt. Tacksam för förslag. Kan man tex använda 1 tjock tråd istf 3 trådar Cotton viskos?
15.04.2024 - 22:45DROPS Design answered:
Hej Kajsa, du kan eventuelt sætte nogle bomuldstråde sammen med nogle tråde iDROPS Cotton Merino så får du det blødt og dejligt, men husk at for at få størrelsen i måleskitsen, skal du få 6 masker på 10 cm :)
16.04.2024 - 11:06
![]() Ingepinge wrote:
Ingepinge wrote:
Hallo, ich war sofort verliebt in dieser Pullover. Da ich Belgierin bin und also mit Nadel unterm Arm stricke... Frage: Geht das auch auf gerade Nadeln? Strickanleitung dazu? Wäre suuuper. Danke
16.02.2022 - 19:43DROPS Design answered:
Liebe Ingepinge, diese Lektion kann sicher Ihnen damit helfen, die Anleitung anzupassen - manchmal ist es aber einfacher mit Rundnadeln zu stricken, vielleicht können unsere Videos damit helfen? Viel Spaß beim stricken!
17.02.2022 - 10:44
![]() Annie wrote:
Annie wrote:
Bonjour, Je veux réaliser ce modèle avec une aiguille circulaire pour éviter de faire des coutures en utilisant la méthode "bottom up sweater". Auriez-vous des conseils concernant les augmentations (devant/dos /manches)? Merci à l'avance pour vos conseils.
08.10.2020 - 19:53DROPS Design answered:
Bonjour Annie, tout comme on doit lire les diagrammes différemment quand on tricote en rangs au lieu d'en rond (cf cette leçon), il vous faudra adapter la lecture des diagrammes à un tricot circulaire - pour les reprendre en rangs après les emmanchures. La légende des diagrammes a été modifiée légèrement, quelques infos manquaient; Bon tricot!
09.10.2020 - 07:48
![]() Heike Sabine Zeiß wrote:
Heike Sabine Zeiß wrote:
Hallo, ich verstehe leider das Absetzen nicht: was ist gemeint mit"1 M vom Faden zurück auf die Nadel legen? Die sind doch alle auf der Nadel?! Bin bei dem ersten Absetzen des Vorderteils, 42 cm.
18.07.2019 - 07:23DROPS Design answered:
Liebe Frau Zeiß, meinen Sie diesen Satz Von der Hinreihe: Am Anfang der Ndl: 1 M vom Faden zurück auf der Ndl legen und diese M und die nächste M re zusammenstricken. dies gilt nur für die Abnahmen für den Armkugel, dh es wird beim Vorderteil nicht bearbeitet. Viel Spaß beim stricken!
18.07.2019 - 10:47
![]() Angie wrote:
Angie wrote:
Hi would I be able to knit this pattern on straight needles please
19.04.2019 - 21:48DROPS Design answered:
Dear Angie, the piece is knitted back and forth until the yoke , and you van knit it on straight needles until this point. Th eyoke is originally knitted on the round, but if you really want to, you can finish it back and forth. Just put together the pieces so, that you turn teh rows at the seam between the back and the left sleeve. Add one stitch to the back piece and to the sleeve to use later as a seam. Later sew the piece up here. Happy Knitting.
20.04.2019 - 00:05
![]() Fabi wrote:
Fabi wrote:
Buon pomeriggio, cosa vuol dire "- ALLO STESSO TEMPO, quando il lavoro misura 7 cm e 14 cm" cioè non capisco quando bisogna aumentare le maglie? quando il lavoro misura cm 7 oppure quando misura cm. 14?
07.04.2019 - 14:38DROPS Design answered:
Buongiorno Fabi, deve aumentare sia a 7 che a 14 cm.. Per un totale di 4 aumenti. Buon lavoro!
07.04.2019 - 14:53
![]() Anna Petrella wrote:
Anna Petrella wrote:
Buongiorno, vorrei fare questo modello con gli stessi colori ma non trovo gli stessi colori con il filato safran e in alternativa del cotton viscose quale filato posso usare e con quali colori. Grazie mille. Anna
27.03.2019 - 18:12DROPS Design answered:
Buongiorno Anna. Le suggeriamo di rivolgersi al suo rivenditore Drops di fiducia: potrà consigliarla al meglio sia nella scelta del filato che del colore. Buon lavoro!
27.03.2019 - 19:04
![]() Antje wrote:
Antje wrote:
Sorry , ich verstehe die Anleitung ab : Jetzt die restlichen 12-12-12-14-14 M auf jeder Ärmel auf 1 Faden legen und die mittleren 9-9-9-10-10 M in der Mitte vorne auf einen anderen Faden für den Hals legen. Das Vorder- und Rückenteil für sich fertig stricken. Was bedeutet auf einen faden legen ? Wie wird weiter gestrickt ? Werden die mittleren Maschen abgekettet ? Freue mich auf Hilfe , glaube es liegt an der Übersetztung ? Danke
20.01.2019 - 18:12DROPS Design answered:
Liebe Antje, ja die Maschen der beiden Ärmel (sowie die für den Rückenteil) legen Sie still und jetzt stricken Sie das Vorderteil hin und zurück, und gleichzeitig nehmen Sie die Maschen der Ärmel ab wie unter "Tip für das Abketten-2" erklärt. Viel Spaß beim stricken!
21.01.2019 - 11:34
![]() Marica wrote:
Marica wrote:
C’è possible d’avoir la traduction en italien? Merci Marica
23.07.2018 - 16:39DROPS Design answered:
Bonjour Marica. Le modèle va être traduit en italien dès que possible. Bon tricot!
23.07.2018 - 17:03
|
||||||||||||||||
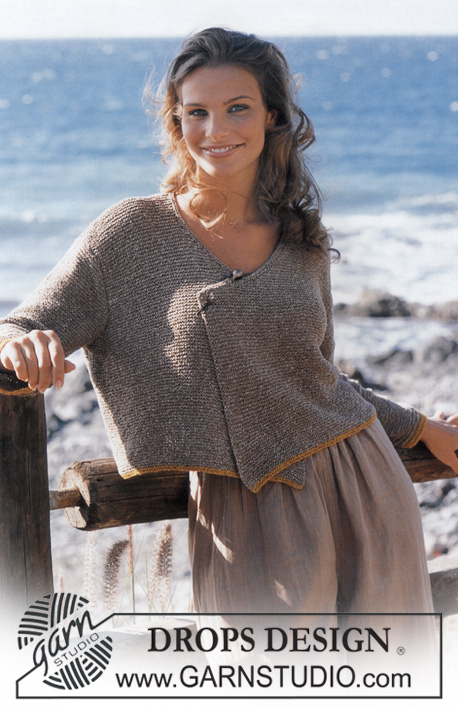
DROPS 82-13 |
||||||||||||||||
|
|
||||||||||||||||
DROPS Pullover in Cotton-Viscose and Safran.
DROPS 82-13 |
||||||||||||||||
|
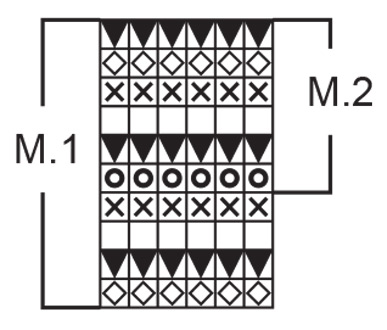
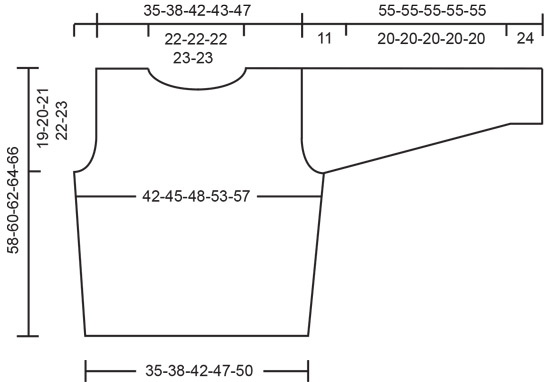
Gauge: 6 sts x 8 rows with 7 strands in stockinette st = 10 x 10 cm. Pattern: See chart. Knitting tips-1 (for yoke shaping): Dec 1 st as follows after the marker: K 2 tog. Dec 1 st as follows before the marker: Slip 1 st as if to knit, K 1, psso. Knitting tips-2 (for sleeve cap shaping): Dec 1 st from sleeve cap sts on st holder as follows: From right side: At the beginning of the row: put 1 st from st holder back on the needle and K 2 tog (the sleeve cap st and the first st on the needle from front or back). At the end of the row: Slip the last st on the row as if to knit, K 1 st from st holder, and psso. From wrong side: At the beginning of the row: slip the 1st st from needle, then twist and return to left needle, twist and put 1 st from st holder onto left needle, then P 2 tog. At the end of the row: P 2 tog. Knitting tip: Because you are working with so many strands of yarn together, take extra care to not drop any of them while putting them onto or taking them off of st holders. Measuring-tips: On account of the pattern and weight of the garment, make all measurements when the piece is held up, otherwise it will be too long when worn. --------------------------------------------- FRONT Work back and forth on circular needle. Loosely cast on 21-23-25-28-30 sts with 1 strand of each color (= 7 strands). Knit 2 rows garter st (row 1 = right side), then knit Pattern 1 one time in height - AT THE SAME TIME when piece measures 7 cm and 14 cm/ 2¾" and 5½" inc 1 st each side = 25-27-29-32-34 sts. After Pattern 1 the piece measures approx. 22 cm/8¾". Change to stockinette st. When the piece measures 39-40-41-42-43 cm/15¼"-15¾"-16"-16½"-17" bind off 2 sts at each side for armhole = 21-23-25-28-30 sts remain. Lay piece aside and knit Back. BACK Cast on and knit the same as the front. Lay piece aside and knit the sleeves. SLEEVE Loosely cast on 14-14-14-16-16 sts with 1 strand of each color (= 7 strands). Knit 2 rows garter st (row 1 = right side), then knit Pattern 2 one time, then change to stockinette st. When the piece measures 24 cm inc 1 st at each side every 6 cm a total of 4 times = 22-22-22-24-24 sts. When the piece measures 44 cm – read Measuring-tips – bind off 2 sts at each side = 18-18-18-20-20 sts remain. Lay piece aside and knit second sleeve. YOKE Put the sleeves in on the same circular needles as Body where you bound off for armhole = 78-82-86-96-100 sts. Put a marker in each transition between front, back and sleeves. Knit 1 round decreasing 1 st at each side of each sleeve in all sizes and 1 st at each side of Body in sizes XL and XXL only – see knitting tips-1. Knit 1 round over all sts. On the next round dec 1 st at each side of each sleeve 1 time = 70-74-78-84-88 sts. Knit the next round as follows: * K 1, 2 yo on needle *, repeat from * - *. On the next round let yo loops drop and dec 1 st at each side of each sleeve again – see knitting tips-1 = 66-70-74-80-84 sts. Knit stockinette st over all sts until the piece measures 50-52-54-56-58 cm at center front. Now put the 12-12-12-14-14 remaining sts of each sleeve on st holders and the center front 9-9-9-10-10 sts on another st holder for the neck. Knit the front and back separately. Read the entire next section before knitting: FRONT Read all section before continuing. Neckband: Dec 1 st at each neck edge every other row 2 times. Sleeve cap: At the same time dec 1 st from sleeve sts – see knitting tips-2 – at front side of sleeve cap every row 6-6-6-7-7 times – when you make the last dec, also bind off the remaining 4-5-6-6-7 shoulder sts. You will still have 6-6-6-7-7 sleeve cap sts on the st holder.When all front sts are bound off the piece measures approx. 58-60-62-64-66 cm. BACK = 21-23-25-26-28 sts. Bind off the remaining 6-6-6-7-7 sts on sleeve cap as on front. When the piece measures 56-58-60-62-64 cm bind off the center 13-13-13-14-14 sts for the neck. Bind off shoulder sts as on front. ASSEMBLY Sew sleeve and side seams. Be sure the seams are not too tight. Sew opening under the sleeve. Sew right shoulder. Neckband: Pick up approx. 30-35 sts around the neck on circular needles with 1 strand of each color (= 7 strands). Knit 1 row knit from wrong side, and then bind off. Sew left shoulder and up along neckband. |
||||||||||||||||
Diagram explanations |
||||||||||||||||
|
||||||||||||||||
 |
||||||||||||||||
 |
||||||||||||||||
Have you finished this pattern?Tag your pictures with #dropspattern or submit them to the #dropsfan gallery. Do you need help with this pattern?You'll find 18 tutorial videos, a Comments/Questions area and more by visiting the pattern on garnstudio.com. © 1982-2026 DROPS Design A/S. We reserve all rights. This document, including all its sub-sections, has copyrights. Read more about what you can do with our patterns at the bottom of each pattern on our site. |
||||||||||||||||


With over 40 years in knitting and crochet design, DROPS Design offers one of the most extensive collections of free patterns on the internet - translated to 17 languages. As of today we count 324 catalogs and 12245 patterns - 12235 of which are translated into English (US/in).
We work hard to bring you the best knitting and crochet have to offer, inspiration and advice as well as great quality yarns at incredible prices! Would you like to use our patterns for other than personal use? You can read what you are allowed to do in the Copyright text at the bottom of all our patterns. Happy crafting!
Post a comment to pattern DROPS 82-13
We would love to hear what you have to say about this pattern!
If you want to leave a question, please make sure you select the correct category in the form below, to speed up the answering process. Required fields are marked *.