
Popular categories
Looking for a yarn?


Comments / Questions (31)
![]() Isabella wrote:
Isabella wrote:
Hallo, meine Frage wäre warum beim Rückenteil man ein paar Maschen abnehmen muss und es passt dann mit dem Muster nicht mehr zusammen. Vorher 115 Maschinen und dann 112 Maschen. Bitte um Hilfe, danke LG isabella
01.01.2026 - 15:44DROPS Design answered:
Hi Isabella, after you increase 1 st each side (for seems) and you have now 114 sts. Now work pattern as follows: 1 edge stitch in garter stitch, A.3 until 2 stitches remain on needle, work first stitch in A.3, 1 edge stitch in garter stitch. Continue back and forth like this. Happy knitting!
30.01.2026 - 10:27
![]() Nathalie wrote:
Nathalie wrote:
Bonjour,j'attend une réponse merci
28.12.2025 - 12:58DROPS Design answered:
Bonjour Nathalie, vous la trouverez ci-dessous, merci pour votre patience. Bon tricot!
02.01.2026 - 12:49
![]() Meyer Nathalie wrote:
Meyer Nathalie wrote:
Je fais la taille M je ne comprends pas les diminutions de emmanchure merci
27.12.2025 - 20:51DROPS Design answered:
Bonjour Mme Meyer, les diminutions des emmanchures se font après les 4 premières mailles (tricotées ainsi: 1 m lisière au point mousse et 3 m comme avant), et avant les 3 dernières mailles (tricotez jusqu'à ce qu'il reste 6 m, tricotez 2 m ens à l'endroit et les 3 dernières mailles comme avant); vous diminuez ainsi d'abord 5 fois tous les 2 rangs (= tous les rangs sur l'endroit) puis 4 fois tous les 4 rangs (=tous les 2 rangs sur l'endroit). Bon tricot!
02.01.2026 - 12:48
![]() Erika Stricker-Müller wrote:
Erika Stricker-Müller wrote:
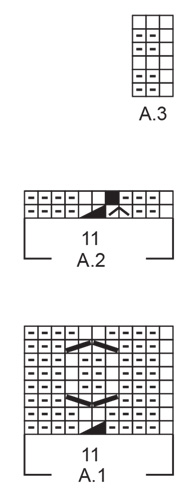
Es betrifft Diagramm A3 1.R. Hinreihe 1M rechts 2 links 2.R.Rückreihe 1 links 2 rechts 3. Hinreihe alle rechts 4.Rückreihe muss ich diese links stricken oder 2 links 1 rechts Ich bekomme nicht dasselbe Muster Bitte geben sie mir jede Reihe wie ich sie stricken muss an Frage
03.11.2025 - 00:48DROPS Design answered:
Liebe Frau Stricker-Müller, so stricken Sie A.3: 1. Reihe: (1 M re, 2 M li) (von (bis) wiederholen) und mit 1 M re enden (= die 1. Masche A.3 so wird das Muster symmetrisch). 2. Reihe: 1 links, dann (2 rechs, 1 links); 3. Reihe: alle M rechts. 4. Reihe: 1 links, (2 re, 1 links); 5. Reihe: (1 re, 2 links), 1 re; 6. Reihe: alle Maschen links. Viel Spaß beim Stricken!
03.11.2025 - 08:34
![]() Nurul wrote:
Nurul wrote:
Hi, I love the design so much! Thank you for your lovely pattern! I have question for the back piece. Is the decrease doing in RS for armholes? Or I have to decrease for each rows, like RS, WS, RS, etc?
25.04.2025 - 13:18DROPS Design answered:
Dear Nurul, decreases for armholes are all worked from the right side of piece, first in every other row (= on every row from right side) a total of 5 to 10 times (see size), then on every 4th row (= on every other row from right side) a total of 4, 3 or 5 times (see size). Happy knitting!
25.04.2025 - 14:02
![]() Debra wrote:
Debra wrote:
Hello, Please help me with the following instruction for the BACK of this pattern. After you bind off the armhole for two rows, on the next right side row, you decrease 1 stitch on each side as follows. In the middle of the instructions it says "work until 6 stitches remain". Does this mean work in pattern? thank you
22.02.2025 - 13:24DROPS Design answered:
Dear Debra, yes, if it says "work" it means work in pattern. Happy knitting!
24.02.2025 - 00:13
![]() Cornelia Kirchner wrote:
Cornelia Kirchner wrote:
Warum muss die Maschenanzahl bei den Armausschnittblenden durch 12 teilbar sein? Ist das nicht ein Fehler und muss 2 heißen?
06.02.2025 - 17:38DROPS Design answered:
Liebe Frau Kirchner, hier gibt es ein "1" zuviel, die Maschenzahl muss teilbar durch 2 sein. Danke für den Hinweis, eine Korrektur erfolgt. Viel Spaß beim Stricken!
07.02.2025 - 08:13
![]() Dominique wrote:
Dominique wrote:
Que signifie les symboles V inversés en caractères gras dans le diagramme A1?. Merci.
31.01.2025 - 16:48DROPS Design answered:
Bonjour Dominique, vous parlez du 7ème rang de A.1? ce sont en fait 2 symboles différents, à tricoter sur 2 fois 2 mailles, autrement dit, vous tricotez 2 torsades (l'inverse de celles du 3ème rang) en commençant par la 1ère, cf 4ème symbole de la légende, puis la 2ème, cf. 5ème symbole de la légende. Bon tricot!
03.02.2025 - 07:24
![]() Stephanie wrote:
Stephanie wrote:
Warum wird das Strickstück bei stimmender Maschenprobe (angegeben in glatt rechts !! ).. Viel zu klein..das Muster ist zwar hochelastisch, aber ich komme auch mit spannen nicht auf Ihr angegebenen Mass bei GR.L...(gestrickt habe ich mit Nadeln Nr.4.. Bin ein wenig ratlos, und freue mich auf eine schnellstmögliche Hilfe..Liebe Grüße..
30.11.2024 - 12:15DROPS Design answered:
Liebe Stefanie, wenn die Maschenprobe Glattrechts stimmt, dann soll die Arbeit - auch mit irgendein anderes Muster - auch stimmen; versuchen Sie mit grösseren oder kleineren Nadeln wenn nötig ist. Hier lesen Sie mehr über Maschenprobe. Viel Spaß beim Stricken!
02.12.2024 - 08:47
![]() Anne Lp wrote:
Anne Lp wrote:
Bonjour, Dans le modèle Day to Knight, pour le dos à la fin : "Après 2 côtes mousse au-dessus de ces mailles, " est ce que 2 côtes = 2 rangs ? Merci par avance pour votre aide car je bloque à cet endroit
19.10.2024 - 22:56DROPS Design answered:
Bonjour Anne Lp, pour tricoter 1 côte mousse, il faut tricoter 2 rangs, cf POINT MOUSSE (en allers et retours):, autrement dit, vous devez tricoter ici 4 rangs au total pour avoir ces 2 côtes mousse sous les emmanchures. Bon tricot!
21.10.2024 - 08:43
|
||||||||||||||||||||||
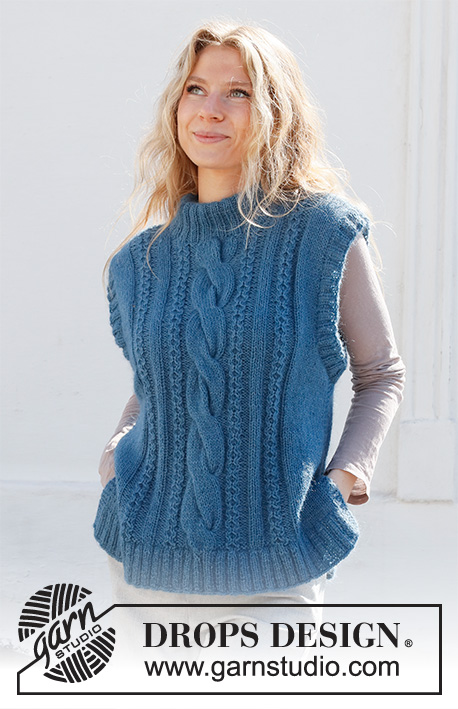
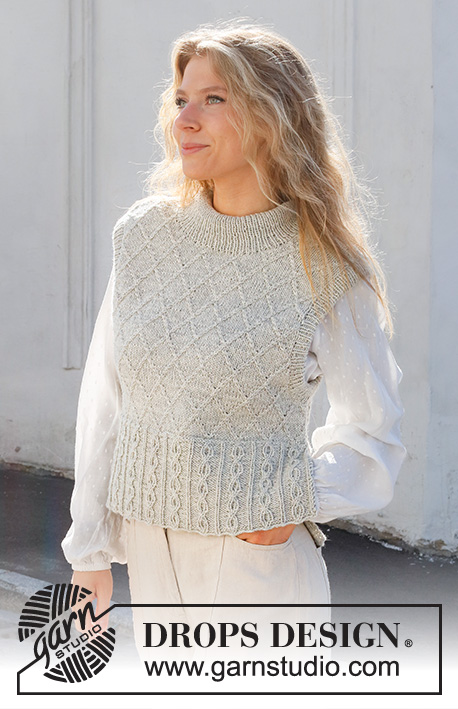
Day to Knight#daytoknightslipover |
||||||||||||||||||||||
 |
 |
|||||||||||||||||||||
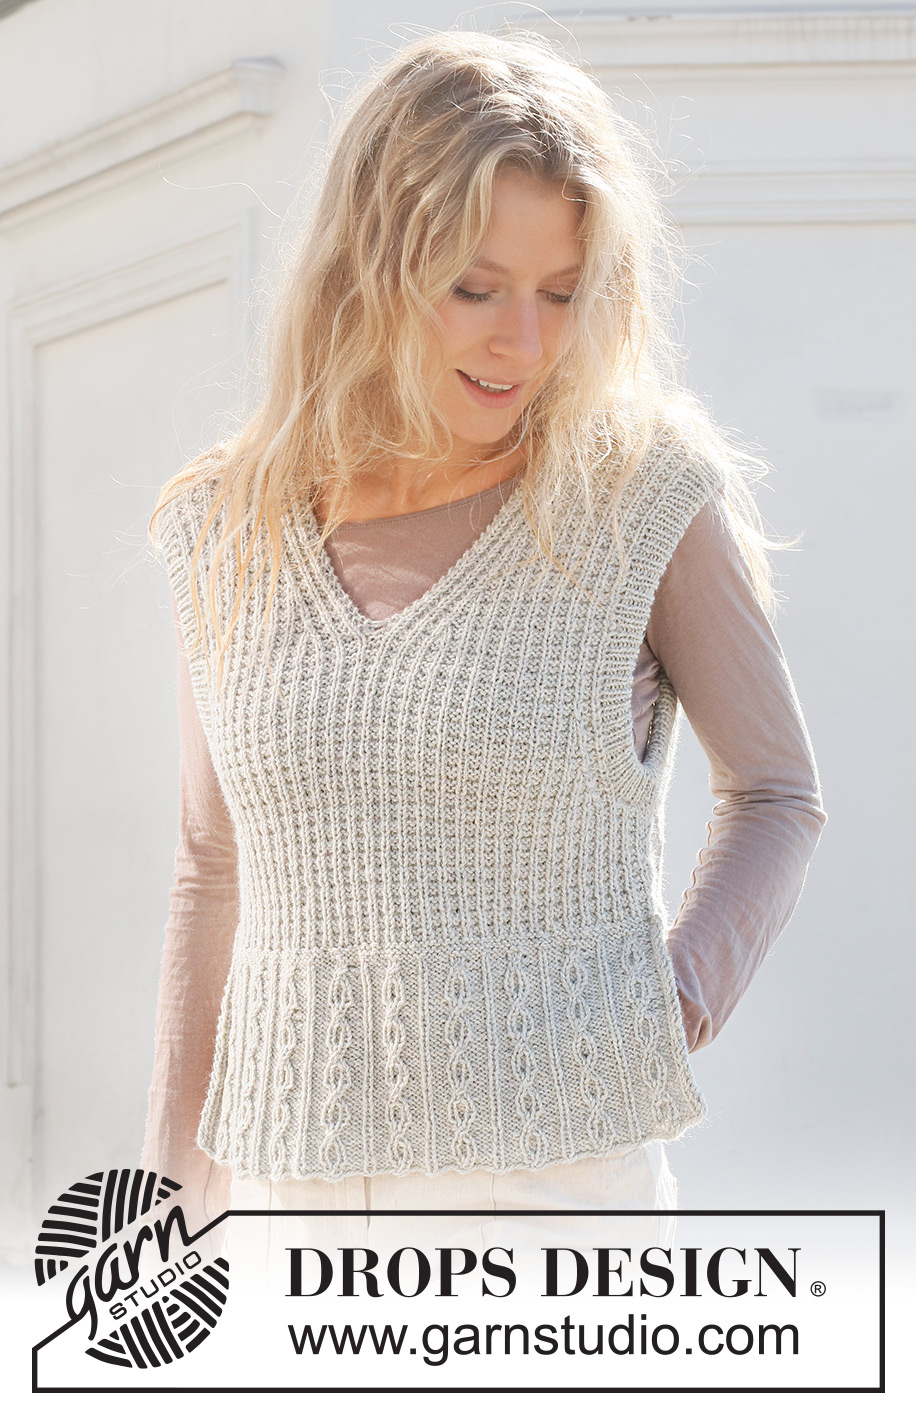
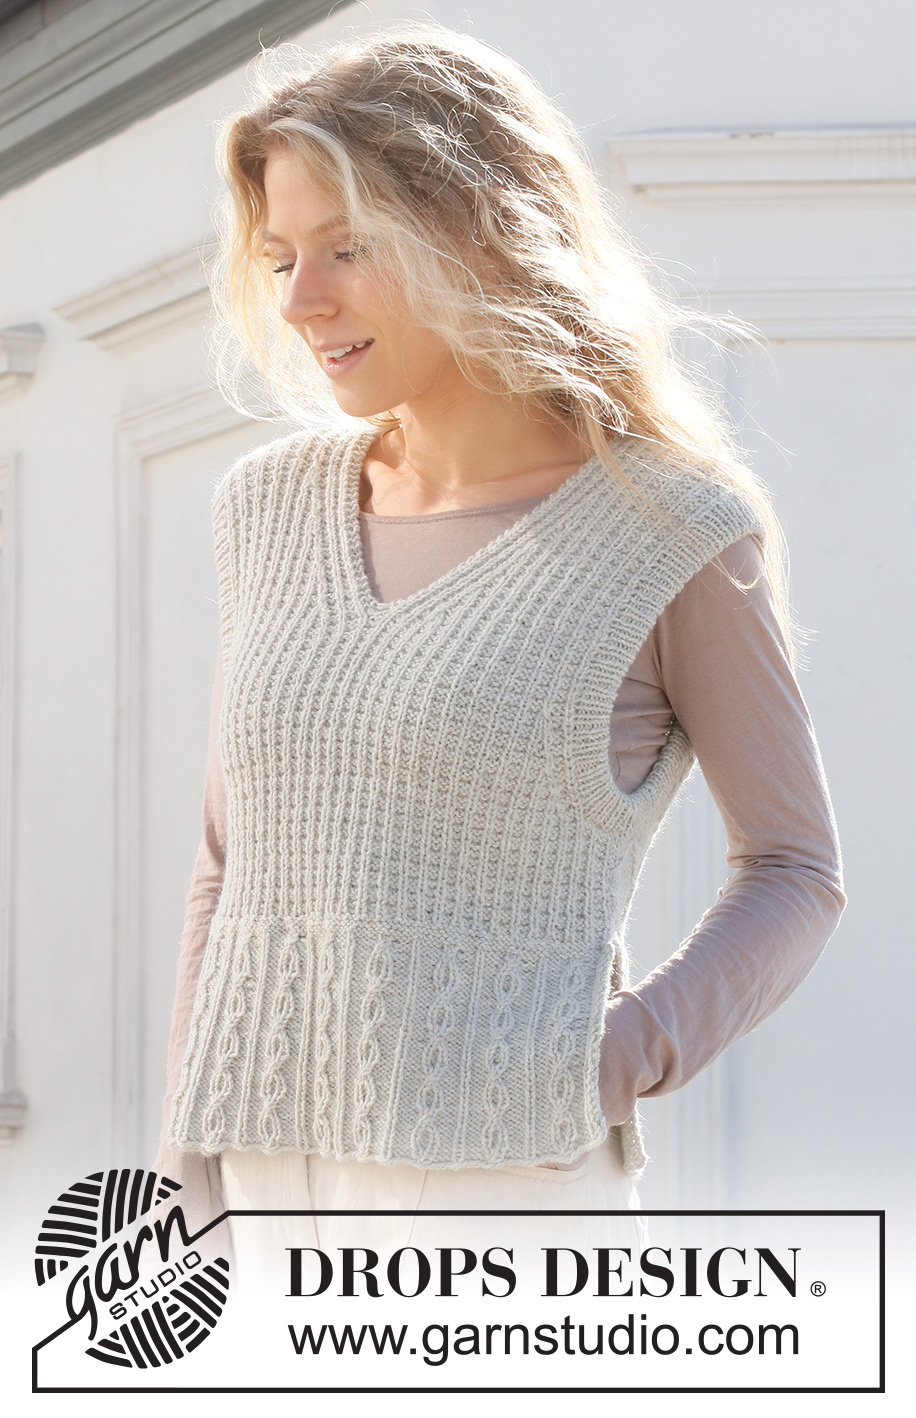
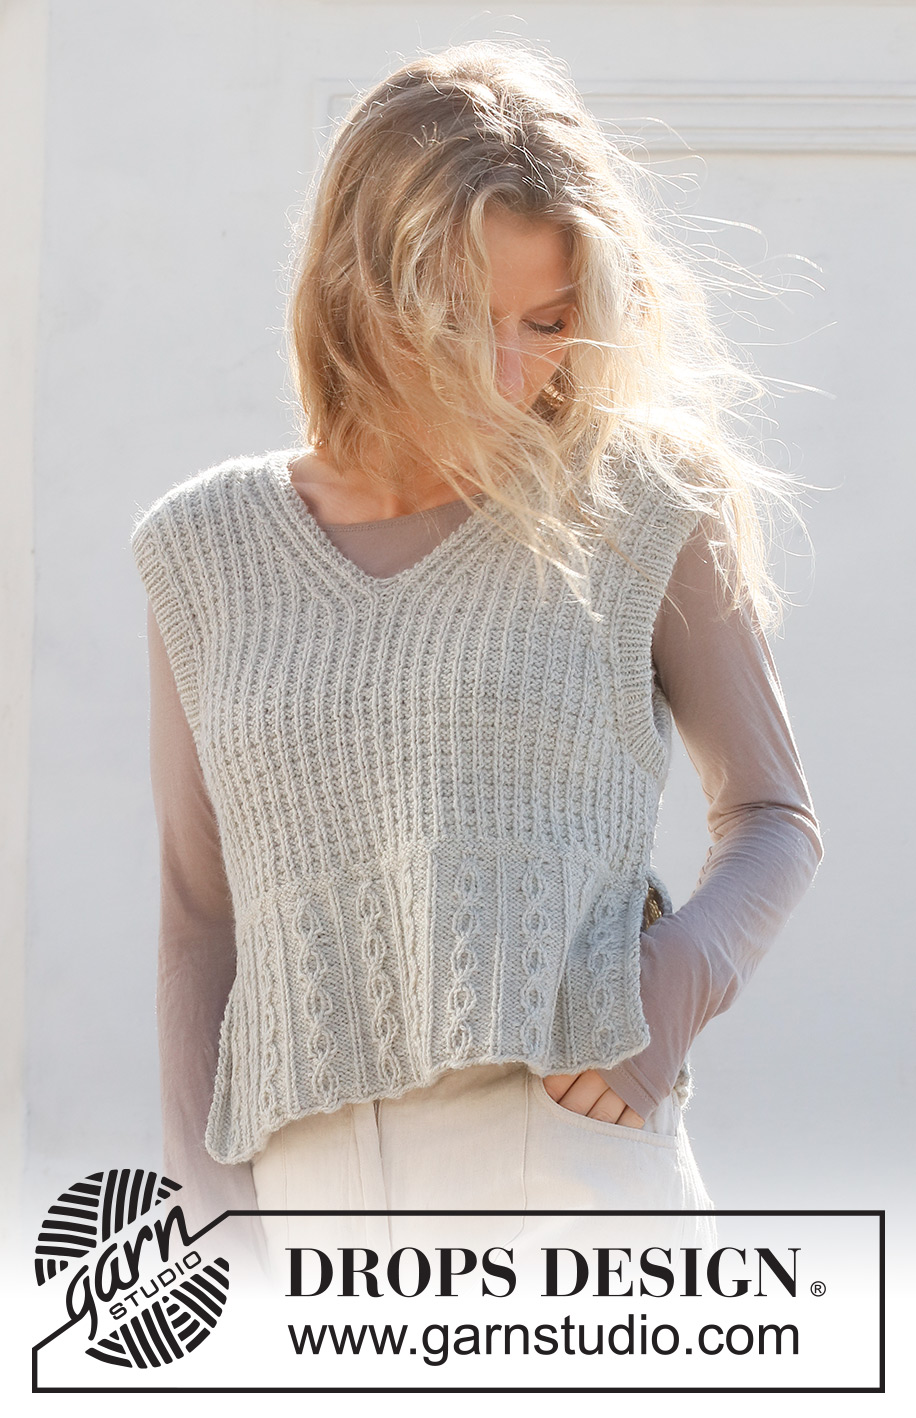
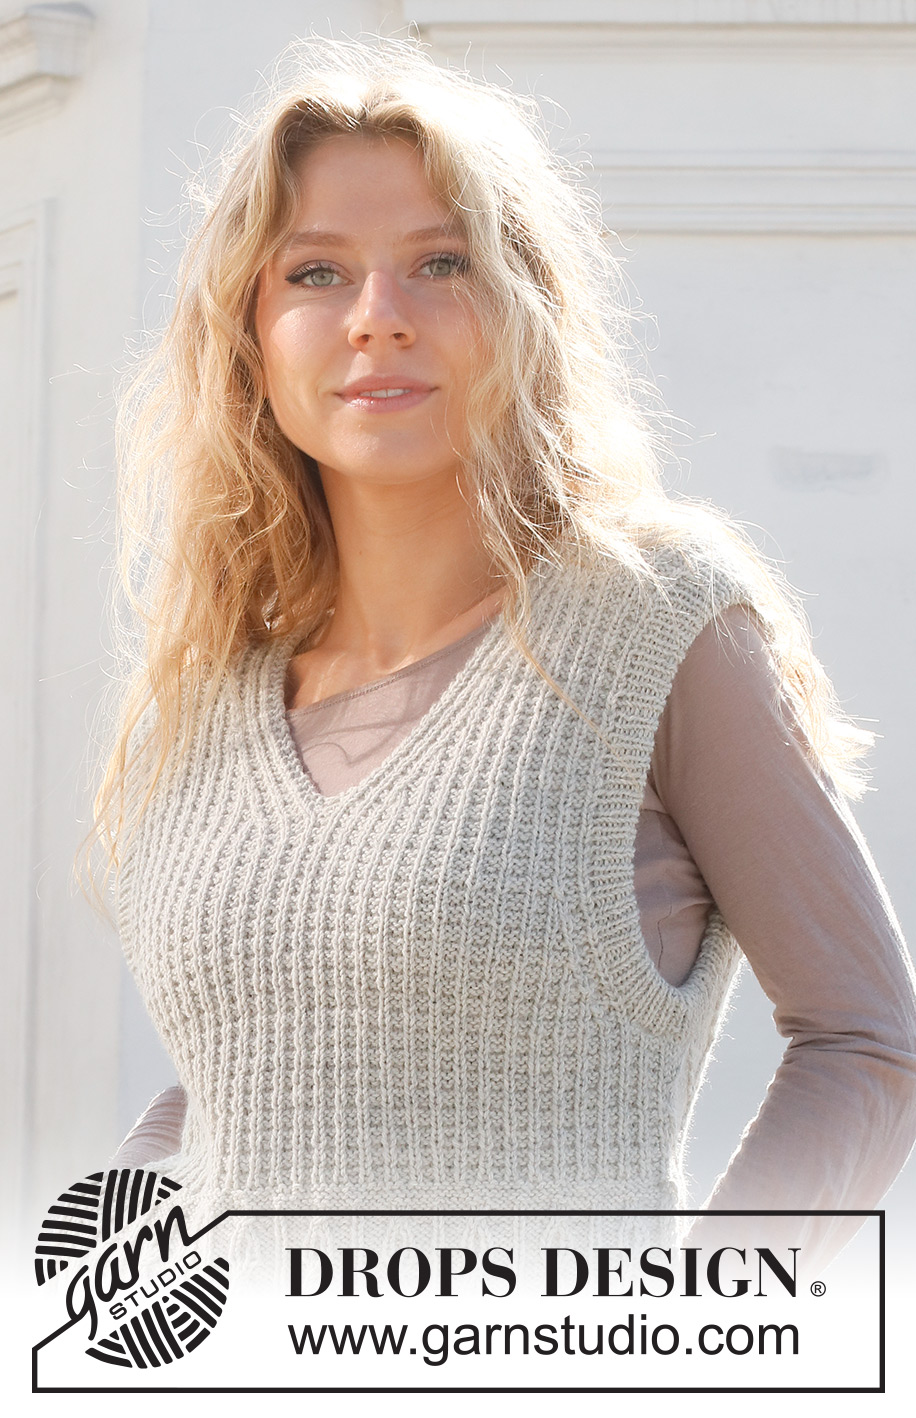
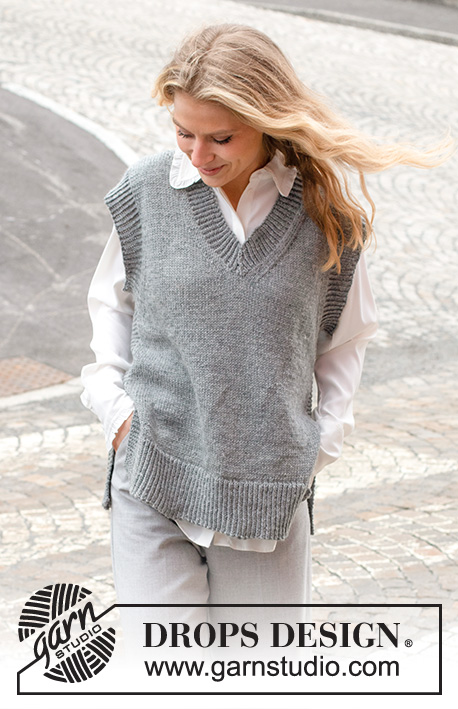
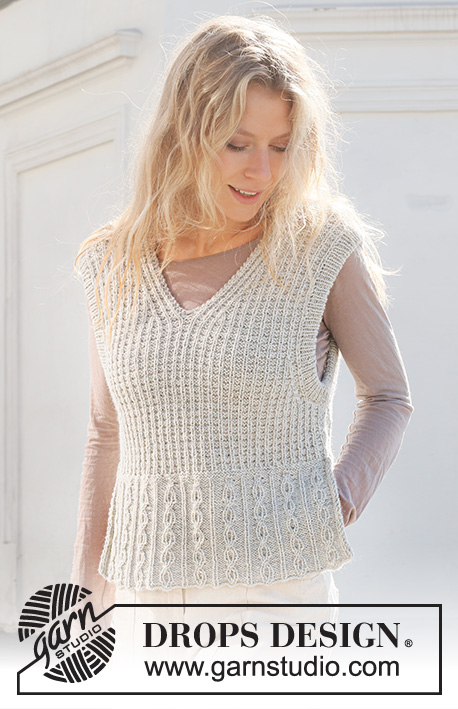
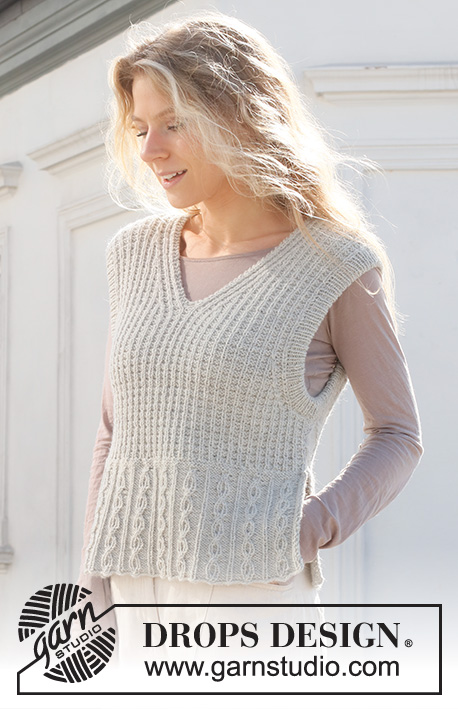
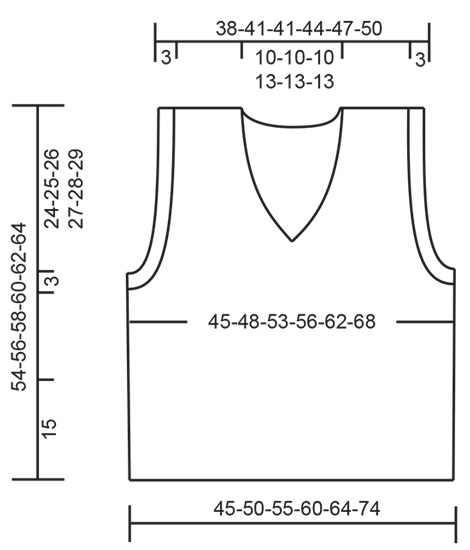
Knitted vest in DROPS Lima or DROPS Karisma. Piece is knitted with V-neck, cables, textured pattern and double sleeve edges. Size: S - XXXL
DROPS 228-5 |
||||||||||||||||||||||
|
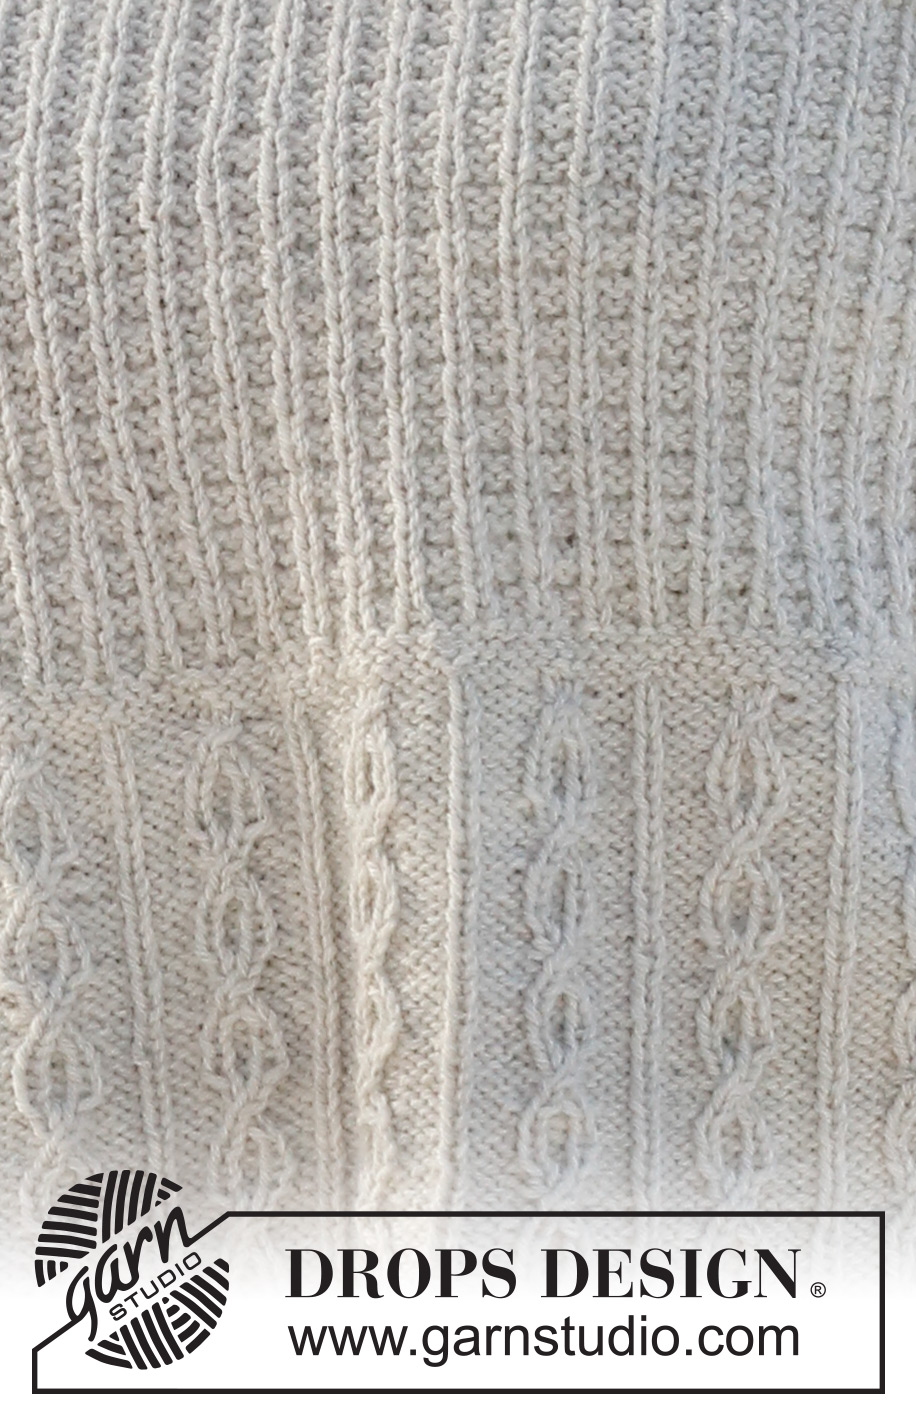
---------------------------------------------------------- EXPLANATION FOR THE PATTERN: ---------------------------------------------------------- GARTER STITCH (back and forth): Knit all rows. 1 ridge vertically = knit 2 rows. PATTERN: See diagrams A.1 to A.3. Diagrams show all rows in pattern seen from the right side. DECREASE TIP (evenly): To calculate how to decrease evenly, use the total number of stitches on row (e.g. 105 stitches) and divide stitches by number of decreases to be done (e.g. 5) = 21. In this example decrease by purling every 20th and 21st stitch together. BIND-OFF TIP: To avoid a tight bind-off edge when binding off, you may use a larger needle. If this still is too tight make 1 yarn over after approx. every 4th stitch while binding off (bind off yarn overs as stitches). ---------------------------------------------------------- START THE PIECE HERE: ---------------------------------------------------------- VEST – SHORT SUMMARY OF PIECE: Work front and back piece back and forth in 2 parts. Then assemble the piece at the shoulder seems and sew the side seams. Finish with sleeve edges in round on a circular needle. BACK PIECE: Cast on 104-115-126-137-148-159 stitches (including 2 edge stitches in each side) on circular needle size 4 MM = US 6 with DROPS Lima or DROPS Karisma. Purl 1 row from wrong side. Then work pattern as follows: 2 edge stitches in GARTER STITCH – read explanation above, A.1 over the next 99-110-121-132-143-154 stitches (= 9-10-11-12-13-14 repetitions of 11 stitches), work first stitch in A.1, 2 edge stitches in garter stitch. Continue back and forth until A.1 has been worked 5 times vertically. REMEMBER THE KNITTING GAUGE. Now work A.2 over every repetition A.1 (continue edge stitches as before). When A.2 has been worked vertically, there are 95-105-115-125-135-145 stitches on row and piece measures approx. 15 cm = 6". Work next row from right side as follows: Purl over all stitches on needle and decrease 1-5-3-7-5-3 stitches evenly– read DECREASE TIP = 94-100-112-118-130-142 stitches. Cast on 1 stitch at the end of row (= 1 edge stitch), turn and knit over all stitch, cast on 1 stitch at the end of row (= 1 edge stitch) = 96-102-114-120-132-144 stitches. Now work pattern as follows: 1 edge stitch in garter stitch, A.3 until 2 stitches remain on needle, work first stitch in A.3, 1 edge stitch in garter stitch. Continue back and forth like this. When piece measures 24-25-26-27-28-29 cm = 9½"-9¾"-10¼"-10⅝"-11"-11⅜", bind off 6-6-9-9-12-12 stitches for armholes at the beginning of the next 2 rows. On next row from right side, decrease 1 stitch in each side as follows: Work 1 edge stitch in garter stitch, work 3 stitch in pattern as before, slip 1 stitch knitwise, knit 1, pass slipped stitch over stitch worked (= 1 stitch decreased), work until 6 stitches remain, knit 2 together (= 1 stitch decreased), work the last 4 stitches in pattern as before. Decrease like this every other row 5-5-9-9-7-10 times in total, then every 4th row 4-4-3-3-5-5 times (= 9-9-12-12-12-15 stitches decreased for armhole in each side) = 66-72-72-78-84-90 stitches. Continue to work until piece measures 51-53-55-57-59-61 cm = 20"-21"-21⅝"-22½"-23¼"-24". Now work in garter stitch over the middle 28-28-28-34-34-34 stitches, work remaining stitches in pattern as before. When 2 ridges have been worked over these stitch, bind off the middle 22-22-22-28-28-28 stitches on next row from right side = 22-25-25-25-28-31 stitches remain on each shoulder. Now finish each shoulder separately. Work pattern as before, i.e. work 1 edge stitch in garter stitch towards the side, 2 edge stitches in garter stitch towards the neck and A.3 over the remaining stitches. When piece measures 54-56-58-60-62-64 cm = 21¼"-22"-22¾"-23⅝"-24⅜"-25¼", bind off. Work the other shoulder the same way. FRONT PIECE: Cast on and work as on back piece until piece measures 24-25-26-27-28-29 cm = 9½"-9¾"-10¼"-10⅝"-11"-11⅜". OVERVIEW OF NEXT SECTION: Then decrease for armholes, at the same time divide for right and left front piece and decrease for V-neck. DECREASE FOR ARMHOLES: When piece measures 24-25-26-27-28-29 cm = 9½"-9¾"-10¼"-10⅝"-11"-11⅜", bind off 6-6-9-9-12-12 stitches for armholes at the beginning of the next 2 rows. On next row from right side, decrease 1 stitch in each side as follows: Work 1 edge stitch in garter stitch, work 3 stitch in pattern as before, slip 1 stitch knitwise, knit 1, pass slipped stitch over stitch worked (= 1 stitch decreased), work until 6 stitches remain, knit 2 together (= 1 stitch decreased), work the last 4 pattern in pattern as before. Decrease like this every other row 5-5-9-9-7-10 times in total, then every 4th row 4-4-3-3-5-5 times (= 9-9-12-12-12-15 stitches decreased for armhole in each side). V-NECK: AT THE SAME TIME when piece measures 34-35-36-37-38-39 cm = 13⅜"-13¾"-14¼"-14½"-15"-15¼", work next row from wrong side as follows: Work as before until the 2 middle stitches on needle. Work 2 stitches in each of the middle 2 stitches on needle (i.e. work in front and back loop of stitch) = 2 stitches increased, work the rest of row. Turn and work the next row - work the new stitch in the middle of front piece in garter stitch. Now divide the piece in the middle of these middle stitches and continue each part separately. LEFT FRONT PIECE: Work as follows from right side: Work pattern and decrease for armhole as before until 10 stitches remain before V-neck, knit the next 2 together (= 1 stitch decreased), work pattern as before the rest of row. Decrease like this every other row 4-4-3-7-7-6 times, then every 4th row 8-8-9-8-8-9 times 12-12-12-15-15-15 stitches decreased for V-neck When all decreases for armholes and neck are done, 22-25-25-25-28-31 stitches remain for shoulder. Continue to work until piece measures 54-56-58-60-62-64 cm = 21¼"-22"-22¾"-23⅝"-24⅜"-25¼". Bind off knitting from right side. RIGHT FRONT PIECE: Work as follows from right side: Work pattern as before over the first 8 stitches, slip 1 stitch knitwise, knit 1, pass slipped stitch over stitch worked (= 1 stitch decreased), work pattern the rest of row and decrease for armhole as before. Decrease like this every other row 4-4-3-7-7-6 times, then every 4th row 8-8-9-8-8-9 times in total = 12-12-12-15-15-15 stitches decreased for V-neck When all decreases for armhole and neck are done, there are 22-25-25-25-28-31 stitches on round. Continue to work until piece measures 54-56-58-60-62-64 cm = 21¼"-22"-22¾"-23⅝"-24⅜"-25¼". Bind off knitting from right side. ASSEMBLY: Sew the shoulder seams. Sew side seam from armholes and down to where 1 edge stitch was cast on in each side (= approx. 16 cm = 6¼" vent). DOUBLE SLEEVE EDGES: Begin mid under sleeve in side seam and pick up approx. 136 to 162 stitch around armhole with circular needle size 3 MM = US 2.5 and DROPS Lima or DROPS Karisma. Number of stitches must be divisible by 2. Work rib in the round as follows: * Knit 1, purl 1 *, repeat from *-* in the round for 6 cm = 2⅜" round. Bind off – read BIND-OFF TIP. Work the same way around the other armhole. Fold the rib around sleeves on inside of garment. Fasten rib to get a double sleeve edge. To avoid a tight sleeve edge that sticks out it is important to keep the seam elastic. |
||||||||||||||||||||||
Diagram explanations |
||||||||||||||||||||||
|
||||||||||||||||||||||
 |
||||||||||||||||||||||
 |
||||||||||||||||||||||
Have you finished this pattern?Tag your pictures with #dropspattern #daytoknightslipover or submit them to the #dropsfan gallery. Do you need help with this pattern?You'll find 24 tutorial videos, a Comments/Questions area and more by visiting the pattern on garnstudio.com. © 1982-2026 DROPS Design A/S. We reserve all rights. This document, including all its sub-sections, has copyrights. Read more about what you can do with our patterns at the bottom of each pattern on our site. |
||||||||||||||||||||||


With over 40 years in knitting and crochet design, DROPS Design offers one of the most extensive collections of free patterns on the internet - translated to 17 languages. As of today we count 325 catalogs and 12298 patterns - 12288 of which are translated into English (US/in).
We work hard to bring you the best knitting and crochet have to offer, inspiration and advice as well as great quality yarns at incredible prices! Would you like to use our patterns for other than personal use? You can read what you are allowed to do in the Copyright text at the bottom of all our patterns. Happy crafting!
Post a comment to pattern DROPS 228-5
We would love to hear what you have to say about this pattern!
If you want to leave a question, please make sure you select the correct category in the form below, to speed up the answering process. Required fields are marked *.