
Looking for a yarn?


Comments / Questions (36)
![]() Marina wrote:
Marina wrote:
Ciao! Potrei lavorare questo berretto con 50 gr di un solo filato di lana e cachemire?
17.06.2025 - 16:22DROPS Design answered:
Buongiormo Marina, deve provare a lavorare un campione e verificare che corrisponda a quello indicato. Buon lavoro!
18.06.2025 - 16:22
![]() Laila wrote:
Laila wrote:
Hallo, kann man den Herringbone pullover nur mit 1 Faden Sky stricken ohne Kid silk? Wenn ja wie muss ich umrechnen mir dem Maschen Anschlag?Ich hab den mit beiden Wolle gestrickt aber der Wolle kratzt und heisst. Danke Laila
30.04.2025 - 08:16DROPS Design answered:
Liebe Laila, am besten stricken Sie dann eine andere Wolle der Garngruppe A anstatt Kid-Silk, so brauchen Sie nichts umzurechnen; sonnst wird die Maschenprobe mit nur 1 Faden Sky verschieden sein, dann sollen Sie die ganze Anleitung je nach der neuen Maschenprobe umrechnen - beachten Sie, daß dann der Pullover anders aussehen würde. Viel Spaß beim Stricken!
30.04.2025 - 09:52
![]() Laila Langer wrote:
Laila Langer wrote:
Hallo, Ich habe eine Frage zum aufteilen von Rumpfteil und Ärmel und zwar ich stricke Gr M nach der Raglanzunahme hab ich 255 M auf der Nadel plus die 4 Raglan Maschen,nehm ich die 4 Raglan Maschen zu der Aufteilung? dann hab ich mehr als 163M mit die 12 neue Maschen fürs Arm und die 4 Raglan Maschen ,komm ich auf 179 M Bitte klär mich auf. Danke Mfg Laila
07.04.2025 - 22:34DROPS Design answered:
Liebe Frau Langer, vor Aufteilung haben Sie 255 M dann legen Sie die 52 Maschen von beiden Ärmeln still und schlagen 6 Maschen für beiden Seiten an, so sind es: 255-52+6-52+6=163 Maschen für den Rumpfteil. Viel Spaß beim Stricken !
08.04.2025 - 09:37
![]() Laila Langer wrote:
Laila Langer wrote:
Hallo, kann ich den Hals 5-7cm stricken statt 10cm ohne zu umschlagen? Danke Mfg Laila
24.03.2025 - 19:49DROPS Design answered:
Liebe Frau Langer, ja sicher, hier strickt man 10 cm für die doppelte Halsblende, aber dann wird sie nur 5 cm sein; so können Sie genauso long stricken, wie Sie es möchten. Viel Spaß beim Stricken!
25.03.2025 - 09:06
![]() Laila Langer wrote:
Laila Langer wrote:
Hallo, Bein Raglanzunahme statt ein Umschlag machen kann ich auch M1R und M1L oder der machen verdoppeln? Noch was, ich bin linkshänderin und bei der zopfmuster mach ich so bei der Erklärung oder wo Maschen vorne sind muss ich die Maschen nach hinten legen u.s.w Danke Laila
20.03.2025 - 07:48DROPS Design answered:
Liebe Laila, sicher können Sie die Zunahmen anders wie in der Anleitung stricken. Wegen Zöpfe weiss ich nicht genau, am besten machen Sie so eine Maschenprobe mit den Zöpfen, so trainieren Sie sich damit. Viel Spaß beim Stricken!
20.03.2025 - 10:21
![]() Laila Langer wrote:
Laila Langer wrote:
Hallo, Der Pulli wird rund gestrickt meine Frage wie liest man die Diagramme? Rechts nach links? Ich verstehe nicht wie man der Patentmasche strickt. Können sie mir das erklären oder gibt's ein Video wo ich dass anschauen kann? Danke Laila
19.03.2025 - 07:53DROPS Design answered:
Liebe Frau Langer, die Diagramme liest man in Runden immer rechts nach links; in diesem Video zeigt man, wie man diese Maschen strickt (auch wenn die untere Maschen bei der vorigen Runden rechts gestrickt wird, wird die PatentMuster so gestrickt, dh in die vorige Runde). Viel Spaß beim Stricken!
19.03.2025 - 15:53
![]() Pauline wrote:
Pauline wrote:
Bonjour, quelle est l'aisance recommandée pour ce modèle ? Merci beaucoup
13.01.2025 - 11:34DROPS Design answered:
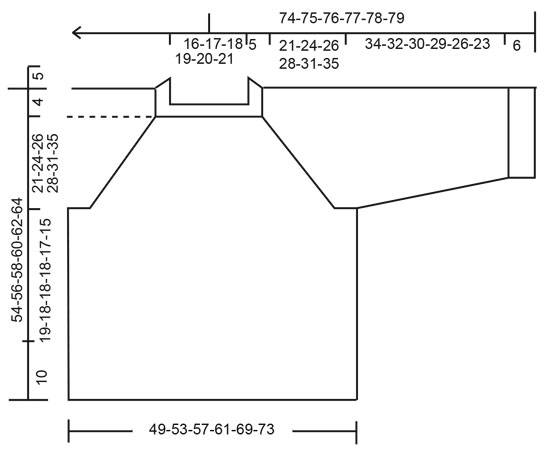
Bonjour Pauline, mesurez un vêtement que vous avez et dont vous aimez la forme puis comparez ces mesures à celles du schéma du bas de page, vous pourrez ainsi choisir l'aisance souhaitée. Retrouvez plus d'infos ici. Bon tricot!
13.01.2025 - 16:46
![]() Anna wrote:
Anna wrote:
Zaczełam robić sweter i mam problem z ilością oczek. Na przód jest więcej oczek niż na tył?
10.10.2024 - 15:27DROPS Design answered:
Witaj Aniu. Wszystko jest w porządku, przód ma więcej oczek ponieważ ma na środku warkocz. Pozdrawiamy!
11.10.2024 - 22:39
![]() Susan wrote:
Susan wrote:
When you start the body you are to continue until the piece measures 7 1/2” then start ribbing for 4”. 7 1/2” seems a bit short for the body. What am I misunderstanding about this section of the pattern?
25.09.2024 - 04:36DROPS Design answered:
Dear Susan, this is correct, body will measure 11 1/2 " in total, ie 29 cm - see also chart. Happy knitting!
25.09.2024 - 08:30
![]() Ann Weinblad wrote:
Ann Weinblad wrote:
How do you work A1-B on the Herringbone Hill cable sweater. I cannot figure it out
18.08.2024 - 02:28DROPS Design answered:
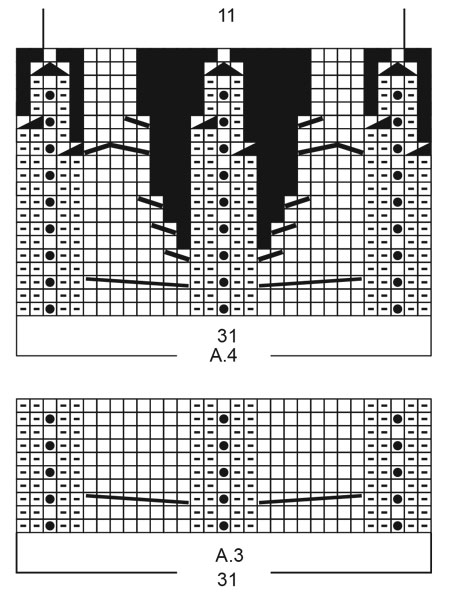
Dear Ann, in the first row work all squares and ignore the white spaces; these are to align the pattern taking into account the new stitches formed by the yarn overs in this row. So, knit 11, yarn over, knit 1, yarn over, knit 7, yarn over, knit 1, yarn over, knit 11. Then work over these stitches, including the new stitches formed by yarn overs as explained in the second row. Happy knitting!
18.08.2024 - 22:53
|
||||||||||||||||||||||||||||||||||||||||
Herringbone Hill#herringbonehillset |
||||||||||||||||||||||||||||||||||||||||
 |
 |
|||||||||||||||||||||||||||||||||||||||
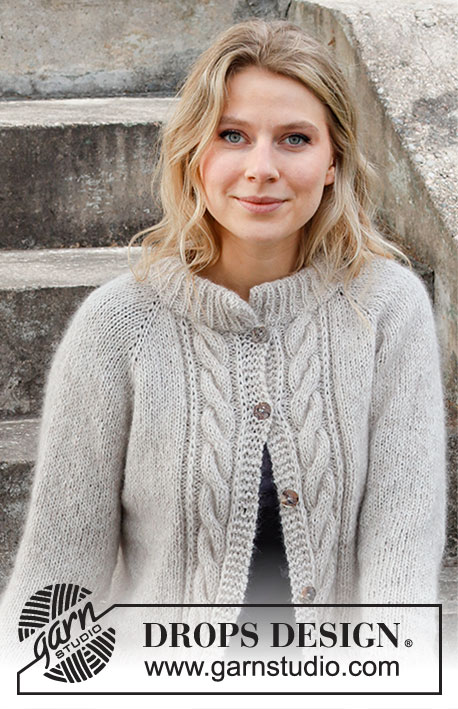
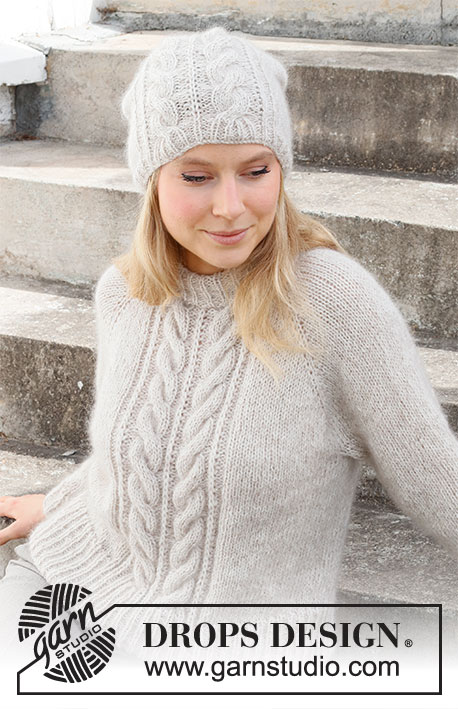
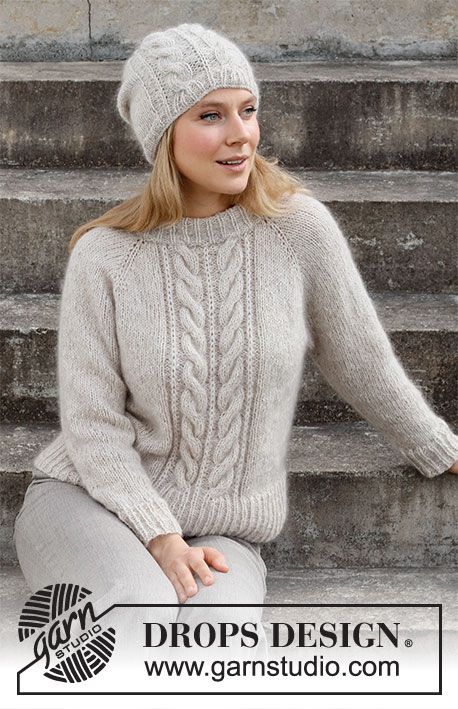
Knitted jumper in DROPS Sky and DROPS Kid-Silk. The piece is worked top down, with raglan, cables and Fisherman’s rib stitches. Sizes S - XXXL. Knitted hat in DROPS Sky and DROPS Kid-Silk, with cables and Fisherman’s rib stitches.
DROPS 215-4 |
||||||||||||||||||||||||||||||||||||||||
|
------------------------------------------------------- EXPLANATIONS FOR THE PATTERN: ------------------------------------------------------- PATTERN: See diagrams A.1 to A.4. A.1 applies to the jumper, A.2 to A.4 apply to the hat. INCREASE TIP (evenly spaced): To work out how to increase evenly, count the total number of stitches on the needle (e.g. 73 stitches) and divide by the number of increases to be made (e.g. 26) = 2.8. In this example, increase by making 1 yarn over after alternately each 2nd and 3rd stitch. On the next round knit the yarn overs twisted to avoid holes. RAGLAN: Increase 1 stitch on each side of the raglan-stitch; increase by making 1 yarn over (= 8 stitches increased on the round). On the next round knit the yarn overs twisted to avoid holes. Then work the new stitches in stocking stitch. DECREASE TIP-1 (for sleeves): Decrease 1 stitch on either side of the marker thread as follows: Work until there are 3 stitches left before the marker thread, knit 2 together, knit 2 (marker thread sits between these 2 stitches), slip 1 stitch as if to knit, knit 1 and pass the slipped stitch over the knitted stitch. DECREASE TIP-2 (for hat): Decrease 1 stitch on each side of the marker thread (= 8 stitches decreased on each decrease round + stitches decreases in A.3). Decrease 1 stitch on either side of the marker thread as follows: Work until there are 3 stitches left before the marker thread, knit 2 together, knit 2 (marker thread sits between these 2 stitches), slip 1 stitch as if to knit, knit 1 and pass the slipped stitch over the knitted stitch (= 2 stitches decreased). CASTING-OFF TIP: To avoid the cast-off edge being tight you can cast off with a larger size needle. If the edge is still tight, make 1 yarn over after approx. each 4th stitch at the same time as casting off; the yarn overs are cast off as normal stitches. ------------------------------------------------------- START THE PIECE HERE: ------------------------------------------------------- JUMPER – SHORT OVERVIEW OF THE PIECE: The neck and yoke are worked in the round with circular needle, from mid back and top down. The yoke is divided for body and sleeves and the body is continued in the round with circular needle. The sleeves are worked with double pointed needles, top down. NECK: Cast on 78-81-84-87-90-93 stitches with circular needle size 4 mm and 1 strand Sky and 1 strand Kid-Silk (= 2 strands). Knit 1 round then work rib (knit 1, purl 2) for 10 cm (double neck). When the rib is finished, knit 1 round where you increase 13-14-15-16-17-18 stitches evenly spaced – read INCREASE TIP = 91-95-99-103-107-111 stitches. Change to circular needle size 5.5 mm. Insert 1 marker at the beginning of the round; the yoke is measured from this marker! YOKE: Now work pattern as follows: 14-15-16-17-18-19 stitches in stocking stitch (= half back piece), 1 yarn over, knit 1 (= raglan-stitch), 1 yarn over, knit 12 (= sleeve), 1 yarn over, knit 1 (= raglan-stitch), 1 yarn over, knit 2-3-4-5-6-7, A.1 over the next 31 stitches, knit 2-3-4-5-6-7 (= front piece), 1 yarn over, knit 1 (= raglan-stitch), 1 yarn over, knit 12 (= sleeve) 1 yarn over, knit 1 (= raglan-stitch), 1 yarn over, 14-15-16-17-18-19 stitches in stocking stitch (= half back piece). You have now increased 1 stitch to RAGLAN on each side of all the raglan-stitches in the transitions between the body and sleeves – read description above. Continue this pattern in the round and increase to raglan every 2nd round a total of 18-20-22-23-27-29 times = 235-255-275-287-323-343 stitches. REMEMBER THE KNITTING TENSION! Continue with stocking stitch and pattern without further increases to raglan until the yoke measures 21-24-26-28-31-35 cm from the marker. Now divide the yoke for the body and sleeves on the next round as follows: Work the first 33-36-39-41-46-49 stitches (= half back piece), place the next 48-52-56-58-66-70 stitches on a thread for the sleeve, cast on 6-6-6-8-8-10 new stitches on the needle (= in side under the sleeve), work the next 73-79-85-89-99-105 stitches (= front piece), place the next 48-52-56-58-66-70 stitches on a thread for the sleeve, cast on 6-6-6-8-8-10 new stitches on the needle (= in side under the sleeve), work the last 33-36-39-41-46-49 stitches (= half back piece). Body and sleeves are finished separately. THE PIECE IS NOW MEASURED FROM HERE. BODY: = 151-163-175-187-207-223 stitches. Continue in the round with A.1 and stocking stitch as before until the piece measures 19-18-18-18-17-15 cm from the division – adjust so you finish on row 5 in A.1. Change to circular needle size 4 mm. The next round is worked as follows: Stocking stitch over the first 60-66-72-78-88-96 stitches and increase 14-14-14-14-16-20 stitches evenly over these stitches, A.1b over the next 31 stitches (4 stitches increased = 35 stitches), stocking stitch over the last 60-66-72-78-88-96 stitches and increase 14-14-14-14-16-20 stitches evenly over these stitches. There are 183-195-207-219-243-267 stitches on the needle. Now work rib as follows: Purl 1, * knit 1, purl 2*, repeat from *-* over the next 72-78-84-90-102-114 stitches, knit 1, continue A.1b (= 35 stitches), * knit 1, purl 2 *, repeat from *-* over the next 72-78-84-90-102-114 stitches, knit 1 and purl 1. NOTE! There should now be (knit 1, purl 2) on the whole round. When the rib measures 10 cm, cast off with knit over knit and purl over purl – read CASTING-OFF TIP. The jumper measures approx. 54-56-58-60-62-64 cm from the shoulder down. SLEEVE: Place the 48-52-56-58-66-70 stitches from the thread on the one side of the piece on double pointed needles/short circular needle size 5.5 mm and knit up 1 stitch in each of the new stitches under the sleeve = 54-58-62-66-74-80 stitches. Insert a marker thread in the middle of the new stitches (= 3-3-3-4-4-5 new stitches on each side of the thread). Work stocking stitch in the round. When the sleeve measures 4 cm from the division, decrease 2 stitches under the sleeve – read DECREASE TIP-1. Decrease like this every 3½-3-2½-2-1½-1 cm a total of 9-10-11-12-15-17 times = 36-38-40-42-44-46 stitches. When the sleeve measures 34-32-30-29-26-23 cm (shorter measurements in larger sizes due to wider neck and longer yoke) knit 1 round where you increase 9-7-8-9-7-8 stitches = 45-45-48-51-51-54 stitches. Change to double pointed needles size 4 mm and work rib (= knit 1, purl 2) for 6 cm. Cast off with knit over knit and purl over purl. The sleeve measures approx. 40-38-36-35-32-29 cm from the division. Work the other sleeve in the same way. ASSEMBLY: Fold the neck to the inside and sew down. To avoid the neck being tight and rolling outwards, it is important the seam is elastic. ------------------------------------------------------- HAT – SHORT OVERVIEW OF THE PIECE: The piece is worked in the round with circular needle, bottom up. Change to double pointed needles when necessary. HAT: Cast on 96-102 stitches with circular needle size 3.5 mm and 1 strand Sky and 1 strand Kid-Silk (= 2 strands). Knit 1 round. Insert a marker thread at the beginning of the round, Work rib knit 1, purl 2) in the round for 3½ cm. The next round is worked as follows: Knit 28-31 and decrease 3 stitches evenly over these stitches, work the last row in A.2 over the next 35 stitches (4 stitches decreased = 31 stitches), knit 33-36 and decrease 5 stitches evenly over these stitches = 84-90 stitches. Change to circular needle size 4.5 mm. Now work pattern as follows: Knit 25-28, A.3 over the next 31 stitches (over A.2), and knit 28-31. Continue this pattern. REMEMBER THE KNITTING TENSION! When the hat measures approx. 18-20 cm – finish after a repeat of A.3 in height, insert 4 marker threads as follows (the threads are inserted between 2 stitches and without working the round): The first marker thread after 5-6 stitches, skip 12-13 stitches, insert a thread here, skip 47-49 stitches (= 8-9 knitted stitches, 31 stitches in A.3, 8-9 knitted stitches), insert a thread here, skip 12-13 stitches, insert a thread here, there are 8-9 stitches after the last thread. Work pattern A.4 over A.3 and knit the other stitches. When 6 rounds of A.4 have been worked, start to decrease on each side of the 4 marker threads - read DECREASE TIP-2. Decrease like this every 4th round a total of 4 times. When all the decreases are finished and A.4 has been completed in height, there are 32-38 stitches left. Now knit all stitches together 2 and 2 = 16-19 stitches. Cut the strands, thread the strands through the remaining stitches, tighten and fasten well. The hat measures approx. 26-28 cm from the top down. |
||||||||||||||||||||||||||||||||||||||||
Diagram explanations |
||||||||||||||||||||||||||||||||||||||||
|
||||||||||||||||||||||||||||||||||||||||
 |
||||||||||||||||||||||||||||||||||||||||
 |
||||||||||||||||||||||||||||||||||||||||
 |
||||||||||||||||||||||||||||||||||||||||
Have you finished this pattern?Tag your pictures with #dropspattern #herringbonehillset or submit them to the #dropsfan gallery. Do you need help with this pattern?You'll find 29 tutorial videos, a Comments/Questions area and more by visiting the pattern on garnstudio.com. © 1982-2025 DROPS Design A/S. We reserve all rights. This document, including all its sub-sections, has copyrights. Read more about what you can do with our patterns at the bottom of each pattern on our site. |
||||||||||||||||||||||||||||||||||||||||


With over 40 years in knitting and crochet design, DROPS Design offers one of the most extensive collections of free patterns on the internet - translated to 17 languages. As of today we count 320 catalogues and 12094 patterns translated into English (UK/cm). 12094
We work hard to bring you the best knitting and crochet have to offer, inspiration and advice as well as great quality yarns at incredible prices! Would you like to use our patterns for other than personal use? You can read what you are allowed to do in the Copyright text at the bottom of all our patterns. Happy crafting!
Post a comment to pattern DROPS 215-4
We would love to hear what you have to say about this pattern!
If you want to leave a question, please make sure you select the correct category in the form below, to speed up the answering process. Required fields are marked *.