
Looking for a yarn?


Comments / Questions (57)
![]() Agnieszka wrote:
Agnieszka wrote:
Chciałabym wykonać wg tego wzoru rozmiar XL, ale korzystając z włóczki Drops Nepal (więc drutów 4.5 albo 5) Czy wobec tego powinnam skorzystać z pomiarów jak dla rozmiaru mniejszego? L albo nawet M? Dziękuję za odpowiedź, Pozdrawiam!
14.01.2022 - 20:04DROPS Design answered:
Witaj Agnieszko, za pomocą drutów 4.5 albo 5 wykonaj próbkę dla wybranej przez siebie włóczki (Nepal). Zobacz ile oczek wchodzi na 10 cm próbki i musisz dopasować liczbę oczek w robótce (wybrać rozmiar). Na szczęście kamizelka nie ma skomplikowanej konstrukcji więc powinno się udać. Zobacz jeszcze kurs DROPS TUTAJ. Pozdrawiamy!
17.01.2022 - 11:31
![]() Jeanne Pigage wrote:
Jeanne Pigage wrote:
I am just starting the Georgetown vest pattern. I am casting on for the medium size which is 19 stitches....but it says to include 1 stitch ON EACH SIDE. Does that mean on each side of the cast on so it would be 21 stitches? Then it says work 1 edge stitch in garter stitche.....does that mean both sides?? Very confusing pattern
12.01.2022 - 23:54DROPS Design answered:
Hi Jeanne, The 19 stitches include the edge stitches, so 1 edge stitch on each side and 17 stitches in the middle. These edge stitches are then worked in garter stitch (1 stitch on both sides) and later used when assembling the vest . Happy knitting!
13.01.2022 - 07:56
![]() Anja wrote:
Anja wrote:
Jeg kan ikke helt forstå bagstykket... når jeg har samlet og strikket de 18 cm. På en str. M skal jeg have 80 masker, så tager jeg ud 1 gang = 82 masker, slår 2 masker op i slutningen af de næste 2 pinde = 86, men i opskriften står der =90 ?? Skal jeg slå op over 2 pinde mere??? Ellers passer det ikke
02.12.2021 - 08:04DROPS Design answered:
Hej Anja. Ja det stämmer, i storlek M så ska du slå op 2 masker i varje sida (på slutten av hver pinne) 2 ganger, alltså 8 masker + de 2 du tidigare slåt op. 80+10=90m. Mvh DROPS Design
02.12.2021 - 11:06
![]() Carina Haag Nilsson wrote:
Carina Haag Nilsson wrote:
Hej , min mor behöver (blir för tungt för henne att hålla i allt till slut pga skadad axel) detta mönster 219-1 stickat nerifrån och upp. Hon har fått besked från er att det ska kunna gå att välja det alternativet vid utskrift här på hemsidan. Jag finner dock inte hur man skulle göra för att kunna få det. Tacksam för hjälp ! Mvh Carina Haag-Nilsson 0702 67 79 85
21.11.2021 - 22:13DROPS Design answered:
Hej Carina. Då har ni dessvärre fått fel information för detta mönster finns bara stickat uppifrån och ner. Detta mönster är stickat nedifrån och upp, men det är i ett annat garn. Mvh DROPS Design
22.11.2021 - 09:38
![]() Ann wrote:
Ann wrote:
Undre mig over optagning af masker til ærme og hals? Der er kun 2 antal masker til 6 forskellige str.? Hvilket skal bruges til str. l?
26.09.2021 - 18:28DROPS Design answered:
Hej Ann. Du ska strike op ett antal masker mellan 88-132 m till ÆRMEKANT, det antal som du får att passa i din storlek och ett antal masker mellan 104-120 m till HALSKANT, det antal som du får att passa där i din storlek. (De mindre storlekarna hamnar nära 88/104 m och de större nära 132/120 m). Mvh DROPS Design
27.09.2021 - 08:17
![]() Michaela wrote:
Michaela wrote:
Hallo, im Text für das Rumpfteil steht, dass man zu beiden Seiten des Markierers zunehmen soll, danach dann aber ABNAHMETIPP... da ist "zunehmen" mMn ein Druckfehler, oder? Liebe Grüße, Michaela
01.09.2021 - 15:28DROPS Design answered:
Liebe Michaela, also so ist es richtig, beim Rumpfteil wird es abgenommen, dh von 186 bis 290 M wenn alle Maschen nach Armauschnnitt gestrickt sind wird es zu 170 bis 274 Maschen abgenommen - siehe Auch Maßskizze. Viel Spaß beim stricken!
02.09.2021 - 08:13
![]() Annbritt Petersson wrote:
Annbritt Petersson wrote:
Det går inte att skriva ut hela mönstret sidorna 3 och 4 blir blanka! Hjälp jag har köpt garn till 2 västar och får inte ut mönstret i sin helhet, kan inte sitta och läsa mönstret i telefonen vill ha det på papper!
28.08.2021 - 18:51DROPS Design answered:
Hei Annbritt. Sjekk med dine innstillinger på din printer. Vi har ingen problemer med å skrive ut hele oppskriften. mvh DROPS design
30.08.2021 - 13:27
![]() Sanne Philipsen wrote:
Sanne Philipsen wrote:
Kan det virkelig passe at ærmegabet kun skal være 21 cm på en herrevest str large? Det er da alt for lille!
23.08.2021 - 06:48DROPS Design answered:
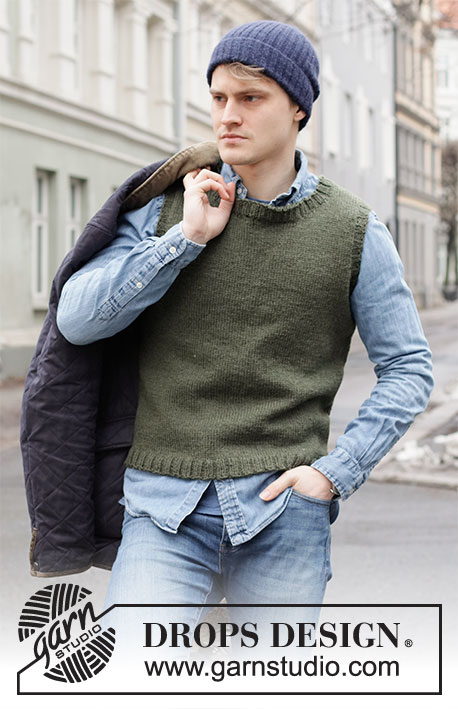
Hej Sanne, følger du opskriften, så kommer ærmegabet til at se ud som på billedet. Du kan naturligvis altid strikke det større :)
25.08.2021 - 08:41
![]() Jan Erickson wrote:
Jan Erickson wrote:
Im making the Georgetown vest size large. After following the increases for the armholes I have91 stitches instead of 98 and cannot figure out where I am going wrong.
03.07.2021 - 02:06DROPS Design answered:
Dear Jan, did you do the increases on the separately knitted shoulder pieces too? You have two 20 stitch pieces for the shoulder, picking up 42 for the neck, increase 1 stitchx1, cast on 2x2, and 1 stitchx3 (8 stitches on both side= 16 stitch) 82 + 16 = 98. Happy Stitching!
03.07.2021 - 06:54
![]() Jan wrote:
Jan wrote:
Im having difficulty understanding adding on the underarm stitches on the Georgetown Vest. I get 91 when I should have 98.
05.06.2021 - 01:57DROPS Design answered:
Dear Jan, what exactly is that you don not understand about the increase? Are you sure, you start off with the correct number of stitches? We need more info to help you. Happy Knitting!
07.06.2021 - 03:38
|
||||
Georgetown Vest#georgetownvest |
||||
 |
 |
|||
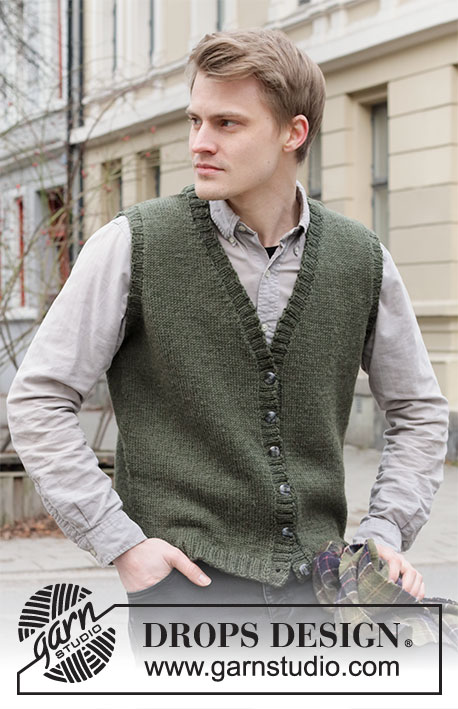
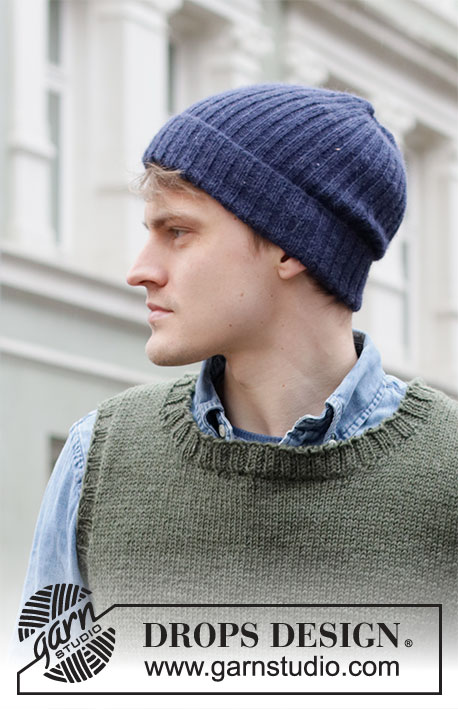
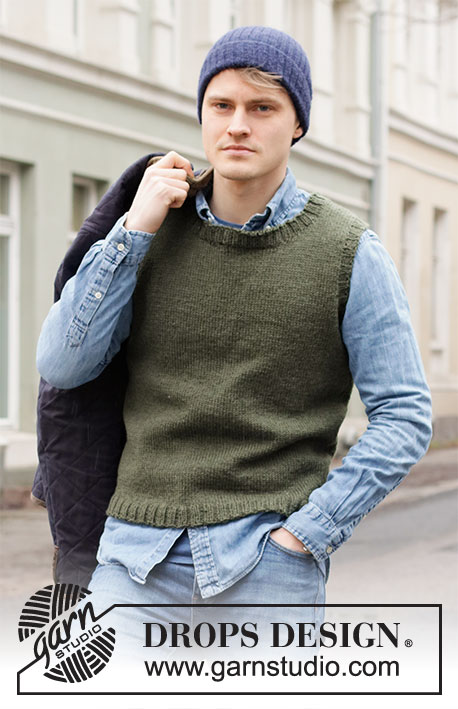
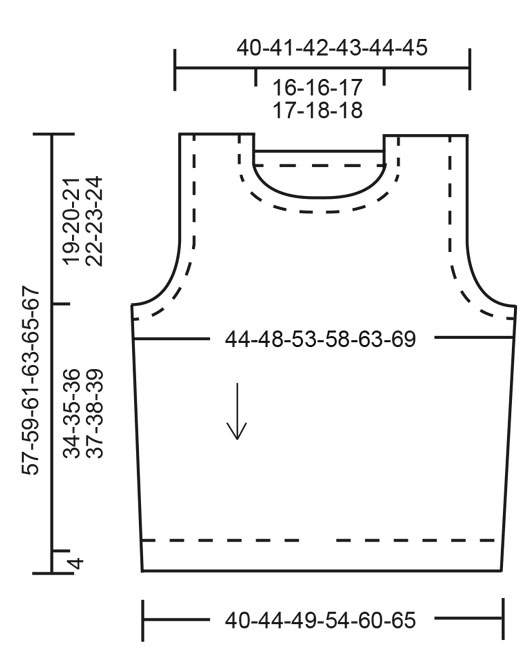
Knitted vest / slipover for men in DROPS Karisma or DROPS Soft Tweed. The piece is worked top down with round neck and ribbed edges. Sizes S - XXXL.
DROPS 219-1 |
||||
|
------------------------------------------------------- EXPLANATIONS FOR THE PATTERN: ------------------------------------------------------- RIDGE/GARTER STITCH (worked back and forth): Knit all rows. 1 ridge in height = Knit 2 rows. INCREASE TIP: Increase 1 stitch by making 1 yarn over. On the next row, work the yarn over twisted to avoid a hole. DECREASE TIP (for sides of body): Decrease 1 stitch on each side of the stitch with the marker thread as follows: Work until there are 3 stitches left before the stitch with the marker thread, knit 2 together, knit 1, slip 1 stitch as if to knit, knit 1 and pass the slipped stitch over the knitted stitch (= 2 stitches decreased). CASTING-OFF TIP: To avoid the cast-off edge being tight you can cast off with a larger size needle. If the edge is still tight, make 1 yarn over after approx. each 4th stitch at the same time as casting off; the yarn overs are cast off as normal stitches. ------------------------------------------------------- START THE PIECE HERE: ------------------------------------------------------- VEST – SHORT OVERVIEW OF THE PIECE: The vest is worked top down. Each shoulder is first worked separately, back and forth, at the same time stitches are increased/cast on for the neck. The front and back pieces are worked separately, back and forth, until the increases for the armholes are finished. Then the pieces are joined and the body worked in the round. Stiches are picked up for the neck and sleeve edges and worked in rib in the round. BACK PIECE: Each shoulder is worked separately. Right shoulder: Cast on 18-19-19-20-20-21 stitches (including 1 edge stitch on each side) using circular needle size 4 mm and Karisma. Work 1 edge stitch in GARTER STITCH – read description above, work stocking stitch until there is 1 stitch left on the row and then 1 edge stitch in garter stitch. Continue like this back and forth. When the piece measures 4 cm increase 1 stitch inside 1 edge stitch on the beginning of next row from the right side – read INCREASE TIP in description above = 19-20-20-21-21-22 stitches. Lay the piece to one side and work the left shoulder. Left shoulder: Cast on 18-19-19-20-20-21 stitches (including 1 edge stitch on each side) using circular needle size 4 mm and Karisma. Work 1 edge stitch in GARTER STITCH – read description above, work stocking stitch until there is 1 stitch left on the row and then 1 edge stitch in garter stitch. Continue like this back and forth. When the piece measures 4 cm, increase 1 stitch inside 1 edge stitch at the end of the next row from the right side = 19-20-20-21-21-22 stitches. Work 1 row back from the wrong side. REMEMBER THE KNITTING TENSION! Now join the 2 shoulders together as follows: Knit the 19-20-20-21-21-22 stitches on the left shoulder, cast on 40-40-42-42-44-44 stitches at the end of the row (= neck), knit the 19-20-20-21-21-22 stitches from the right shoulder onto the same needle = 78-80-82-84-86-88 stitches. Continue back and forth with stocking stitch and 1 edge stitch in garter stitch on each side. When the piece measures 18-18-18-17-17-16 cm, increase/cast on stitches for the armhole on each side as follows: Increase 1 stitch inside 1 edge stitch on each row from the right side 2-1-1-3-4-4 times, then cast on new stitches for the armholes at the end of each row as follows: Cast on 2 stitches 0-2-2-3-3-4 times and 3 stitches 0-0-1-1-2-3 times (= a total of 2-5-8-12-16-21 stitches increased for each armhole) = 82-90-98-108-118-130 stitches. Lay the piece to one side and work the front piece. FRONT PIECE: Each shoulder is worked separately. Left shoulder: Cast on 18-19-19-20-20-21 stitches (including 1 edge stitch on each side) using circular needle size 4 mm and Karisma. Work 1 edge stitch in garter stitch, work stocking stitch until there is 1 stitch left on the row and then 1 edge stitch in garter stitch. Continue like this back and forth. When the piece measures 5-5-6-6-7-7 cm, increase/cast on stitches for the neck as follows: Increase 1 stitch inside 1 edge stitch on the beginning of the next row from the right side = 19-20-20-21-21-22 stitches. Then cast on stitches at the end of each row from the wrong side as follows: Cast on 2 stitches 3 times and 3 stitches 1 time = 28-29-29-30-30-31 stitches. Lay the piece to one side and work the right shoulder. Right shoulder: Cast on 18-19-19-20-20-21 stitches (including 1 edge stitch on each side) using circular needle size 4 mm and Karisma. Work 1 edge stitch in garter stitch, work stocking stitch until there is 1 stitch left on the row and then 1 edge stitch in garter stitch. Continue like this back and forth. When the piece measures 5-5-6-6-7-7 cm, increase/cast on stitches for the neck as follows: Increase 1 stitch inside 1 edge stitch at the end of the next row from the right side = 19-20-20-21-21-22 stitches. Then cast on stitches at the end of each row from the right side as follows: Cast on 2 stitches 3 times and 3 stitches 1 time = 28-29-29-30-30-31 stitches. Now join the right and left shoulders together from the right side as follows: Knit the 28-29-29-30-30-31 stitches on the right shoulder, cast on 22-22-24-24-26-26 stitches for the neck, knit the 28-29-29-30-30-31 stitches from the left shoulder = 78-80-82-84-86-88 stitches. Continue back and forth with stocking stitch and 1 edge stitch in garter stitch on each side. When the piece measures 18-18-18-17-17-16 cm, increase/cast on stitches for the armholes as follows. Increase 1 stitch inside 1 edge stitch on each row from the right side 2-1-1-3-4-4 times, then cast on new stitches for the armholes at the end of each row as follows: Cast on 2 stitches 0-2-2-3-3-4 times and 3 stitches 0-0-1-1-2-3 times (= a total of 2-5-8-12-16-21 stitches increased for each armhole) = 82-90-98-108-118-130 stitches. THE PIECE IS NOW MEASURED FROM HERE! BODY: Now join the front and back pieces together from the right side as follows: Work stocking stitch over the 82-90-98-108-118-130 stitches from the front piece, cast on 11-11-13-13-15-15 new stitches on the needle (= in side under sleeve), stocking stitch over the next 82-90-98-108-118-130 stitches on the back piece and cast on 11-11-13-13-15-15 new stitches on the needle (= in side under sleeve) = 186-202-222-242-266-290 stitches. Insert 1 marker in the middle stitch of the 11-11-13-13-15-15 new stitches in each side. Allow the markers to follow your work onwards; stitches will later be decreased on each side of both markers. Work stocking stitch in the round. When the piece measures 5 cm, decrease on both sides of each marker – read DECREASE TIP (= 4 stitches decreased). Decrease like this every 9-9-10-10-10-11 cm a total of 4 times = 170-186-206-226-250-274 stitches. When the piece measures 34-35-36-37-38-39 cm increase 26-26-30-34-38-42 stitches evenly spaced = 196-212-236-260-288-316 stitches. Change to circular needle size 3 mm and work rib (= knit 2 / purl 2) in the round for 4 cm. Cast off with knit over knit and purl over purl – read CASTING-OFF TIP. The vest measures approx. 57-59-61-63-65-67 cm from the shoulder down. ASSEMBLY: Sew the shoulder seams with grafting stitches. ARMHOLE EDGE: Knit up approx. 88-132 stitches inside the 1 stitch with short circular needle size 3 mm and Karisma. Adjust so the number of stitches is divisible by 4. Work rib (= knit 2 / purl 2) in the round for 2 cm. Cast off with knit over knit and purl over purl – remember CASTING-OFF TIP! Work the other sleeve edge in the same way. NECK: Knit up 104-120 stitches inside the 1 stitch with short circular needle size 3 mm and Karisma. Adjust so the number of stitches is divisible by 4. Work rib (= knit 2 / purl 2) in the round for 2 cm. Cast off with knit over knit and purl over purl. |
||||
Diagram explanations |
||||
|
||||
 |
||||
Have you finished this pattern?Tag your pictures with #dropspattern #georgetownvest or submit them to the #dropsfan gallery. Do you need help with this pattern?You'll find 24 tutorial videos, a Comments/Questions area and more by visiting the pattern on garnstudio.com. © 1982-2025 DROPS Design A/S. We reserve all rights. This document, including all its sub-sections, has copyrights. Read more about what you can do with our patterns at the bottom of each pattern on our site. |
||||


With over 40 years in knitting and crochet design, DROPS Design offers one of the most extensive collections of free patterns on the internet - translated to 17 languages. As of today we count 320 catalogues and 12094 patterns translated into English (UK/cm). 12094
We work hard to bring you the best knitting and crochet have to offer, inspiration and advice as well as great quality yarns at incredible prices! Would you like to use our patterns for other than personal use? You can read what you are allowed to do in the Copyright text at the bottom of all our patterns. Happy crafting!
Post a comment to pattern DROPS 219-1
We would love to hear what you have to say about this pattern!
If you want to leave a question, please make sure you select the correct category in the form below, to speed up the answering process. Required fields are marked *.