
Popular categories
Looking for a yarn?


Comments / Questions (178)
![]() Gillian Marie Warne wrote:
Gillian Marie Warne wrote:
Hello do you have a version of this pattern for two needles please, I cannot use a circular needle, or perhaps you could tell me how to convert the pattern myself...thank you.
15.03.2025 - 09:46DROPS Design answered:
Dear Gillian, we don't make custom patterns. You can work this pattern with straight needles, by dividing the body and working the front and back pieces separately. You can read more about how to adapt this pattern in this lesson. However, the edges for the neck and the sleeves need to be worked in the round; you can use double pointed needles instead of a circular needle. Happy knitting!
16.03.2025 - 20:42
![]() Paula María wrote:
Paula María wrote:
Hola, ya vi que se sigue en la parte que se queda pero por detrás 😊
25.02.2025 - 14:04
![]() Paula María wrote:
Paula María wrote:
No me queda claro, después de cerrar los puntos de la sisa, que se hace, se corta el hilo y se sigue con la parte delantera?
24.02.2025 - 22:38DROPS Design answered:
Hola Paula, después de cerrar los puntos de la sisa sigues con el hilo pero trabajas solo sobre la mitad del cuerpo, de ida y vuelta; esta mitad es la parte delantera. No hace falta cortar el hilo porque sigues trabajando en la misma fila y el inicio de la fila es el mismo que en el cuerpo. Después de trabajar el delantero y los hombros del delantero se corta el hilo y se retoma donde se separó para el delantero y la espalda; unes el hilo de trabajo y trabajas sobre los puntos restantes en esa fila (de la espalda).
02.03.2025 - 18:34
![]() Kathryn wrote:
Kathryn wrote:
Hi there - I've just finished the right front shoulder and want to move to the left, but have bound off and cut the string. How do I start on the left shoulder without a connected yarn? Thank you!
15.02.2025 - 08:21DROPS Design answered:
Hi Kathryn, You continue across the left shoulder, working the first stitch from the right side and leaving a strand end which is fastened as usual later. Happy knitting!
17.02.2025 - 07:30
![]() Nicole PUNGIER wrote:
Nicole PUNGIER wrote:
Il y a quelque chose que je ne comprends au moment de relever les mailles pour faire les bordures. Pourquoi faut-il relever 84 à 124 mailles pour les bordures d'emmanchures et 76 à92 mailles pour celle de l'encolure. Je ne trouve pas cela logique, l'encolure étant plus large que l'emmanchure. Merci de votre explication. Cordialement.
02.01.2025 - 18:32DROPS Design answered:
Bonjour Mme Pungier, les emmanchures sont plus larges (40 à 50 cm) que l'encolure, raison pour laquelle on va relever davantage de mailles pour la bordure des emmanchures que pour le col. Bon tricot!
03.01.2025 - 15:27
![]() Odette Guilmette wrote:
Odette Guilmette wrote:
Bonjour, Relever les mailles autour des emmanchures: "à la division de l'ouvrage" s'agit-t-il de la couture de l'épaule ou sous le bras? Et je m'interroge sur le nombre de mailles à relever. Pas d'indication précise. Je tricote grandeur M et le nombre de mailles indiquées va de 84 à 124 . Alors je relève 3/4 pour certaines parties? en répartissant les mailles avec marqueurs? Comment diviser si je n'ai pas le nombre exact. Merci
30.12.2024 - 18:19DROPS Design answered:
Bonjour Mme Guillemette, la division de l'ouvrage, c'est là où vous avez divisé le dos et le devant quand vous avez arrêté de tricoter en rond pour terminer chaque partie séparément = en bas de l'emmanchure. Le nombre de mailles va varier en fonction de votre propre tension en hauteur, ce qui compte c'est que votre nombre de mailles soit situé entre 84 et 124 en fonction de la taille, qu'il soit bien divisible par 4 pour les côtes, pour que les côtes ne soient ni trop serrées, ni trop lâches autour des emmanchures. Bon tricot!
02.01.2025 - 15:03
![]() Christina wrote:
Christina wrote:
In der Größe L hat sich leider ganz am Anfang schon ein Fehler eingeschlichen. Wenn ich 184 M anschlage, nach der 1. R r mit den Rippen anfange, fängt die Runde mit 2 r M an und hört mit 2 M r auf. Also hab ich dort 4 M r. Ist das Absicht? Viele Grüße
22.12.2024 - 11:19
![]() Joussier wrote:
Joussier wrote:
Peut on le recevoir pour aiguilles droites? Je ne tricote pas en circulaire et je ne sais pas traduire les indications pour aiguilles droites.merci.
16.11.2024 - 18:43DROPS Design answered:
Bonjour Mme Joussier, cette leçon vous aidera à faire les ajustements nécessaires pour le tricoter en allers et retours. Bon tricot!
18.11.2024 - 07:57
![]() Becky Paul wrote:
Becky Paul wrote:
I’m working on the front piece and have 88 stitches. Directions say at beginning of the first row to bind off 2 stitches. For the beginning of the next 6 rows the pattern says to bind off one stitch. If I do this I will have bound off a total of 10 stitches (2+6 = 8) so I’d have 78 stitches. The pattern says I should have 72 stitches. Where are the other 6 stitches that I should have bound off? What am I doing wrong?
08.11.2024 - 02:29DROPS Design answered:
See answer below :)
08.11.2024 - 08:27
![]() Becky wrote:
Becky wrote:
Working on front piece and I have 88 stitches. Directions say at the beginning of each row bind off 2 stitches 1 time and 1 stitch 6 times. I’m interpreting this to mean first row, bind off 3 stitches and then knit across. Next row, bind off 3 stitches and then knit across. For the next 8 rows start each row by binding off one stitch. If I do this I’d end up with 70 stitches and pattern says I should have 72 stitches so this doesn’t work. What am I doing wrong?
08.11.2024 - 00:38DROPS Design answered:
Dear Becky, first cast off 2 stitches at the beg of next row, finish row, turn and cast off 2 sts at the beg of next row , finish row = you have cast off 2 sts on each side. Now cast off 1 stitch at the beg of next row, work row to the end, turn, cast off 1 stitch at the beg of the row, work row to the end, work these 2 rows (casting off 1 st on each side) a total of 6 times = you have cast off (2 sts 1 time) + (1 st x 6 times) = 8 sts on each side, so that you get 88-16=72 sts left. Happy knitting!
08.11.2024 - 08:24
|
|
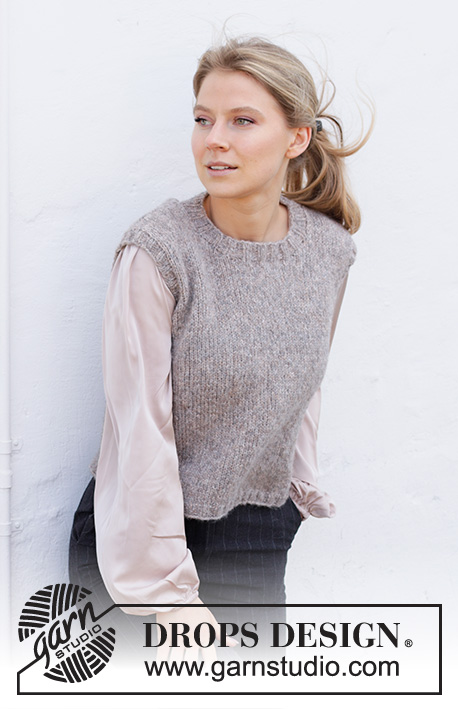
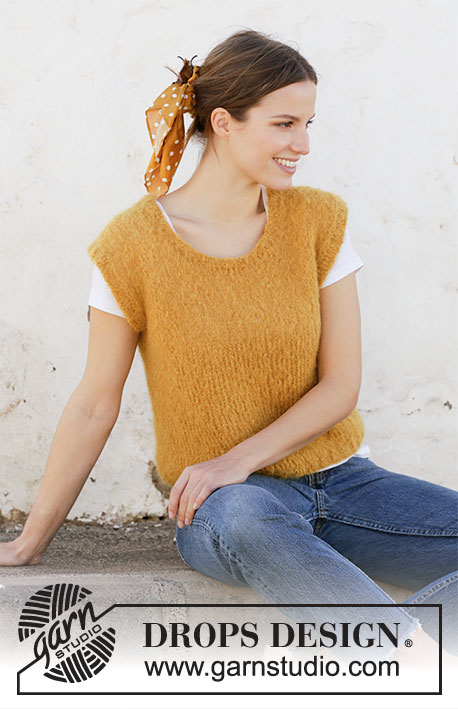
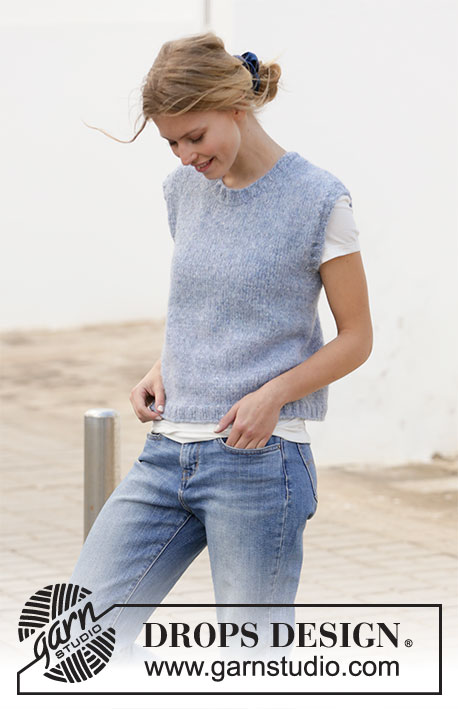
College Days#collegedaysvest |
|
 |
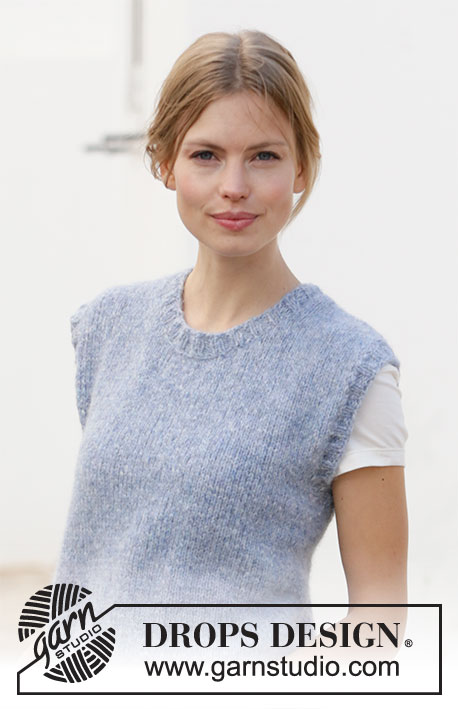 |
Knitted vest / slipover with round neck in DROPS Air. Sizes S – XXXL.
DROPS 210-28 |
|
|
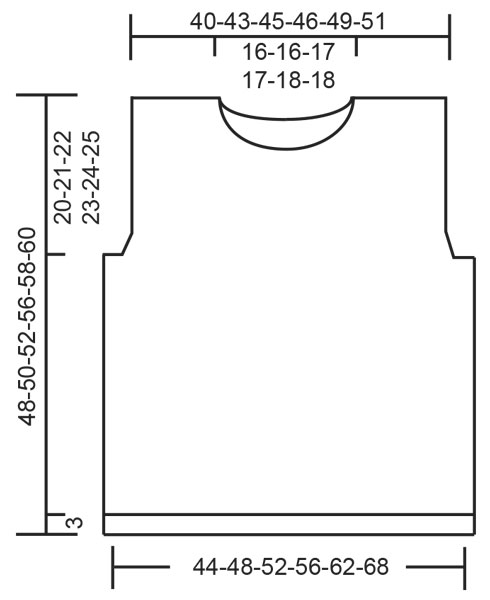
------------------------------------------------------- EXPLANATIONS FOR THE PATTERN: ------------------------------------------------------- DECREASE TIP-1 (evenly spaced): To work out how to decrease evenly, count the total number of stitches on needle (e.g. 156 stitches) and divide by number of decreases to be made (e.g. 8) = 19.5. In this example decrease by knitting alternatively each 18th and 19th stitch and each 19th and 20th stitch together. ------------------------------------------------------- START THE PIECE HERE: ------------------------------------------------------- VEST – SHORT OVERVIEW OF THE PIECE: The piece is worked in the round with circular needle, bottom up as far as the armholes. Front and back pieces are finished separately back and forth. Neck and sleeve edges are worked in the round with circular needle to finish. BODY: Cast on 156-172-184-200-220-240 stitches with circular needle size 4.5 mm and Air. Knit 1 round, then work rib (knit 2, purl 2) for 3 cm. Change to circular needle size 5 mm. Work stocking stitch, decreasing 8 stitches evenly spaced on the first round = 148-164-176-192-212-232 stitches – read DECREASE TIP above. Insert 1 marker at the beginning of the round and 1 marker after the next 74-82-88-96-106-116 stitches. Allow the markers to follow your work onwards; they will be used when casting off for the armholes. Work stocking stitch until the piece measures 28-29-30-33-34-35 cm from the cast-on edge. REMEMBER THE KNITTING TENSION! On the next round cast off for the armholes, starting 3-3-3-4-4-4 stitches before the first marker; cast off 6-6-6-8-8-8 stitches (the marker sits in the middle of these stitches), work as before until there are 3-3-3-4-4-4 stitches left before the next marker, cast off the next 6-6-6-8-8-8 stitches (the marker sits in the middle of these stitches) and work to end of round. Front and back pieces are finished separately, back and forth on the needle. FRONT PIECE: = 68-76-82-88-98-108 stitches. Work stocking stitch and cast off for the armholes on each side at the beginning of each row as follows: Cast off 2 stitches 1 time and 1 stitch 1-3-4-6-9-12 times = 62-66-70-72-76-80 stitches. Continue working until the piece measures 38-40-40-44-44-46 cm (there is approx. 10-10-12-12-14-14 cm left to finished length). On the next row from the right side cast off for the neck as follows: Work the first 25-27-28-29-30-32 stitches, cast off the next 12-12-14-14-16-16 stitches and work the last 25-27-28-29-30-32 stitches. The shoulders are finished separately; do not cut the strand – continue with the right shoulder, from the wrong side. RIGHT SHOULDER ON FRONT PIECE: = 25-27-28-29-30-32 stitches. Work stocking stitch, starting from the wrong side, and cast off stitches for the neck at the beginning of each row from the right side as follows: Cast off 2 stitches 2 times and 1 stitch 4 times = 17-19-20-21-22-24 stitches. Continue working until the piece measures 48-50-52-56-58-60 cm from the cast-on edge. Cast off and cut the strand. LEFT SHOULDER ON FRONT PIECE: = 25-27-28-29-30-32 stitches. Work stocking stitch, starting from the right side and cast off stitches for the neck at the beginning of each row from the wrong side as follows: Cast off 2 stitches 2 times and 1 stitch 4 times = 17-19-20-21-22-24 stitches. Continue working until the piece measures 48-50-52-56-58-60 cm from the cast-on edge (match to the right shoulder). Cast off and cut the strand. BACK PIECE: = 68-76-82-88-98-108 stitches. Work stocking stitch and cast off stitches for the armholes on each side at the beginning of each row as follows: Cast off 2 stitches 1 time and 1 stitch 1-3-4-6-9-12 times = 62-66-70-72-76-80 stitches. Continue working until the piece measures 44-46-48-52-54-56 cm (there is approx. 4 cm left to finished length). On the next row from the right side, cast off for the neck as follows: Work the first 18-20-21-22-23-25 stitches, cast off the next 26-26-28-28-30-30 stitches and work the last 18-20-21-22-23-25 stitches. The shoulders are finished separately; do not cut the strand – continue with the left shoulder from the wrong side. LEFT SHOULDER ON BACK PIECE: = 18-20-21-22-23-25 stitches. Work stocking stitch, starting from the wrong side and cast off 1 stitch at the beginning of the next row from the right side = 17-19-20-21-22-24 stitches. Continue working until the piece measures 48-50-52-56-58-60 cm from the cast-on edge; match the front piece. Cast off and cut the strand. RIGHT SHOULDER ON BACK PIECE: = 18-20-21-22-23-25 stitches. Work stocking stitch, starting from the right side and cast off 1 stitch at the beginning of the next row from the wrong side = 17-19-20-21-22-24 stitches. Continue working until the piece measures 48-50-52-56-58-60 cm from the cast-on edge; match to the front piece. Cast off and cut the strand. ASSEMBLY: Sew the shoulder seams with grafting stitches. NECK: Start from the right side at one of the shoulder seams. Using circular needle size 4.5 mm knit up approx. 76 to 92 stitches inside the 1 stitch around the whole neck-line (number must be divisible by 4). Work rib (knit 2, purl 2) in the round for 2 cm. Cast off with knit over knit and purl over purl. EDGE AROUND ARMHOLES: Start from the right side where the piece was divided for the armhole. Using circular needle size 4.5 mm knit up approx. 84 to 124 stitches around the armhole (number must be divisible by 4). Work rib (knit 2, purl 2) in the round for 2 cm. Cast off with knit over knit and purl over purl. Work an edge around the other armhole in the same way. |
|
|
|
Have you finished this pattern?Tag your pictures with #dropspattern #collegedaysvest or submit them to the #dropsfan gallery. Do you need help with this pattern?You'll find 22 tutorial videos, a Comments/Questions area and more by visiting the pattern on garnstudio.com. © 1982-2025 DROPS Design A/S. We reserve all rights. This document, including all its sub-sections, has copyrights. Read more about what you can do with our patterns at the bottom of each pattern on our site. |
|


With over 40 years in knitting and crochet design, DROPS Design offers one of the most extensive collections of free patterns on the internet - translated to 17 languages. As of today we count 314 catalogues and 11820 patterns translated into English (UK/cm). 11820
We work hard to bring you the best knitting and crochet have to offer, inspiration and advice as well as great quality yarns at incredible prices! Would you like to use our patterns for other than personal use? You can read what you are allowed to do in the Copyright text at the bottom of all our patterns. Happy crafting!
Post a comment to pattern DROPS 210-28
We would love to hear what you have to say about this pattern!
If you want to leave a question, please make sure you select the correct category in the form below, to speed up the answering process. Required fields are marked *.