
Looking for a yarn?


Comments / Questions (35)
![]() Silvia wrote:
Silvia wrote:
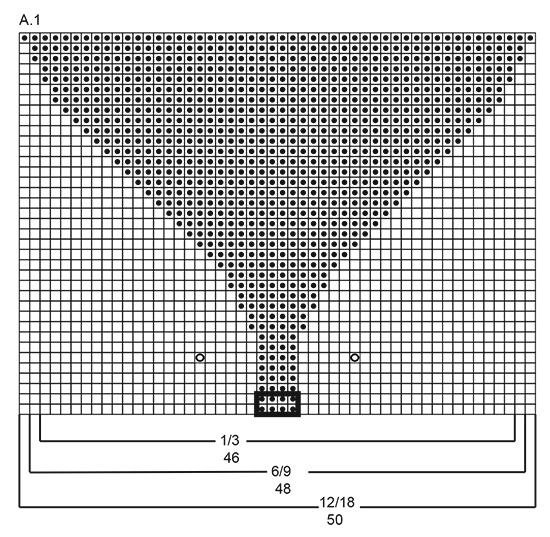
Chiedo: se seguo lo schema per taglia 2 anni, a fine bordo ho 54 m+2m di vivagno. Lo schema A1 davanti volpe, ne da 50(23+23+ 4 per il naso). Dove sono le altre 4 maglie? GRAZIE🌹
10.10.2022 - 17:47DROPS Design answered:
Buonasera Silvia, deve scegliere lo schema A.1 corrispondente alla sua taglia: lo schema A.1 per la taglia 2 anni ha 50 maglie per la to + 4 maglie centrali. Buon lavoro!
10.10.2022 - 19:07
![]() Ursula wrote:
Ursula wrote:
Very cute design
20.04.2022 - 07:16
![]() Laure wrote:
Laure wrote:
Bonjour, lorsque vous mentionnez de tricoter une lisière en mousse. Est-ce que ça signifie que je dois tricoter la 1e er la dernière maille du patron à l'endroit? Ou c'est une lisière couture mousse, dans ce cas là, la 1e maille est glissée à l'envers et la dernière est tricotée à l'endroit? Je ne trouve pas de tutoriel expliquant la technique Merci
22.01.2022 - 01:18DROPS Design answered:
Bonjour Laure, pour tricoter 1 maille lisière au point mousse de chaque côté, tricotez la première et la dernière maille à l'endroit tous les rangs, comme on le montre par exemple dans cette vidéo. Bon tricot!
24.01.2022 - 08:33
![]() Ida wrote:
Ida wrote:
Hej! Ska det bytas till rundsticka 3.0 efter resåren på vanten också eller bara för mössan?
14.01.2022 - 14:40DROPS Design answered:
Hej Ida, du strikker vanterne på pind 2,5 :)
17.01.2022 - 14:00
![]() Allison Margaret Sell wrote:
Allison Margaret Sell wrote:
Is the purl row alternated between each knit 2 purl 2 row?
09.01.2022 - 22:25DROPS Design answered:
Hi Allison, The purl row is a one-off at the beginning of the hat to give a neat edge. After this you work rib (knit 2, purl 2) to the length specified for your size. Happy knitting!
10.01.2022 - 08:25
![]() Renee wrote:
Renee wrote:
Because this is basically two squares of knitted fabric I see no reason to use circular knitting needles and use straight needles instead. Using a circular knitting needle would be better if you could knit this in the round and I think I can actually adapt it in that manner. Seams on a babies head is not comfortable.
27.12.2021 - 01:16
![]() Renee wrote:
Renee wrote:
Since this pattern is knitted in two parts and not in the round. Why the circular needles? I just read through it so I could be missing something?
26.12.2021 - 13:00DROPS Design answered:
Hello Renee! Circular needles are used because all stitches would not fit on double-pointed needles. Happy knitting!
27.12.2021 - 00:01
![]() Daria wrote:
Daria wrote:
In che modo è possibile adattare il modello del cappello per un bambino di 5/7 anni? Grazie
05.12.2021 - 21:29DROPS Design answered:
Buonasera Daria, questo modello è stato progettato per arrivare alla taglia di 4 anni, e in questa sede non ci è possibile progettare altre taglie. Buon lavoro!
06.12.2021 - 18:47
![]() Pauline wrote:
Pauline wrote:
Bonjour, Merci pour cet adorable modèle dont je viens de finir le bonnet. Je démarre les moufles et le diagramme m'interpelle. Il est écrit que le trait sur 2 mailles correspond au coloris rouille et que le triangle noir correspond au coloris gris perle. Or, si l'on suit le schéma, il est noté de faire des diminutions coloris rouille sur la partie du tricot en gris perle, et de faire des diminutions coloris gris perle sur la partie rouille. Est-ce normal ou est-ce une erreur ? Merci.
05.10.2021 - 23:07DROPS Design answered:
Bonjour Pauline, il semble que la légende et les symboles aient été inversés, tricotez les diminutions dans la couleur de la partie tricotée (= côté visage en gris perle et l'autre côté en rouille) - une correction sera fort probablement faite d'ici peu, merci pour votre retour! Bon tricot!
06.10.2021 - 07:33
![]() Elaine Benjamin wrote:
Elaine Benjamin wrote:
I love this pattern, but as with so many patterns I was going along really well and then got stymied at one part. I started to sew the top seam at least three times and undid it because I felt it looked too bulky. Can you give advice as to what seam is the best one for the top of the hat? I tried a mattress stitch from the right side but that was very bulky and I don't know what else. It is looking so good that I don't want to ruin it with a bad seam. Thank you in advance!
23.04.2021 - 22:43DROPS Design answered:
Dear Elanie, you can try the matress stitch shown in THIS video, or you can try to put the edges side by side and stitch only into the outer loop of the edge stitch. Happy Crafting!
23.04.2021 - 23:25
|
||||||||||||||||||||||
Baby Fox#babyfoxhat |
||||||||||||||||||||||
 |
 |
|||||||||||||||||||||
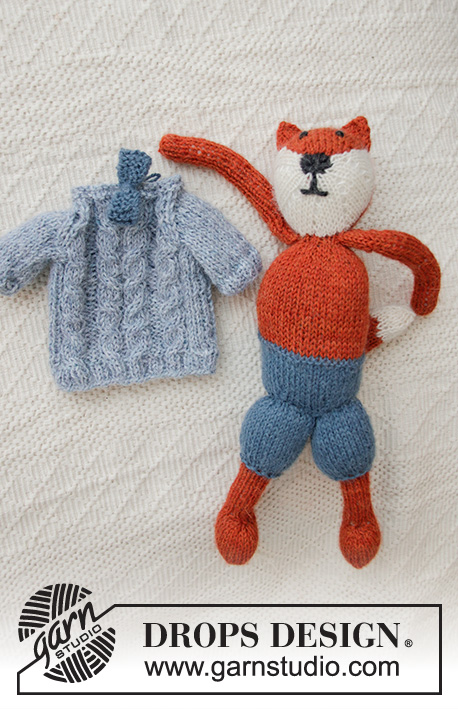
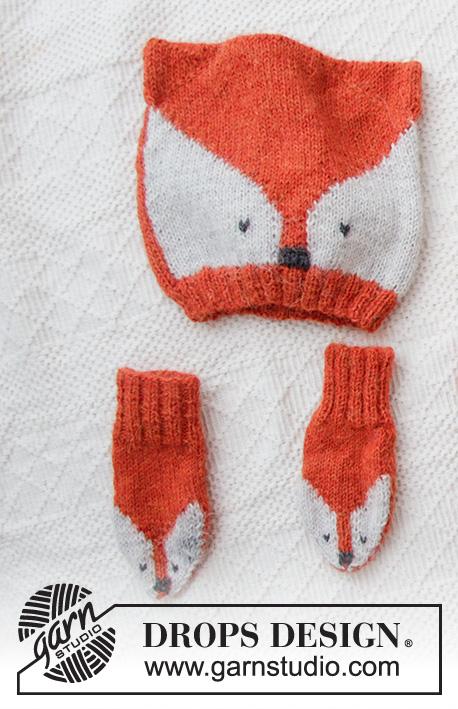
Knitted hat and mittens for babies with fox-pattern in DROPS Alpaca. Sizes Premature – 4 years.
DROPS Baby 36-1 |
||||||||||||||||||||||
|
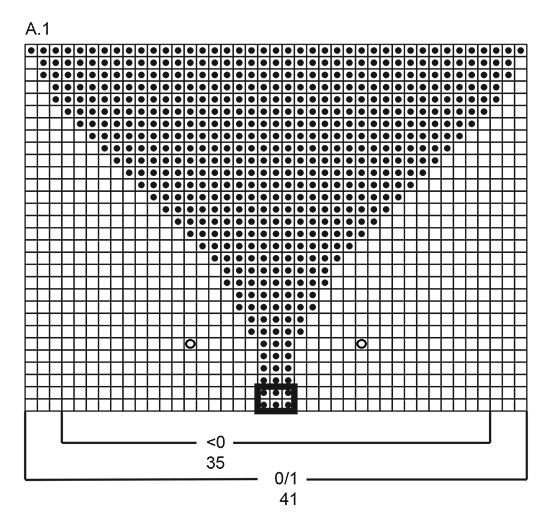
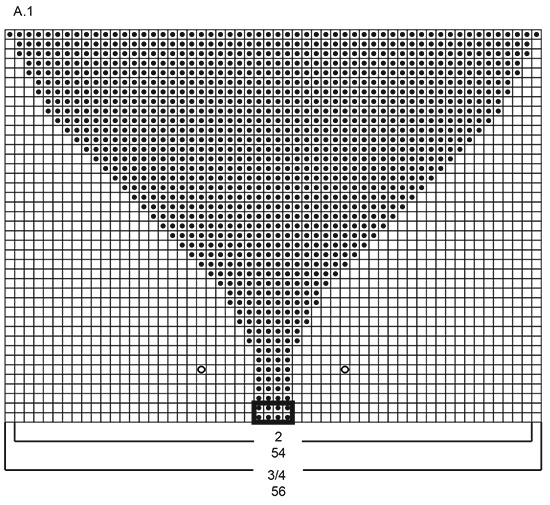
------------------------------------------------------- EXPLANATIONS FOR THE PATTERN: ------------------------------------------------------- RIDGE/GARTER STITCH (worked back and forth): Knit all rows. 1 ridge in height = Knit 2 rows. PATTERN: Hat: See diagram A.1 – choose diagram for your size. Mittens: See diagram A.2 – choose diagram for your size. The diagrams are worked in stocking stitch. NOTE: To avoid holes when changing colour, twist the 2 strands together. The thick square around the stitches marks where you work duplicate stitches for the fox’s nose. The diagram shows all rows in the pattern from the right side. DECREASE TIP (for hat): Decrease evenly spaced from the wrong side by purling 2 together (= 1 stitch decreased). ------------------------------------------------------- START THE PIECE HERE: ------------------------------------------------------- HAT – SHORT OVERVIEW OF THE PIECE: The piece is worked back and forth with circular needle in 2 sections which are sewn together to finish. Section 1 is worked with fox-pattern and section 2 is worked with one colour. SECTION 1 (with fox-pattern): Cast on (40) 44-48-52-52 (56-60) stitches (including 1 edge stitch on each side) with circular needle size 2.5 mm and rust. Purl 1 row from the wrong side. Then work as follows from the right side: Work 1 edge stitch in GARTER STITCH – read description above, * knit 2, purl 2 *, work from *-* until there are 3 stitches left, knit 2 and 1 edge stitch in garter stitch. When the rib measures (2) 2-2-2-3 (3-3) cm, change to circular needle size 3 mm. Purl 1 row from the wrong side and decrease (3) 1-0-2-0 (0-2) stitches evenly spaced – read DECREASE TIP = (37) 43-48-50-52 (56-58) stitches. Then work pattern as follows: 1 edge stitch in garter stitch (edge stitch worked in same colour as the first stitch in A.1), A.1 (= (35) 41-46-48-50 (54-56) stitches) and finish with 1 edge stitch in garter stitch (edge stitch worked in same colour as the last stitch in A.1). When working with 2 colours, work the first part with light pearl grey using the strand from the outside of the ball, the part with rust using the strand from the outside of the ball and the second part with light pearl grey using the strand from the inside of the ball (i.e. you are using 3 strands, 2 strands light pearl grey and 1 strand rust on the same row). Continue this pattern. REMEMBER THE KNITTING TENSION! When all stitches have been worked with rust (the piece measures approx. (10) 11-12-13-15 (15-16) cm), continue with rust until the piece measures (16) 16-17-18-19 (20-21) cm. Cast off with knit from the right side. SECTION 2 (one-coloured): Cast on (40) 44-48-52-52 (56-60) stitches (including 1 edge stitch on each side) with circular needle size 2.5 mm and rust. Purl 1 row from the wrong side. Then work as follows from the right side: 1 edge stitch in garter stitch, * purl 2, knit 2 *, work from *-* until there are 3 stitches left, purl 2 and 1 edge stitch in garter stitch. When the rib measures (2) 2-2-2-3 (3-3) cm, change to circular needle size 3 mm. Purl 1 row from the wrong side and decrease (3) 1-0-2-0 (0-2) stitches evenly spaced = (37) 43-48-50-52 (56-58) stitches. Work stocking stitch with 1 edge stitch in garter stitch on each side, using rust until the piece measures (16) 16-17-18-19 (20-21) cm; adjust to match section 1. Cast off with knit from the right side. ASSEMBLY: Sew the hat together inside the 1 edge stitch on each side. Sew the top of the hat neatly together. Sew a triangle in each corner at the top, sewing through both layers, from approx. 3 cm down the side to approx. 3 cm across the top of the hat (= fox-ears). Sew the nose and eyes with duplicate stitches using dark grey – see markings in the diagram. ------------------------------------------------------- MITTENS - SHORT OVERVIEW OF THE PIECE: The piece is worked back and forth with circular needle. MITTEN: Cast on 42-46 stitches (including 1 edge stitch on each side) with circular needle size 2.5 mm and rust. Purl 1 row from the wrong side then work rib (= knit 2, purl 2) starting from the right side and with 1 edge stitch in GARTER STITCH – read description above, on each side. When the piece measures 4-4 cm, work stocking stitch with 1 edge stitch in garter stitch on each side until the piece measures 5-6½ cm. REMEMBER THE KNITTING TENSION! Work 1 edge stitch in garter stitch, A.2 (= 40-44 stitches) and 1 edge stitch in garter stitch. When working with 2 colours, work the first part with light pearl grey using the strand from the outside of the ball, the first part with rust using the strand from the outside of the ball, the second part with light pearl grey using the strand from the inside of the ball and the second part with rust using the strand from the inside of the ball (i.e. you are using 4 strands, 2 strands light pearl grey and 2 strands rust on the same row). When A.2 has been worked 1 time in height there are 10 stitches left on the needle. Cut the strand and pull it through the remaining stitches and fasten well. The mitten measures approx. 12-14 cm. Work 1 more mitten in the same way. ASSEMBLY: Sew nose and eyes with duplicate stitches and dark grey – see markings in the diagram. Sew the mitten together inside the 1 edge stitch. |
||||||||||||||||||||||
Diagram explanations |
||||||||||||||||||||||
|
||||||||||||||||||||||
 |
||||||||||||||||||||||
 |
||||||||||||||||||||||
 |
||||||||||||||||||||||
 |
||||||||||||||||||||||
Have you finished this pattern?Tag your pictures with #dropspattern #babyfoxhat or submit them to the #dropsfan gallery. Do you need help with this pattern?You'll find 21 tutorial videos, a Comments/Questions area and more by visiting the pattern on garnstudio.com. © 1982-2025 DROPS Design A/S. We reserve all rights. This document, including all its sub-sections, has copyrights. Read more about what you can do with our patterns at the bottom of each pattern on our site. |
||||||||||||||||||||||


With over 40 years in knitting and crochet design, DROPS Design offers one of the most extensive collections of free patterns on the internet - translated to 17 languages. As of today we count 320 catalogues and 12093 patterns translated into English (UK/cm). 12093
We work hard to bring you the best knitting and crochet have to offer, inspiration and advice as well as great quality yarns at incredible prices! Would you like to use our patterns for other than personal use? You can read what you are allowed to do in the Copyright text at the bottom of all our patterns. Happy crafting!
Post a comment to pattern DROPS Baby 36-1
We would love to hear what you have to say about this pattern!
If you want to leave a question, please make sure you select the correct category in the form below, to speed up the answering process. Required fields are marked *.