
Looking for a yarn?


Comments / Questions (52)
![]() Annica wrote:
Annica wrote:
Är tröjan på bilden stickad i kidsilk eller brushed alpaca silk?
02.03.2021 - 07:00DROPS Design answered:
Hej Annica, den er strikket i DROPS Kid-Silk - God fornøjelse!
03.03.2021 - 14:41
![]() Mieke Kouters wrote:
Mieke Kouters wrote:
Ik ben deze trui in maat L aan het breien. Ben met de mouwen bezig. Er staat verder breien tot het werk 48 cm meet, pas aan tot na een even naald. Daarna heen en weer breien tot 52 cm . Snap niet wat er moet gebeuren bij 48 cm ??? Graag bericht. Groet Mieke
13.12.2020 - 20:18DROPS Design answered:
Dag Mieke,
Vanaf dat punt brei je niet meer in de rondte, maar heen en weer. Dit is de naad van de mouw die in het armsgat genaaid wordt (zie tekening onderaan het patroon).
14.12.2020 - 12:54
![]() Antje wrote:
Antje wrote:
Laut Anleitung soll das Zopfmuster am Schalkragen bei Größe S auf jeder Seite noch 6 cm gestrickt werden. Mit den nachfolgenden 3 Reihen kommt man auf ca. 7 cm pro Seite. Für den hinteren Halsausschnitt sollen 28 Maschen abgekettet werden plus beidseitig eine Masche in der nächsten Hinreihe. Das ergibt laut Maschenprobe plus zwei cm in der Höhe ca. 20 cm. Deshalb musste ich den Schalkragen pro Seite 3 cm länger stricken, damit er in den Ausschnitt passt. Können Sie das bitte prüfen?
19.11.2020 - 10:18DROPS Design answered:
Liebe Antje, mit 17 M = 10 cm sind die 28 Maschen beim Rückenteil ca 16 cm breit - der Schalkragen stricken Sie am Ende von jedem Vorderteil (die werden beide zusammengenäht (bisschen ziehen wenn nötig is) und dann am Halsausschnitt Rückenteil genäht), siehe FERTIGSTELLEN - dieses Video zeigt, wie man so einen Schalkragen strickt. Viel Spaß beim stricken!
19.11.2020 - 10:39
![]() Natalia wrote:
Natalia wrote:
Bonjour, Je suis bloquée au moment où il faut diviser l'ouvrage entre les 2 torsades du devant pour l'encolure et continuer en allers et retours à partir du milieu devant. Comment dois-je m'y prendre ? Dois-je prendre un nouveau fil et commencer par le milieu devant ? Merci de votre aide !
13.11.2020 - 22:52DROPS Design answered:
Bonjour Natalia, le dernier tour tricoté sur toutes les mailles doit être un rang envers des diagrammes (la correction va être faite), à la fin de ce tour, coupez le fil. Commencez le rang suivant au milieu des 2 torsades = au milieu devant sur l'endroit (= le rang impair suivant) et continuez ainsi en allers et retours. Bon tricot!
16.11.2020 - 13:54
![]() Joelle wrote:
Joelle wrote:
Bonjour Je suis étonnée de ne pas avoir reçu de réponse à ma question du 23 mars, concernant le nombre de mailles restantes après les premières diminutions. Merci d'avance pour votre réponse.
28.03.2020 - 18:18DROPS Design answered:
Bonjour Joelle, une simple petite erreur dans la réponse vous a empêché de la recevoir, elle est maintenant visible - voici le détail en taille XL vous augmentez 4 mailles dans A.1 et A.4 mailles dans A.2 vous aurez donc: jersey (58-11 = 47 m), A.1 (7+4=11 m), A.2 (7+4=11 m), jersey: (58-11=47 m) jersey (130-22=108 m) soit: 47+11+11+47+108= 224 m. Désolée pour cette erreur et Bon tricot!
30.03.2020 - 09:51
![]() Michelle wrote:
Michelle wrote:
Le fil brushed alpace silk je trouve trop leger en un fil puis je le doubler avec le meme secon fil sans changer les explications ou les aiguilles? ou dois je tout calculer?
27.03.2020 - 15:24DROPS Design answered:
Bonjour Michelle, ce modèle est calculé sur la base d'un échantillon de 17 m x 22 rangs = 10 x 10 cm avec 1 fil Brushed Alpaca Silk, si vous souhaitez modifier la tension, il vous faudra recalculer les explications - plus d'infos sur l'échantillon ici. Bon tricot!
27.03.2020 - 16:32
![]() Joelle wrote:
Joelle wrote:
Bonjour Je viens de commencer ce modèle, pour la taille XL. Je ne comprends pas comment il reste 224 mailles après les premières diminutions. Si je fais (58-11)+7+7+(58-11)+(130-22), j'obtiens 216 et non 224 mailles. Pourriez vous me donner plus de détails à ce sujet? Merci d'avance.
23.03.2020 - 20:04DROPS Design answered:
Bonjour Joelle, tout à fait, mais vous allez augmenter 4 mailles au 1er rang de A.1 et 4 mailles au 1er rang de A.2, soit 216+8= 224 m. Bon tricot!
24.03.2020 - 09:43
![]() Thiourt wrote:
Thiourt wrote:
Placer 1 fil marqueur au début du tour (= repère côté), tricoter les 46-50-54-58-62-70 premières mailles en jersey en diminuant 9-9-10-11-10-13 mailles à intervalles réguliers – voir DIMINUTIONS-1, tricoter A.1 au-dessus des 5-5-5-7-7-7 mailles suivantes, A.2 au-dessus des 5-5-5-7-7-7 mailles suivantes, bjr nous devons faire les dim sur les m qui arrivent et nous retrouver avec le nombre de m demandé? Et ensuite tricoter au dessus des 7m suivante?? je ne comprend pas merci
19.03.2020 - 10:44DROPS Design answered:
Bonjour Mme Thiourt, en tricotant les 46-50-54-58-62-70 mailles en jersey vous diminuez 9-9-10-11-10-13 mailles à intervalles réguliers au-dessus de ces 46-50-54-58-62-70 mailles, il va donc vous rester 37-41-44-47-52-57 m jersey. Bon tricot!
19.03.2020 - 11:53
![]() Tanja Gruber wrote:
Tanja Gruber wrote:
Beim Ärmel heißt es, ab 49 cm Länge, hin- und zurück stricken. Heißt das, ich stricke ab da nicht mehr in geschlossenen Runden? Teile ich die Arbeit dann?
23.02.2020 - 14:42DROPS Design answered:
Liebe Frau Gruber, ja genau, die Arbeit wird hier geteilt und von hier in Reihen (= hin und zurück) stricken. Diese extra cm in Reihen gestrickt werden dann am Armlöcher zusammengenäht (siehe Video. Viel Spaß beim stricken!
24.02.2020 - 09:16
![]() Margarete wrote:
Margarete wrote:
Wie viele Maschen muß ich zu Beginn des V- Ausschnitts abnehmen ? Es heißt nur in jeder 6 Reihe abnehmen . Wieviele Maschen steht nicht da. Erst danach kommt in jeder 4 Reihe 12333 x und was bedeutet in diesem Zusammenhang x . Ich stricke in xl . Vielen Dank
28.01.2020 - 10:17DROPS Design answered:
Liebe Margarete, es wird 1 Masche beim V-Ausschnitt abgenommen -siehe ABNAHMETIPP-2 (gilt für den V-Ausschnitt). XL ist id 4. Größe, dh Sie wie folgt zunehmen sollen: In jeder 6. Reihe insgesamt 2 x abnehmen, dann in jeder 4. Reihe insgesamt 3 x, dann in jeder 2. Reihe insgesamt 7 x Viel Spaß beim stricken!
28.01.2020 - 10:58
|
||||||||||||||||||||||
Golden Fall#goldenfallsweater |
||||||||||||||||||||||
 |
 |
|||||||||||||||||||||
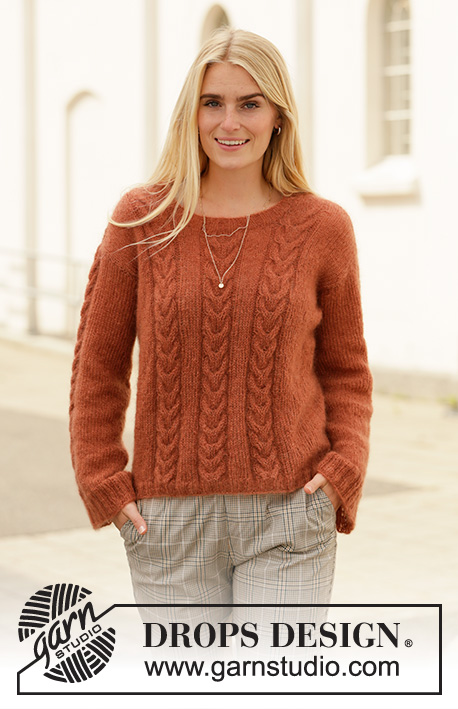
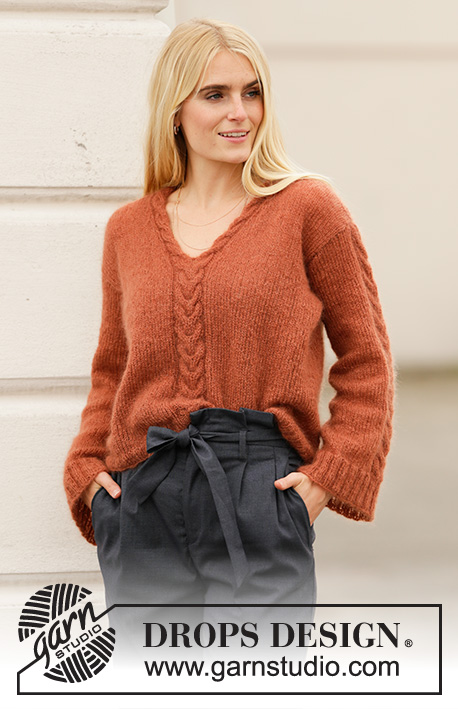
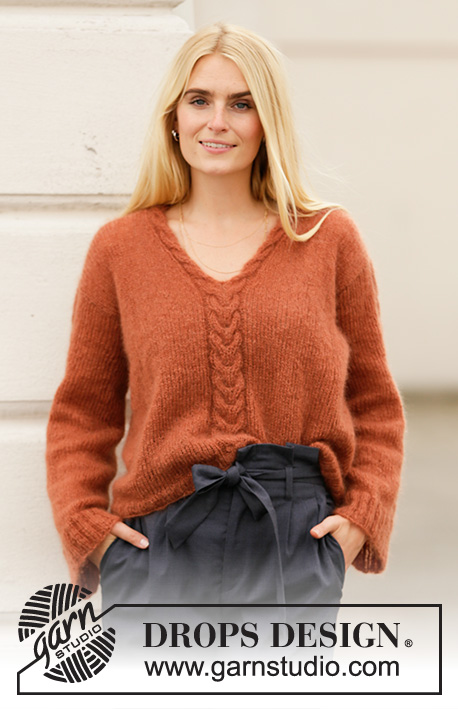
Knitted jumper in 2 strands DROPS Kid-Silk or 1 strand DROPS Brushed Alpaca Silk. The piece is worked with cables and V-neck with shawl collar. Sizes S - XXXL.
DROPS 205-37 |
||||||||||||||||||||||
|
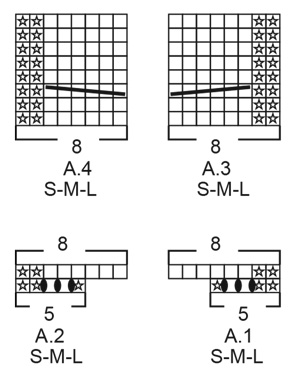
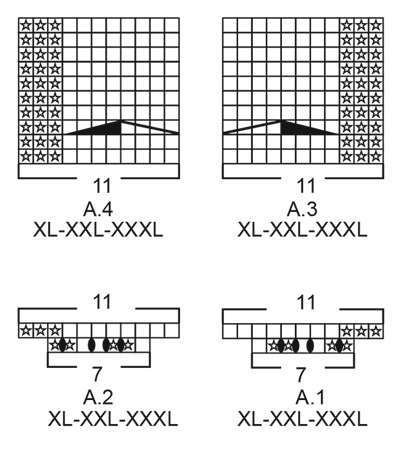
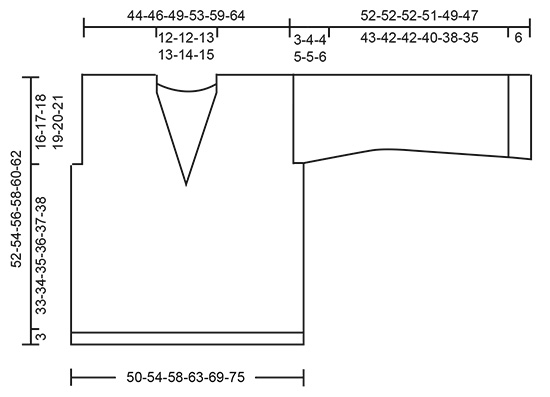
------------------------------------------------------- EXPLANATIONS FOR THE PATTERN: ------------------------------------------------------- PATTERN: See diagrams A.1 to A.4. The diagrams show all rows in the pattern seen from the right side. DECREASE TIP-1 (evenly spaced): To work out how to decrease evenly, count the total number of stitches over which to decrease (e.g. 46 stitches) and divide by number of decreases to be made (e.g. 9) = 5.1. In this example, decrease by knitting approx each 4th and 5th stitch together. DECREASE TIP-2 (for V-neck): All decreases are worked from the right side! Decrease 1 stitch before A.3 as follows: Work until there are 2 stitches left before A.3, knit 2 together (= 1 stitch decreased) Decrease 1 stitch after A.4 as follows: Work A.4, slip 1 stitch as if to knit, knit 1 and pass the slipped stitch over the knitted stitch (= 1 stitch decreased). DECREASE TIP-3 (for sleeves): Decrease 1 stitch on each side of the marker thread as follows: Work until there are 3 stitches left before the marker thread, knit 2 together, knit 2 (marker thread sits between these 2 stitches), slip 1 stitch as if to knit, knit 1 and pass the slipped stitch over the knitted stitch. INCREASE TIP (for sleeves): Work until there is 1 stitch left before the marker thread, 1 yarn over, knit 2 (marker thread sits between these 2 stitches), 1 yarn over. On the next round knit the yarn overs twisted to avoid holes. Then work the new stitches in stocking stitch. ------------------------------------------------------- START THE PIECE HERE: ------------------------------------------------------- JUMPER – SHORT OVERVIEW OF THE PIECE: The piece is worked in the round with circular needle as far as the V-neck, then the front and back pieces are worked back and forth from mid front as far as the armholes. Finally the front and back pieces are finished separately. The sleeves are worked in the round with short circular needle/double pointed needles. BODY: Cast on 200-220-232-260-284-308 stitches with circular needle size 4 mm and 2 strands Kid-Silk or 1 strand Brushed Alpaca Silk. Knit 1 round, then work rib (= knit 2 / purl 2) for 3 cm. Change to circular needle size 5 mm and work the next round as follows: Insert 1 marker thread at the beginning of the round (= side), work stocking stitch over the first 46-50-54-58-62-70 stitches – decrease 9-9-10-11-10-13 stitches evenly over these stitches – read DECREASE TIP-1, work A.1 over the next 5-5-5-7-7-7 stitches, A.2 over the next 5-5-5-7-7-7 stitches, work stocking stitch over the next 46-50-54-58-62-70 stitches – decrease 9-9-10-11-10-13 stitches evenly over these stitches (= front piece), insert 1 marker thread here (= side), work stocking stitch over the remaining 98-110-114-130-146-154 stitches – decrease 14-18-16-22-28-26 stitches evenly over these stitches (= back piece). When A.1 and A.2 have been completed there are 174-190-202-224-244-264 stitches on the needle (= 90-98-104-116-126-136 stitches on front piece and 84-92-98-108-118-128 stitches on back piece). Now work A.3 (= 8-8-8-11-11-11 stitches) over A.1 and A.4 (= 8-8-8-11-11-11 stitches) over A.2; the remaining stitches are worked in stocking stitch. Continue this pattern, A.3 and A.4 are repeated in height. REMEMBER THE KNITTING TENSION! Work until the piece measures 34-35-36-37-38-39 cm – adjust to after an even-numbered round. Now divide the piece for the neck between the 2 cables on the front piece. Continue working back and forth from mid front, starting from the right side. Decrease for the V-neck on the first row from the right side – at the same time, when the piece measures 36-37-38-39-40-41 cm, cast off for the armholes; work as follows (pattern continues as before): V-NECK: Decrease for the V-neck on the first row from the right side - read DECREASE TIP-2. Decrease every 6th row a total of 2 times then every 4th row a total of 1-2-2-3-3-3 times and then every 2nd row a total of 7-6-7-6-7-8 times. ARMHOLES: When the piece measures 36-37-38-39-40-41 cm cast off 10-14-14-18-18-20 stitches in each side (= 5-7-7-9-9-10 stitches on each side of the marker threads in the sides). Front and back pieces are finished separately as described below. RIGHT FRONT PIECE: Continue with stocking stitch, A.4 and neck decreases as before. When the decreases for the neck are finished there are 30-32-34-38-42-45 stitches on the needle. Continue working until the piece measures 16-17-18-19-20-21 cm from where you cast off for the armhole (the piece measures a total of 52-54-56-58-60-62 cm). On the next row from the wrong side, cast off the first 22-24-26-27-31-34 stitches for the shoulder = 8-8-8-11-11-11 stitches on the needle. Continue with A.4 over the remaining stitches for the shawl collar for 6-6-7-7-7-8 cm. On the next row from the right side knit the cable stitches together 2 and 2 = 5-5-5-7-7-7 stitches, cast off on the next row from the right side. LEFT FRONT PIECE: Continue with stocking stitch, A.3 and decreases for V-neck. When the decreases for neck are finished there are 30-32-34-38-42-45 stitches left on the needle. Continue working until the piece measures 16-17-18-19-20-21 cm from where stitches were cast off for the armholes (the piece measures a total of 52-54-56-58-60-62 cm). On the next row from the right side cast off the first 22-24-26-27-31-34 stitches for the shoulder = 8-8-8-11-11-11 stitches. Continue with A.3 over the remaining stitches until the collar measures 6-6-7-7-7-8 cm. On the next row from the right side knit the cable stitches together 2 and 2 = 5-5-5-7-7-7 stitches, cast off on the next row from the right side. BACK PIECE: = 74-78-84-90-100-108 stitches. Continue with stocking stitch back and forth until the piece measures 14-15-16-17-18-19 cm from where stitches were cast off for the armholes (the piece measures a total of 50-52-54-56-58-60 cm). On the next row from the right side, cast off the middle 28-28-30-34-36-38 stitches for neck and each shoulder is finished separately. Cast off 1 stitch on the next row from the neck = 22-24-27-27-31-34 stitches left on shoulder. Continue working until the piece measures 52-54-56-58-60-62 cm, loosely cast off. Work the other shoulder in the same way . SLEEVE: Cast on 72-80-80-84-92-96 stitches with short circular needle/double pointed needles size 4 mm and 2 strands Kid-Silk or 1 strand Brushed Alpaca Silk. Knit 1 round, then work rib (= knit 2 / purl 2) for 6 cm. Insert 1 marker thread at the beginning of the round; it will be used when decreasing and increasing mid under sleeve. Change to short circular needle size 5 mm and work the next round as follows: Knit the first 30-34-34-34-38-42 stitches – decrease 8-10-8-9-11-13 stitches evenly over these stitches, work A.1 over the next 5-5-5-7-7-7 stitches, A.2 over the next 5-5-5-7-7-7 stitches, knit the remaining 32-36-36-36-40-40 stitches – decrease 10-12-10-11-13-11 stitches evenly over these stitches. When A.1 and A.2 have been completed there are 60-64-68-72-76-80 stitches on the needle. Then work A.3 (= 8-8-8-11-11-11 stitches) over A.1 and work A.4 (= 8-8-8-11-11-11 stitches) over A.2; the remaining stitches are worked in stocking stitch. When the piece measures 14 cm, decrease 2 stitches mid under sleeve – read DECREASE TIP-3. Repeat the decrease when the piece measures 35 cm = 56-60-64-68-72-76 stitches. Continue working until the sleeve measures 42-42-42-41-39-37 cm. Now increase 2 stitches mid under sleeve – read INCREASE TIP. Increase like this every 3 cm a total of 2 times = 60-64-68-72-76-80 stitches. Continue working until the piece measures 49-48-48-46-44-41 cm – adjust to after an even-numbered round. Now work back and forth over all stitches until the piece measures 52-52-52-51-49-47 cm. On the next row from the right side knit the 6-6-6-8-8-8 cable stitches together 2 and 2 = 54-58-62-64-68-72 stitches. Cast off. Work the other sleeve in the same way. ASSEMBLY: Sew the shoulder seams inside the cast-off edge. Sew the collar together mid back with grafting stitches and then sew it to the neck at the back – the seam should turn in to the wrong side. Sew in the sleeves – sew the cast-off edge on the sleeve to the armhole and sew the opening under the sleeve to where stitches were cast off on the body. |
||||||||||||||||||||||
Diagram explanations |
||||||||||||||||||||||
|
||||||||||||||||||||||
 |
||||||||||||||||||||||
 |
||||||||||||||||||||||
 |
||||||||||||||||||||||
Have you finished this pattern?Tag your pictures with #dropspattern #goldenfallsweater or submit them to the #dropsfan gallery. Do you need help with this pattern?You'll find 22 tutorial videos, a Comments/Questions area and more by visiting the pattern on garnstudio.com. © 1982-2025 DROPS Design A/S. We reserve all rights. This document, including all its sub-sections, has copyrights. Read more about what you can do with our patterns at the bottom of each pattern on our site. |
||||||||||||||||||||||


With over 40 years in knitting and crochet design, DROPS Design offers one of the most extensive collections of free patterns on the internet - translated to 17 languages. As of today we count 320 catalogues and 12092 patterns translated into English (UK/cm). 12092
We work hard to bring you the best knitting and crochet have to offer, inspiration and advice as well as great quality yarns at incredible prices! Would you like to use our patterns for other than personal use? You can read what you are allowed to do in the Copyright text at the bottom of all our patterns. Happy crafting!
Post a comment to pattern DROPS 205-37
We would love to hear what you have to say about this pattern!
If you want to leave a question, please make sure you select the correct category in the form below, to speed up the answering process. Required fields are marked *.