
Looking for a yarn?


Comments / Questions (24)
![]() Hochet Valérie wrote:
Hochet Valérie wrote:
Bonjour à toute l'équipe Je réalise la première manche en taille M, et j'en suis après les 7 x augmentations, j'ai doc bien 77 mailles. Seulement je ne comprends pas la suite, car je ne retrouve ^pas le bon nombre de mailles, soit 77. d'après vos explications, je dois faire : 4 m de A3, 60 m de A4 (15m x 5 dessins), 1m, 4m de A3 = 4 +60+1+4= 69 m au lieu de 77 m Pouvez vous m'aider s'il vous plait. Cordialement.
29.04.2019 - 22:40DROPS Design answered:
Bonjour Mme Hochet, on tricote A.3 au-dessus des 8 premières mailles et des 8 dernières mailles, A.3 = 16 m du milieu sous la manche, vous tricotez ainsi les 16 m de A.3 comme avant, puis 5 x A.4 (= 60 m ) et 1 m jersey = 8 (= les 8 dernières m de A.3 = début du tour) + 60 + 1 + 8 (= les 8 premières m de A.3 = fin du tour) = 77 m. Bon tricot!
30.04.2019 - 10:02
![]() Silvana wrote:
Silvana wrote:
Grazie e eccomi con un nuovo quesito. Sto per iniziare il giro che precede le noccioline. (30mo giro) dal diagramma sembra che la costina di una maglia dritta di sposti. Ma nella foto continua dritta sino alla nocciolina finale. Quindi....? Grazie mille
26.04.2019 - 16:34DROPS Design answered:
Buongiorno Silvana. Nel grafico sembra spostata perchè nel giro precedente ci sono due maglie gettate al centro del diagramma, quindi 2 maglie in più. L'ultima m del giro, coincide con l'ultima maglia del giro precedente, quindi la costina continua dritta. Buon lavoro!
26.04.2019 - 18:02
![]() Silvana wrote:
Silvana wrote:
Buonasera, ho difficoltà a capire il diagramma A.1, quando devo iniziare il nono giro. Dopo il marcapunto di inizio giro, devo fare un gettato o cominciare con una diminuzione doppia? Grazie attendo fiduciosa.....
25.04.2019 - 19:22DROPS Design answered:
Buongiorno Silvana. Il giro nove inizia con le ultime 2 maglie del giro precedente. Quindi, quando rimangono 2 m alla fine del giro 8, lavora 1 m gettata, l’accavallata doppia (ultime 2 m del giro 8 + prima maglia del giro 9) , 1 m gettata e così via come indicato nel diagramma. Buon lavoro!
25.04.2019 - 20:50
![]() Elin Törnblom wrote:
Elin Törnblom wrote:
Hej, Mönster A2 och andra syns inte. Det är bara små vita fyrkanter. Kan ni ordna så att dessa blir synliga igen?
21.03.2019 - 13:25DROPS Design answered:
Hei Elin. Alle symboler i diagrammene og symbolforklaringen er fult synlig fra vår side. Har du problemer med å se dem uansett hvaslags enhet du bruker (mobil, pc, nettbrett)? hilsen DROPS
21.03.2019 - 13:47
![]() Évelyne wrote:
Évelyne wrote:
Bonjour, je pense qu'il y a une erreur sur le rang 9 de la grille. Comment travailler sur un groupe de 3 mailles alors qu'il n'y a que 2 mailles endroit au rang 8 précédent ? Cela decale le motif. J'ai réglé le problème en décalant mon anneau marqueur de début de rang d'une maille vers la droite. Merci pour votre attention.
17.03.2019 - 16:01DROPS Design answered:
Bonjour Évelyne, le diagramme est juste, au début du 9ème tour, on va tricoter les 2 dernières mailles du tour précédent avec la 1ère maille du début du tour (= le jeté et la diminution = dernières mailles du dernier A.1), et on va continuer ainsi, à la fin de chaque A.1, on va tricoter les 2 dernières mailles avec la 1ère m du A.1 suivant. Bon tricot!
18.03.2019 - 10:39
![]() Nicole wrote:
Nicole wrote:
Ich bin auch gerade bei der 9. Reihe von A1 und möchte sicher gehen, daß ich das richtig verstanden habe: am Ende von Reihe 8 stricke ich nur 1 M.re (statt 3 lt. Muster), einen Umschlag, die zwei verbliebenen zusammen und ziehe die 1. M. von Rd. 9 darüber. Richtig? Verfahre ich immer so, wenn die nächste Runde lt. Muster versetzt beginnt?
12.03.2019 - 22:40DROPS Design answered:
Liebe Nicole, Reihe 9 im diagram beginnt mit den 2 letzen Maschen vom Reihe 8: A.1 so wiederholen (die 2 letzten Maschen im ersten A.1 werden zs mit der 1. Masche im nächsten A.1 gestrickt). Dann werden diese 2 ersten Maschen (= Umschlag, Abnahme) wieder als die 2 letzten Maschen der Runde gestrickt (es sind aber 2 Maschen mehr bei Reihe 10 wegen den 2 Umschlägen in der Mitte = A.1 = 14 M). Viel Spaß beim stricken!
13.03.2019 - 08:17
![]() Illenseer Lilli wrote:
Illenseer Lilli wrote:
Habe die drobst 200-12 pullover angefangen zu stricker aber ich habe ein problem in der reihe 9 bei A.1,in der rechten seite geht es nich aus mit maschen und dann auch verschibt es sich die mitte vom blatt. ich bitte sie nachsuprühfen. mfg
27.02.2019 - 19:28DROPS Design answered:
Liebe Lilli, bei den 9. Reihe in A.1 stricken Sie im 1. Rapport die letzten 2 Maschen der vorrigen Runde zusammen mit der ersten Maschen 1. Rapport, und so weiter stricken, dh die 2 letzten Maschen vom A.1 zusammen mit der 1. Masche nächstes Rapport stricken. Viel Spaß beim stricken!
05.03.2019 - 12:21
![]() Mira Ekstrand wrote:
Mira Ekstrand wrote:
Hej! Var finns själva mönstret och garnåtgång? Jag ser bara diagrammet.
21.02.2019 - 15:07DROPS Design answered:
Hej. Nu finns mönstret på svenska.
08.03.2019 - 09:30
![]() Małgorzata wrote:
Małgorzata wrote:
Prześliczny ! Jak ja uwielbiam te okrągłe karczki.
21.02.2019 - 12:56
![]() Henriette Friis wrote:
Henriette Friis wrote:
Glæder mig til at strikke den, Hvornår kommer opskriften, helst så jeg kan nå at strikke den inden maj ??
19.02.2019 - 18:17DROPS Design answered:
Hei Henriette. Den vil bli lagt ut på dansk veldig snart. God fornøyelse
21.02.2019 - 11:35
|
||||||||||||||||||||||||||||||||||
Summer Twinkle Sweater#summertwinklesweater |
||||||||||||||||||||||||||||||||||
 |
 |
|||||||||||||||||||||||||||||||||
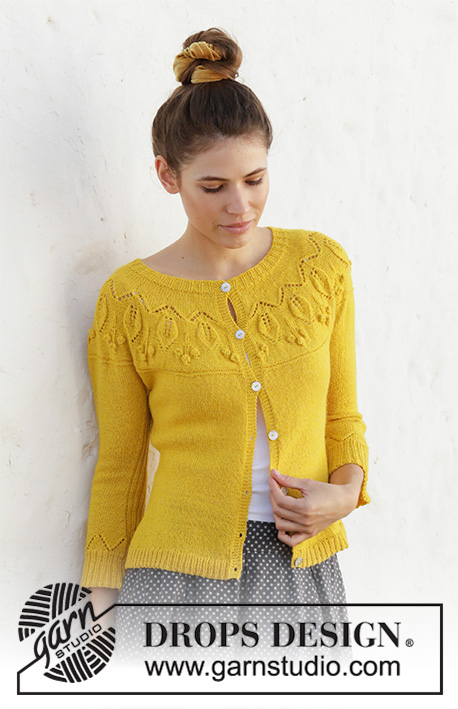
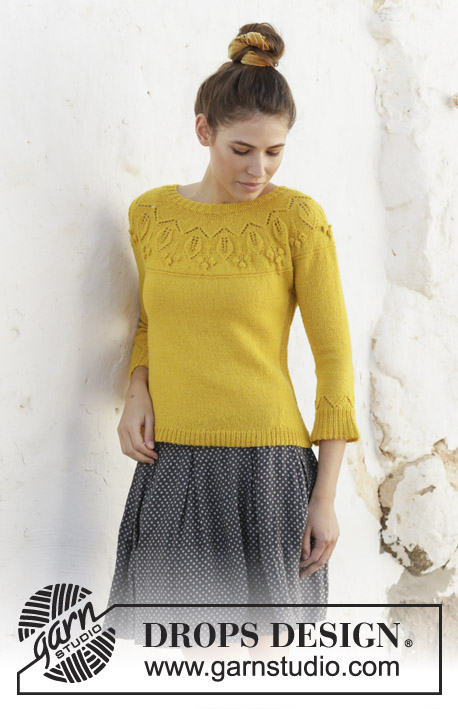
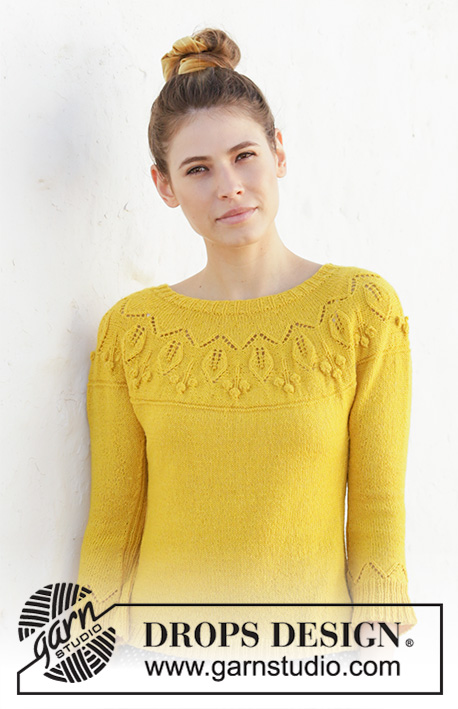
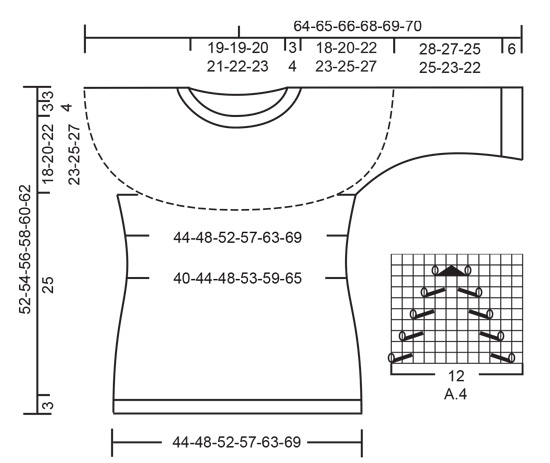
Knitted jumper with leaf pattern, bobbles, round yoke and ¾-length sleeves. The piece is worked in DROPS Flora, top down. Sizes S - XXXL.
DROPS 200-12 |
||||||||||||||||||||||||||||||||||
|
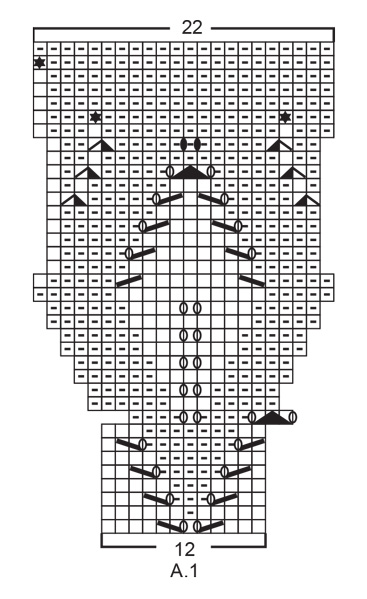
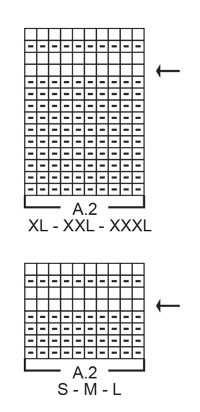
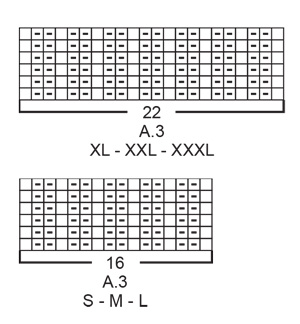
------------------------------------------------------- EXPLANATIONS FOR THE PATTERN: ------------------------------------------------------- PATTERN: See diagrams A.1 to A.4. Choose diagram for your size (applies to A.2 and A.3) INCREASE TIP-1 (evenly spaced): To work out how to increase evenly, count the total number of stitches on the needle (e.g. 117 stitches) and divide by the number of increases to be made (e.g. 39) = 3. In this example, increase by making 1 yarn over after each 3rd stitch. On the next round knit the yarn overs twisted to avoid holes INCREASE TIP-2 (for sides of body and mid under sleeves): Increase on each side of the rib as described below: Work as far as A.3, make 1 yarn over, work A.3 (= 16-16-16-22-22-22 stitches - marker thread sits in middle of these 16-16-16-22-22-22 stitches), make 1 yarn over (= 2 stitches increased). On the next round knit the yarn overs twisted to avoid holes. Then work the new stitches in stocking stitch. DECREASE TIP (for sides of body and mid under sleeves): Decrease on each side of A.3 as described below: Work until there are 2 stitches left before A.3, knit 2 together, work A.3 (= 16-16-16-22-22-22 stitches - marker thread sits in middle of these 16-16-16-22-22-22 stitches), slip 1 stitch as if to knit, knit 1 and pass the slipped stitch over the knitted stitch (= 2 stitches decreased). ------------------------------------------------------- START THE PIECE HERE: ------------------------------------------------------- JUMPER - SHORT OVERVIEW OF THE PIECE: Neck and yoke are worked in the round with circular needle, top down. The yoke is divided for body and sleeves. The body is continued in the round with circular needle. The sleeves are worked in the round with short circular needle/double pointed needles, top down. NECK: Cast on 117-120-123-129-132-138 stitches with short circular needle size 2.5 mm and Flora. Knit 1 round then work rib in the round (= knit 1, purl 2) for 3-3-3-4-4-4 cm. When the rib is finished knit 1 round where you increase 39-40-41-43-44-46 stitches evenly spaced – read INCREASE TIP-1 = 156-160-164-172-176-184 stitches. Then work the yoke as described below. YOKE: Change to circular needle size 3 mm and work stocking stitch in the round. REMEMBER THE KNITTING TENSION! When the piece measures 4-5-6-6-7-7 cm from the cast-on edge increase 12-32-40-44-52-56 stitches evenly spaced = 168-192-204-216-228-240 stitches. When the piece measures 5-6-7-8-9-9 cm from the cast-on edge start the leaf pattern; i.e. work A.1 in the round (= 14-16-17-18-19-20 repeats of 12 stitches). Continue this pattern. When A.1 has been completed there are 308-352-374-396-418-440 stitches on the needle. Work A.2 in the round. AT THE SAME TIME on the round marked with an arrow in A.2 increase 16-8-10-28-34-40 stitches evenly spaced = 324-360-384-424-452-480 stitches on needle. When A.2 has been completed, continue with stocking stitch until the piece measures 21-23-25-27-29-31 cm from the cast-on edge. Now divide the yoke for body and sleeves on the next round as follows: Work 48-53-56-62-68-74 stitches in stocking stitch (= ½ back piece), place the next 65-73-79-87-89-91 stitches on 1 thread for sleeve, cast on 8-8-12-12-14-16 new stitches on needle (= in side under sleeve), work 97-107-113-125-137-149 stitches in stocking stitch (= front piece), place the next 65-73-79-87-89-91 stitches on 1 thread for sleeve, cast on 8-8-12-12-14-16 new stitches on needle (= in side under sleeve) and work the remaining 49-54-57-63-69-75 stitches in stocking stitch (= ½ back piece). Cut the strand. Then finish body and sleeves separately. THE PIECE IS NOW MEASURED FROM HERE! BODY: = 210-230-250-274-302-330 stitches. Insert 1 marker thread on each side of the body in the middle of the 8-8-12-12-14-16 stitches cast on under each sleeve. The threads mark sides of body. Start the round by one of the marker threads and work stocking stitch in the round with A.3 over the middle 16-16-16-22-22-22 stitches on each side of the body (threads sit in the middle of each A.3). Continue this pattern. When the piece measures 2 cm from the division decrease 1 stitch on each side of A.3 on each side – read DECREASE TIP (= 4 stitches decreased). Decrease like this every 1½ cm a total of 5 times on each side = 190-210-230-254-282-310 stitches. When the piece measures 13 cm from the division increase 1 stitch on each side of A.3 on each side – read INCREASE TIP-2 (= 4 stitches increased). Increase like this every 2½ cm a total of 5 times on each side = 210-230-250-274-302-330 stitches. Continue working until the piece measures 25 cm from the division in all sizes (or to desired length; there is 3 cm left to finished length). On the next round increase as follows: Work A.3 as before over the first 8-8-8-11-11-11 stitches on the round, work 89-99-109-115-129-143 stitches in stocking stitch and increase at the same time 27-26-31-34-35-39 stitches evenly spaced over these 89-99-109-115-129-143 stitches, continue A.3 over the next 16-16-16-22-22-22 stitches as before, work 89-99-109-115-129-143 stitches in stocking stitch and increase at the same time 27-26-31-34-35-39 stitches evenly spaced over these 89-99-109-115-129-143 stitches, continue A.3 over the remaining 8-8-8-11-11-11 stitches as before = 264-282-312-342-372-408 stitches. This increase is to prevent the rib being tight. Change to circular needle size 2.5 mm and work rib in the round (= knit 1/ purl 2) for 3 cm and make sure the rib fits neatly over A.3 on each side. Change to circular needle size 3 mm and loosely cast off with knit over knit and purl over purl (use a larger needle size to avoid the cast-off edge being tight). The jumper measures approx. 52-54-56-58-60-62 cm from the shoulder down. SLEEVE: Place the 65-73-79-87-89-91 stitches from the thread on the one side of the piece on short circular needle/double pointed needles size 3 mm and knit up 1 stitch in each of the 8-8-12-12-14-16 stitches cast on under the sleeve = 73-81-91-99-103-107 stitches. Insert 1 marker thread in the middle of the 8-8-12-12-14-16 new stitches. The marker thread marks mid under sleeve and the start of the round. Work A.3 mid under sleeve (marker thread sits in middle of A.3) and the remaining stitches in stocking stitch. When the piece measures 2-2-1-1-1-1 cm from the division decrease 1 stitch on each side of A.3 – read DECREASE TIP (= 2 stitches decreased). Decrease like this every 1½-1-1-1-1-1 cm a total of 6-9-13-12-12-13 times = 61-63-65-75-79-81 stitches. When the piece measures 13-13-15-14-14-15 cm from the division increase 1 stitch on each side of A.3 – read INCREASE TIP-2 (= 2 stitches increased). Increase like this every 1½-1½-1-1-1-1 cm a total of 8-7-6-7-5-4 times = 77-77-77-89-89-89 stitches. Continue working until the sleeve measures 25-24-22-22-20-19 cm from the division (shorter measurements in larger sizes due to wider neck and longer yoke). The increases are now finished and the lace pattern at bottom of sleeves starts here. Work the next round as follows: Continue with A.3 as before over the first 8-8-8-11-11-11 stitches, work 0-0-0-3-3-3 stitches in stocking stitch, A.4 over the next 60 stitches (= 5 repeats of 12 stitches in all sizes), work 1-1-1-4-4-4 stitches in stocking stitch and finish with A.3 over the remaining 8-8-8-11-11-11 stitches as before. When A.4 has been completed in height, work 1 round with stocking stitch and A.3 as before where you increase 19-19-19-25-25-25 stitches evenly spaced over the 61-61-61-67-67-67 stitches which are not rib = 96-96-96-114-114-114 stitches. Change to short circular needle/double pointed needles size 2.5 mm and work rib in the round (= knit 1, purl 2 – the rib fits neatly over A.3 mid under sleeve). When the rib measures 2 cm increase every other purl 2 to purl 3 = 112-112-112-133-133-133 stitches. When the rib measures 4 cm increase the remaining purl 2 to purl 3 = 128-128-128-152-152-152 stitches. Continue working until the sleeve measures approx. 34-33-31-31-29-28 cm from the division (rib measures approx. 6 cm). Change to short circular needle size 3 mm and loosely cast off with knit over knit and purl over purl. Work the other sleeve in the same way. |
||||||||||||||||||||||||||||||||||
Diagram explanations |
||||||||||||||||||||||||||||||||||
|
||||||||||||||||||||||||||||||||||
 |
||||||||||||||||||||||||||||||||||
 |
||||||||||||||||||||||||||||||||||
 |
||||||||||||||||||||||||||||||||||
 |
||||||||||||||||||||||||||||||||||
Have you finished this pattern?Tag your pictures with #dropspattern #summertwinklesweater or submit them to the #dropsfan gallery. Do you need help with this pattern?You'll find 25 tutorial videos, a Comments/Questions area and more by visiting the pattern on garnstudio.com. © 1982-2025 DROPS Design A/S. We reserve all rights. This document, including all its sub-sections, has copyrights. Read more about what you can do with our patterns at the bottom of each pattern on our site. |
||||||||||||||||||||||||||||||||||


With over 40 years in knitting and crochet design, DROPS Design offers one of the most extensive collections of free patterns on the internet - translated to 17 languages. As of today we count 320 catalogues and 12094 patterns translated into English (UK/cm). 12094
We work hard to bring you the best knitting and crochet have to offer, inspiration and advice as well as great quality yarns at incredible prices! Would you like to use our patterns for other than personal use? You can read what you are allowed to do in the Copyright text at the bottom of all our patterns. Happy crafting!
Post a comment to pattern DROPS 200-12
We would love to hear what you have to say about this pattern!
If you want to leave a question, please make sure you select the correct category in the form below, to speed up the answering process. Required fields are marked *.