
Looking for a yarn?


Comments / Questions (3)
![]() Peuckert wrote:
Peuckert wrote:
Kann man Schafwolle auch filzen
30.11.2022 - 15:35DROPS Design answered:
Liebe Frau Peuckert, hier lesen Sie mehr um Filzen - gerne kann Ihnen noch Ihr Wollladen damit helfen. Viel Spaß beim stricken!
30.11.2022 - 17:06
![]() Eva wrote:
Eva wrote:
Enkelt mönster för en nybörjare. Tovningen blev bra, men tummen är lite för lång.
04.01.2022 - 15:50
![]() Helena Hartiala wrote:
Helena Hartiala wrote:
Kysymys neuletiheydestä: leveyssuunnassa huovutuksessa tiheys muuttuu vain 20->22 ja pituussuunnassa paljon enemmän 26->34. Voiko tämä pitää paikkansa?
12.05.2021 - 09:58
|
|
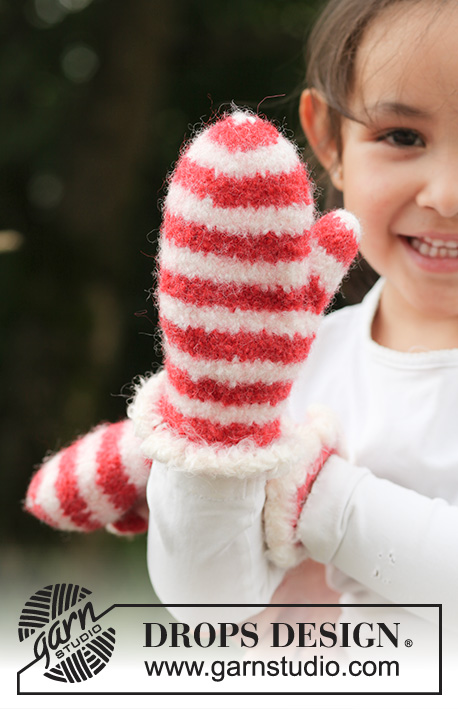
Snowball Fight#snowballfightmittens |
|
 |
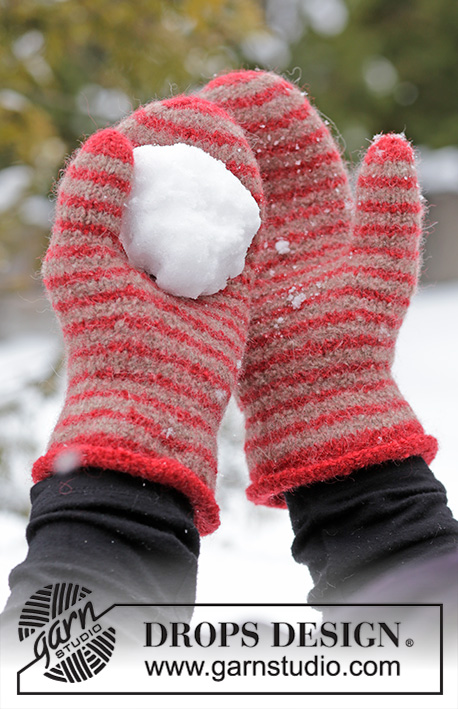 |
Knitted and felted mittens for adult, with stripes, in DROPS Lima. Theme: Christmas.
DROPS Extra 0-1430 |
|
|
EXPLANATIONS FOR THE PATTERN: ------------------------------------------------------- STRIPES: * 3 rounds of beige, 2 rounds of red *, work from *-*. INCREASE TIP: Increase 1 stitch by working 2 stitches in the same stitch. DECREASE TIP: Decrease 1 stitch on each side of the marker as follows: Work until there are 2 stitches before the stitch with the marker, knit 2 together, knit 1 (marker in this stitch), slip 1 stitch as if to knit, knit 1 and pass the slipped stitch over the knitted stitch. ------------------------------------------------------- START THE PIECE HERE: ------------------------------------------------------- MITTEN - SHORT OVERVIEW OF THE PIECE: The piece is worked in the round with double pointed needles. You work from the wrist and up over the hand. MITTEN: Cast on 56-60-60 stitches with double pointed needles size 4.5 mm and red. Work stocking stitch until the piece measures 3 cm. Then work stocking stitch and STRIPES – read description above. AT THE SAME TIME on the next round, decrease 4 stitches evenly on round (decrease by knitting 2 stitches together). Decrease like this every 1½ cm a total of 3-3-2 times = 44-48-52 stitches. REMEMBER THE KNITTING TENSION! When the piece measures approx. 8-8-7 cm insert 1 marker in the 22nd-24th-26th stitch on the round (= marks the thumb). Now increase 1 stitch on each side of the stitch with the marker – read INCREASE TIP. Increase like this on the outside of the increased stitches every 4th round a total of 6-7-8 times = 56-62-68 stitches. After the last increase, place the increased stitches + the stitch with the marker + 1 stitch on each side of these stitches on a thread for the thumb = 15-17-19 thumb-stitches. Cast on 3 stitches behind the thumb stitches = 44-48-52 stitches. The piece measures approx. 16-17-18 cm. Continue with stocking stitch and stripes in the round over these stitches. When the piece measures 12 cm from where stitches were cast on behind the thumb insert 2 markers as follows: Insert the first marker in the first stitch and the second marker in the 23rd-25th-27th stitch. On the next round decrease before and after both markers – read DECREASE TIP (= 4 stitches decreased). Decrease like this every 2nd round a total of 4-5-6 times, continue with red and decrease every round a total of 4 times = 12 stitches. Cut the strand, pull it through the remaining stitches, pull tight and fasten well. THUMB: The thumb is worked in the round with stocking stitch and stripes. Make sure that the stripes match the rest of the piece. Place the 15-17-19 thumb-stitches on double pointed needles size 4.5 mm and knit up 3 stitches in the 3 increased stitches on the hand = 18-20-22 stitches. When the thumb measures approx. 6-6½-7 cm decrease 3 stitches evenly on the round (decrease by knitting 2 stitches together) = 15-17-19 stitches. Work 3 rounds. Continue with red and on the next round decrease 5-7-7 stitches evenly = 10-10-12 stitches. When the thumb measures 7½-8-8½ cm knit all stitches together 2 and 2 = 5-5-6 stitches. Cut the strand, pull it through the remaining stitches, pull tight and fasten well. Work the other mitten in the same way. FELTING: So that the thumb is not felted together, turn the mitten inside out and place a small plastic bag in the thumb. Fasten with a safety pin - NOTE: Fasten the pin straight down towards the tip of the thumb so that it is easier to remove after felting. Turn the mitten back so that it is felted the right way out. Place the mittens in the washing machine; use a detergent without enzymes and optical bleaches. Wash at 40 degrees with normal centrifuge and no pre-wash. After washing shape the mittens to the right measurements while still wet. Later washes are as for normal wool garments. AFTER FELTING: If the piece is not felted enough and is too big: Wash the piece one more time in the washing machine while it is still wet add a terry towel that measures approx. 50 x 70 cm - NOTE: Do not use a short program. If the piece has been felted too much and is too small: While the piece is still wet stretch it to the correct measurements, if the piece is dry, make sure to soak it first. Remember: All subsequent washes are as a normal wool garment. |
|
Have you finished this pattern?Tag your pictures with #dropspattern #snowballfightmittens or submit them to the #dropsfan gallery. Do you need help with this pattern?You'll find 12 tutorial videos, a Comments/Questions area and more by visiting the pattern on garnstudio.com. © 1982-2025 DROPS Design A/S. We reserve all rights. This document, including all its sub-sections, has copyrights. Read more about what you can do with our patterns at the bottom of each pattern on our site. |
|


With over 40 years in knitting and crochet design, DROPS Design offers one of the most extensive collections of free patterns on the internet - translated to 17 languages. As of today we count 320 catalogues and 12094 patterns translated into English (UK/cm). 12094
We work hard to bring you the best knitting and crochet have to offer, inspiration and advice as well as great quality yarns at incredible prices! Would you like to use our patterns for other than personal use? You can read what you are allowed to do in the Copyright text at the bottom of all our patterns. Happy crafting!
Post a comment to pattern DROPS Extra 0-1430
We would love to hear what you have to say about this pattern!
If you want to leave a question, please make sure you select the correct category in the form below, to speed up the answering process. Required fields are marked *.