
Popular categories
Looking for a yarn?


Comments / Questions (184)
![]() Aisha wrote:
Aisha wrote:
Hi I am very confused when it comes to the sleeves and the shoulders. I am working the right body piece for 6-9 months but I do not understand how the sleeves are sewn together. If I could show a picture I would but I am so very confused as to how the sleeves are attached together. When asked to slip the first 11 stitches for the neck, this is part of the sleeve so I don’t understand how this is for the neck. Please help
01.09.2024 - 15:34DROPS Design answered:
Dear Aisha, in 6/9 months you divide body after 27 cm and continue each piece separately casting on new stitches for sleeve at the end of row from RS (right sleeve) / from WS (left sleeve) / on each side (back piece), then work towars shoulder shaping neck on front pieces / back piece. Slip the 11 sts towards neck on front piece then cast off sts for neck; when working hood, work these 11 sts then pick up sts around neck towards 11 sts on other front piece and work hood. The cast off stitches on shoulders/sleeves are then sew together on top of shoulders. Happy knitting!
02.09.2024 - 08:58
![]() Adriana wrote:
Adriana wrote:
En la parte delantera derecha dice: "Al inicio de la siguiente fila por el lado derecho pasar los primeros 9 puntos a 1 aguja auxiliar para el escote ... Continuar trabajando de ida y vuelta ..." Cuando dice continuar trabajando de ida y vuelta, ¿se refiere a los puntos que se acaban de separa o a a todos los demás de la parte delantera? ¿Y, una vez hechas las reducciones, se trabajan de nuevo todos los puntos delanteros hasta cerrarlos? Gracias
16.08.2024 - 21:08DROPS Design answered:
Hola Adriana, los 9 puntos se trabajan y se pasan a 1 gancho auxiliar, así tienes el hilo después de estos 9 puntos. Estos puntos se dejan a un lado y se usarán al trabajar el cuello; no trabajas sobre ellos hasta que se vuelvan a mencionar, en la capucha. Se trabaja sobre el resto de puntos y se cierran puntos sobre estos puntos restantes.
18.08.2024 - 23:39
![]() Sandra wrote:
Sandra wrote:
Hola, tengo una duda en la parte de "cuerpo", cuando se juntan ambas piernas y dice que se continue con A.1, son ambos A.1A y A.1B como en las piernas, o solamente A.1A? Gracias
12.07.2024 - 13:43DROPS Design answered:
Hola, tienes que trabajar A.1A y A.1B como en las piernas. Saludos!
12.07.2024 - 13:47
![]() Petra wrote:
Petra wrote:
Hallo, ich möchte gerne diesen Anzug stricken. Habe aber leider bei dem Schema ein Brett vorm Kopf 🙈 Sind die 4 Reihen im Rapport nur als Hinreihe gedacht und Rückreihe wie sie erscheinen (= 8 Reihen) oder muss ich als Hin- und Rückreihe stricken (=4 Reihen)? Danke für Eure Hilfe LG, Petra
04.06.2024 - 19:26DROPS Design answered:
Liebe Petra, die Diagramme zeigen alle Reihen, dh die Hin- sowie die Rück-Reihen, so sind beide A.1A und A.1B 4 Reihen - es handelt sich hier um ein doppeltes Perlmuster, siehe Video. Viel Spaß beim Stricken!
05.06.2024 - 07:56
![]() Jeanette wrote:
Jeanette wrote:
Hei! på forstykkene skal man sette 9 masker på en tråd før man fortsetter arbeidet og feller noen masker til hals. Jeg ser ikke hva jeg skal videre med disse 9 maskene som er satt på en tråd?
21.03.2024 - 18:33DROPS Design answered:
Hei Jeanette. Under HETTE står det: Strikk opp fra retten ca 44 til 70 masker rundt halsen (inkludert maskene på trådene foran). Altså de 9 maskene du satte på 1 tråd. mvh DROPS Design
02.04.2024 - 13:43
![]() Kristina wrote:
Kristina wrote:
Jeg strikker minste størrelse. Jeg har nå satt sammen beina og begynte med bolen. Men når jeg sette maskene sammen fra beina blir det 4 masker med samme mønster( 4r eller 4) på baksiden. Hva skal jeg gjøre for å endre dette slik at mønsteret blir riktig igjen (2r og 2 v)? Hvis jeg feller 2 masker får jeg ikke riktig maskeantall. Men hvis jeg ikke gjør det blir ikke mønsteret riktig oppigjennom hele ryggen på hele dressen. Bør jeg heller øke?
20.01.2024 - 14:40DROPS Design answered:
Hej Kristina, ja det er bedre hvis du øker 2 masker så mønteret stemmer :)
02.02.2024 - 13:25
![]() Mary-Clare Cavanagh wrote:
Mary-Clare Cavanagh wrote:
When I put the 2 legs together onto the circular needle I cannot match the pattern up. It doesn't match. I've tried it several times and reknit both pieces 3 times now and I still can't get the pattern to match up when I put them together. Please help as my daughter wants this for her baby due in May. Thank you
05.01.2024 - 14:39DROPS Design answered:
Dear Mary, the pattern on the legs should match up, but it may be mismatched in between the legs, since we increase more stitches there. This part is generally hidden due to the position in the garment and the wearer's posture, so it won't be too visible. Happy knitting!
07.01.2024 - 23:11
![]() Claudia wrote:
Claudia wrote:
Ja die Antwort ist mir klar . Ist es aber so richtig. Weil davor habe ich eine rechte randmasche gestrickt und dann zwei rechts und zwei links usw., Aber jetzt müsste ich eine Randmasche rechts stricken und dann eine Masche rechts und dann 2 links , 2 rechts usw.
05.12.2023 - 09:18
![]() Claudia wrote:
Claudia wrote:
Hallo Liebes Team. Ich habe eine Frage: ich stricke gerade Größe O/1 . Ich bin gerade dabei die Beine auf eine Nadel zu Stricken. Da ich am rechten Teil ja mit den 4 neuen Maschen anfange, geht das Muster nicht ganz auf. Stimmt es das ich eine Randmasche kraus rechts stricke, dann eine rechts , dann 2 links und 2 rechts usw. ? Anders komme ich nicht auf mein Muster zurück! Dann bist zum Ende und dann weiterführend das linke Beinteil dranstricken!
05.12.2023 - 03:44DROPS Design answered:
Liebe Claudia, das Muster stricken Sie wie zuvor, dh das Muster über die Maschen von den Beinen genauso wie zuvor stricken, so wissen Sie wie die ersten Maschen gestrickt werden (mit 1 Masche Krausrechts beidseitig). Viel Spaß beim stricken!
05.12.2023 - 09:06
![]() Sonja wrote:
Sonja wrote:
Hei. Joku muukin on tainnut kysyä tätä samaa mutta kielellä jota en ymmärrä. Olen kohdassa missä lahkeet yhdistetään (koko: keskonen) enkä saa mallineuletta täsmäämään. Koska molempien lahkeiden kuvio on samassa vaiheessa lahkeilla, toiseen lahkeeseen tulisi tavallaan kolmas kerros oikeita ja nurjia peräkkäin. Kuuluuko kuviokerroksen vaihtua lahkeiden välissä vai olenko tehnyt jotain väärin?
21.11.2023 - 23:08DROPS Design answered:
Ota molemmat lahkeet samalle puikolle neulomatta silmukoita, ensin oikea lahje ja sitten vasen lahje. Tällä tavoin voit jatkaa mallineuletta työn oikealta puolelta molemmissa lahkeissa.
11.12.2023 - 17:28
|
|||||||
Truly Wooly#trulywoolyonesie |
|||||||
 |
 |
||||||
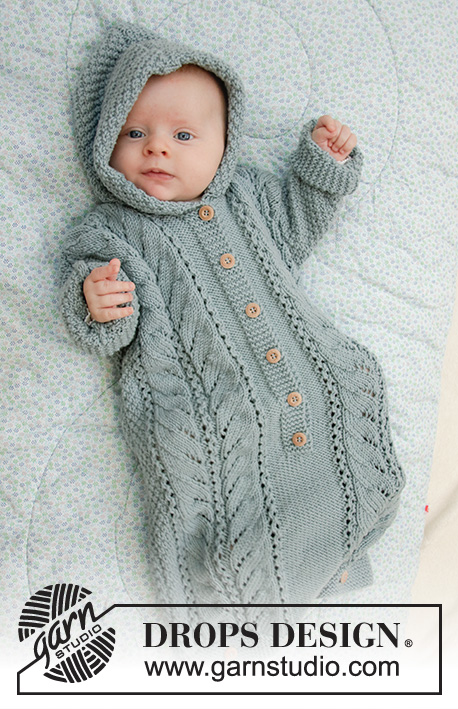
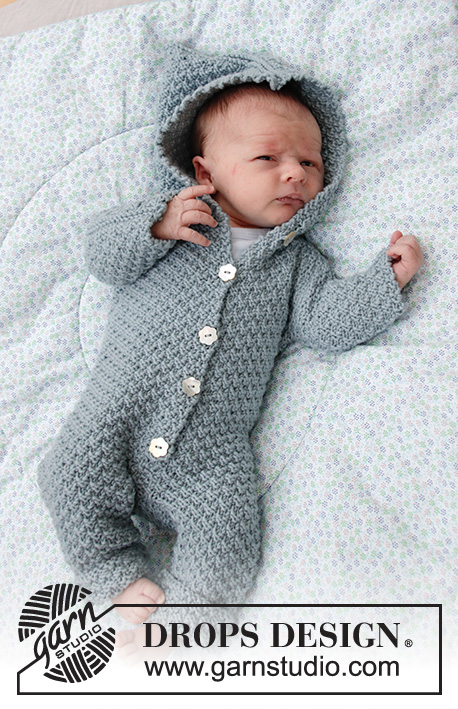
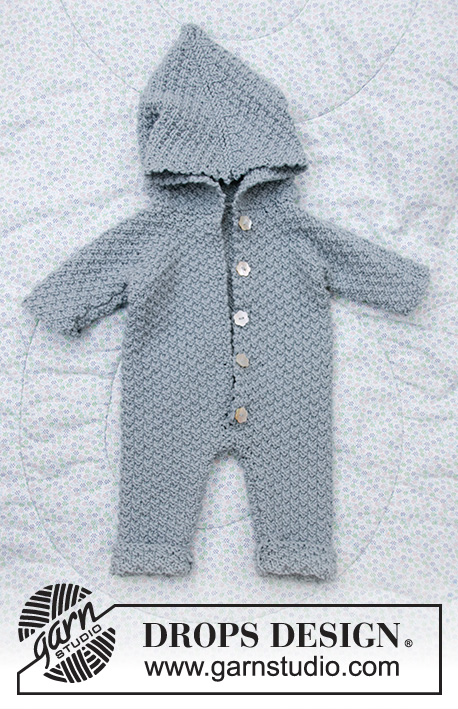
Knitted suit for baby in DROPS Merino Extra Fine. Piece is knitted with textured pattern and hood. Size premature - 4 years
DROPS Baby 33-8 |
|||||||
|
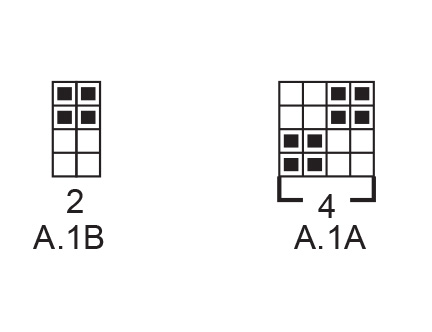
EXPLANATION FOR THE PATTERN: ---------------------------------------------------------- GARTER STITCH (back and forth): 1 ridge = knit 2 rows. 1 edge stitch in garter stitch = knit stitch from right side and knit stitch from wrong side. PATTERN: See diagram A.1. Diagrams show all rows in pattern seen from the right side. INCREASE TIP-1 (applies to legs in size 3/4 years): Increase 1 stitch inside 1 edge stitch in garter stitch by making 1 yarn over. On next row work yarn overs twisted to avoid holes. Work the increased stitches in A.1. INCREASE TIP-2 (evenly): To calculate how to increase evenly, use the total number of stitches on row (e.g. 44 stitches) and divide stitches by number of increases to be done (e.g. 14) = 3.1. In this example increase by making 1 yarn over after approx. every 3rd stitch. On next row knit yarn overs twisted to avoid holes. BUTTONHOLES (bottom up): Decrease for buttonholes on right band. 1 BUTTONHOLE = knit third and fourth stitch from edge together and make 1 yarn over. On next row purl or knit yarn over (depending on where in the diagram you are) to make holes. Decrease for buttonholes when piece measures (measured from where legs where put together): (<0): 5, 10, 15 and 20 cm 0/1 months: 6, 11, 16, 21 and 26 cm 1/3 months: 5, 10, 15, 20, 25 and 30 cm. 6/9 months: 6, 12, 17, 22, 27 and 32 cm. 12/18 months: 6, 12, 17, 23, 28 and 34 cm. 2 years: 9, 15, 21, 27, 33 and 39 cm. 3/4 years: 7, 13, 19, 25, 31, 37 and 43 cm ---------------------------------------------------------- START THE PIECE HERE: ---------------------------------------------------------- SUIT - SHORT OVERVIEW OF THE PIECE: Work each leg back and forth on circular needle, bottom up. Place legs together and work back and forth on circular needle from mid front up to sleeves. Then cast on new stitches for sleeves in each side and finish front pieces and back piece separately. Sew piece together on the shoulder. Finish by picking up stitches around the neck and work a hood. RIGHT LEG (when suit is worn): Cast on (32) 36-40-40-44 (44-48) stitches on circular needle size 4 mm with Merino Extra Fine. Work first row as follows from right side: 1 edge stitch in GARTER STITCH – read explanation above, work A.1A until 3 stitches remain on row (= 7-8-9-9-10 (10-11) repetitions of 4 stitches), work A.1B (= 2 stitches) and finish with 1 edge stitch in garter stitch. Continue pattern like this. REMEMBER THE KNITTING TENSION! When piece measures 4 cm, insert 1 marker in piece (marks fold). When piece measures 14 cm (only applies to size 3/4 years) increase 1 stitch in each side – read INCREASE TIP-1 (do not increase in the other sizes). Repeat increase in size 3/4 years when piece measures 24 cm = (32) 36-40-40-44 (44-52) stitches on needle. Work until piece measures (12) 12-16-23-31 (32-35) cm from cast-on edge, adjust so that next row is worked from right side. Cast off 1 stitch at beginning of the next 2 rows (i.e. cast off edge stitches) = (30) 34-38-38-42 (42-50) stitches. Then work the next 2 rows as follows, begin from right side: Work as before over all stitches and cast on (3) 3-3-5-5 (7-7) new stitches at the end of row (= mid back). Turn piece, work A.1 as before over all stitches, but make sure to continue pattern correctly, then cast on (4) 4-4-6-6 (8-8) stitches at the end of row from wrong side (= mid front). There are now (37) 41-45-49-53 (57-65) stitches on needle and piece measures approx. (13) 13-17-24-32 (33-36) cm from cast-on edge. Put piece aside and work left leg as explained below. LEFT LEG (when suit is worn): Cast on (32) 36-40-40-44 (44-48) stitches on circular needle size 4 mm and work first row as follows from right side: 1 edge stitch in garter stitch, work A.1A until 3 stitches remain on row (= 7-8-9-9-10 (10-11) repetitions of 4 stitches), work A.1B (= 2 stitches) and finish with 1 edge stitch in garter stitch. Continue pattern like this. When piece measures 4 cm, insert 1 marker in piece (marks fold). When piece measures 14 cm (only applies to size 3/4 years) increase 1 stitch in each side – remember INCREASE TIP-1 (do not increase in the other sizes). Repeat increase in size 3/4 years when piece measures 24 cm = (32) 36-40-40-44 (44-52) stitches on needle. Work until piece measures (12) 12-16-23-31 (32-35) cm from cast-on edge, adjust so that next row is worked from right side. Cast off 1 stitch at beginning of the next 2 rows (i.e. cast off edge stitches) = (30) 34-38-38-42 (42-50) stitches. Then work the next 2 rows as follows, begin from right side: Work as before over all stitches and cast on (4) 4-4-6-6 (8-8) new stitches at the end of row (= mid front). Turn piece, work A.1 as before over all stitches, but make sure to continue pattern correctly, then cast on (3) 3-3-5-5 (7-7) stitches at the end of row from wrong side (= mid back). There are now (37) 41-45-49-53 (57-65) stitches on needle and piece measures approx. (13) 13-17-24-32 (33-36) cm from cast-on edge. Cut the yarn. Now place the parts together as explained below. BODY: Place right leg and left leg on same circular needle with right leg first. Begin from right side on right leg, work 1 edge stitch in garter stitch, continue A.1 as before over the remaining stitches on right leg (make sure to continue pattern correct according to finish on leg), then continue pattern over the first (36) 40-44-48-52 (56-64) stitches on left leg (make sure to continue pattern correct) and finish with 1 edge stitch in garter stitch = (74) 82-90-98-106 (114-130) stitches on needle. Insert another marker in piece! NOW MEASURE PIECE FROM THIS MARKER! Continue A.1 back and forth with 1 edge stitch in garter stitch in each side towards mid front. When piece measures (3) 3-3-3-4 (5-5) cm from marker (adjust to work next row from right side) cast off 1 stitch at beginning of the next 2 rows (i.e. cast off edge stitches). Then work the next 2 rows as follows, begin from right side: Work as before over all stitches and cast on 3 new stitches at the end of row (= left band at the front). Turn piece, work A.1 as before over all stitches (make sure to continue pattern correctly) and cast on 3 new stitches at the end of row from wrong side (= right band at the front). There are now (78) 86-94-102-110 (118-134) stitches on needle. Continue A.1 back and forth over all stitches (i.e. do not work edge stitches in garter stitch). Remember BUTTONHOLES on right band - read explanation above. When piece measures (15) 20-24-27-28 (32-36) cm from the new marker, i.e. (28) 33-41-51-60 (65-72) cm from cast-on edge, divide the piece in each side. Finish front pieces and back piece separately as explained below. RIGHT FRONT PIECE: Begin from right side and work as before over the first (21) 23-25-27-29 (31-35) stitches, then cast on (9) 13-13-17-17 (21-25) new stitches for sleeve. Slip the remaining stitches on 1 stitch holder for back piece and left front piece. Continue A.1 back and forth as before but make sure that pattern fits over all stitches. AT THE SAME TIME cast on (8) 10-14-14-16 (20-22) new stitches for sleeve at the end of the next 2 rows from right side = (46) 56-66-72-78 (92-104) stitches on needle. Continue pattern back and forth over all stitches until piece measures (22) 28-32-35-36 (41-45) cm from marker, i.e. (35) 41-49-59-68 (74-81) cm from cast-on edge. At the beginning of next row from right side slip the first (8) 8-9-11-11 (12-12) stitches on 1 stitch holder for neck but to avoid cutting the yarn work them before slipping them on the stitch holder. Continue pattern back and forth as before and cast off for neck at the beginning of every row from mid front as follows: Cast off 2 stitches 1 time and 1 stitch (1) 1-2-2-2 (3-3) times = (35) 45-53-57-63 (75-87) stitches remain on needle. Then work until the entire suit measures approx. (24) 30-34-37-39 (44-49) cm from marker, i.e. (37) 43-51-61-71 (77-85) cm from cast-on edge, but adjust so that next row is worked from right side. Work 1 ridge back and forth over all stitches. Then cast off by knitting from the right side. The entire suit measures approx. (38) 44-52-62-72 (78-86) cm from cast-on edge. Now work back piece as explained below. BACK PIECE: Slip the first (36) 40-44-48-52 (56-64) stitches on stitch holder (seen from right side) on circular needle size 4 mm and continue A.1 back and forth over these stitches as before. AT THE SAME TIME cast on new stitches for sleeves at the end of every row in each side as follows: Cast on (9) 13-13-17-17 (21-25) stitches 1 time in each side and then (8) 10-14-14-16 (20-22) stitches 2 times in each side = (86) 106-126-138-150 (178-202) stitches on needle. Continue pattern back and forth over all stitches until piece measures (23) 29-33-36-38 (43-48) cm from marker). On next row cast off the middle (12) 12-16-20-20 (24-24) stitches for neck and finish each shoulder/sleeve separately. Then cast off 2 stitches on next row from neck = (35) 45-53-57-63 (75-87) stitches remain on needle for shoulder/sleeve. Then work until the entire suit measures approx. (24) 30-34-37-39 (44-49) cm from marker, but adjust according to front piece and make sure that next row is from right side. Work 1 ridge back and forth over all stitches. Then cast off by knitting from the right side. Work the other shoulder/sleeve the same way. Then work left front piece as explained below. LEFT FRONT PIECE: Slip the remaining (21) 23-25-27-29 (31-35) stitches on stitch holder back on needle size 4 mm. Begin from right side and continue A.1 back and forth as before. AT THE SAME TIME cast on new stitches for sleeve at the end of the next 3 rows from wrong side as follows: Cast on (9) 13-13-17-17 (21-25) stitches 1 time and then (8) 10-14-14-16 (20-22) stitches 2 times = (46) 56-66-72-78 (92-104) stitches on needle. Continue pattern back and forth over all stitches until piece measures the same as right front piece. At the beginning of next row from wrong side slip the first (8) 8-9-11-11 (12-12) stitches on 1 stitch holder for neck but to avoid cutting the yarn work them before slipping them on the stitch holder. Continue pattern back and forth as before and cast off for neck at the beginning of every row from mid front as follows: Cast off 2 stitches 1 time and 1 stitch (1) 1-2-2-2 (3-3) times = (35) 45-53-57-63 (75-87) stitches remain on needle. Then work until the entire suit measures approx. (24) 30-34-37-39 (44-49) cm from marker, i.e. (37) 43-51-61-71 (77-85) cm from cast-on edge, but measure so that next row is worked from right side. Work 1 ridge back and forth over all stitches. Then cast off by knitting from the right side. The entire suit measures approx. (38) 44-52-62-72 (78-86) cm from cast-on edge. ASSEMBLY: Sew shoulder seams inside cast-off edges. Sew the seams under the sleeve. Sew seam on inside of both legs inside 1 edge stitch in each side. Sew seam mid front from bottom of band and down inside 1 edge stitch in each side. Sew together the opening between the legs. Fold the end of legs at the marker. Sew the buttons on to the left band. HOOD: Pick up from right side approx. 44 to 70 stitches around the neck (including stitches on stitch holders at the front). Knit 1 row from wrong side while increasing evenly to (58) 70-74-74-78 (86-86) stitches – read INCREASE TIP-2. Knit 1 row from right side and knit 1 row from wrong side. Work next row as follows from right side: Work A.1A until 2 stitches remain on needle and finish with A.1B (= 2 stitches). Continue pattern like this until piece measures (17) 18-19-20-21 (22-23) cm from ridge in the neck, but adjust so that next row is from right side. Work 1 ridge back and forth over all stitches. Then cast off by knitting from the right side. Place the hood double and sew seam at the top inside cast-off edge. |
|||||||
Diagram explanations |
|||||||
|
|||||||
|
|||||||

|
|||||||
Have you finished this pattern?Tag your pictures with #dropspattern #trulywoolyonesie or submit them to the #dropsfan gallery. Do you need help with this pattern?You'll find 28 tutorial videos, a Comments/Questions area and more by visiting the pattern on garnstudio.com. © 1982-2025 DROPS Design A/S. We reserve all rights. This document, including all its sub-sections, has copyrights. Read more about what you can do with our patterns at the bottom of each pattern on our site. |
|||||||


With over 40 years in knitting and crochet design, DROPS Design offers one of the most extensive collections of free patterns on the internet - translated to 17 languages. As of today we count 314 catalogues and 11820 patterns translated into English (UK/cm). 11820
We work hard to bring you the best knitting and crochet have to offer, inspiration and advice as well as great quality yarns at incredible prices! Would you like to use our patterns for other than personal use? You can read what you are allowed to do in the Copyright text at the bottom of all our patterns. Happy crafting!
Post a comment to pattern DROPS Baby 33-8
We would love to hear what you have to say about this pattern!
If you want to leave a question, please make sure you select the correct category in the form below, to speed up the answering process. Required fields are marked *.