
Popular categories
Looking for a yarn?


Comments / Questions (41)
![]() Je Maintiendrai wrote:
Je Maintiendrai wrote:
Bonjour, Je souhaiterais tricoter ce modèle mais je ne sais pas quelle taille choisir et je n'ai jamais tricoté de pull pour moi. Je fais habituellement un 42 et parfois du 40 dans les tailles du commerce. Pourriez-vous s'il vous plait me guider dans la taille à choisir? Merci d'avance.
07.04.2019 - 16:50DROPS Design answered:
Bonjour! Si vous faites un garment vous trouverez en bas de la page un schéma avec toutes les mesures (en cm) du vêtement terminé. Si vous suivez les explications et gardez la bonne tension/le bon échantillon, votre vêtement aura la même taille que les mesures du schéma. Si vous ne savez pas quelle taille choisir, la solution peut être de mesurer un pull que vous avez et dont vous aimez la taille. Vous pouvez ensuite regarder les mesures dans le schéma et y trouver la bonne taille. Bon tricot!
07.04.2019 - 22:04
![]() Anna-Marie wrote:
Anna-Marie wrote:
Jeg synes der står der er patent - men det er noget andet når man følger mønstret, ikke?
14.02.2019 - 15:50DROPS Design answered:
Hei Anna-Maria. Denne oppskriften er strikket med struktur og hullmønster, som beskrevet i tittelen. Det strikkes ikke patent her. Jeg kan likevel se at den kommer opp når man søkt på patent, det skal vi få rettet. God fornøyelse
18.02.2019 - 11:54
![]() Samanta wrote:
Samanta wrote:
Buongiorno, non so dove sbaglio : ma sul davanti se lavoro un numero dispari su A1 e poi devo iniziare A2, sul rovescio mi vengono due maglie diritto attaccate e le coste non vengono rispettate. Devo invertire A1? GRAZIE
29.01.2019 - 10:53DROPS Design answered:
Buongiorno Samanta. Quando lavora A1 su un numero dispari, l'ultima maglia viene lavorata come la prima maglia di A1, quindi a diritto sul diritto del lavoro. Al ferro di ritorno, lavora questa maglia a rovescio e poi segue le coste come già impostate. Buon lavoro!
30.01.2019 - 11:13
![]() ELISA wrote:
ELISA wrote:
Lorsque je fais mon échantillon : 10 cm egal 18 mailles avec des aiguilles n°7 (je tricote très serré). Je souhaite faire la taille S. Comment faire pour arriver au bon échantillon (10cm = 15 mailles)
04.01.2019 - 16:17DROPS Design answered:
Bonjour Elisa, si vous tricotez serré, il vous faudra ajuster la taille des aiguilles: vous avez trop de mailles pour 10 cm, essayez à nouveau avec des aiguilles plus grosses. Bon tricot!
07.01.2019 - 08:11
![]() Celine wrote:
Celine wrote:
Après avoir recommencé 3 fois car les côtes ne tombaient pas au bon endroit en réunissant les deux épaules, j’ai fini par lire le schéma A1 en miroir. Cela donne ça au 3ème rang (envers) et tous les rangs envers: 1m. lisière, (1m. Envers, 1m.endroit) tout le rang au lieu de l’inverse, 1m lisière. Avec cette correction, les cotes et le motif A2 sont bien positionnés.
30.12.2018 - 09:04
![]() Aase Hermansen wrote:
Aase Hermansen wrote:
Hej - kan jeg mon erstatte 1 tråd air med 2 tråde cotton merino ?? Mvh. Aase
28.11.2018 - 10:46DROPS Design answered:
Hei Aase. Det som er viktig ved garnbytte er at strikkefastheten blir overholdt. Air tilhører garngruppe C, mens Cotton Merino tilhører garngruppe B. Cotton Merino har derfor en tettere strikkefasthet en Air, men dessverre ikke så tett at 2 tråder tilsvarer strikkefastheten til Air. Om du derimot velger et garn fra gruppe A vil dette være en mulighet. Alternativt kan du velge et annet garn fra gruppe C (og da strikke med 1 tråd). Her er en oversikt over hvilke garn som tilhører hvilke grupper. God fornøyelse
29.11.2018 - 14:05
![]() Willemijn wrote:
Willemijn wrote:
Het rugpand wordt 70 cm breed, is dat de bedoeling?
20.11.2018 - 15:08DROPS Design answered:
Dag Willemijn,
Dat klopt dat de panden breed zijn, het is een oversized model.
21.11.2018 - 10:49
![]() Carla wrote:
Carla wrote:
Hello, betreffende maat medium - voorpand. Ik heb rechter en linker schouder samengebracht op 1 naald en sta op het punt om met patroon A2 te beginnen. Ik zou 1 ribbelsteek moeten breien, 13 steken in A1 patroon, 49 steken in A2 patroon, dan terug 13 steken in A1 patroon en 1 ribbelsteek. Als ik het telpatroon van A2 bekijk, dan start deze met 47 steken ipv 49 steken zoals in de beschrijving omdat er geminderd is, maar dit staat niet in het patroon waar je die 2 steken moet minderen ?Bedankt!
19.11.2018 - 23:19DROPS Design answered:
Dag Carla
Als je de rechter en linker schouder samengevoegd hebt, heb je 77 steken op de naald en hoef je verder niet meer de minderen of te meerderen. In het telpatroon A.2 begin je met 49 steken en pas in een van de laatse naalden in het telpatroon minder je naar 47 steken. (Je leest het telpatroon van onder naar boven.) Als je verder breit volgens de beschrijving kom je dus precies uit met de steken.
25.11.2018 - 16:52
![]() Fanny wrote:
Fanny wrote:
Bonjour, pour faire les épaules du dos, il est indiqué "tricoter sur l'endroit ainsi: rang 1..., rang 2... rang 3... etc". Faut-il faire des rangs envers entre chacun de ces rangs endroits ? Je ne pense pas avoir compris car si je fais cela, les augmentations se font toujours sur l'endroit et je me retrouve avec 2 épaules droites. Merci pour votre aide
18.11.2018 - 09:26DROPS Design answered:
Bonjour Fanny, suivez simplement l'ordre des rangs à tricoter (pas de rangs entre), soit pour l'épaule gauche: 1er rang sur l'envers (= on augmente pour l'encolure), 2ème rang sur l'endroit, 3ème rang sur l'envers. Pour l'épaule droite: 1er rang sur l'endroit (on augmente pour l'encolure), 2ème rang sur l'envers . Tricotez ensuite les 2 épaules sur l'endroit en montant les mailles de l'encolure entre les deux. Bon tricot!
19.11.2018 - 08:47
![]() Dominique wrote:
Dominique wrote:
Je tricote la taille L. Le nombre de maille que j'obtiens après les augmentations des manches ne correspond pas: 25 mailles au départ puis 5 fois 2 et une fois 1 ne font pas 53 mais 47. Où est l'erreur ? Merci pour vos explications.
02.11.2018 - 17:47DROPS Design answered:
Bonjour Dominique, effectivement, il faut monter à la fin 1 x 4 m - la correction a été faite, merci. Bon tricot!
05.11.2018 - 08:17
|
||||||||||||||||||||||
Aster#astersweater |
||||||||||||||||||||||
 |
 |
|||||||||||||||||||||
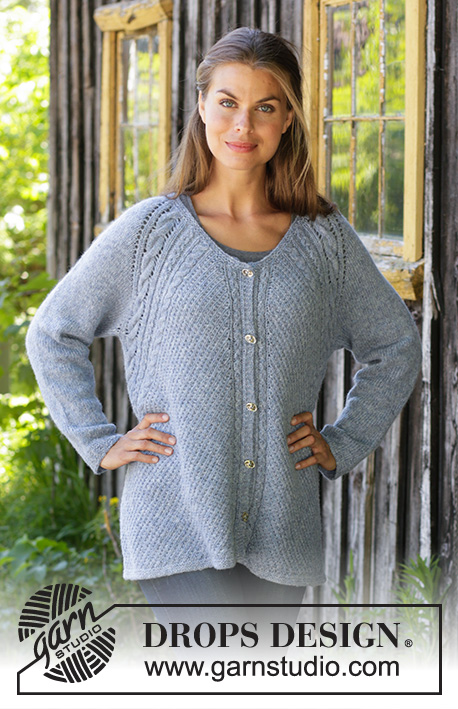
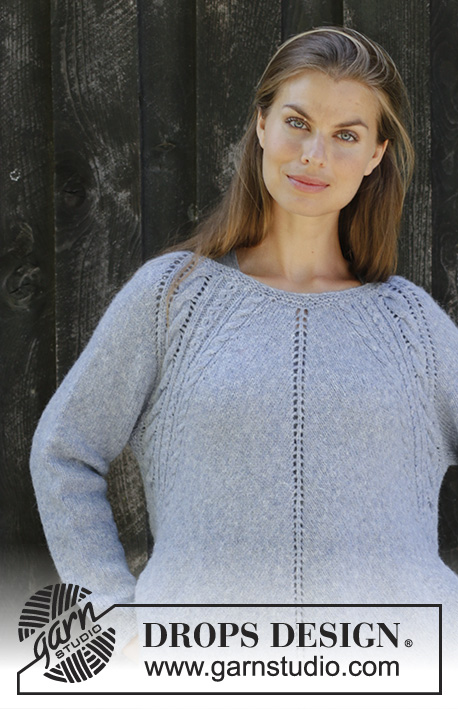
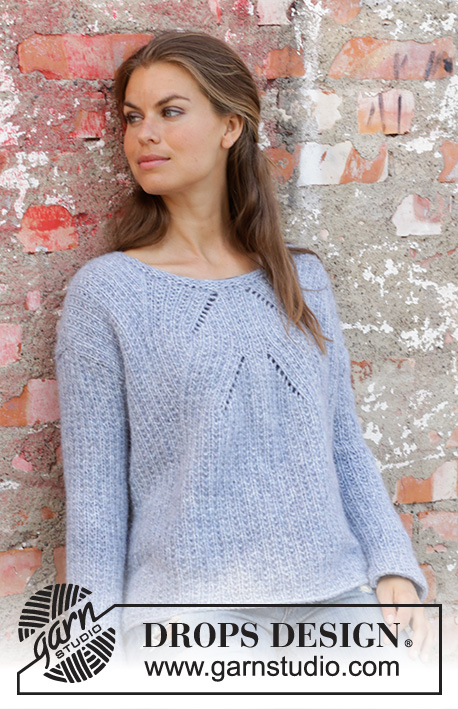
Knitted jumper in DROPS Air. The piece is worked top down with textured pattern and lace pattern. Size S – XXXL.
DROPS 194-4 |
||||||||||||||||||||||
|
EXPLANATIONS FOR THE PATTERN: ------------------------------------------------------- RIDGE/GARTER STITCH (worked back and forth): 1 ridge = Knit 2 rows. PATTERN: See diagrams A.1 and A.2. The diagrams show all the rows in the pattern seen from the right side. DECREASE TIP (for sleeves): All decreases are made from the right side! Decrease as follows after the 1 edge stitch in garter stitch: Slip 1 stitch as if to knit, knit 1, pass the slipped stitch over. Decrease as follows before the 1 edge stitch in garter stitch: Work until there are 3 stitches left on the row, knit 2 together, 1 edge stitch in garter stitch. ------------------------------------------------------- START THE PIECE HERE: ------------------------------------------------------- JUMPER - SHORT OVERVIEW OF THE PIECE: The piece is worked back and forth in sections which are sewn together to finish. You work top down with circular needle. FRONT PIECE: Left shoulder: Cast on 25-27-29-29-31-33 stitches with circular needle size 6 mm and Air. Purl 1 row from the wrong side. Then work pattern as follows from the right side: 1 edge stitch in GARTER STITCH – read description above, A.1 (= 2 stitches) until there are 2 stitches left on the row, work the first stitch in A.1, 1 edge stitch in garter stitch. Continue like this back and forth until the piece measures 4-4-4-4-5-5 cm – adjust so that the next row is worked from the wrong side: ROW 1: Work pattern as before over all stitches and cast on 1 new stitch at the end of the row (= towards neck) = 26-28-30-30-32-34 stitches. ROW 2: Work 1 edge stitch in garter stitch, work pattern as before until there is 1 stitch left, 1 edge stitch in garter stitch. ROW 3: Work pattern as before over all stitches. Lay the piece to one side and work right shoulder. Right shoulder: Cast on 25-27-29-29-31-33 stitches with circular needle size 6mm and Air. Purl 1 row from the wrong side. Then work pattern as follows from the right side: 1 edge stitch in garter stitch, A.1 until there are 2 stitches left on the row, work the first stitch in A.1, 1 edge stitch in garter stitch. Continue like this back and forth until the piece measures 4-4-4-4-5-5 cm – adjust so that the next row is from the right side: ROW 1: Work pattern as before over all stitches and cast on 1 new stitch at the end of the row (= towards neck) = 26-28-30-30-32-34 stitches. ROW 2: Work 1 edge stitch in garter stitch, work pattern as before until there is 1 stitch left on the row, 1 edge stitch in garter stitch. REMEMBER THE KNITTING TENSION! Now work the right and left shoulders together from the right side as follows: Work as before over the 26-28-30-30-32-34 stitches on the right shoulder, cast on 21-21-21-25-25-25 new stitches on the needle for neck, work as before over the 26-28-30-30-32-34 stitches on the left shoulder = 73-77-81-85-89-93 stitches on the row. Work back 1 row in this pattern from the wrong side and 1 edge stitch in garter stitch in each side (purl the new neck stitches). Now work pattern as follows: 1 edge stitch in garter stitch, work pattern as before over the next 11-13-15-17-19-21 stitches, A.2 (= 49 stitches), work pattern as before over the next 11-13-15-17-19-21 stitches, 1 edge stitch in garter stitch. Continue like this back and forth. When the piece measures 13-14-13-14-15-15 cm cast on new stitches for the armholes at the end of each row in each side as follows: Cast on 1 stitch 2-2-2-2-2-2 times, 2 stitches 0-0-2-2-3-4 times and 4-4-2-2-4-4 stitches 1 time (a total of 6-6-8-8-12-14 stitches increased for the armhole in each side of the piece) = 85-89-97-101-113-121 stitches. The new stitches are worked into pattern A.1 as you go. Continue like this back and forth until A.2 has been completed in height. When A.2 has been completed in height you have decreased 2 stitches in the diagram = 83-87-95-99-111-119 stitches. Now continue with pattern A.1 with 1 edge stitch in garter stitch in each side. When the piece measures 54-56-58-60-62-64 cm from the shoulder, cast off with knit over knit and purl over purl. BACK PIECE: Right shoulder: Cast on 25-27-29-29-31-33 stitches with circular needle size 6 mm and Air. Purl 1 row from the wrong side. Then work pattern as follows from the right side: ROW 1: 1 edge stitch in garter stitch, A.1 (= 2 stitches) until there are 2 stitches left on the row, work the first stitch in A.1, 1 edge stitch in garter stitch. ROW 2: Work pattern as before and cast on 1 new stitch at the end of the row (= towards neck) = 26-28-30-30-32-34 stitches. ROW 3: Work 1 edge stitch in garter stitch, work pattern as before until there is 1 stitch left on the row, 1 edge stitch in garter stitch. ROW 4: Work pattern as before over all stitches. Lay the piece to one side and work left shoulder. Left shoulder: Cast on 25-27-29-29-31-33 stitches with circular needle size 6 mm and Air. Purl 1 row from the wrong side. Then work pattern as follows from the right side: ROW 1: 1 edge stitch in garter stitch, A.1 until there are 2 stitches left on the row, work the first stitch in A.1, 1 edge stitch in garter stitch. ROW 2: Work pattern as before over all stitches. ROW 3: Work pattern as before and cast on 1 new stitch at the end of the row = 26-28-30-30-32-34 stitches. ROW 4: Work 1 edge stitch in garter stitch, work pattern as before until there is 1 stitch left, 1 edge stitch in garter stitch. REMEMBER THE KNITTING TENSION! Now work the left and right shoulder together from the right side as follows: Work as before over the 26-28-30-30-32-34 stitches on the left shoulder, cast on 21-21-21-25-25-25 new stitches on the needle for neck, work as before over the 26-28-30-30-32-34 stitches on the right shoulder = 73-77-81-85-89-93 stitches on row. Work 1 row back from the wrong side in pattern as before and with 1 edge stitch in garter stitch in each side (purl the new neck stitches). Now work pattern as follows: 1 edge stitch in garter stitch, A.1 until there are 2 stitches left on the row, work the first stitch in A.1, 1 edge stitch in garter stitch. Continue back and forth like this. When the piece measures 13-14-13-14-15-15 cm cast on new stitches for the armholes at the end of each row in each side as follows: Cast on 1 stitch 2-2-2-2-2-2 times, 2 stitches 0-0-2-2-3-4 times and 3-3-1-1-3-3 stitches 1 time (a total of 5-5-7-7-11-13 stitches increased for the armholes in each side of the piece – NOTE: You cast on 1 less stitch for the armholes on each side of the back piece than on the front piece so that the pattern will fit into the sides of the body = 83-87-95-99-111-119 stitches. The new stitches are worked into pattern A.1 as you go. When the piece measures 54-56-58-60-62-64 cm from the shoulder, cast off with knit over knit and purl over purl. SLEEVE: Cast on 19-23-25-27-27-27 stitches with circular needle size 6 mm and Air. Work pattern A.1 until there is 1 stitch left, work the first stitch in A.1. Continue like this back and forth, AT THE SAME TIME at the end of each row cast on new stitches in each side for the sleeve cap as follows: Cast on 2 stitches 3-3-3-3-2-2 times, 1 stitch 0-0-0-0-4-5 times, 2 stitches 2-2-2-2-2-2 times and 4 stitches 1 time = 47-51-53-55-59-61 stitches. The new stitches are worked into pattern A.1. When all the stitches are cast on, insert a marker thread in the piece. THE PIECE IS NOW MEASURED FROM HERE! Continue back and forth with pattern A.1 and 1 edge stitch in garter stitch in each side. When the piece measures 4 cm decrease 1 stitch in each side – read DECREASE TIP. Decrease like this approx. every 5-5-4-4-3-3 cm a total of 7-8-8-9-10-10 times = 33-35-37-37-39-41 stitches. Continue until the sleeve measures 44-44-43-43-41-39 cm from the marker thread (shorter measurements in larger sizes due to wider shoulders). Cast off with knit over knit and purl over purl. Work the other sleeve in the same way. ASSEMBLY: Sew the shoulder seams inside the cast-on edge. Sew the sleeves to the body inside the cast-on edge on the sleeves and inside the 1 edge stitch in garter stitch on the body. Sew the sleeve and side seams inside the 1edge stitch in garter stitch. NECK: Knit up 66-78 stitches from the right side with short circular needle size 6 mm. Work 2 ridges. Cast off with purl. |
||||||||||||||||||||||
Diagram explanations |
||||||||||||||||||||||
|
||||||||||||||||||||||

|
||||||||||||||||||||||

|
||||||||||||||||||||||
Have you finished this pattern?Tag your pictures with #dropspattern #astersweater or submit them to the #dropsfan gallery. Do you need help with this pattern?You'll find 27 tutorial videos, a Comments/Questions area and more by visiting the pattern on garnstudio.com. © 1982-2025 DROPS Design A/S. We reserve all rights. This document, including all its sub-sections, has copyrights. Read more about what you can do with our patterns at the bottom of each pattern on our site. |
||||||||||||||||||||||


With over 40 years in knitting and crochet design, DROPS Design offers one of the most extensive collections of free patterns on the internet - translated to 17 languages. As of today we count 314 catalogues and 11821 patterns translated into English (UK/cm). 11821
We work hard to bring you the best knitting and crochet have to offer, inspiration and advice as well as great quality yarns at incredible prices! Would you like to use our patterns for other than personal use? You can read what you are allowed to do in the Copyright text at the bottom of all our patterns. Happy crafting!
Post a comment to pattern DROPS 194-4
We would love to hear what you have to say about this pattern!
If you want to leave a question, please make sure you select the correct category in the form below, to speed up the answering process. Required fields are marked *.