
Popular categories
Looking for a yarn?


Comments / Questions (110)
![]() Marina wrote:
Marina wrote:
Buongiorno, vorrei lavorare questo vestitino con i ferri diritti, davanti e dietro con le cuciture sui fianchi, è possibile? come posso adattare la spiegazione? grazie. Buona giornata Marina
10.05.2019 - 08:49DROPS Design answered:
Buongiorno Marina. E’ sufficiente che avvii la metà delle maglie indicate più 1 m vivagno da ciascun lato per la cucitura. A questo link trova indicazioni utili su come adattare ai ferri dritti un lavoro presentato per essere lavorato in tondo. Buon lavoro!
10.05.2019 - 09:49
![]() Sigrid Rudolph wrote:
Sigrid Rudolph wrote:
Vor den Armausschnitten strickt man 9 Maschen rechts, dann nimmt man verteilt 4 Maschen ab, dann 18 Maschen, dann wieder 4 Maschen verteilt abnehmen und 9 Maschen rechts, in dieser Weise weiterstricke, bis 27 cm erreicht sind. Nehme ich nun weiter jede 2. Reihe ab oder stricke ich Kraus rechts weiter. LG Sigrid
05.05.2019 - 18:43DROPS Design answered:
Liebe Frau Rudolph, abnehmen werden Sie nur bei der 1. dieser Reihen, dann stricken Sie wieter über die 56 Maschen wie zuvor = mit 18 M krausrecht auf beiden Seiten und im Muster wie zuvor zwischen den 18 M krausrechts. Viel Spaß beim stsricken!
06.05.2019 - 10:13
![]() Dani wrote:
Dani wrote:
Vielen Dank für die schnelle Antwort! Eine kurze Frage ob ich es auch wirklich richtig verstanden habe: solange ich in der Runde stricke ist es egal ob Hin- oder Rückreihe. Ein leeres Kästchen wird immer rechts gestrickt und ein Kreuz im Kästchen immer links?
10.04.2019 - 11:27DROPS Design answered:
Liebe Dani, ja genau, in Runden werden die Maschen wie bei nur Hinreihen gestrickt, erst Sie dann die Arbeit teilen und weiter hin und zurück stricken, werden dann bei den Rückreihen ein Kreuz rechts und ein leeres Kästchen links gestrickt. Viel Spaß beim stricken!
10.04.2019 - 11:56
![]() Dani wrote:
Dani wrote:
Hallo, wird A2 mit einer Hinreihe begonnen? Dann wäre es doch vom Muster her umgekehrt wie in A1. Da strickt man zwischen den Musterreihen linke Maschen. Bei A2 wären es dann rechte Maschen. Vielleicht habe ich ja was übersehen? Vielen Dank vorab für Ihre Hilfe
09.04.2019 - 20:50DROPS Design answered:
Liebe Dani, die Diagramme zeigen alle Reihe, dh die HIn- sowie die Rückreihen. A.2 wird zuerst in Runden gestrickt, dh immer rechts nach links lesen - A.1 endet mit einer Reihe linke Maschen, A.2 beginnt dann mit 1 oder 2 Reihen (siehe Grösse) rechte Maschen. Viel Spaß beim stricken!
10.04.2019 - 10:06
![]() Lykke wrote:
Lykke wrote:
Jeg strikker str. 56-62. Jeg er kommet til indtagninger i A.2, men kan ikke regne ud hvor mange m pr p jeg skal tage ind?
16.03.2019 - 11:43DROPS Design answered:
Hei Lykke. På omganger markert med stjerne skal du felle 6 masker jevnt fordelt på omgangen, på omganger markert med sort prikk skal du felle 12 masker jevnt fordelt på omgangen. Dette står forklart i symbolforklaringen. God fornøyelse
26.03.2019 - 12:04
![]() Lieve wrote:
Lieve wrote:
Wat bedoelen ze met patroon/ribbelsteek bij armsgat?
05.03.2019 - 10:29DROPS Design answered:
Dag Lieve,
Er wordt mee bedoelt dat je het patroon/dan wel ribbelsteek voortzet, dus terwijl je het armsgat maakt brei je door in het patroon (en waar je ribbelsteek moet breien, brei je ribbelsteek).
05.03.2019 - 17:49
![]() Anna wrote:
Anna wrote:
Buon giorno Come diminuire le ultime maglie a fine giro? Grazie
02.03.2019 - 11:35
![]() Anna wrote:
Anna wrote:
Buon giorno Come diminuire le ultime maglie a fine giro? Grazie
02.03.2019 - 10:56DROPS Design answered:
Buongiorno Anna. Può chiuderle normalmente e poi tagliare il filo e proseguire con il dietro; oppure può intrecciare queste maglie alla fine del giro precedente così da non aver bisogno di tagliare il filo. Buon lavoro!
02.03.2019 - 14:14
![]() Buongiorno wrote:
Buongiorno wrote:
Buongiorno Sto lavorando la misura più piccola.quando dite x lo scaldo:continuare fino a quando misura 24 cm lavorare 9 maglie a legaccio lavorare il motivo si riferisce al diagramma? Grazie
02.03.2019 - 07:35DROPS Design answered:
Buongiorno. Sì, per motivo si intende il diagramma. Buon lavoro!
02.03.2019 - 08:29
![]() Anna wrote:
Anna wrote:
Buona giornata Non so il perché ma terminato il motivo A2 non mi risulta L altezza di 27cm Ma molto di meno
19.02.2019 - 11:00DROPS Design answered:
Buongiorno Anna. Potrebbe essere un problema di tensione verticale. Una volta completato il diagramma A2, prosegue a legaccio. Segue poi le indicazioni (per gli scalfi , lo scollo e così via) sulla base delle misure in cm indicate. Buon lavoro!
19.02.2019 - 12:18
|
|||||||||||||||||||||||||
Serafina#serafinadress |
|||||||||||||||||||||||||
 |
 |
||||||||||||||||||||||||
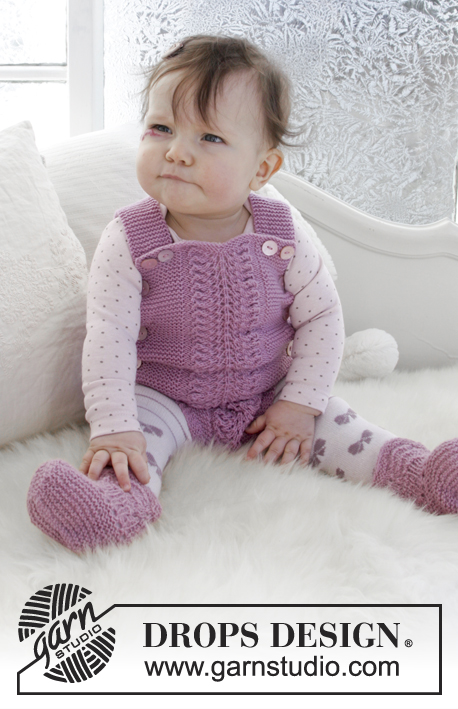
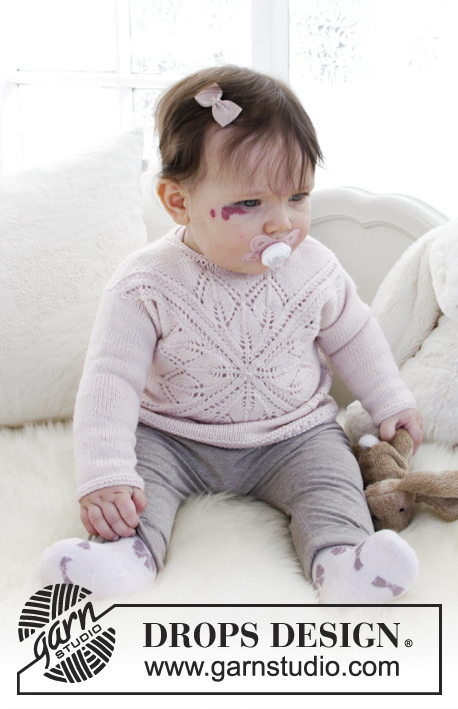
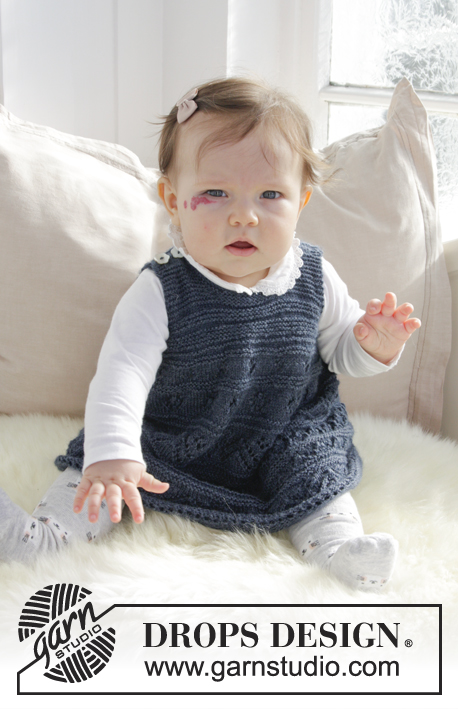
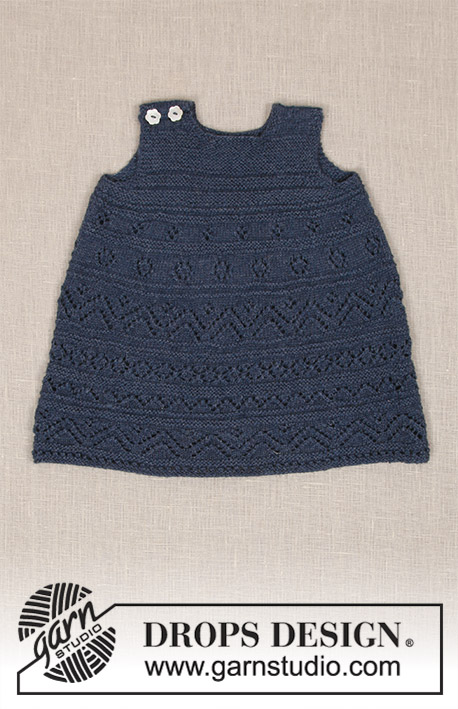
Knitted dress with lace pattern and garter stitch for baby. Size 0 - 4 years Piece is knitted in DROPS Alpaca.
DROPS Baby 31-17 |
|||||||||||||||||||||||||
|
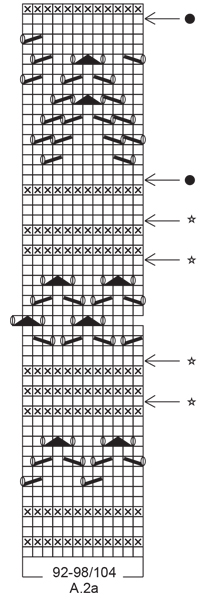
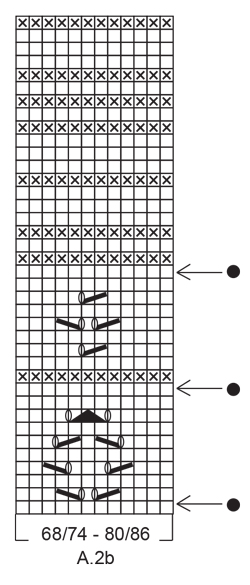
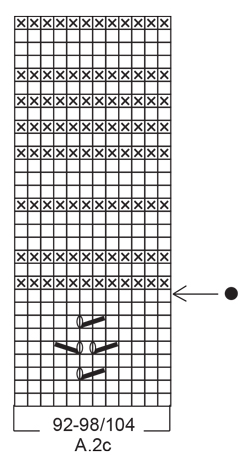
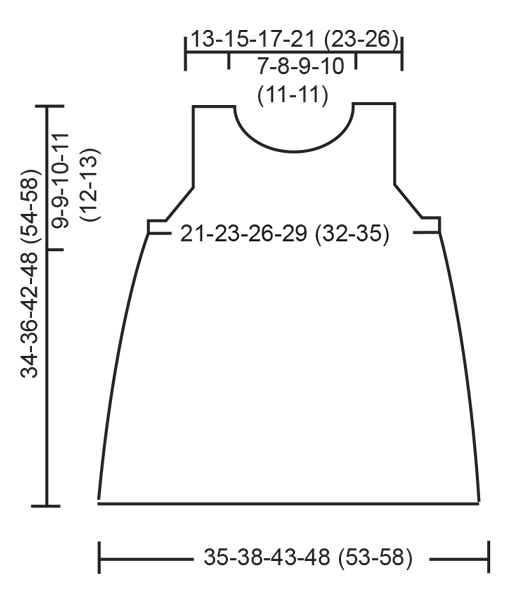
INFORMATION FOR PATTERN: GARTER STITCH (worked in the round): 1 ridge = 2 rounds. Knit 1 round and purl 1 round. GARTER STITCH (back and forth): 1 ridge = knit 2 rows. PATTERN: See diagrams A.1 and A.2 (first A.2a, then A.2b and A.2c). Choose diagram for your size. Diagrams show all rows in pattern seen from the right side. DECREASE TIP-1 (applies evenly spaced decrease): To calculate how to decrease evenly, use the total number of stitches on row (e.g. 168 stitches) and divide stitches by number of decreases to be done (e.g. 6) = 28. In this example work approx. every 27th and 28th stitch together. DECREASE TIP-2 (applies to armholes): Decrease inside 3 edge stitches in garter stitch. All decreases are done from the right side. Decrease before 3 edge stitches as follows: Knit 2 together. Decrease after 3 edge stitches as follows: Slip 1 stitch knitwise, knit 1, pass slipped stitch over stitch worked. ---------------------------------------------------------- DRESS: Worked in the round on circular needle up to armhole, then work front and back piece back and forth separately. Neck edge is worked back and forth on needle. BODY: Cast on 168-180-204-228 (252-276) stitches on circular needle size 3 mm with Alpaca. Insert 1 marker at beginning of round and 1 marker after 84-90-102-114 (126-138) stitches, markers indicates side of garment. Then work A.1 (= 12 stitches) over all stitches (= 14-15-17-19 (21-23) times in width). REMEMBER THE KNITTING TENSION! When A.1 has been worked 1 time vertically, piece measures approx. 8 cm. Then work A.2 (= 12 stitches) over all stitches (= 14-15-17-19 (21-23) times in width). On rounds marked with arrow decrease stitches evenly - read DECREASE TIP-1. For every time 12 stitches are decreased in total, work 1 repetition less of A.2 in width. When all decreases are done, there are 108-120-132-156 (156-180) stitches on needle (= 54-60-66-78 (78-90) stitches on each side of marker). READ ALL OF THE FOLLOWING SECTION BEFORE CONTINUING! WORK PATTERN WHILE AT THE SAME TIME DECREASING FOR ARMHOLE THE SIDE AS FOLLOWS: PATTERN: Continue with pattern. When A.2 has been worked vertically, continue in GARTER STITCH - see explanation above. Piece measures approx. 27-27-33-33 (39-39) cm. ARMHOLE: When piece measures 24-26-31-36 (41-44) cm, continue as follows: Work 9 stitches in garter stitch, work pattern/garter stitch as before, but decrease 4-4-4-8 (2-6) stitches evenly until 9 stitches remain before next marker, work 18 stitches in garter stitch, work pattern/garter stitch as before, but decrease 4-4-4-8 (2-6) stitches evenly until 9 stitches remain on round, finish with 9 stitches in garter stitch = 100-112-124-140 (152-168) stitches in total (= 50-56-62-70 (76-84) stitches on each side of markers). Continue like this until piece measures 25-27-32-37 (42-45) cm. Now cast off stitches for armhole as follows: Cast off the first 6 stitches, work 3 stitches in garter stitch, work pattern until 9 stitches remain before next marker, work 3 stitches in garter stitch, cast off the next 12 stitches, work 3 stitches in garter stitch, work pattern as before until 9 stitches remain, work 3 stitches in garter stitch and cast off the last 6 stitches. Now finish front and back piece separately. BACK PIECE: Now work back and forth. = 38-44-50-58 (64-72) stitches. Continue with pattern and 3 stitches in garter stitch in each side of piece. Then decrease 1 stitch for armhole inside 3 stitches in garter stitch in each side of piece - read DECREASE TIP-2! Decrease like this on every other row 3-4-5-4 (4-5) times in total = 32-36-40-50 (56-62) stitches. When piece measures 32-34-40-46 (52-56) cm, cast off the middle 16-18-22-24 (26-26) stitches for neck = 8-9-9-13 (15-18) stitches on each shoulder. Now finish each shoulder separately. LEFT SHOULDER: Continue in stocking stitch with 3 stitches in garter stitch out towards armhole as before until piece measures 34-36-42-48 (54-58) cm in total. Cast off by purling from wrong side. This shoulder is sewn together with left shoulder on front piece later. RIGHT SHOULDER: Continue in stocking stitch with 3 stitches in garter stitch out towards armhole as before until piece measures 34-36-42-48 (54-58) cm in total. Cast off by knitting from wrong side. On this shoulder sew on buttons later. FRONT PIECE: Work as on back piece until piece measures 30-32-37-42 (48-51) cm. Now cast off the middle 10-12-16-16 (18-18) stitches for neck = 11-12-12-17 (19-22) stitches on each shoulder. Now finish each shoulder separately. RIGHT SHOULDER: Cast off 1 stitch on every row from neck 3-3-3-4 (4-4) times in total = 8-9-9-13 (15-18) stitches. When piece measures 32-34-40-46 (52-56) cm, work in stocking stitch with 3 stitches in garter stitch out towards armhole. When piece measures 34-36-42-48 (54-58) cm, decrease for 2 buttonholes from right side as follows: Knit 1-1-1-2 (3-3), knit 2 together, make 1 yarn over (= 1 buttonhole), knit 2-2-2-4 (5-8), knit 2 together, make 1 yarn over (= 1 buttonhole), finish with 1-2-2-3 (3-3) stitches in garter stitch. Cast off by knitting on next row from wrong side. LEFT SHOULDER: Cast off 1 stitch on every row from neck 3-3-3-4 (4-4) times in total = 8-9-9-13 (15-18) stitches. Continue in stocking stitch with 3 stitches in garter stitch out towards armhole as before until piece measures 34-36-42-48 (54-58) cm in total. Cast off by purling from wrong side. This shoulder is sewn together with left shoulder on back piece later. ASSEMBLY: Sew buttons on to right shoulder on back piece. Sew left shoulder together with grafting/kitchener stitches. NECK EDGE: Worked back and forth. Begin at right shoulder on back piece and pick up 46-70 stitches around the neck from right side. Knit 3 rows, cast off by knitting, make sure to avoid a tight cast-off edge, cast off with 1 larger needle size if needed. |
|||||||||||||||||||||||||
Diagram explanations |
|||||||||||||||||||||||||
|
|||||||||||||||||||||||||

|
|||||||||||||||||||||||||
|
|||||||||||||||||||||||||

|
|||||||||||||||||||||||||

|
|||||||||||||||||||||||||

|
|||||||||||||||||||||||||
|
|||||||||||||||||||||||||

|
|||||||||||||||||||||||||
|
|||||||||||||||||||||||||
|
|||||||||||||||||||||||||
Have you finished this pattern?Tag your pictures with #dropspattern #serafinadress or submit them to the #dropsfan gallery. Do you need help with this pattern?You'll find 28 tutorial videos, a Comments/Questions area and more by visiting the pattern on garnstudio.com. © 1982-2025 DROPS Design A/S. We reserve all rights. This document, including all its sub-sections, has copyrights. Read more about what you can do with our patterns at the bottom of each pattern on our site. |
|||||||||||||||||||||||||


With over 40 years in knitting and crochet design, DROPS Design offers one of the most extensive collections of free patterns on the internet - translated to 17 languages. As of today we count 314 catalogues and 11821 patterns translated into English (UK/cm). 11821
We work hard to bring you the best knitting and crochet have to offer, inspiration and advice as well as great quality yarns at incredible prices! Would you like to use our patterns for other than personal use? You can read what you are allowed to do in the Copyright text at the bottom of all our patterns. Happy crafting!
Post a comment to pattern DROPS Baby 31-17
We would love to hear what you have to say about this pattern!
If you want to leave a question, please make sure you select the correct category in the form below, to speed up the answering process. Required fields are marked *.