
Popular categories
Looking for a yarn?


Comments / Questions (13)
![]() Schopf, Beate wrote:
Schopf, Beate wrote:
Ich habe das Kleid vor ein paar Jahren gestrickt. Bis jetzt hat meine Enkelin es gerne oft getragen. Jetzt ist es zu klein geworden. Nun werde ich es zum zweitenmal in 140 Stricken. Es wird sicher wieder 1-3 Jahre getragen werden.
29.03.2025 - 08:30
![]() Letizia wrote:
Letizia wrote:
Buongiorno!! Se volessi lavorare questo modello in tinta unità (senza motivo jacquard) come devo procedere per lo sprone? Grazie mille
06.02.2023 - 13:05DROPS Design answered:
Buonasera Letizia, può lavorare il motivo con un colore solo rispettando gli aumenti. Buon lavoro!
10.02.2023 - 16:08
![]() Hélène wrote:
Hélène wrote:
Bonjour! À la section « bordure de manches » vous mentionnez « relever en plus 1 maille dans chacune des 8 mailles. Ma question comment relevez-vous ces mailles.? Au plaisir de vous lire,
21.12.2020 - 14:00DROPS Design answered:
Bonjour Hélène, utilisez la technique montrée dans cette vidéo ou bien dans cette leçon, photo 18B. Bon tricot!
21.12.2020 - 14:18
![]() Isabel wrote:
Isabel wrote:
Hallo, ich bin gerade dabei euer schönes Modell zu stricken. In der Anleitung steht, dass das Modell von oben nach unten gestrickt wird, auf den bildern sieht das aber so aus als ob die Tunika von unten nach oben gestrickt wurde. Was ist richtig? Beim Rumpfteil steht, dass 1 Runde links gestrickt wird und dann noch 7 cm glatt rechts. Auf den Bildern sieht das nicht so aus, als ob die Tunika noch so lang wird.
20.12.2020 - 22:16DROPS Design answered:
Liebe Isabel, die Anleitung für diese Tunika wurde von oben nach unten gestrickt - beim Rumpfteil stricken Sie glattrechts mit rot bis Arebit mist 19-22-25-28-31-34 cm ab der Teilung, erst dann A.2 und 7 cm glatt rechts (Bruchkante) stricken. Viel Spaß beim stricken!
21.12.2020 - 08:33
![]() Hélène wrote:
Hélène wrote:
Bonjour, Je tricote présentement votre modèle Lotta mais j’aimerais savoir si vous avez des modèles de chandails pour adolescents soit 14-16ans .? Au plaisir de vous lire
03.11.2020 - 17:48DROPS Design answered:
Bonjour Hélène, nous avons quelques modèles enfant en taille 13/14 ans et d'autres modèles seront en taille XS dans la rubrique adulte. Bon tricot!
04.11.2020 - 08:41
![]() Hélène wrote:
Hélène wrote:
Bonjour, j’ai une autre question en référence au « col « à savoir comment faites-vous les augmentations soit (24) grandeur 9-10. Est-ce un jeté ou une augmentation intercalaire? Merci à l’avance
14.10.2020 - 22:37DROPS Design answered:
Bonjour Hélène, vous pouvez faire un jeté ou augmenter comme vous en avez l'habitude. Bon tricot!
15.10.2020 - 09:05
![]() Hélène wrote:
Hélène wrote:
Bonjour! À la section « col » les augmentations se font-elles en fonction des informations selon votre vidéo « comment répartir des augmentations/diminutions « . Je tricote la grandeur 9/10 donc je dois augmenter de 24 mailles pour un total de 120 mailles. Merci à l’avance.
06.10.2020 - 17:27DROPS Design answered:
Bonjour Hélène, tout à fait les augmentations doivent se faire à intervalles réguliers comme l'explique cette leçon. Bon tricot!
07.10.2020 - 07:59
![]() Birgit Hommes wrote:
Birgit Hommes wrote:
Hallo, habe dieses schöne Modell nachgearbeitet in Gr. 146/152. Leider hatte ich am Ende jeweils ein Knäuel übrig, von rot fast 2. Hier sollte die Anleitung für die Bestellung angepasst werden.
26.01.2020 - 11:46
![]() Mechthild wrote:
Mechthild wrote:
Hallo! Bei der Ärmelblende beschreibt ihr, dass die stillgelegten Maschen auf ein Nadelspiel Nr. 3,5 gelegt werden sollen. Ich vermute, dass sich hier ein Schreibfehler eingeschlichen hat und ihr Nr. 2,5 meint? Liebe Grüße M.
04.06.2019 - 16:02DROPS Design answered:
Liebe Frau Mechtild, Sie sind ja recht, die Ärmelblende wird mit Nadeln 2, 5 gestrickt, eine Korrektur erfolgt gleich. Viel Spaß beim stricken!
06.06.2019 - 09:05
![]() Nathalie wrote:
Nathalie wrote:
Bonjour j’ai une question je suis rendu dos et devant dans le patron il indique de tricoter en jersey et quand l’ouvrage mesure x (depuis la séparation ) que voulez vous dire depuis la séparation? Et que veut dire :rang de cassure ?
04.10.2018 - 04:23DROPS Design answered:
Bonjour Nathalie, la hauteur depuis séparation correspond à la hauteur tricotée uniquement sur le dos et le devant, après avoir mis les mailles des manches en attente. Le rang de cassure est le tour envers que l'on tricote sur l'endroit, on va ensuite replier la bordure au niveau de ce rang et coudre les mailles rabattues sur l'envers -cf vidéo. Bon tricot!
04.10.2018 - 10:24
|
||||||||||
Lotta#lottatunic |
||||||||||
 |
 |
|||||||||
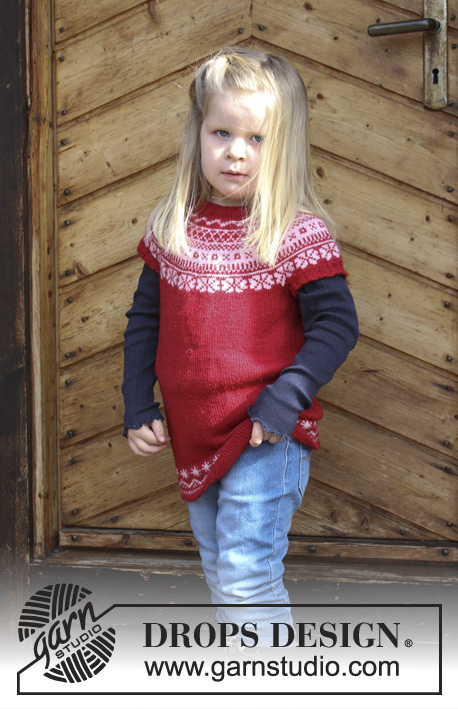
Children’s tunic with round yoke and multi-coloured Norwegian pattern, worked top down. Sizes 2 - 12 years. The piece is worked in DROPS BabyMerino.
DROPS Children 30-8 |
||||||||||
|
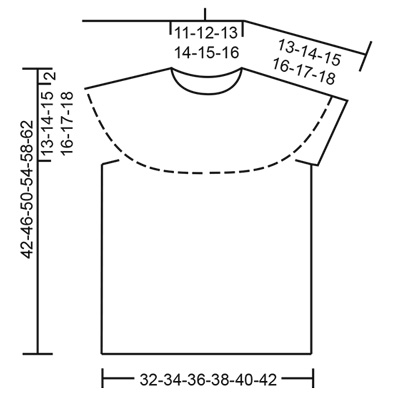
INFORMATION FOR THE PATTERN: PATTERN: See diagrams A.1 and A.2. Choose diagram for your size. KNITTING TIP (for multi-coloured pattern): To avoid the knitting tension becoming tighter when working the pattern, it is important that the strands do not pull at the back of the piece. You can increase a needle size when working pattern if this is a problem. ---------------------------------------------------------- TUNIC: The piece is worked in the round with circular needle, top down. You can work an elevation in the back of the neck to get a better fit, so that the yoke is a little higher in the neck. You can choose to leave out this elevation; the neck will then be the same front and back – see description of elevation further down the page. After the yoke, the body is worked in the round with circular needle. The sleeve edges are worked in the round with double pointed needles, top down. NECKLINE: Cast on 88-88-92-96-96-100 stitches with short circular needle size 2.5 mm and with red. Insert 1 marker at the beginning of the round (= mid back). Work rib (= knit 2 / purl 2) for 1½ cm. Change to circular needle size 3 mm. Knit 1 round where you increase 7-17-18-19-24-25 stitches evenly on round = 95-105-110-115-120-125 stitches. Now work an elevation in the back of the neck or go straight to working the yoke if you do not want an elevation. ELEVATION IN BACK OF NECK: Skip this section if you do not want an elevation. Knit 8 stitches past the marker, turn, tighten strand and purl 16 stitches back. Turn, tighten strand and knit 24 stitches, turn, tighten strand and purl 32 stitches back. Continue working 8 more stitches each time you turn until you have worked over a total of 48-48-48-64-64-80 stitches, turn and knit to mid back. YOKE: Continue by working A.1 (= 19-21-22-23-24-25 repeats in width) and read KNITTING TIP! REMEMBER THE KNITTING TENSION! Change to longer circular needle when necessary. When A.1 has been completed, there are 228-252-264-276-288-300 stitches on the round. Knit 1 round where the number of stitches is adjusted to 236-252-260-280-292-304 stitches, continue with red for 0-1-2-0-1-2 cm. The yoke now measures approx. 13-14-15-16-17-18 cm mid front (measured without the rib in neck). The next round is worked as follows: Work 35-38-39-42-44-46 stitches (= half back piece), place the next 48-50-52-56-58-60 stitches on 1 thread for sleeve edge (without working them), cast on 6-6-8-8-8-8 new stitches (= in side under sleeve), work 70-76-78-84-88-92 stitches (= front piece), place the next 48-50-52-56-58-60 stitches on 1 thread for sleeve edge (without working them), cast on 6-6-8-8-8-8 new stitches (= in side under sleeve), work 35-38-39-42-44-46 stitches (= half back piece). Body and sleeve edges are finished separately. THE PIECE IS NOW MEASURED FROM HERE! BODY: = 152-164-172-184-192-200 stitches. Continue with stocking stitch and red. When the piece measures 19-22-25-28-31-34 cm from the separation, knit 1 round where you increase 0-4-4-0-0-0 stitches evenly on round = 152-168-176-184-192-200 stitches. Work A.2 over all stitches (= 19-21-22-23-24-25 repeats of 8 stitches). Continue with red when A.2 has been completed. Purl 1 round (= the folding round), then work stocking stitch for 7 cm. Cast off. SLEEVE EDGE: Place the stitches from one of the threads on double pointed needles size 2.5 mm and, in addition, knit up 1 stitch in each of the 6-6-8-8-8-8 stitches cast on under the sleeve in red = 54-56-60-64-66-68 stitches. Insert 1 marker in the middle of the 6-6-8-8-8-8 stitches = mid under sleeve. Knit 1 round where you increase 2-0-0-0-2-0 stitches evenly on round = 56-56-60-64-68-68 stitches. Work rib in the round (= knit 2 / purl 2) for 1½ cm, then cast off with knit over knit and purl over purl. Work the other sleeve edge in the same way. ASSEMBLY: Fold the bottom 7 cm on the body in towards the wrong side of the tunic (at the folding round) and fasten neatly with small stitches. |
||||||||||
Diagram explanations |
||||||||||
|
||||||||||

|
||||||||||
|
||||||||||
Have you finished this pattern?Tag your pictures with #dropspattern #lottatunic or submit them to the #dropsfan gallery. Do you need help with this pattern?You'll find 27 tutorial videos, a Comments/Questions area and more by visiting the pattern on garnstudio.com. © 1982-2025 DROPS Design A/S. We reserve all rights. This document, including all its sub-sections, has copyrights. Read more about what you can do with our patterns at the bottom of each pattern on our site. |
||||||||||


With over 40 years in knitting and crochet design, DROPS Design offers one of the most extensive collections of free patterns on the internet - translated to 17 languages. As of today we count 314 catalogues and 11820 patterns translated into English (UK/cm). 11820
We work hard to bring you the best knitting and crochet have to offer, inspiration and advice as well as great quality yarns at incredible prices! Would you like to use our patterns for other than personal use? You can read what you are allowed to do in the Copyright text at the bottom of all our patterns. Happy crafting!
Post a comment to pattern DROPS Children 30-8
We would love to hear what you have to say about this pattern!
If you want to leave a question, please make sure you select the correct category in the form below, to speed up the answering process. Required fields are marked *.