Lotta by DROPS Design

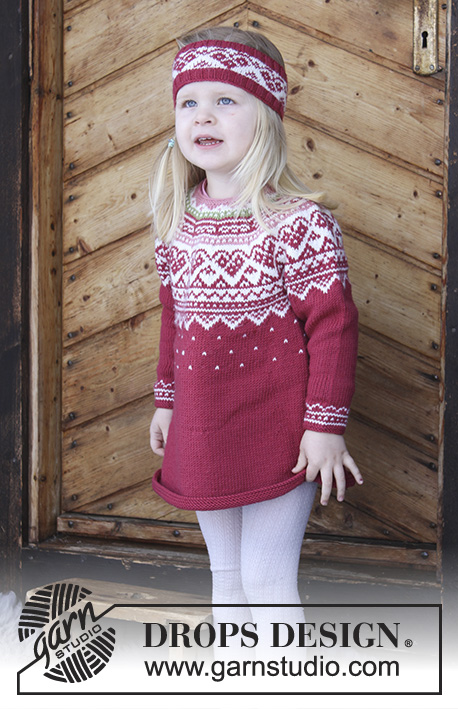
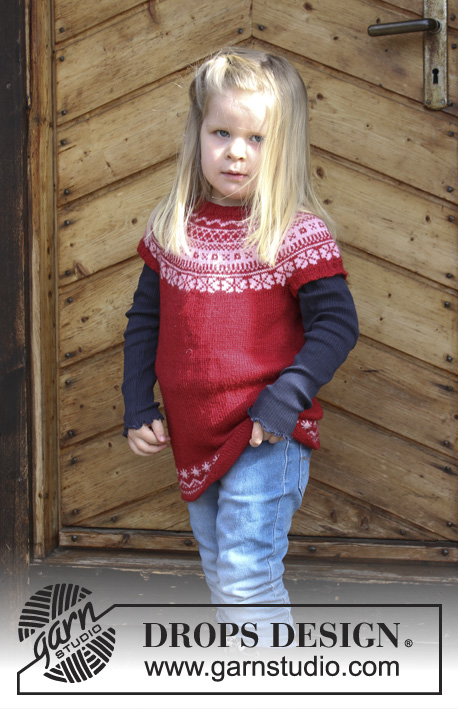
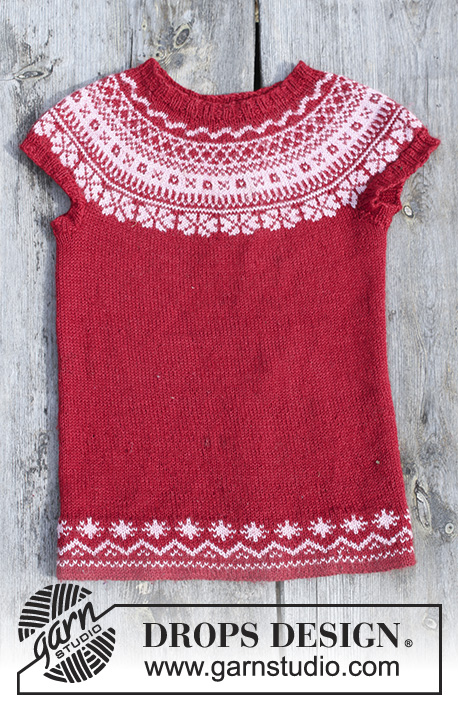
Dětská tunika s kruhovým sedlem a norským vzorem, pletená shora dolů z příze DROPS BabyMerino. Velikost 2 - 12 let.

DROPS Children 30-8
DROPS Design: model č. bm-011-bn
Skupina přízí A
-----------------------------------------------------------
Velikost: 2 - 3/4 - 5/6 - 7/8 - 9/10 - 11/12 let
Velikost v cm: 92 - 98/104 - 110/116 - 122/128 - 134/140 - 146/152
Materiál:
DROPS BABY MERINO firmy Garnstudio (spadá do skupiny přízí A)
150-150-200-200-250-300 g, barva č. 16, červená
50-50-100-100-100-100 g, barva č. 05, světlá růžová

Použitou přízi můžete také nahradit některou ze seznamu:
"Náhradní příze (Skupina přízí A)" – viz link níže.

DROPS KRUHOVÉ JEHLICE (40 + 60 nebo 80 cm) č.3 – nebo velikosti potřebné k upletení zkušebního vzorku o rozměrech 24 ok a 32 řad lícovým žerzejem = 10 cm na šířku a 10 cm na výšku.

DROPS PONOŽKOVÉ JEHLICE a KRUHOVÉ JEHLICE (40 a 60 cm) č.2,5 na lemy - nebo velikosti potřebné k upletení zkušebního vzorku o rozměrech 26 ok a 34 řad lícovým žerzejem = 10 cm na šířku a 10 cm na výšku.

-------------------------------------------------------

Zkušební vzorek – Podívejte se, jak ho měřit a proč
Náhradní příze – Podívejte se, jak změnit přízi
Skupina přízí A až F – Neměňte návod, změňte přízi
Spotřeba příze při použití náhradní příze – Využijte náš převodník

-------------------------------------------------------


100% vlna
od 104.00 Kč /50g
DROPS Baby Merino uni colour DROPS Baby Merino uni colour 104.00 Kč /50g
Ganella
Objednat
DROPS Baby Merino mix DROPS Baby Merino mix 104.00 Kč /50g
Ganella
Objednat
needles Jehlice a háčky Objednat
Přízi na tento model můžete mít už za 416Kč. Více zde.

Návod

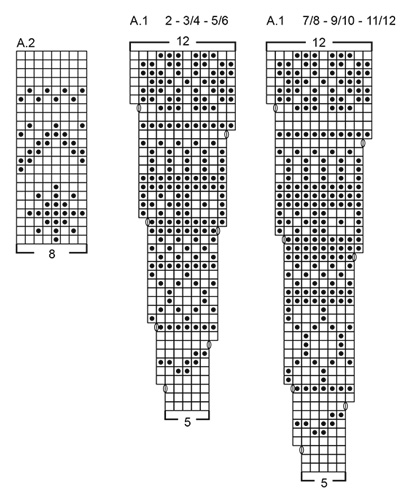
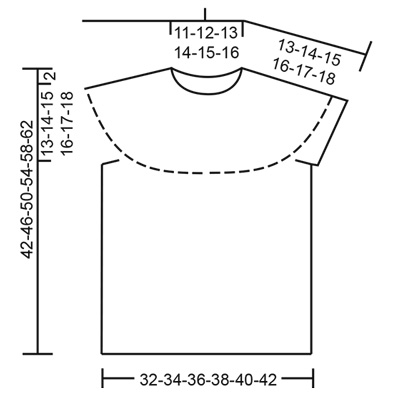
VZOR:
Viz schémata A.1 a A.2. Zvolte si schéma pro požadovanou velikost.

TIP (norský vzor):
Abychom předešli deformování pleteniny v místech s vyplétaným vzorem, dbáme na to, aby vlákna příze tažená za prací nebyla příliš utažená. Pokud má vzor přece jen tendenci příliš se stahovat, použijeme na vyplétání vzoru silnější jehlice.
----------------------------------------------------------

TUNIKA:
Pleteme v kruhových řadách na kruhové jehlici, shora dolů, tj. od průkrčníku k dolnímu okraji.
Aby tunika lépe seděla, můžeme uplést zadní stranu průkrčníku mírně zvýšenou. Pokud se rozhodnete zvýšení průkrčníku vynechat, bude přední a zadní díl stejně vysoký – viz ZVÝŠENÍ zadního průkrčníku níže. Po dokončení sedla pleteme trup v kruhových řadách na kruhové jehlici. Rukávky pleteme v kruhových řadách na ponožkových jehlicích, shora dolů.

LEM PRŮKRČNÍKU:
Na krátkou kruhovou jehlici č.2,5 nahodíme červenou přízí 88-88-92-96-96-100 ok a označíme si začátek kruhové řady (= střed zadního průkrčníku). Pleteme pružným vzorem 2/2 (= střídáme 2 oka hladce, 2 obrace) do výše 1,5 cm. Pak pleteninu převedeme na kruhovou jehlici č.3. Pleteme 1 kruhovou řadu hladce a SOUČASNĚ přidáme rovnoměrně 7-17-18-19-24-25 ok = 95-105-110-115-120-125 ok.
Nyní buď upleteme zvýšení zadní strany, nebo budeme pokračovat rovnou sedlem (bez tvarování průkrčníku).

ZVÝŠENÍ ZADNÍHO PRŮKRČNÍKU:
Pokud průkrčník tvarovat nechcete, pak tuto část vynechejte.
Upleteme hladce 8 ok za značkou, práci otočíme, přízi utáhneme a pleteme obrace 16 ok zpáteční řady. Práci otočíme, přízi utáhneme a upleteme hladce 24 ok, práci otočíme, přízi utáhneme a pleteme obrace 32 ok zpáteční řady. Takto pokračujeme – po každém otočení práce upleteme vždy o 8 ok více, až máme upleteno celkem 48-48-48-64-64-80 ok. Práci otočíme a pleteme zpět ke středu zadního průkrčníku (= ke značce).

SEDLO:
Nyní pleteme vzor A.1 (= v kruhové řadě máme 19-21-22-23-24-25 sekvencí vzoru). Viz TIP! Podle potřeby převedeme pleteninu na delší kruhovou jehlici. Po dokončení celé sekvence vzoru A.1 (na výšku) máme v kruhové řadě 228-252-264-276-288-300 ok. Pleteme 1 kruhovou řadu hladce a SOUČASNĚ upravíme celkový počet ok v kruhové řadě na výsledných 236-252-260-280-292-304 ok. Pak upleteme červenou přízí ještě 0-1-2-0-1-2 cm výšky. Sedlo teď měří asi 13-14-15-16-17-18 cm (měřeno uprostřed přední strany a bez pružného lemu). Následující kruhovou řadu pleteme takto: upleteme 35-38-39-42-44-46 ok (= polovina zadního dílu), následujících 48-50-52-56-58-60 ok odložíme na pomocnou jehlici (oka jen odložíme, nepleteme je! = rukávek), nahodíme 6-6-8-8-8-8 nových ok (= podpaží, bok), upleteme 70-76-78-84-88-92 ok (= přední díl), následujících 48-50-52-56-58-60 ok odložíme na pomocnou jehlici (oka jen odložíme, nepleteme je! = rukávek), nahodíme 6-6-8-8-8-8 nových ok (= podpaží, bok) a upleteme posledních 35-38-39-42-44-46 ok (= polovina zadního dílu). Trup a rukávky dokončíme odděleně.
NYNÍ MĚŘÍME DÍL OD TOHOTO MÍSTA!

TRUP:
= 152-164-172-184-192-200 ok. Pokračujeme červenou přízí lícovým žerzejem. Ve výši 19-22-25-28-31-34 cm od průramků upleteme 1 kruhovou řadu hladce a SOUČASNĚ přidáme rovnoměrně 0-4-4-0-0-0 oka = 152-168-176-184-192-200 ok. Pak pleteme nad všemi oky vzor A.2 (= 19-21-22-23-24-25 sekvencí vzoru po 8 okách). Po dokončení celé sekvence vzoru A.2 (na výšku) pokračujeme červenou přízí. Upleteme 1 kruhovou řadu obrace (= přehyb), pak pleteme 7 cm výšky lícovým žerzejem. Poté všechna oka uzavřeme.

RUKÁVEK:
Odložená oka jednoho rukávku vrátíme z pomocné jehlice zpět na ponožkové jehlice č.3,5 a navíc k nim nabereme červenou přízí po 1 oku z každého z 6-6-8-8-8-8 nově nahozených ok v podpaží = 54-56-60-64-66-68 ok. Doprostřed 6-6-8-8-8-8 nových ok v podpaží vložíme značku = střed vnitřní strany rukávku. Pleteme 1 kruhovou řadu hladce a SOUČASNĚ přidáme rovnoměrně 2-0-0-0-2-0 oka = 56-56-60-64-68-68 ok. Pak pleteme lem pružným vzorem 2/2. Když je lem vysoký 1,5 cm, všechna oka dle vzoru uzavřeme.
Stejným způsobem upleteme i druhý rukávek.

DOKONČENÍ:
Dolní okraj tuniky přeložíme v místě přehybu (= 7 cm od dolního okraje), zahneme do rubu a přišijeme.

Schéma

symbols = červená
symbols = světlá růžová
symbols = 1x nahodíme mezi 2 oky, v následující kruhové řadě pleteme nahození hladce za zadní nit, aby se v pletenině netvořily dírky
diagram
diagram

Potřebujete poradit s tímto návodem?

Děkujeme, že jste si vybrali návod DROPS Design. Zakládáme si na tom, že dáváme k dispozici návody ověřené a snadno srozumitelné. Všechny návody jsou přeložené z norského originálu a tak si můžete kdykoli srovnat rozměry a počty s původním návodem (DROPS Children 30-8) .

Máte s návodem potíže? Níže najdete seznam odkazů, které vám pomohou dokončit vaše dílo co nejdříve - nebo se třeba přiučit něco nového.

signature-image signature

Máte s návodem potíže? Níže najdete seznam odkazů, které vám pomohou dokončit vaše dílo co nejdříve - nebo se třeba přiučit něco nového.

Každý náš návod je doprovázen speciálními video-ukázkami, které vás navedou.

Máme takopodrobné rozpisy různých technik a postupů krok za krokem - najdete je zde.

1) Why is the knitting/crochet tension so important?

Knitting tension is what determines the final measurements of your work, and is usually measured per 10 x 10 cm. It is provided like so: number of stitches in width x number of rows in height - eg: 19 stitches x 26 rows = 10 x 10 cm.

The knitting tension is very individual; some people knit/crochet loosely while others work tightly. You adjust the knitting tension with the needle size, which is why the suggested needle size only serve as a guide! You need to adjust this (up or down) to ensure that YOUR knitting tension matches the knitting tension provided in the pattern. If you work with a different knitting tension than provided you will have a different yarn consumption, and your work will have different measurements than what the pattern suggests.

The knitting tension also determines which yarns can replace each other. As long as you achieve the same knitting tension you can replace one yarn with another.

See DROPS lesson: How to measure your tension/gauge

See DROPS video: How to make a gauge tension swatch

nahoru

2) What are the yarn groups?

All our yarns are categorised into yarn groups (from A to F) according to thickness and knitting tension – group A contains the thinnest yarns and group F the thickest. This makes it easier for you to find alternative yarns to our patterns, should you wish to switch yarn. All yarns within the same group have a similar knitting tension and can easily replace each other. However, different yarn qualities have different structures and properties which will give the finished work a unique look and feel.

Click here for an overview of the yarns in each yarn group

nahoru

3) Can I use a different yarn than what the pattern suggests?

The important thing when changing from one yarn to another is that the knitting/crochet tension remains the same. This is so that the measurements of the finished piece will be the same as on the sketch provided. It is easier to achieve the same knitting tension using yarns from the same yarn group. It is also possible to work with multiple strands of a thinner yarn to achieve the knitting tension of a thicker one. Please try our yarn converter. We recommend you to always work a test swatch.

Please NOTE: when changing yarn the garment might have a different look and feel to the garment in the photo, due to individual properties and qualities of each yarn.

See DROPS lesson: Can I use a different yarn than the one mentioned in the pattern?

nahoru

4) How do I use the yarn converter?

At the top of all our patterns you’ll find a link to our yarn converter, which is a helpful tool should you wish to use a different yarn than suggested. By filling in the yarn quality you wish to replace, the amount (in your size) and number of strands, the converter will present good alternative yarns with the same knitting tension. Additionally it will tell you how much you’ll require in the new qualities and whether you’ll need to work with multiple strands. Most skeins are 50g (some are 25g or 100g).

If the pattern is worked with multiple colours, every colour will have to be converted separately. Similarly, if the pattern is worked with several strands of different yarns (for example 1 strand Alpaca and 1 strand Kid-Silk) you will have to find alternatives for each, individually.

Click here to see our yarn converter

nahoru

5) Why do I get the wrong knitting tension with the suggested needle size?

The needle size provided in the pattern serves only as a guide, the important thing is to follow the knitting tension. And since knitting tension is very individual, you will have to adjust the needle size to ensure that YOUR tension is the same as in the pattern – maybe you’ll have to adjust 1, or even 2 needle sizes, up or down to achieve the correct tension. For this, we recommend that you work test swatches.

Should you work with a different knitting tension than the one provided, the measurements of the finished garment might deviate from the measurement sketch.

See DROPS lesson: How to measure your tension/gauge

See DROPS video: How to make a gauge tension swatch

nahoru

6) Why is the pattern worked top-down?

Working a garment top-down provides more flexibility and room for personal adjustment. For example it is easier to try the garment on while working, as well as making adjustments to length of yoke and shoulder caps.

The instructions are carefully explaining every step, in the correct order. Diagrams are adjusted to the knitting direction and are worked as usual.

nahoru

7) Why are the sleeves shorter in larger sizes?

The total width of the garment (from wrist-to-wrist) will be larger in the larger sizes, despite the actual sleeves being shorter. The larger sizes have longer sleeve caps and wider shoulders, so there will be a good fit in all sizes.

nahoru

8) What is a repeat?

Diagrams are often repeated on the round or in height. 1 repeat is the diagram the way it appears in the pattern. If it says to work 5 repeats of A.1 in the round, then you work A.1 a total of 5 times after/next to each other in the round. If it says to work 2 repeats of A.1 vertically/in height you work the entire diagram once, then begin again at the start and work the entire diagram one more time.

nahoru

9) How do I work according to a knitting diagram?

The diagram depicts all rows/rounds, and every stitch seen from the right side. It is read from bottom to top, from right to left. 1 square = 1 stitch.

When working back and forth, every other row is worked from the right side and every other row is worked from the wrong side. When working from the wrong side, the diagram will have to be worked reversed: from left to right, knit stitches are purled, purl stitches are knit etc.

When working in the round every round is worked from the right side and the diagram are worked from right to left on all rounds.

See DROPS lesson: How to read knitting diagrams

nahoru

10) How do I work according to a crochet diagram?

The diagram depicts all rows/rounds, and every stitch seen from the right side. It is worked from bottom to top, from right to left.

When working back and forth every other row is worked from the right side: from right to left and every other row is worked from the wrong side: from left to right.

When working in the round, every row in the diagram are worked from the right side, from right to left.

When working a circular diagram you start in the middle and work your way outwards, counter clockwise, row by row.

The rows usually start with a given number of chain stitches (equivalent to the height of the following stitch), this will either be depicted in the diagram or explained in the pattern.

See DROPS lesson: How to read crochet diagrams

nahoru

11) How do I work several diagrams simultaneously on the same row/round?

Instructions for working several diagrams after each other on the same row/round, will often be written like so: “work A.1, A.2, A.3 a total of 0-0-2-3-4 times". This means you work A.1 once, then A.2 is worked once, and A.3 is repeated (in width) the number of times provided for your size – in this case like so: S = 0 times, M = 0 times, L=2 times, XL= 3 times and XXL = 4 times.

The diagrams are worked as usual: begin with the first row in A.1, then work the first row in A.2 etc.

See DROPS lesson: How to read knitting diagrams

See DROPS lesson: How to read crochet diagrams

nahoru

12) Why does the piece start with more chain stitches than it’s worked with?

Chain stitches are slightly narrower than other stitches and to avoid working the cast-on edge too tight, we simply chain more stitches to begin with. The stitch count will be adjusted on the following row to fit the pattern and measurement sketch.

nahoru

13) Why increase before the rib edge when the piece is worked top-down?

The rib edge is more elastic and will contract slightly compared to, for example, stocking stitch. By increasing before the rib edge, you avoid a visible difference in width between the rib edge and the rest of the body.

nahoru

14) Why increase in the cast-off edge?

It’s very easy to cast off too tightly, and by making yarn overs while casting off (and simultaneously casting these off) you avoid a too tight cast off edge.

See DROPS video: How to bind off with yarn overs (yo)

nahoru

15) How do I increase/decrease on every 3rd and 4th row/round alternately?

To achieve an even increase (or decrease) you can increase on, for example: every 3rd and 4th row alternately, like so: work 2 rows and increase on the 3rd row, work 3 rows and increase on the 4th. Repeat this until the increase is complete.

See DROPS lesson: Increase or decrease 1 st on every 3rd and 4th row alternately

nahoru

16) Why is the pattern slightly different than what I see in the photo?

Pattern repeats can vary slightly in the different sizes, in order to get the correct proportions. If you’re not working the exact same size as the garment in the photo, yours might deviate slightly. This has been carefully developed and adjusted so that the complete impression of the garment is the same in all sizes.

Make sure to follow instructions and diagrams for your size!

nahoru

17) How can I work a jacket in the round instead of back and forth?

Should you prefer to work in the round instead of back and forth, you may of course adjust the pattern. You’ll need to add steeks mid-front (usually 5 stitches), and follow the instructions. When you would normally turn and work from the wrong side, simply work across the steek and continue in the round. At the end you’ll cut the piece open, pick up stitches to work bands, and cover the cut edges.

See DROPS video: How to knit steeks and cut open

nahoru

18) Can I work a jumper back and forth instead of in the round?

Should you prefer to work back and forth instead of in the round, you may of course adjust the pattern so you work the pieces separately and then assemble them at the end. Divide the stitches for the body in 2, add 1 edge stitch in each side (for sewing) and work the front and back pieces separately.

See DROPS lesson: Can I adapt a pattern for circular needles into straight needles?

nahoru

19) Why do you show discontinued yarns in the patterns?

Since different yarns have different qualities and textures we have chosen to keep the original yarn in our patterns. However, you can easily find options among our available qualities by using our yarn converter, or simply pick a yarn from the same yarn group.

It is possible that some retailers still have discontinued yarns in stock, or that someone has a few skeins at home that they would like to find patterns for.

The yarn converter will provide both alternative yarn as well as required amount in the new quality.

nahoru

20) How do I make a women’s size garment into a men’s size one?

If you have found a pattern you like which is available in women’s size it’s not very difficult to convert it to men’s size. The biggest difference will be the length of sleeves and body. Start working on the women size that you think would fit across the chest. The additional length will be worked right before you cast off for the armhole/sleeve cap. If the pattern is worked top-down you can add the length right after the armhole or before the first decrease on sleeve.

Regarding additional yarn amount, this will depend on how much length you add, but it is better with a skein too many than too few.

nahoru

21) How do I prevent a hairy garment from shedding?

All yarns will have excess fibres (from production) that might come off as lint or shedding. Brushed yarns (ie hairier yarns) have more of these loose, excess fibres, causing more shedding.

Shedding also depends on what is worn under or over the garment, and whether this pulls at the yarn fibres. It’s therefore not possible to guarantee that there will be no shedding

Below are some tips on how to get the best result when working with hairier yarns:

1. When the garment is finished (before you wash it) shake it vigorously so the looser hairs come off. NOTE: do NOT use a lint roller, brush or any method that pulls at the yarn.

2. Place the garment in a plastic bag and put it in your freezer - the temperature will cause the fibres to become less attached to each other, and excess fibres will come off easier.

3. Leave in the freezer for a few hours before taking it out and shaking it again.

4. Wash the garment according to the instructions on the yarn label.

nahoru

22) Where on the garment is the length measured?

The measurement sketch/schematic drawing provides information regarding the full length of the garment. If it’s a jumper or a jacket the length is measured from the highest point on the shoulder closest to the neckline, and straight down to the bottom of the garment. It is NOT measured from the tip of shoulder. Similarly, the length of yoke is measured from the highest point on the shoulder and down to where yoke is split into body and sleeves.

On a jacket measures are never taken along bands, unless specifically stated. Always measure inside band stitches when measuring the length.

See DROPS lesson: How to read a schematic drawing

nahoru

23) How do I know how many balls of yarn I need?

The required amount of yarn is provided in grams, eg: 450 g. To calculate how many balls you’ll need you first need to know how many grams are in 1 ball (25g, 50g or 100g). This information is available if you click on the individual yarn quality on our pages. Divide the amount required with the amount of each ball. For example, if each ball is 50g (the most common amount), the calculation will be as follows: 450 / 50 = 9 balls.

nahoru

Pořídili jste si přízi DROPS na tento model? Pak máte taky právo žádat po svém prodejci, u něhož jste nakoupili, pomoc a rady. Seznam DROPS obchodů najdete tady!
Pořád se nemůžete dobrat odpovědi, kterou hledáte? Pak posuňte stránku dolů a napište nám svůj dotaz, naši specialisté se vám pokusí poradit. Obvykle to zvládneme během 5 až 10 pracovních dnů.. Mezitím si můžete pročíst otázky a odpovědi, které k tomuto modelu položili ostatní, nebo navštívit skupinu DROPS Workshop na Facebooku, kde vám může poradit některá spřízněná duše!

Komentáře / Otázky (12)

country flag Letizia wrote:

Buongiorno!! Se volessi lavorare questo modello in tinta unità (senza motivo jacquard) come devo procedere per lo sprone? Grazie mille

06.02.2023 - 13:05

DROPS Design answered:

Buonasera Letizia, può lavorare il motivo con un colore solo rispettando gli aumenti. Buon lavoro!

10.02.2023 kl. 16:08

country flag Hélène wrote:

Bonjour! À la section « bordure de manches » vous mentionnez « relever en plus 1 maille dans chacune des 8 mailles. Ma question comment relevez-vous ces mailles.? Au plaisir de vous lire,

21.12.2020 - 14:00

DROPS Design answered:

Bonjour Hélène, utilisez la technique montrée dans cette vidéo ou bien dans cette leçon, photo 18B. Bon tricot!

21.12.2020 kl. 14:18

country flag Isabel wrote:

Hallo, ich bin gerade dabei euer schönes Modell zu stricken. In der Anleitung steht, dass das Modell von oben nach unten gestrickt wird, auf den bildern sieht das aber so aus als ob die Tunika von unten nach oben gestrickt wurde. Was ist richtig? Beim Rumpfteil steht, dass 1 Runde links gestrickt wird und dann noch 7 cm glatt rechts. Auf den Bildern sieht das nicht so aus, als ob die Tunika noch so lang wird.

20.12.2020 - 22:16

DROPS Design answered:

Liebe Isabel, die Anleitung für diese Tunika wurde von oben nach unten gestrickt - beim Rumpfteil stricken Sie glattrechts mit rot bis Arebit mist 19-22-25-28-31-34 cm ab der Teilung, erst dann A.2 und 7 cm glatt rechts (Bruchkante) stricken. Viel Spaß beim stricken!

21.12.2020 kl. 08:33

country flag Hélène wrote:

Bonjour, Je tricote présentement votre modèle Lotta mais j’aimerais savoir si vous avez des modèles de chandails pour adolescents soit 14-16ans .? Au plaisir de vous lire

03.11.2020 - 17:48

DROPS Design answered:

Bonjour Hélène, nous avons quelques modèles enfant en taille 13/14 ans et d'autres modèles seront en taille XS dans la rubrique adulte. Bon tricot!

04.11.2020 kl. 08:41

country flag Hélène wrote:

Bonjour, j’ai une autre question en référence au « col «  à savoir comment faites-vous les augmentations soit (24) grandeur 9-10. Est-ce un jeté ou une augmentation intercalaire? Merci à l’avance

14.10.2020 - 22:37

DROPS Design answered:

Bonjour Hélène, vous pouvez faire un jeté ou augmenter comme vous en avez l'habitude. Bon tricot!

15.10.2020 kl. 09:05

country flag Hélène wrote:

Bonjour! À la section « col » les augmentations se font-elles en fonction des informations selon votre vidéo « comment répartir des augmentations/diminutions « . Je tricote la grandeur 9/10 donc je dois augmenter de 24 mailles pour un total de 120 mailles. Merci à l’avance.

06.10.2020 - 17:27

DROPS Design answered:

Bonjour Hélène, tout à fait les augmentations doivent se faire à intervalles réguliers comme l'explique cette leçon. Bon tricot!

07.10.2020 kl. 07:59

country flag Birgit Hommes wrote:

Hallo, habe dieses schöne Modell nachgearbeitet in Gr. 146/152. Leider hatte ich am Ende jeweils ein Knäuel übrig, von rot fast 2. Hier sollte die Anleitung für die Bestellung angepasst werden.

26.01.2020 - 11:46

country flag Mechthild wrote:

Hallo! Bei der Ärmelblende beschreibt ihr, dass die stillgelegten Maschen auf ein Nadelspiel Nr. 3,5 gelegt werden sollen. Ich vermute, dass sich hier ein Schreibfehler eingeschlichen hat und ihr Nr. 2,5 meint? Liebe Grüße M.

04.06.2019 - 16:02

DROPS Design answered:

Liebe Frau Mechtild, Sie sind ja recht, die Ärmelblende wird mit Nadeln 2, 5 gestrickt, eine Korrektur erfolgt gleich. Viel Spaß beim stricken!

06.06.2019 kl. 09:05

country flag Nathalie wrote:

Bonjour j’ai une question je suis rendu dos et devant dans le patron il indique de tricoter en jersey et quand l’ouvrage mesure x (depuis la séparation ) que voulez vous dire depuis la séparation? Et que veut dire :rang de cassure ?

04.10.2018 - 04:23

DROPS Design answered:

Bonjour Nathalie, la hauteur depuis séparation correspond à la hauteur tricotée uniquement sur le dos et le devant, après avoir mis les mailles des manches en attente. Le rang de cassure est le tour envers que l'on tricote sur l'endroit, on va ensuite replier la bordure au niveau de ce rang et coudre les mailles rabattues sur l'envers -cf vidéo. Bon tricot!

04.10.2018 kl. 10:24

country flag Kari wrote:

Takk for svar ang. Lotta tunika. Hvis jeg ikke skal ha mønster hvordan øker jeg for å få 252 masker, når jeg har 105. Er det på hver pinne jeg øker, hvor mange, eller? Beklager at jeg ikke skjønner, men håper på en forklaring. MVH Kari nordstrand

24.06.2018 - 21:10

DROPS Design answered:

Hei Kari, Du kan følge økningene i A.1 uten å strikke mønster. For eksempel, øk med 1 kast om pinnen hver 5. maske på omgang 3 og hver 6. maske på omgang 8 osv. God fornøyelse!

25.06.2018 kl. 06:17

Přidejte komentář k návodu DROPS Children 30-8

Rádi bychom věděli, co si o tomto modelu myslíte!

Pokud se chcete na něco zeptat, dbejte prosím na to, abyste ve formuláři níže vybrali správnou kategorii - díky tomu se dříve dozvíte, co potřebujete vědět. Povinná pole jsou označena *.

Z galerie #dropsfan

Lotta

Helena, Germany

Lotta

Helena, Germany