
Popular categories
Looking for a yarn?


Comments / Questions (43)
![]() Kristina Nilsson wrote:
Kristina Nilsson wrote:
Ska diagram A3/A4/A5 på framstycket upprepas hela tiden eller fortsätter man på varv 3 när man stickat dem en gång.
30.07.2020 - 23:26DROPS Design answered:
Hej Kristina, jeg er ikke sikker på jeg forstår dit spørgsmål... A.3, A.4 og A.5 upprepas från varv 1 framöver. Lycka till
04.08.2020 - 10:39
![]() Sarah wrote:
Sarah wrote:
Pour les diagrammes A3, A4 et A5, comment gérer les petits "bouts" de diagrammes restant en haut pour les torsades à 4 mailles? Doit-on recommencer en bas du diagramme mais en modifiant la partie torsade pour garder la même régularité, ajouter des lignes en fin de diagramme pour inclure ce petit morceau (mais que fait-on sur le reste de la ligne?) ou autre chose encore??
06.04.2020 - 12:58DROPS Design answered:
Bonjour Sarah, les "petits bouts" de diagrammes en hauteur correspondent aux rangs manquants pour répéter ces torsades en hauteur, autrement dit, quand ces diagrammes sont terminés en hauteur, reprenez-les au premier rang, mais continuez les torsades comme avant (= vous devez toujours avoir 5 rangs entre chaque torsade). Bon tricot!
09.04.2020 - 14:15
![]() Kristina Ramberg wrote:
Kristina Ramberg wrote:
Dags att börja sticka fram o bak ihop MEN upptäcker då att jag inte är på samma varv i mönstret a3-a5 på bakstycket som på FRAM! Har jag gjort något fel och var i så fall. Varför ska man börja vid stjärnan på bakstycket en omgång men i te o gång 2? Blir det inte ett konst,ig avbrott mitt i mönstret om jag lägger till två rader innan jag fortsätter med flätorna. Jag förstår inte snälla hjälp mig. Vänlig hälsning kristina
13.09.2019 - 17:38DROPS Design answered:
Hej Kristina, det gör inget att du inte är på samma varv på fram och bakstycke, om annars du har kommit lika långt i cm när du sätter ihop maskorna. Men kan det vara därfor stjärnan viser var du skall börja... ?
02.10.2019 - 12:02
![]() C J wrote:
C J wrote:
Næste spørgsmål er så, når man begynder at tage ud til ærmegab, hvordan skal de udtagne maske strikkes? Jeg kan se at spørgsmålet er stillet før (på svensk), men jeg forstår ikke det svar der gives.
02.09.2019 - 20:02
![]() C J wrote:
C J wrote:
Jeg forstår ikke fortsættelsen efter man har strikket mønster A3, A4 og A5. Jeg går ud fra, at man skal gentage mønsteret, men så får man for mange pinde mellem snoningerne. I mønsteret er der 5 pinde mellem hver snoning. Når man starter forfra på mønsteret vil der komme 7 pinde!
02.09.2019 - 20:01
![]() Kari Frøyland wrote:
Kari Frøyland wrote:
I diagrammet for a.3+4+5 er det en fletterad i hver hvor det er vist 4 rader ekstra i høyden. Betyr det at en rapport for disse radene egentlig består av 6 rader per rapport som egentlig fungerer uavhenging av resten av diagrammet (ikke synkront med diagrammet for resten) - kan det stemme?
21.05.2019 - 19:39
![]() Diana Sinn wrote:
Diana Sinn wrote:
Die äußeren Zöpfe sollen ja im Rhythmus jede 6. Reihe gestrickt werden. Wenn ich aber bei den Schultern nach A 6 + A7 mit der 3. Reihe von A3,4 +5 weiter Stricke, fehlt mir eine Hin- und Rückreihe bei den beiden äußeren Zöpfen. Was mache ich da falsch? Besten Dank im voraus!
22.04.2019 - 16:54DROPS Design answered:
Liebe Frau Sinn, wenn A.6 und A.7 fertig sind, habe Sie 3 Reihen nach dem Zopf gestrickt, wenn Sie dann A.3,4 und 5 stricken, stricken Sie zuerst 2 Reihen dann die Zöpfe = es ind jetzt 5 Reihen zwischen Zöpfen. Viel Spaß beim stricken!
23.04.2019 - 14:46
![]() Marie-Odile SANSAULT wrote:
Marie-Odile SANSAULT wrote:
Bonjour. Lorsque je tricote le premier rang du devant, j'ai un décalage de 2 mailles au passage du diagramme A2 aux diagrammes A3/A4/A5 : j'ai 2 mailles en trop au début de A3, 2 mailles qui manquent à la fin de A3 pour passer à A4, 2 mailles qui manquent à la fin de A4, et 2 mailles en trop pour le passage à A5. Je tricote le modèle XXL et j'ai bien 128 mailles. Avec ce décalage, je ne parviens pas à bien raccorder les motifs. Merci de votre réponse.
09.02.2019 - 20:29DROPS Design answered:
Bonjour Mme Sansault, A.3 se tricote au-dessus des 42 premières m de A.2, A.4 se tricote au-dessus des 2 dernières m de A.2 + les 34 m montées pour l'encolure + les 2 premières m de A.1 (= 38 m) et A.5 se tricote au-dessus des 42 dernières m de A.1. Continuez les 3 m point mousse comme avant au début et à la fin des rangs. Bon tricot!
11.02.2019 - 09:14
![]() Annica Bruce wrote:
Annica Bruce wrote:
I diagram beskrivningen så saknas tecken för 3 av beskrivningarna = mellan 2 maskor görs det 1 omslag om stickan, på nästa varv stickas omslaget vridet så att det inte blir hål = 2 maskor räta tillsammans = sätt 1 maska på flätsticka bakom arbetet, sticka 1 rätmaska, sticka maskan på flätstickan rät Hur ska man göra Med vänlig hälsning, Annica
07.10.2018 - 10:57DROPS Design answered:
Hei Annica. Mener du at det er 3 av symbolene du ikke kan se i symbolforklaringen? Det fungerer helt fint hos oss - vi har sjekket både på PC og mobil. Vi gikk gjennom symbolene, og så at 2 av dem du nevnte (=2 masker rett sammen og = mellom 2 masker lages 1 kast) ikke er brukt i diagrammene. Vi har nå fjernet dem fra symbolforklaringen. Symboldet for = sett 1 maske på flettepinne bak arbeidet, strikke 1 rett, strikk masken på flettepinnen er en sort rettvinklet trekant som går over 2 ruter. Symbolforklaringen skal nå være oppdatert, takk for beskjed og god fornøyelse.
09.10.2018 - 11:06
![]() Sooz 127 wrote:
Sooz 127 wrote:
Hi - I love this design and am using Drops Flora yarn but I've had to go up to size 4/4.5mm needles to get the gauge right which means the knit is a bit 'loose' and looses the effect. Generally my gauge is about right so not sure what I'm doing wrong . Any pointers would be greatly appreciated!
19.06.2018 - 15:15DROPS Design answered:
Dear Sooz127, after you have worked your swatch, wash it as you will wash the garment afterwards, and leave it dry flat. Check then measurements and adjust needle size if necessary - you should get 24 sts x 32 rows in stocking st = 10 x 10 cm. Happy knitting!
19.06.2018 - 15:56
|
||||||||||||||||||||||||||||
Morgan's Daughter#morgansdaughtersweater |
||||||||||||||||||||||||||||
 |
 |
|||||||||||||||||||||||||||
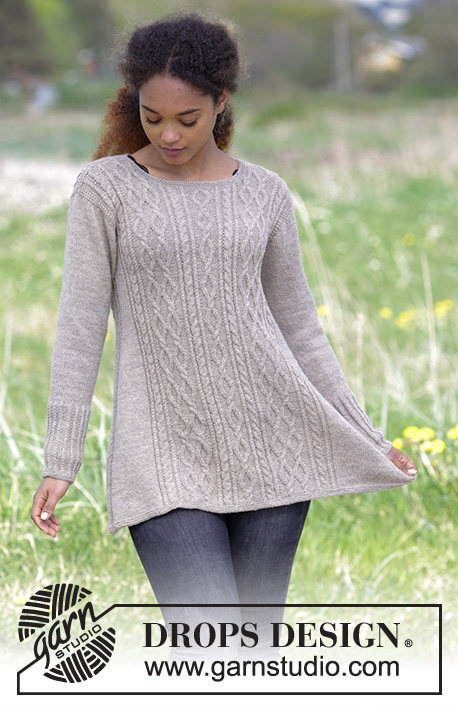
Knitted jumper with cables and A-shape, worked top down. Sizes S - XXXL. The piece is worked in DROPS Flora.
DROPS 179-3 |
||||||||||||||||||||||||||||
|
INFORMATION FOR THE PATTERN: RIDGE/GARTER STITCH (worked back and forth): 1 ridge = Knit 2 rows. RIDGE/GARTER STITCH (worked in the round): 1 ridge = 2 rounds. Knit 1 round and purl 1 round. PATTERN: See diagrams A.1 to A.9. Choose diagram for your size. The diagrams show all the rows in the pattern seen from the right side. INCREASE TIP-1: To work out how to increase evenly, count the total number of stitches to be increased over (e.g. 26 stitches) and divide by the number of increases to be made (e.g. 8) = 3.25. In this example, increase after approx. every 3rd stitch. Increase 1 stitch by making 1 yarn over, on the next row work the yarn overs twisted to prevent holes. INCREASE TIP-2 (for the armholes): All increases are made from the right side! Increase 1 stitch by making 1 yarn over, on the next row (wrong side) purl the yarn overs twisted to prevent holes. INCREASE TIP-3 (for sides of body): Start 4 stitches before the marker thread, make 1 yarn over, work 1 stitch stocking stitch, work A.8 (= 6 stitches, the marker thread sits in the middle of A.8), work 1 stitch stocking stitch, make 1 yarn over (= 2 stitches increased). On the next round, knit the yarn overs twisted to prevent holes. DECREASE TIP (for mid under the sleeve): Start 5 stitches before the marker thread, knit 2 together, work A.8 (= 6 stitches, the marker thread sits in the middle of A.8), slip 1 stitch as if to knit, knit 1, pass the slipped stitch over the knitted stitch (= 2 stitches decreased). ---------------------------------------------------------- JUMPER: The front and back pieces are worked separately back and forth with circular needle and top down. When the increases to armholes have been completed, the pieces are worked together and the body is worked in the round with circular needle to finished length. The sleeves are worked back and forth with short circular needle, top down until the sleeve cap has been completed, then are worked in the round with short circular needle to finished length, but change to double pointed needles when you have decreased enough stitches. LEFT SHOULDER FRONT (when the garment is worn): Cast on 26-26-28-28-30-30 stitches with circular needle size 3 mm and Flora. Knit 1 row from the wrong side, knit 1 row from the right side and knit 1 row from the wrong side. Knit 1 row from the right side where you, at the same time, increase 8 stitches in all sizes evenly on row – read INCREASE TIP-1 = 34-34-36-36-38-38 stitches. Work back from the wrong side with knit 3 edge stitches and purl 31-31-33-33-35-35 stitches. The next row is worked as follows from the right side: Work A.1 (= 31-31-33-33-35-35 stitches) and finish with 3 edge stitches in garter stitch towards the side. Continue the pattern in this way. REMEMBER THE KNITTING TENSION! When you have worked 10 rows in A.1 cast on new stitches to neck at the end of each row from the wrong side as shown in A.1, i.e. cast on 1 stitch 3 times and 2 stitches 3 times = 43-43-45-45-47-47 stitches. When A.1 has been completed, cast on 34 new stitches to neck at the end of the last row from the wrong side = 77-77-79-79-81-81 stitches. The piece measures approx. 8 cm from the cast-on edge. Lay the piece to one side and work right shoulder front as described below. RIGHT SHOULDER FRONT (when the garment is worn): Cast on 26-26-28-28-30-30 stitches with circular needle size 3 mm. Knit 1 row from the wrong side, knit 1 row from the right side and knit 1 row from the wrong side. Knit 1 row from the right side and, at the same time, increase 8 stitches in all sizes evenly on row = 34-34-36-36-38-38 stitches. Work back from the wrong side with purl 31-31-33-33-35-35 stitches and 3 edge stitches in garter stitch. The next row is worked as follows from the right side: Work 3 edge stitches in garter stitch, work A.2 (= 31-31-33-33-35-35 stitches). Continue the pattern in this way. When you have worked 11 rows in A.2 cast on new stitches to neck at the end of each row from the right side as shown in A.2, i.e. cast on 1 stitch 3 times and 2 stitches 3 times = 43-43-45-45-47-47 stitches. When A.2 has been completed, work the right and left shoulders together to the front piece as described below. FRONT PIECE: Place the stitches from the two shoulders on the same circular needle size 3 mm (the 34 stitches cast on to neck on left shoulder front = mid front) = 120-120-124-124-128-128 stitches. The first row is worked as follows from the right side: 3 edge stitches in garter stitch, work A.3 (= 38-38-40-40-42-42 stitches), work A.4 (= 38 stitches), work A.5 (= 38-38-40-40-42-42 stitches) and finish with 3 edge stitches in garter stitch. Continue the pattern in this way and increase to armhole as described below. ARMHOLE: When the piece measures 17-15-16-14-13-13 cm increase 1 stitch in each side to armhole – read INCREASE TIP-2, i.e. increase from the right side after 3 edge stitches in garter stitch at the beginning of the row and before 3 edge stitches in garter stitch at the end of the row. Increase in this way every 2nd row a total of 3-7-7-13-17-21 times, then cast on 3-4-6-6-8-10 new stitches at the end of the next two rows = 132-142-150-162-178-190 stitches and the piece measures approx. 19-20-21-22-24-26 cm from the shoulder down. Lay the piece to one side and work right shoulder back as described below. RIGHT SHOULDER BACK (when the garment is worn): Cast on 26-26-28-28-30-30 stitches with circular needle size 3 mm. Knit 1 row from the wrong side, knit 1 row from the right side and knit 1 row from the wrong side. Knit 1 row from the right side and, at the same time, increase 8 stitches in all sizes evenly on row = 34-34-36-36-38-38 stitches. Work back from the wrong side with knit 3 edge stitches and purl 31-31-33-33-35-35 stitches. The next row is worked as follows from the right side: Work A.6 (= 31-31-33-33-35-35 stitches) and finish with 3 edge stitches in garter stitch towards the side. Continue the pattern in this way. When you have worked 2 rows in A.6 cast on 2 new stitches to neck at the end of the last row from the wrong side as shown in A.6 = 36-36-38-38-40-40 stitches. When you have worked 4 rows in A.6 cast on 48 new stitches to neck at the end of the last row from the wrong side = 84-84-86-86-88-88 stitches. Lay the piece to one side and work left shoulder back as described below. LEFT SHOULDER BACK (when the garment is worn): Cast on 26-26-28-28-30-30 stitches with circular needle size 3 mm. Knit 1 row from the wrong side, knit 1 row from the right side and knit 1 row from the wrong side. Knit 1 row from the right side where you increase, at the same time, 8 stitches in all sizes evenly on row = 34-34-36-36-38-38 stitches. Work back from the wrong side with purl 31-31-33-33-35-35 stitches and 3 edge stitches in garter stitch. The next row is worked as follows from the right side: Work 3 edge stitches in garter stitch, work A.7 (= 31-31-33-33-35-35 stitches). Continue the pattern in this way. When you have worked 3 rows in A.7 cast on 2 new stitches to neck at the end of the last row from the right side as shown in A.7 = 36-36-38-38-40-40 stitches. When A.7 has been completed, work the left and right shoulders together to the back piece as described below. BACK PIECE: Place the stitches from the two shoulders on the same circular needle size 3 mm (the 48 stitches cast on to neck on right shoulder back = mid back) = 120-120-124-124-128-128 stitches. The first row is worked as follows from the right side (start on row 3 in A.3, A.4 and A.5 marked with star): Work 3 edge stitches in garter stitch, work A.3 (= 38-38-40-40-42-42 stitches), work A.4 (= 38 stitches), work A.5 (= 38-38-40-40-42-42 stitches) and finish with 3 edge stitches in garter stitch. Continue the pattern in this way (when A.3, A.4 and A.5 have been completed 1 time in height from row 3, repeat all rows in height to finished length). AT THE SAME TIME increase to armhole as described below. ARMHOLE: When the piece measures 17-15-16-14-13-13 cm increase 1 stitch in each side to armholes – read INCREASE TIP-2, i.e. increase from the right side after 3 edge stitches in garter stitch at the beginning of the row and before 3 edge stitches in garter stitch at the end of the row. Increase in this way every 2nd row a total of 3-7-7-13-17-21 times, then cast on 3-4-6-6-8-10 new stitches at the end of the next two rows = 132-142-150-162-178-190 stitches and the piece measures approx. 19-20-21-22-24-26 cm from the shoulder down. Now work the front and back pieces together as described below. BODY: Place the stitches from the front piece on the needle (without working the stitches), insert 1 marker thread (= in the side), place the stitches from the back piece on the needle and insert 1 marker thread (= in the side) = 264-284-300-324-356-380 stitches. The first round is worked as follows: Work 6-7-9-9-11-13 stitches in garter stitch, 3-7-7-13-17-21 stitches stocking stitch, continue A.3, A.4 and A.5 as before, work 3-7-7-13-17-21 stitches stocking stitch, 12-14-18-18-22-26 stitches in garter stitch (the marker thread sits in the middle of these 12-14-18-18-22-26 stitches), work 3-7-7-13-17-21 stitches stocking stitch, continue A.3, A.4 and A.5 as before, work 3-7-7-13-17-21 stitches stocking stitch and finish with 6-7-9-9-11-13 stitches in garter stitch. Continue the pattern in this way, but when you have worked 2 ridges over the middle 12-14-18-18-22-26 stitches in each side work the next round as follows: NOTE: Start the round 3 stitches before the marker thread in the side, work A.8 (= 6 stitches, the marker thread sits in the middle of A.8), work 6-11-13-19-25-31 stitches stocking stitch, continue A.3, A.4 and A.5 as before, work 6-11-13-19-25-31 stitches stocking stitch, work A.8 (= 6 stitches, the marker thread sits in the middle of A.8), work 6-11-13-19-25-31 stitches stocking stitch, continue A.3, A.4 and A.5 as before and finish with 6-11-13-19-25-31 stitches stocking stitch. Continue the pattern in this way. When the piece measures 32-34-36-38-40-42 cm from the shoulder (approx. 13-14-15-16-16-16 cm from the armhole), increase 2 stitches in each side – read INCREASE TIP-3 (= 4 stitches increased). Increase in this way every 6th round (approx. every 2 cm) to finished length (if the knitting tension is correct in height, this is equivalent to approx. 21 increases in each side). When the piece measures 73-75-77-79-81-83 cm there are approx. 348-368-384-408-440-464 stitches on the needle. On the next round, knit together the stitches in each cable (both the cables with 4 stitches and the cables with 2 stitches) 2 and 2 (just the cables, not the purl sections or the stocking stitch sections) = approx. 294-314-330-354-386-410 stitches. Work 3 RIDGES in the round over all stitches – see description above. Cast off with knit, but to prevent the cast-off edge being tight, you can make 1 yarn over after every 8th stitch at the same time as you cast off (the yarn overs are cast off as normal stitches). The whole jumper measures approx. 74-76-78-80-82-84 cm from the shoulder down. SLEEVE: Cast on 38-40-40-42-48-48 stitches with short circular needle size 3 mm. Work stocking stitch back and forth and cast on new stitches to sleeve cap at the end of each row in each side as follows: Cast on 3 stitches 1 time in all sizes, 2 stitches 2 times in all sizes, 1 stitch 7-8-11-13-14-17 times, 2 stitches 2-2-1-1-1-1 times and 3-4-6-6-8-10 stitches 1 time = 80-86-92-98-110-120 stitches and the piece measures approx. 8-9-10-11-12-14 cm from the cast-on edge and down. Insert 1 marker thread at the beginning of the row (= mid under the sleeve). Continue by working stocking stitch in the round, but over the middle 6 stitches under the sleeve work A.8. When the piece measures 3-3-3-2-2-1 cm from the marker thread decrease 2 stitches mid under the sleeve – read DECREASE TIP. Decrease in this way every 2½-2-1½-1½-1-1 cm a total of 11-14-15-18-22-26 times = 58-58-62-62-66-68 stitches. When the piece measures 30-30-29-29-29-27 cm from the marker thread (shorter measurements in larger sizes because of longer sleeve cap and wider shoulders) knit 1 round where you increase 22-22-23-23-24-22 stitches evenly on round = 80-80-85-85-90-90 stitches. Change to double pointed needles size 2.5 mm. The next round is worked as follows: Continue A.8 over the 6 stitches mid under the sleeve, work A.9A until there are 4 stitches left before A.8 (= 14-14-15-15-16-16 repeats of 5 stitches) and finish with A.9B (= 4 stitches). Continue the pattern in this way. When the cuff measures 12 cm decrease all purl 3 to purl 2, by purling 2 together in each purl section = 64-64-68-68-72-72 stitches. Continue working until the cuff measures 15 cm (the whole sleeve measures approx. 53-54-54-55-56-56 cm from the cast-on edge). On the next round knit together the stitches in each cable 2 and 2 = 48-48-51-51-54-54 stitches. Work 2 ridges in the round. Cast off with knit, but to prevent the cast-off edge being tight, you can cast of with double pointed needles size 3 mm or make 1 yarn over after approx. every 8th stitch as on the body. The sleeve measures approx. 54-55-55-56-57-57 cm from the top down. Work the other sleeve in the same way. ASSEMBLY: Sew the shoulder seams inside the cast-on edge. Knit up approx.116 to 126 stitches around the neck on short circular needle size 2.5 mm. Work 3 ridges and cast off with knit, but to prevent the cast-off edge being tight, you can cast of with short circular needle size 3mm. Sew in the sleeves. |
||||||||||||||||||||||||||||
Diagram explanations |
||||||||||||||||||||||||||||
|
||||||||||||||||||||||||||||

|
||||||||||||||||||||||||||||

|
||||||||||||||||||||||||||||

|
||||||||||||||||||||||||||||

|
||||||||||||||||||||||||||||
Have you finished this pattern?Tag your pictures with #dropspattern #morgansdaughtersweater or submit them to the #dropsfan gallery. Do you need help with this pattern?You'll find 31 tutorial videos, a Comments/Questions area and more by visiting the pattern on garnstudio.com. © 1982-2025 DROPS Design A/S. We reserve all rights. This document, including all its sub-sections, has copyrights. Read more about what you can do with our patterns at the bottom of each pattern on our site. |
||||||||||||||||||||||||||||


With over 40 years in knitting and crochet design, DROPS Design offers one of the most extensive collections of free patterns on the internet - translated to 17 languages. As of today we count 314 catalogues and 11820 patterns translated into English (UK/cm). 11820
We work hard to bring you the best knitting and crochet have to offer, inspiration and advice as well as great quality yarns at incredible prices! Would you like to use our patterns for other than personal use? You can read what you are allowed to do in the Copyright text at the bottom of all our patterns. Happy crafting!
Post a comment to pattern DROPS 179-3
We would love to hear what you have to say about this pattern!
If you want to leave a question, please make sure you select the correct category in the form below, to speed up the answering process. Required fields are marked *.