
Popular categories
Looking for a yarn?


Comments / Questions (13)
![]() Schwörer wrote:
Schwörer wrote:
Werden die Umschläge im gestreiften Teil verschränkt abgestrickt oder nur abgestrickt steht nirgends bei den Tips Mit freundlichen Grüssen Pia Schwörer
12.05.2017 - 10:33DROPS Design answered:
Liebe Frau Schwörer, die Umschläge, die verschränkt gestrikt sind, sind in der Reihe 6, 8, 10 und 12 beschrieben. Viel Spaß beim stricken!
12.05.2017 - 13:45
![]() Heidi Breinlinger wrote:
Heidi Breinlinger wrote:
Achtung. Nach der Handwäsche mit Wollwaschmittel ist das Weisse türkis verfärbt. Ärgerlich!
22.04.2017 - 17:27DROPS Design answered:
Liebe Frau Breilinger, hier finden Sie tipps zur Garnpflege. Mehr Auskünfte bekommen Sie gerne von Ihrem DROPS Laden. Viel Spaß beim stricken!
24.04.2017 - 10:54
![]() Lisa Lebrija wrote:
Lisa Lebrija wrote:
Nu har jeg strikket dette sjal/tørklæde, og jeg må sige kanten med den 1. maske i dobbelt garn og omslag på hver pind i mønsteret er rigtig grim. Kunne den virkelig ikke være gjort på en anden måde?
13.04.2017 - 16:45
|
||||||||||||||||
Shifting Tide#shiftingtideshawl |
||||||||||||||||
 |
 |
|||||||||||||||
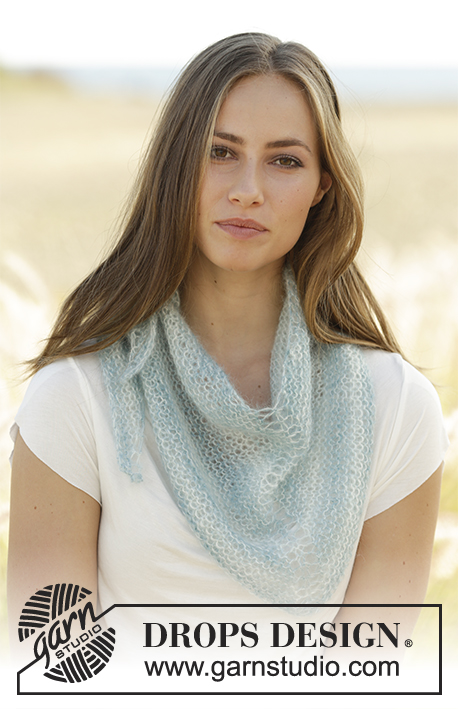
Shawl with garter stitch, stripes and lace pattern, worked in DROPS Fabel.
DROPS 178-33 |
||||||||||||||||
|
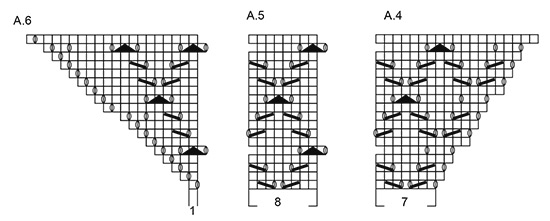
RIDGE/GARTER STITCH (worked back and forth): 1 ridge = knit 2 rows. STRIPES: * 1 ridge (i.e. knit 2 rows) with blue lagoon, 1 ridge with off white *, repeat from *-*. KNITTING TIP: To prevent long lengths of yarn along the sides of the shawl when working stripes, work the outermost stitch in each side (both from the right and the wrong side) with 1 strand off white + 1 strand blue lagoon (= 2 strands). To do this, use the strand both from the inside and the outside of both the balls or make a separate ball in each colour which then follow the shawl along the one side. PATTERN: See diagrams A.1 to A.6. The diagrams show all the rows in the pattern seen from the right side. ---------------------------------------------------------- SHAWL: The shawl is worked first in GARTER STITCH back and forth – see description above, then work lace pattern. Cast on 5 stitches with circular needle size 3.5 mm and off white and work as follows: ROW 1 (= right side): Knit. ROW 2 (= wrong side): Knit 2, 1 yarn over, purl 1, 1 yarn over, knit 2 = 7 stitches. ROW 3 (= right side): Knit 2, 1 yarn over, knit 1, 1 yarn over, knit 1, 1 yarn over, knit 1, 1 yarn over, knit 2 = 11 stitches. Insert 1 marker in the middle stitch (= mid-stitch). ROW 4 (= wrong side): Knit to the mid-stitch, purl the mid-stitch and knit to end of row. Continue by working garter stitch in STRIPES – see description above, with 1 edge stitch in garter stitch in each side, mid-stitch in stocking stitch and increase in each side as follows – READ KNITTING TIP and REMEMBER THE KNITTING TENSION: ROW 5 (= right side): Knit 1 with 1 strand off white + 1 strand blue lagoon (= 2 strands), continue working with 1 strand blue lagoon as follows: 1 yarn over, knit 1, 1 yarn over, Knit to the middle stitch, 1 yarn over, knit 1 (mid-stitch), 1 yarn over, Knit until there are 2 stitches left on the needle, 1 yarn over, knit 1, 1 yarn over, knit 1 with 1 strand off white + 1 strand blue lagoon. ROW 6 (= wrong side): Knit 1 with 2 strands, continue working with 1 strand blue lagoon as follows: knit 2, knit the next yarn over twisted so that there is not a hole, knit to the middle stitch, purl the mid-stitch, knit until there are 4 stitches left on the needle, knit the first yarn over twisted, knit 2 and finish with knit 1 with 2 strands. ROW 7 (= right side): Knit 1 with 2 strands, continue with 1 strand off white as follows: 1 yarn over, knit 1, 1 yarn over, knit to the middle stitch, 1 yarn over, knit 1 (= mid-stitch), 1 yarn over, knit until there are 2 stitches left on the needle, 1 yarn over, knit 1, 1 yarn over and knit 1 with 2 strands. ROW 8 (= short row from the wrong side): Knit 1 with 2 strands, continue with 1 strand off white as follows: knit 2, knit 1 twisted (so there is not a hole), knit 4, turn the piece. ROW 9 (= right side): Slip the first stitch as if to knit, tighten the strand and knit 6 stitches back with off white and knit the last stitch with 2 strands. ROW 10 (= wrong side): Knit 1 with 2 strands, continue with 1 strand off white as follows: knit to the middle stitch, purl the mid-stitch, knit until there are 4 stitches on the needle, knit the first yarn over twisted (so that there is not a hole), knit 2 and finish with knit 1 with 2 strands. ROW 11 (= short row from the wrong side): Knit 1 with 2 strands, knit 7 with off white. ROW 12 (= wrong side): Slip the first stitch as if to knit, tighten the strand and knit 6 stitches back with off white and knit the last stitch with 2 strands. Repeat rows 5 -12 back and forth, but with each repetition work 2 stitches more on the short rows until the short rows have a total of 26 stitches in each side, then work the short rows over these 26 stitches until finished length (the other stitches are continued as before). After each repetition you have increased 12 new stitches. Continue in this way until there are 347 stitches on the needle (the piece now measures approx. 38 cm along the mid-stitch). Work with 1 strand off white, but the outermost stitch in each side is worked in 2 strands off white to finished length. Work 1 ridge back and forth over all stitches with increases in each side and on each side of the mid-stitch as before = 353 stitches on the needle. Continue by working pattern according to diagrams A.1 to A.6 as follows: Work diagram A.1 over 1 stitch, work A.2 until there are 7 stitches left before the mid-stitch, work A.3 over the next 7 stitches, 1 stitch in stocking stitch (= mid-stitch), A.4 over the next 7 stitches, A.5 is repeated until there is 1 stitch left and work A.6 over this 1 stitch. Work and increase in this way until you have worked 2 repeats of A.1 to A.6 in height. Work 2 ridges over all the stitches, then cast off with yarn overs as follows: To make sure the cast-off edge is not tight you can make 1 yarn over after approx. every 4th stitch (the yarn over is cast off as a normal stitch). |
||||||||||||||||
Diagram explanations |
||||||||||||||||
|
||||||||||||||||

|
||||||||||||||||
|
||||||||||||||||
Have you finished this pattern?Tag your pictures with #dropspattern #shiftingtideshawl or submit them to the #dropsfan gallery. Do you need help with this pattern?You'll find 19 tutorial videos, a Comments/Questions area and more by visiting the pattern on garnstudio.com. © 1982-2025 DROPS Design A/S. We reserve all rights. This document, including all its sub-sections, has copyrights. Read more about what you can do with our patterns at the bottom of each pattern on our site. |
||||||||||||||||


With over 40 years in knitting and crochet design, DROPS Design offers one of the most extensive collections of free patterns on the internet - translated to 17 languages. As of today we count 314 catalogues and 11821 patterns translated into English (UK/cm). 11821
We work hard to bring you the best knitting and crochet have to offer, inspiration and advice as well as great quality yarns at incredible prices! Would you like to use our patterns for other than personal use? You can read what you are allowed to do in the Copyright text at the bottom of all our patterns. Happy crafting!
Post a comment to pattern DROPS 178-33
We would love to hear what you have to say about this pattern!
If you want to leave a question, please make sure you select the correct category in the form below, to speed up the answering process. Required fields are marked *.