
Looking for a yarn?


Comments / Questions (143)
![]() Sine wrote:
Sine wrote:
Hej. Hvad betyder dette tegn /\ som ses flere steder i diagrammerne A2, A3 og A4 - ses over fastmasker (2. omgang). Er det to luftmasker imellem de to fastmasker? Mvh Sine
04.03.2019 - 16:50
![]() Monika wrote:
Monika wrote:
Proszę pomóc mi rozmieścić pierwszy rząd schematu A2 i A1 w karczku jak najprościej .jestem początkująca w rozczytywaniu schematów ,dziękuję
24.02.2019 - 13:51DROPS Design answered:
Witaj Moniko, musisz trzymać się dokładnie opisu: "umieścić 1-szy marker na początku okrążenia, przer. A.2 ponad 4 pierwszymi sł, umieścić 2-gi marker,…” itd. Wskazówki ogólne: gdy przerabiamy na okrągło, każdy rząd w schemacie jest przerabiany na prawej stronie robótki, od prawej do lewej strony. Gdy przerabiamy schemat kołowy (jak np. A.2), zaczynamy przerabiać od środka i dalej przerabiamy na boki, przeciwnie do ruchu wskazówek zegara, rząd po rzędzie. Wkrótce na naszej stronie dodany zostanie nowy kurs dotyczący tego zagadnienia. W razie problemów skontaktuj się ze sklepem, w którym kupiłaś włóczkę. Powodzenia!
25.02.2019 - 08:26
![]() Eva Thieme wrote:
Eva Thieme wrote:
Zu meiner Frage: ich häkle Größe M.
23.02.2019 - 21:46
![]() Eva Thieme wrote:
Eva Thieme wrote:
Bis zur 6.Runde sind die Reihen in A2 und A1 praktisch gleich. Ab der 7.Runde sind sie in A2 und A1 verschieden (da ja A2 weitergehäkelt werden soll, währen A1 doch wieder von vorn beginnt). Sehe ich das so richtig? Es entsteht dadurch natürlich ein anderes Bild als in den ersten 6 Runden. Für eine Erklärung wäre ich dankbar!
23.02.2019 - 21:19DROPS Design answered:
Leibe Frau Thieme, in A.1 und A.2 häkeln Sie die Maschen genauso gleich, aber in A.2 wird es zugenommen und A.1 wird übereinander gehäkelt (in A.1 nehmen Sie je nach der Größe bei den Stb-Reihen zu, es wird aber ziemlich gleich sein). Sie können Markierer zwischen jedem Diagram einszetzen, so folgen Sie die beiden Diagramme besser. Vile Spaß beim häkeln!
25.02.2019 - 09:37
![]() Doris wrote:
Doris wrote:
Hallo Soll man nur zwischen den 2 Makierer mit den 4 Stäbchen immer A2 häkeln? Das wären dann ja 4xA2 und den Rest A1. Nur dann komm ich auf 216 Maschen und nicht auf 240! Mit freundlichen Grüßen Doris
17.09.2018 - 09:26DROPS Design answered:
Liebe Doris, ja genau, A.2 wird zwischen den Markierungen gehäkelt, dh 4 Mal insgesamt in der Runde. Bei der letzten Reihe in A.2 haben Sie 36 Stb in jedem A.2, dann haben Sie: A.2 (=36 Stb), A.1 (= 12 Stb), A.2 (= 36 Stb), A.1 (= 36 Stb), A.2 (= 36 Stb), A.1 (= 12 Stb), A.2 (= 36 Stb), A.1 (= 36 Stb) = 240 Stb. Viel Spaß beim häkeln!
17.09.2018 - 09:52
![]() Doris wrote:
Doris wrote:
Hallo, in der dritten Reihe soll man A2 über die 4Stb häkeln???Ist damit gemeint das man 3Luftmaschen 1 Stäbchen und wieder 3Luftmaschen häkeln soll??? Mit freundlichen Grüßen Doris
16.09.2018 - 19:12DROPS Design answered:
Liebe Doris, bei der 1. Reihe häkeln Sie A.2 über 4 Stb, bei den nächsten Reihe in A.2 häkeln Sie einfach wie im A.2 beschrieben, dh bei der 3. Reihe: 1 fM in das Stb, dann 3 Stb, 2 Lm, 3 Stb um die 2-Lm-Bogen. Am besten können Sie Markierungen zwischen jedem Rapport (Diagrma) einsetzen, es wird so einfacher die Diagramme zu folgen. Viel Spaß beim häkeln!
17.09.2018 - 09:29
![]() Carrie wrote:
Carrie wrote:
Hi, same question I just asked, where do I add the 6 extra stitches and what kind of stitch am I adding? Do you add all 6 in one area? Is there a video tutorial with this pattern that might help?
27.07.2018 - 14:28DROPS Design answered:
Dear Carrie, on round 5 you are working dc (see diagram), you will increase 6 sts evenly between the markers as explained - read how to increase evenly here. Happy crocheting!
27.07.2018 - 15:33
![]() Carrie wrote:
Carrie wrote:
I am on round 5 working sz XL. Can you please explain how I am supposed to increase between stitch markers? I thought I was supposed to follow the diagram stitches... Where do I add extra stitches to increase? I really want to make this pattern but it is very confusing! Such a beautiful sweater, please help! :)
27.07.2018 - 06:24DROPS Design answered:
Dear Carrie, you are right, you are supposed to follow the diagram stitches, but at the same time, you will increase evenly 6 sts between 2nd and 3rd marker and 6 sts between 6th and 7th marker = there are now 18 sts between 2nd/3rd and between 6/7th marker and you can now repeat A.1 a total of 3 times in width between these markers. Happy crocheting!
27.07.2018 - 10:02Bev wrote:
I have worked the first rounds up to the round (3) where the 8 stitch markers are placed. There are no further instructions as to how to continue the pattern. The next instructions for XL are for row 6. I do not know how to continue with the pattern - A1, A2 or A3 or should I proceed with A1 and A2 as was given for the row for the stitch marker placement 2 repeats of A1 and 1 repeat of A2? Please could you help as I was enjoying the pattern so far. Thank you.
28.05.2018 - 18:20DROPS Design answered:
Dear Bev, continue working in pattern as stated before working to row 5 included as shown in diagrams. Then on row 6, increase evenly as explained. Happy crocheting!
29.05.2018 - 08:46
![]() Ingun wrote:
Ingun wrote:
Ich liebe diesen Pullover und würde ihn wirklich gerne nacharbeiten. Aber ich kann Häkelschriften einfach nicht lesen. Es wäre schön, wenn es hierzu auch eine Video-Tutorial geben würde.
20.05.2018 - 08:33
|
||||||||||||||||||||||||||||
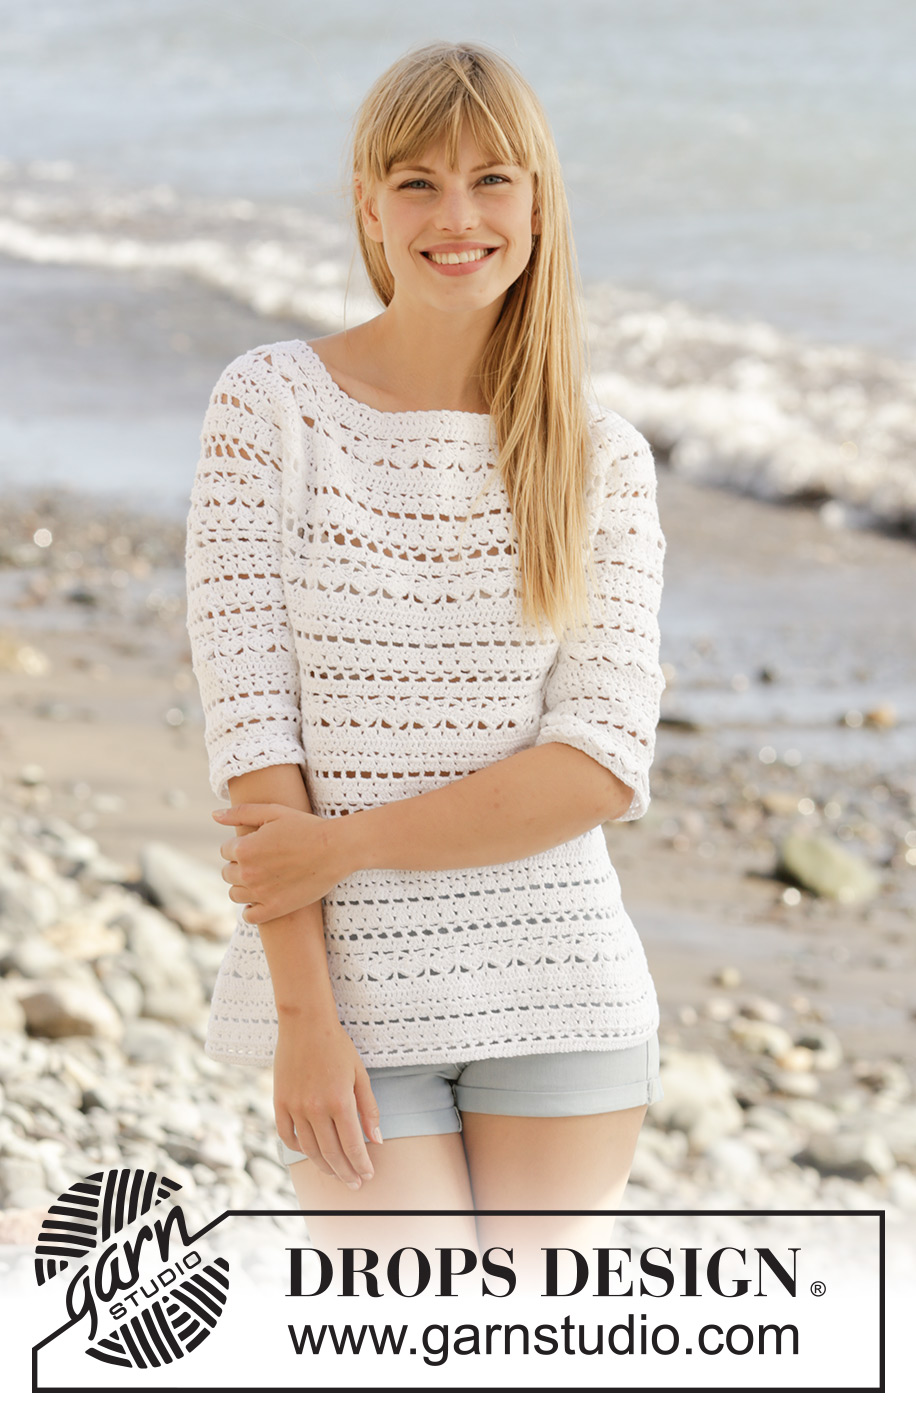
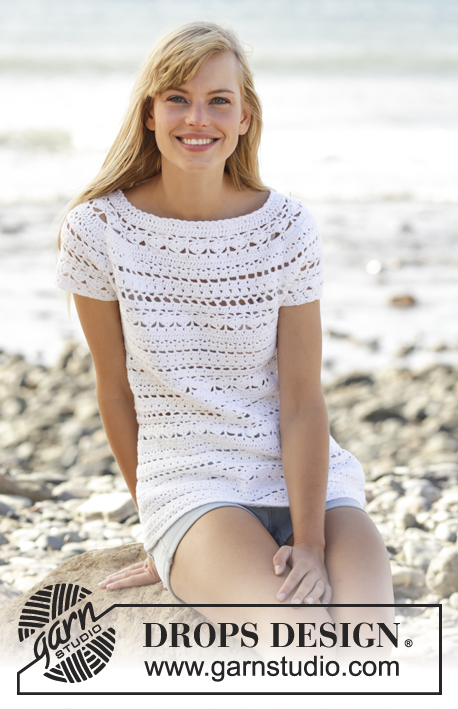
Seashore Bliss#seashoreblisssweater |
||||||||||||||||||||||||||||
|
|
||||||||||||||||||||||||||||
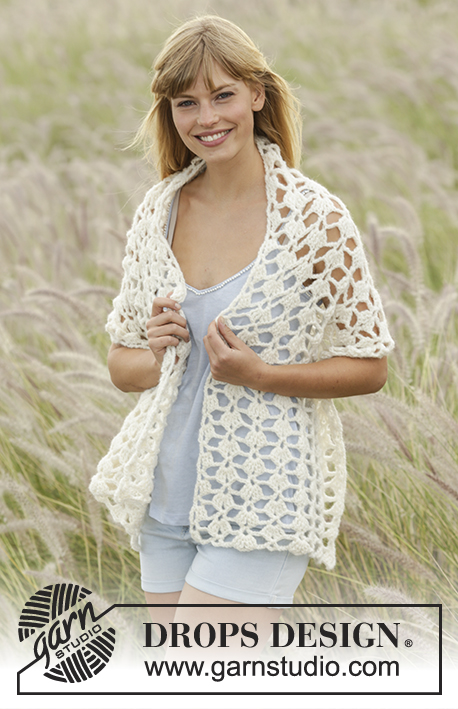
Crochet DROPS jumper with lace pattern and round yoke in ”Muskat”. The piece is worked top down. Size: S - XXXL.
DROPS 169-15 |
||||||||||||||||||||||||||||
|
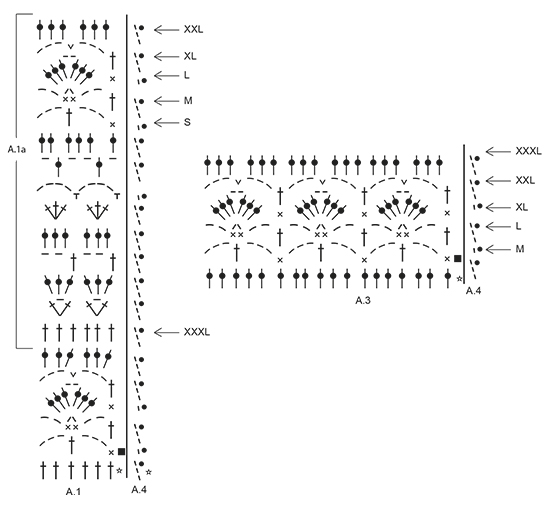
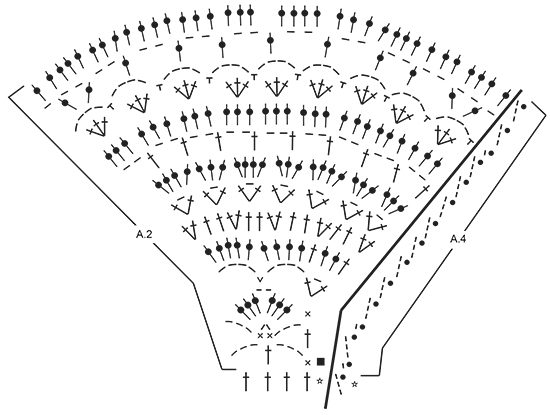
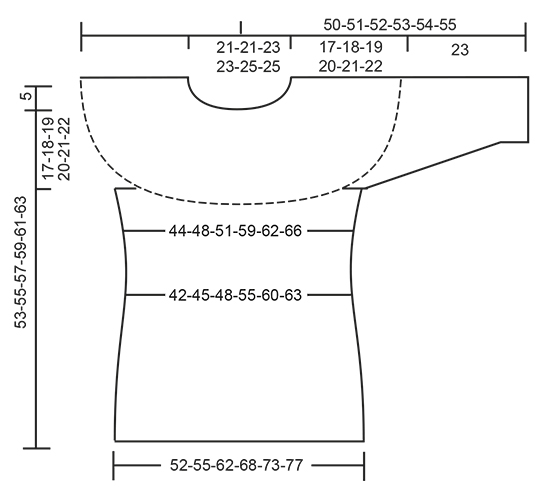
PATTERN: See diagrams A.1 to A.4. Diagram A.4 shows how round beg and ends. CROCHET INFO: Replace first tr at beg of every tr round with 3 ch. Finish round with 1 sl st in 3rd ch at beg of round. Replace first dc at beg of every dc round with 1 ch. Finish every round with 1 sl st in ch from beg of round. INCREASE TIP: Inc 1 tr by working 2 tr in same tr. DECREASE TIP: Dec 1 tr by working 2 tr tog as follows: Work 1 tr but wait with last pull through (= 2 sts on hook), then work next tr but on last pull through, pull yarn through all 3 sts on hook. TIP ARMHOLE: Size S, M and XL: In the last repeat of A.1 before marker 1 and marker 3 (= beginning of armhole), replace the last chain stitch with a treble crochet in the last stitch of the same repeat on previous row. ---------------------------------------------------------- JUMPER: The piece is worked top down. NOTE: It is important to keep the crochet tension vertically so that the measurements on yoke will be correct. YOKE: Work 108-108-117-117-124-124 ch on hook size 4 mm with Muskat and form 1 ring with 1 sl st in first ch. Work first round as follows: Work 3 ch (= 1 tr) - READ CROCHET INFO, 1 tr in each of the next 3-3-5-5-5-5 ch, * skip 1 ch, 1 tr in each of the next 6 ch *, repeat from *-* the entire row = 94-94-102-102-108-108 tr. Work 1 round with 1 tr in every tr and inc 18-18-22-22-28-40 tr evenly - READ INCREASE TIP = 112-112-124-124-136-148 tr. Work next round and insert 8 markers in the piece as follows: A.4 shows how round beg and ends. Insert 1st marker at beg of round, work A.2 over the first 4 tr, insert 2nd marker, A.1 over the next 12 tr (= 2 times in width), insert 3rd marker, A.2 over the next 4 tr, insert 4th marker, work A.1 over the next 36-36-42-42-48-54 tr (= 6-6-7-7-8-9 times in width), insert 5th marker, A.2 over the next 4 tr, insert 6th marker, A.1 over the next 12 tr (= 2 times in width), insert 7th marker, A.2 over the next 4 tr, insert 8th marker, A.1 over the last 36-36-42-42-48-54 tr (= 6-6-7-7-8-9 times in width). REMEMBER THE CROCHET TENSION! SIZE XXL-XXXL: On 5th round (round with tr) in A.1 inc evenly as follows: Between 2nd and 3rd marker and 6th and 7th marker: Inc 6-6 tr. 12-12 tr have been inc in total on round (= 18-18 tr between 2nd and 3rd marker and 6th and 7th marker). Repeat A.1 3-3 times between 2nd and 3rd marker and between 6th and 7th marker: ALL SIZES: On 6th round (round with tr) in A.1 inc evenly as follows: Between 2nd and 3rd marker and 6th and 7th marker: Inc 0-0-6-6-6-6 tr (= 12-12-18-18-24-24 tr between these markers). Between 4th and 5th marker and 8th and 1st marker: Inc 0-6-6-6-6-6 tr (= 36-42-48-48-54-60 tr between each of these markers). Then repeat diagram A.1 2-2-3-3-4-4 times between 2nd and 3rd marker, 6-7-8-8-9-10 times between 4th and 5th marker, 2-2-3-3-4-4 times between 6th and 7th marker and 6-7-8-8-9-10 times between 8th and 1st marker. Work A.2 as before. SIZE XL-XXL-XXXL: On 8th round (round with tr) in A.1 inc evenly as follows: Between 4th and 5th marker and 8th and 1st marker: Inc 6-6-6 tr (= 54-60-66 tr between each of these markers). 12-12-12 tr have been inc in total on round. Repeat A.1 9-10-11 times between 4th and 5th marker and between 8th and 1st marker. Repeat inc on 10th round in A.1 (= 60-66-72 tr between each of these markers). Repeat diagram A.1 10-11-12 times between 4th and 5th marker and between 8th and 1st marker. ALL SIZES: On last round in A.2 insert 1 new marker in the middle of each A.2 (i.e. 18 tr on each side of marker in A.2 = 4 markers). Remove the old markers (= 4 markers remain in piece). Sts between markers are for sleeves (= 48-48-54-54-60-60 tr on each sleeve). When A.2 has been worked 1 time vertically, there are 240-252-276-300-324-336 tr on round. Yoke is now done in size S. SIZE M-L-XL-XXL-XXXL: Continue with pattern A.1 as before but over tr in A.2 (= 36 tr) work A.3 2 times in total in width (marker is in the middle of these repetitions). Work 1-2-3-4-5 rounds of A.3 (see arrow in diagram for correct size). Piece now measures 17-18-19-20-21-22 cm vertically. ALL SIZES: Work A.1a (see arrow on where pattern beg in the different sizes) 3 times in total in width until first marker - SEE ARMHOLE TIP, work 8-8-8-10-10-10 ch, skip sts between the 2 markers (= sleeve), work A.1a 12-13-14-16-17-18 times in total in width until next marker (= front piece), work 8-8-8-10-10-10 ch, skip sts between the 2 markers (= sleeve), work A.1a 9-10-11-13-14-15 times in total in width (= 160-172-184-212-224-236 sts). Fasten off. BODY: Beg round mid under sleeve as follows: Size S-L: Work 1 sl st in 5th ch, 1 ch, work 1 dc in each of the next 3-3 ch, work A.1a as before until ch under 2nd sleeve, 1 dc in each of the 8-8 ch under sleeve, work A.1a as before the rest of round. Work the 8-8 sts under each sleeve as 1st st in A.1a. SIZE M-XL-XXL-XXXL: Work 1 sl st in 5th ch, 3 ch, work 1 tr in each of the next 3-5-5-5 ch, work A.1a as before until ch under 2nd sleeve, 1 tr in each of the 8-10-10-10 ch under sleeve, work A.1a as before the rest of round. Work the 8-10-10-10 sts under each sleeve as 1st st in A.1a. ALL SIZES: Insert 1 marker in piece, NOW MEASURE PIECE FROM HERE. On first round with tr dec 4-4-4-2-2-2 tr evenly - READ DECREASE TIP = 156-168-180-210-222-234 tr. Then repeat A.1a 26-28-30-35-37-39 times in width. Repeat A.1a vertically. When piece measures 12 cm, adjust so that next round is with tr, dec 6 tr evenly = 150-162-174-204-216-228 tr. Now repeat A.1a 25-27-29-34-36-38 times in width. SIZE XL: Repeat dec when piece measures 16 cm from marker = 198 tr. Now repeat A.1a 33 times in width. ALL SIZES: When piece measures 20-21-22-23-24-25 cm from marker – adjust so that next round is with tr, inc 6 tr evenly. Repeat inc every 2-2-1½-1½-1½-1½ cm 5-5-7-7-7-7 more times = 186-198-222-246-264-276 tr. Repeat A.1a 1 more in width on every inc. When all inc are done, repeat A.1a 31-33-37-41-44-46 times in width. Work until piece measures 36-37-38-39-40-41 cm from marker, adjust to finish nicely according to pattern. Fasten off. SLEEVE: SIZE S: Beg by working mid under sleeve as follows: Work 1 sl st in 4th ch of the 8 ch worked in armhole on body. Work 1 ch (= 1 dc). Then work 1 dc in each of the next 4 ch, work A.3 over the next 18 tr, work A.1 (adjust pattern according to A.3) 2 times in total in width as before, work A.3 over the next 18 tr, finish with 1 dc in each of the last 3 ch. Work as 1st st in A.3 in the 8 sts under sleeve. When A.3 has been worked 1 time vertically, there are 56 tr on last round. SIZE M-XL-XXL: Beg by working mid under sleeve as follows: Work 1 sl st in 4th ch of the 8-10-10 ch worked in armhole on body. Work 3 ch (= 1 tr). Then work 1 tr in each of the next 4-6-6 ch, work A.3 as before, work A.1 (adjust pattern according to A.3) 2-3-4 times in total in width as before, work A.3, finish with 1 tr in each of the last 3 ch. Work as 1st st in A.3 in the 8-10-10-10 tr under sleeve. When A.3 has been worked 1 time vertically, there are 56-64-70 tr on last round. SIZE L: Beg by working mid under sleeve as follows: Work 1 sl st in 4th ch of the 8 ch worked in armhole on body. Work 1 ch (= 1 dc). Then work 1 dc in each of the next 4 ch, work A.3 as before, work A.1 (adjust pattern according to A.3) 3 times in total in width as before, work A.3, finish with 1 dc in each of the last 3 ch. Work as 1st st in A.3 in the 8 tr under sleeve. When A.3 has been worked 1 time vertically, there are 62 tr on last round. SIZE XXXL: Beg by working mid under sleeve as follows: Work 1 sl st in 4th ch of the 10 ch worked in armhole on body. Work 3 ch (= 1 tr). Then work 1 tr in each of the next 6 ch, work A.1a over the next 60 tr, finish with 1 tr in each of the last 3 ch = 70 tr. ALL SIZES: = 56-56-62-64-70-70 tr. Repeat A.1a vertically until finished measurements. On first round with tr dec 2-2-2-4-4-4 tr evenly = 54-54-60-60-66-66 tr. Repeat A.1a 9-9-10-10-11-11 times in total in width. When piece measures 10 cm, adjust so that next round is with tr, dec 6 tr evenly = 48-48-54-54-60-60 tr. Then repeat A.1a 8-8-9-9-10-10 times in width. When piece measures 23 cm, adjust to finish nicely according to pattern, fasten off. Work another sleeve the same way. NECK EDGE: Crochet an edge around the neck. Beg mid back. Work * 1 dc in first tr, 3 ch, skip approx. 1 cm *, repeat from *-* around the entire neck. Make sure to avoid a tight neck edge, adjust to finish with 1 sl st in first ch. Fasten off. |
||||||||||||||||||||||||||||
Diagram explanations |
||||||||||||||||||||||||||||
|
||||||||||||||||||||||||||||
 |
||||||||||||||||||||||||||||
 |
||||||||||||||||||||||||||||
 |
||||||||||||||||||||||||||||
Have you finished this pattern?Tag your pictures with #dropspattern #seashoreblisssweater or submit them to the #dropsfan gallery. Do you need help with this pattern?You'll find 10 tutorial videos, a Comments/Questions area and more by visiting the pattern on garnstudio.com. © 1982-2025 DROPS Design A/S. We reserve all rights. This document, including all its sub-sections, has copyrights. Read more about what you can do with our patterns at the bottom of each pattern on our site. |
||||||||||||||||||||||||||||


With over 40 years in knitting and crochet design, DROPS Design offers one of the most extensive collections of free patterns on the internet - translated to 17 languages. As of today we count 320 catalogues and 12093 patterns translated into English (UK/cm). 12093
We work hard to bring you the best knitting and crochet have to offer, inspiration and advice as well as great quality yarns at incredible prices! Would you like to use our patterns for other than personal use? You can read what you are allowed to do in the Copyright text at the bottom of all our patterns. Happy crafting!
Post a comment to pattern DROPS 169-15
We would love to hear what you have to say about this pattern!
If you want to leave a question, please make sure you select the correct category in the form below, to speed up the answering process. Required fields are marked *.