Comments / Questions (90)
![]() Vivi Pedersen wrote:
Vivi Pedersen wrote:
Skal der være 312m når jeg har hæklet mønster A.4?
28.05.2018 - 22:00DROPS Design answered:
Hej Vivi, ja du har samme antal masker i første og sidste omgang af A.4. God fornøjelse!
29.05.2018 - 16:11
![]() Vivi Pedersen wrote:
Vivi Pedersen wrote:
Er de ikke en fejl i diagram A.4 -+ 2. Linje. Ifølge symbolforklar8nf skal der hækles 3 masker sammen, men er det ikke kun 2 masker der skal hækles. Sammen. Eller Kanegårdsvej ikke få det til at stemme
27.05.2018 - 18:18DROPS Design answered:
Hej Vivi, du hækler alle 3 st i samme maske, men trækker sidste omslag igennem alle masker på nålen så du slutter med 1 maske, dvs du slutter med samme antal masker som du startede med. God fornøjelse!
30.05.2018 - 13:32
![]() Vivi Pedersen wrote:
Vivi Pedersen wrote:
Jeg synes jeg mangler en diagrmforklaring på det omvendte v der første gang er i mønster A2
23.05.2018 - 22:42DROPS Design answered:
Hei Vivi. Du har helt rett i at det ser ut som det mangler - dette fordi symbolet var ganske forskjellig fra sånn det ser ut i diagrammet. Dette har nå blitt endret på, så nå er symbolene identiske. Definisjonen er som følger: Hekle 2 st til 1 st slik: Hekle 1 st, men vent med siste gjennomtrekning (= 2 m på nålen), hekle deretter neste st, men ved siste gjennomtrekning trekkes tråden gjennom alle m på nålen. Takk for beskjed og god fornøyelse.
25.05.2018 - 14:51
![]() Isabelle wrote:
Isabelle wrote:
Bonjour, je suis arrivée aux emmanchures en taille XXL. J'ai bien 264 m à la fin du tour avec la flèche. Quand je crochète le tour suivant donc des emmanchures, il me reste 20 m et en comptant : crocheter 38m, sauter 44m, crocheter 82m, sauter 44m et crocheter 38m = 246 m et non 264. Pourriez-vous m'aider? Où est mon erreur? Je suppose également que le tour des émanchures se crochète avec le dessin du diagramme. Ce n'est pas très clair. Merci pour votre réponse.
08.05.2018 - 06:51DROPS Design answered:
Bonjour Isabelle, avant la 2ème emmanchure vous devez crocheter jusqu'à ce qu'il reste 82 m avant la fin du tour (= et pas 82 m entre les 2 emmanchures), et terminer en sautant 44 m, crochetez 44 ml et les 38 dernières mailles du tour. Bon crochet!
08.05.2018 - 09:02
![]() Parvathi Natarajan wrote:
Parvathi Natarajan wrote:
In L/XL size, when I start the left Front piece and I skip 16 dcs from the beg of previous rnds, it seems to be at Armhole level. I think its because the beginning of the round has shifted with the slip sts in the prior rnds. Is this normal?A lso, when I skip 32 dcs for the right front side, its not at the same level as the left front side. Only when I skip around 38 dcs and start the right front, it matches, but I have less dcs on the bottom. Is that okay?
22.03.2018 - 22:07DROPS Design answered:
Dear Mrs Natarajan, make sure both front pieces are mirrored, you should have 16 dc unworked for collar (top of jacket) and 32 dc unworked for bottom edge of jacket. Fold the jacket double in the middle, check that armholes matching and ajust if necessary. Happy crocheting!
26.03.2018 - 10:07
![]() Mette Hansen wrote:
Mette Hansen wrote:
Jeg hækler jakken I str. L/XL...alt passer til og med ærmegab. Men hvordan skal man komme fra 252m til 312m når der ingen udtagninger er? Jeg er lige ved at opgive :-( Hvad forskel er der på a2 og a3? Hvor skal a3 laves ift a2?
11.03.2018 - 18:33DROPS Design answered:
Hej Mette, jo når du fortsætter med A.2 og A.3 så tager du automatisk ud ifølge diagrammerne. Udtagningerne er tegnet ind i diagrammerne. God fornøjelse!
20.03.2018 - 10:44
![]() Valeria Medero wrote:
Valeria Medero wrote:
Hola! Terminé A5 y A6. Me quedaron los 600 puntos de mi talla S/M Cómo debo continuar con el frente? No entiendo a qué se refiere cuando dice "Trabajar hileras cortas, de ida y vuelta, a lo largo de un lado." Qué son "hileras cortas?" Gracias, Valeria
22.01.2018 - 21:36DROPS Design answered:
Hola Valeria. En este caso, trabajar las hileras cortas quiere decir que estamos trabajando solamente sobre los puntos de un delantero, no la vuelta completa. En el texto, se explican como trabajar estas filas bajo FRENTES. Al terminar un delantero, el otro delantero se trabaja de la misma manera.
28.01.2018 - 16:29
![]() Laura Wilkinson wrote:
Laura Wilkinson wrote:
Hi, could you please clarify something for me, when working a2 and a3 at the point of the diamond according to the pattern you do a row with 1 treble at the tip of the points and then do the row with the 3 trb into 1 trb at the tip? From what I can see on the pics it looks like you go straight onto the 3 in 1 trb row Thanks
25.11.2017 - 12:59DROPS Design answered:
Dear Mrs Wilkinson, on row 10 in A.2 and A.3 you start with 1 tr and finish each repeat with 3 tr tog. Happy crocheting!
27.11.2017 - 09:05Caroline wrote:
Voor de maat L/XL kom ik op 252 alvorens aan de mouwen te beginnen. Als ik over de eerste 36 steken moet haken, kom ik uit tussen 2 stokjes, moet ik dan eigenlijk niet op een stokje uitkomen om de 40 lussen te haken en 40 steken over te slaan? Ik kom er niet uit.. graag uw tegenberichtje, met dank!
13.09.2017 - 21:22
![]() Cindi wrote:
Cindi wrote:
How do you go from a1 to a2? Do you just dc in each dc? Won't that create a pucker?
11.09.2017 - 09:54DROPS Design answered:
Dear Cindy, on first round in A.2 and A.3 as shown in diagram, ie on 1st row, work 1 dc in each dc. Happy crocheting!
11.09.2017 - 11:20
Endless Love#endlesslovecardigan |
||||||||||||||||||||||||||||
 |
 |
|||||||||||||||||||||||||||
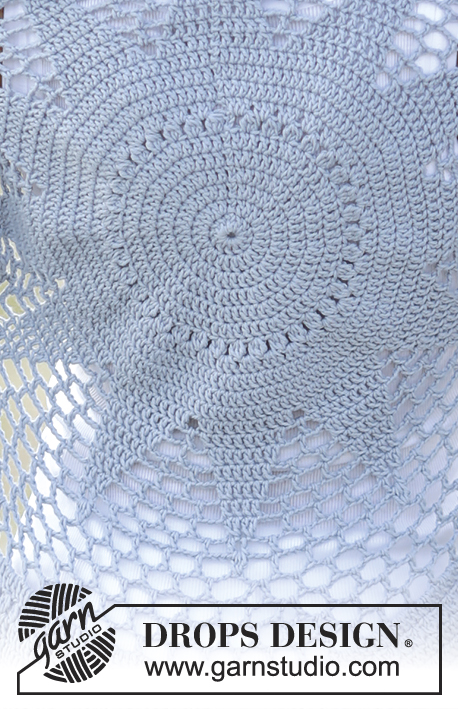
Crochet DROPS jacket worked in a circle with trebles and lace pattern in ”Cotton Merino”. Size S - XXXL.
DROPS 168-12 |
||||||||||||||||||||||||||||
|
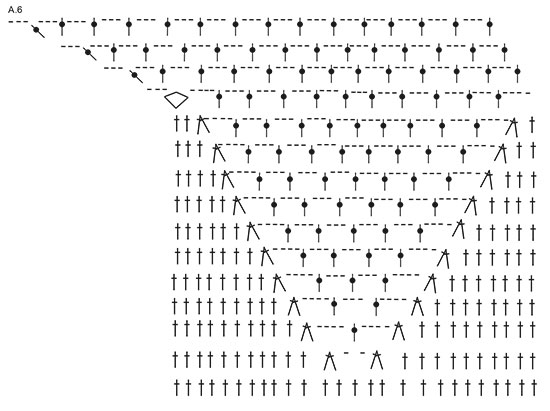
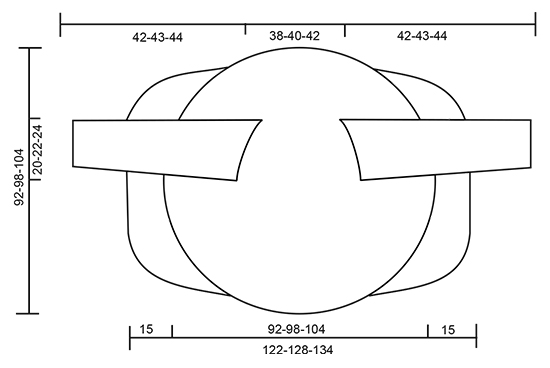
PATTERN: See diagrams A.1 to A.6. DECREASE TIP: Work 1 tr around next ch-space but wait with last pull through, work next tr around next ch-space (do not work 3 ch between tr), on last pull through, pull yarn through all 3 loops on hook. CROCHET TIP (applies to sleeve): After last tr on the round, continue to next round with 1 tr in next ch-space (= first ch-space on next round). NOTE: Insert 1 marker at the beg of round between last ch and first tr on the next round, move the marker upwards. NOTE: MAKE SURE NOT TO DISPLACE THE MARKER. ---------------------------------------------------------- JACKET WORKED IN A CIRCLE: Worked in the round from the centre and outwards. Work 4 ch with Cotton Merino on hook size 4 mm and form a ring with 1 sl st. Then work pattern according to diagram A.1 (= 6 repetitions in width) NOTE: A.x shows how every round beg and end, and is in addition to pattern. REMEMBER THE CROCHET TENSION! When entire A.1 has been worked vertically (= 132 tr), continue as follows: Work * A.2 (= 11 tr), A.3 (= 11 tr) *, repeat from *-* 6 times in total. Work up to and with arrow in diagram - see arrow for your size, there are now 228-252-264 sts on round. Work next round as follows: Continue to work over the first 34-36-38 sts, work 36-40-44 ch, and skip the next 36-40-44 sts (= armhole), work until 70-76-82 sts remain, work 36-40-44 ch and skip the next 36-40-44 sts (= armhole), continue to work over the last 34-36-38 sts. On next round continue according to pattern, work pattern as in diagram around ch-spaces in each side. When A.2 and A.3 have been worked, there are 312 tr on round. Continue with A.4 (= 39 repetitions on round). First round in A.4 shows last round in A.2/A.3, do not work this round. Continue to work as follows: Work * A.5 (= 26 tr), A.6 (= 26 tr) *, repeat from *-* 6 times in total. When A.5/A.6 have been worked, there are 600 sts on round (150 tr with 3 ch between each). Finish size S/M here. Size M/L -XXL/XXXL: Work 2-4 more rounds as last round in A.5/A.6 = 162-174 tr with 3 ch between. ALL SIZES: Piece measures approx. 46-49-52 cm from centre (92-98-104 cm in total). FRONT PIECES: Work back and forth in the one side with short rows. Cut the yarn, skip the first 13-16-19 tr on round, then work over the next 49 tr + ch-spaces as follows (insert a marker here): Work 3 ch, skip 1 ch-space, 1 dc around next ch-space, 3 ch (these 2 ch-spaces are no longer worked), 1 tr around next ch-space, work pattern as before until 2 ch-spaces remain (i.e. ch-spaces between tr, do not work around these 2 ch-spaces anymore), turn piece. Continue the short rows like this, AT THE SAME TIME inc 1 tr + 3 sts in the middle ch-space on every row (work 1 tr + 3 ch + 1 tr in this space). Continue with inc and dec on every row until piece measures 15 cm from marker. Skip 26-32-38 tr, then work short rows over the next 49 tr (13-16-19 tr remain on round). Work the same way as in the other side. CROCHET EDGE: Work an edge around the entire circle as follows: 1 dc around first ch-space, * 3 ch, 1 dc around next ch-space *, repeat from *-* and finish with 1 sl st in first dc. Fasten off. SLEEVES: Worked in the round, top down. Beg mid under one armhole, work 1 dc around first ch-space, 6 ch (= 1 tr + 3 ch), skip first tr and work 1 tr around next ch-space, * 3 ch, 1 tr around next ch-space *, repeat from *-* the entire round (work 1 tr + 3 ch around tr in corners), finish round with 1 tr around first 6 ch, then continue to work in the round without finishing it – READ CROCHET TIP = 21-23-25 tr + 21-23-25 ch-spaces. Continue with 1 tr + 3 ch around every space. When piece measures 4 cm, dec 1 ch-space before marker - READ DECREASE TIP! Repeat dec every 4½ cm 7 more times, dec alternately before and after marker = 13-15-17 tr + 13-15-17 ch-spaces. Continue until piece measures 42-43-44 cm. CROCHET EDGE SLEEVES: Crochet an edge around the sleeves as follows: 1 dc around first ch-space, * 3 ch, 1 dc around next ch-space *, repeat from *-* and finish with 1 sl st in first dc. Fasten off. Work the other sleeve the same way. |
||||||||||||||||||||||||||||
Diagram explanations |
||||||||||||||||||||||||||||
|
||||||||||||||||||||||||||||
 |
||||||||||||||||||||||||||||
 |
||||||||||||||||||||||||||||
 |
||||||||||||||||||||||||||||
 |
||||||||||||||||||||||||||||
 |
||||||||||||||||||||||||||||
Have you finished this pattern?Tag your pictures with #dropspattern #endlesslovecardigan or submit them to the #dropsfan gallery. Do you need help with this pattern?You'll find 7 tutorial videos, a Comments/Questions area and more by visiting the pattern on garnstudio.com. © 1982-2026 DROPS Design A/S. We reserve all rights. This document, including all its sub-sections, has copyrights. Read more about what you can do with our patterns at the bottom of each pattern on our site. |
||||||||||||||||||||||||||||


Post a comment to pattern DROPS 168-12
We would love to hear what you have to say about this pattern!
If you want to leave a question, please make sure you select the correct category in the form below, to speed up the answering process. Required fields are marked *.