
Looking for a yarn?


Comments / Questions (37)
![]() Christie wrote:
Christie wrote:
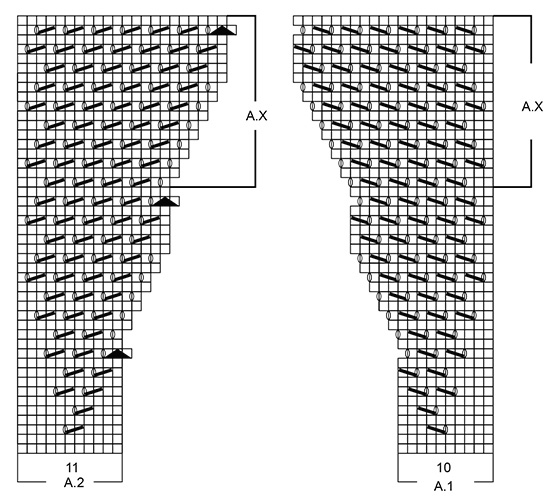
Ok so i looked over the chart more carefully and I see where the increases are, but according to the written portion of the pattern, it says I will go from 175 to 216 sts in size M when I finish working a1 and a2 one time vertically; meaning I will have inc 44 sts. But I counted the chart increases and there seems to only be about 11 inc in both a1 and a2 leaving only 22 sts of inc. should I be double inc, or am I wrong in the amount of inc I managed to count?
24.10.2016 - 19:20DROPS Design answered:
Dear Christie, these inc are included in diagrams A.1 and A.2, ie when you have worked the diagrams 1 time in height, you will have inc a total of 22 sts inc in A.1/A.2 on each side (44 sts inc in total). Just work diagrams you will see the number of sts inc. Happy knitting!
25.10.2016 - 09:08
![]() Christie wrote:
Christie wrote:
Hi, I'm confused with the lace chart... in the first row of lace in a1 and a2, it appears I only need 1 eyelet to start but the sides are just knit. Is that correct, because when I look at the sample picture, there appears to be more eyelets? I'm just a bit confused with incorporating the lace correctly and also with the increases on the sides; should I increase and then k5, then make the eyelet? (First row of chart a1 and a2.)
24.10.2016 - 18:25DROPS Design answered:
Dear Christie, A.1 and A.2 start with 2 rounds K before 1st eyelet. The first st in A.2 is the middle st on the sides. Inc are done on each side when working diagram. After you have worked A.1 1 time in height, just repeat A.X in height until finished measurements. Happy knitting!
25.10.2016 - 09:00
![]() Kim wrote:
Kim wrote:
" When piece measures 15 cm / 6'' in all sizes, cast on new sts for armhole at the end of every row as follows: Cast on 1 st 1-2-3-3-2-2 times, 2 sts 0-1-1-1-2-3 times and 3 sts 0-0-0-1-2-3 times = 73-81-87-97-107-119 sts." Do I add on to BOTH ends each increase? I'm making medium and if I cast on 1 stitch 2 times, then 2 stitches 1 time and 3 stitches 0 times, that is only 4 stitches added on. I won't have 81 stitches on, unless I add to both ends??
06.10.2016 - 05:42DROPS Design answered:
Dear Kim, yes you should cast on new sts at the end of each row for armholes, ie on each side, in size M, cast on 1 st at the end of next 4 rows (= 1 st 2 times on each side), then 2 sts at the end of next 2 rows = 8 new sts have been cast off, 4 on each side. Happy knitting!
06.10.2016 - 09:23
![]() A De Groot-Posset wrote:
A De Groot-Posset wrote:
Hallo, ik heb deze trui gebreid. Hij is leuk geworden. Hoe kan ik deze trui het beste opspannen zodat het breiwerk wat mooier er uit ziet?
17.07.2016 - 14:28DROPS Design answered:
Hoi. Ik zou de wasvoorschriften voor DROPS Belle aanhouden (klik hier) en verder niet te veel rekken, maar plat laten drogen. Klik ook hier voor meer algemene tips over het wassen van onze garens
19.07.2016 - 13:42
![]() Marlene wrote:
Marlene wrote:
Ich stricke diesen Pullover zum dritten Mal. Mit ist aufgefallen, dass es einen Fehler ab Wiederholung AX gibt und zwar muss zusätzlich eine Masche vor der Mitte zugenommen werden muss. Ist das schon mal aufgefallen. MfG Marlene
12.06.2016 - 22:34Maria wrote:
Det forstaar jeg ikke. I diagrammet A2 hvor det er "en lös maske, 2 rette sammen og den löse masken over" , markert med en svart trekant, er det et kast paa hver side av denne trekanten. Et kast paa slutten i A1 og et kast i A2 etter trekanten.
27.05.2016 - 14:32Maria wrote:
I diagrammet A1, nest siste rad skal det ikke väre tilsammen 7 kast?
27.05.2016 - 11:40DROPS Design answered:
Hej Maria. Nej, det er korrekt. Du kommer til at stemme, naar du strikker A.2 (antal masker)
27.05.2016 - 12:28
![]() Marijke Wauman wrote:
Marijke Wauman wrote:
Kan het zijn dat er in de laatste rij van patroon A1 een omslag te weinig staat? Na de laatste afhaling is er 1 steek rechts en dan moet er volgens mij een omslag komen, want anders klopt de volgende rij niet.
27.04.2016 - 16:09DROPS Design answered:
Hoi Marijke. Het patroon klopt. Je hebt 1 st meer bij A.X in A.2, je breit de twee patronen naast elkaar, dus in totaal kloppen het aantal st.
18.05.2016 - 16:38
![]() Maria wrote:
Maria wrote:
Sono arrivata benissimo fino ad avere 200 m sul corpo, ma da qui non riesco assolutamente a capire come proseguire. Non capisco proprio la spiegazione: devo ripetere AX , ma come faccio? Mi sfugge proprio il significato della spiegazione. Potere aiutarmi per favore? Grazie mille maria
01.04.2016 - 15:06DROPS Design answered:
Buongiorno Maria. Quando ricomincia il diag.Ax (di A1) lavora tutte le m del motivo traforato come già impostato, dopo l'ultima m a dir lavora 1 m gettata e poi inizia con il diag.Ax (di A2) quindi con 1 m dir, 1 gettata e prosegue con il motivo traforato fino al segnapunti. La parte traforata in questo modo continua ad aumentare. Buon lavoro!
01.04.2016 - 15:46Sabrina Poggi wrote:
Line not clear: after working AX first time, how do I increase stitches? Do I repeat just the AX rows and increase happens on its own? Or do I add stitches? Thx.
27.03.2016 - 04:37DROPS Design answered:
Dear Mrs Poggi, after you have worked A.X 1 time in height, repeat lace pattern as before with inc as before too (inc are included in diagram), ie repeat A.X in height with lace pattern and inc as before. Happy knitting!
29.03.2016 - 09:46
|
||||||||||||||||
Venezia#veneziasweater |
||||||||||||||||
|
|
||||||||||||||||
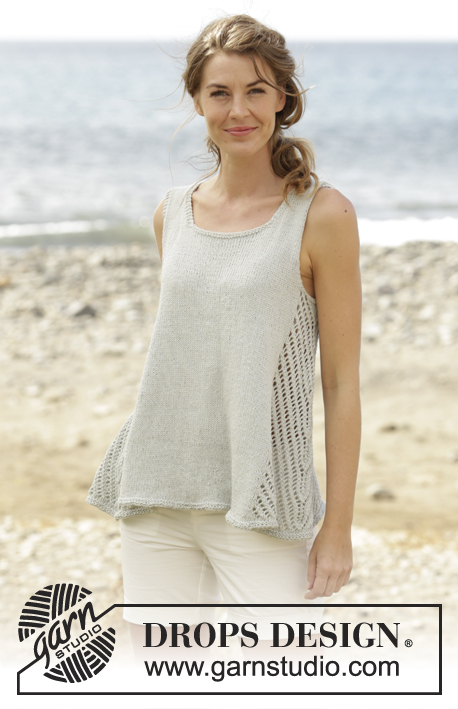
Knitted DROPS jumper with lace pattern in the sides and A-shape, worked top down in ”Belle”. Size: S - XXXL.
DROPS 168-34 |
||||||||||||||||
|
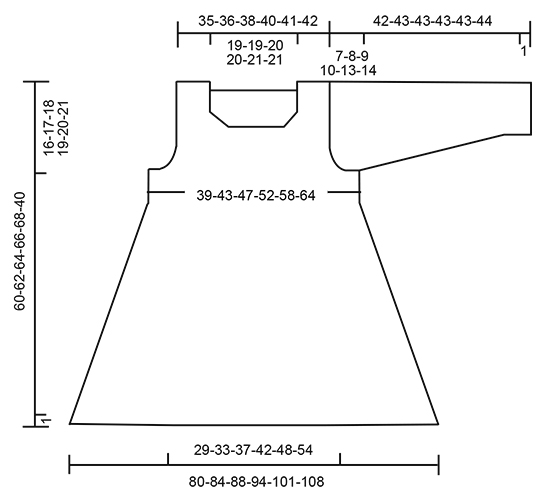
GARTER ST (worked in the round): 1 ridge = 2 rounds. * K 1 round and P 1 round *, repeat from *-*. GARTER ST (back and forth): K all rows. 1 ridge = 2 rows K. PATTERN: See diagrams A.1 and A.2. INCREASE TIP: Inc 1 st by making a YO. On next row P YO twisted (i.e. work in back loop of YO instead of front) to avoid holes. ---------------------------------------------------------- JUMPER: The piece is worked top down. Work first front and back piece separately, back and forth down to armhole. Then work in the round. BACK PIECE: Work right shoulder as follows: Cast on 17-18-19-21-21-22 sts on circular needle size 4.5 mm with Belle. Work as follows (1st row = from RS): 3 sts in GARTER ST - see explanation above (= towards the neck), work 13-14-15-17-17-18 sts in stocking st, 1 edge st in garter st (= towards armhole). Continue like this until 4 row have been worked. On next row inc 1 st inside the 3 sts in garter st towards the neck - READ INCREASE TIP = 18-19-20-22-22-23 sts. Work 1 row from WS and put piece aside. Work left shoulder as follows: Cast on and work as right shoulder but reversed. I.e. inc 1 st before the 3 sts in garter st towards the neck on 5th row in stocking st = 18-19-20-22-22-23 sts. Work 1 row from WS. Turn and work as before over all sts. At the end of row cast on 35-35-37-37-39-39 new sts for neck and then work the 18-19-20-22-22-23 sts from right shoulder on to needle = 71-73-77-81-83-85 sts. Work the new sts cast on for neck in garter st = 41-41-43-43-45-45 sts in garter st in the middle of back piece (incl the 3 sts in garter st worked on each side of neck). When 2 ridges have been worked over these sts, continue in stocking st with 1 st in garter st in each side. REMEMBER THE KNITTING TENSION When piece measures 15 cm in all sizes, cast on new sts for armhole at the end of every row as follows: Cast on 1 st 1-2-3-3-2-2 times, 2 sts 0-1-1-1-2-3 times and 3 sts 0-0-0-1-2-3 times = 73-81-87-97-107-119 sts. Work 1 row from WS after last inc and put piece aside. Piece measures 16-17-18-19-20-21 cm from shoulder. FRONT PIECE: Work left shoulder as follows: Cast on 17-18-19-21-21-22 sts on circular needle size 4.5 mm with Belle. Work as follows (1st row = from RS): Work 3 sts in garter st (= towards neck), work 13-14-15-17-17-18 sts in stocking st, 1 edge st in garter st (= towards armhole). Continue like this back and forth. When piece measures 7-8-7-8-8-8 cm, inc 1 st for neck inside the 3 sts in garter st towards the neck. Repeat inc every other row 4-4-5-5-6-6 more times = 22-23-25-27-28-29 sts. When all inc are done, work 1 row from WS. Put piece aside. Work right shoulder as follows: Cast on and work as left shoulder but reversed. When all inc for neck are done, there are 22-23-25-27-28-29 sts on needle. Work 1 row from WS. Turn and work as before over all sts. At the end of row cast on 27 new sts in all sizes for neck, then work all sts from left shoulder on to needle = 71-73-77-81-83-85 sts. Continue back and forth in stocking st with 1 edge st in garter st in each side and work in garter st over the middle 33 sts in all sizes (= the 27 new sts cast on for neck + 3 sts on each side of these). When 2 ridges have been worked over the middle 33 sts in all sizes, continue in stocking st and 1 edge st in garter st in each side. When piece measures 15 cm in all sizes, cast on new sts for armhole at the end of every row towards armhole the same way as on back piece, then work 1 row from WS = 73-81-87-97-107-119 sts. Piece measures 16-17-18-19-20-21 cm from shoulder. Now work as follows: Work in stocking st over all sts on front piece, cast on 5-5-7-7-9-9 new sts for armhole, continue in stocking st over all sts on back piece, cast on 5-5-7-7-9-9 new sts for armhole. There are now 156-172-188-208-232-256 sts for body. BODY: Then work in the round on circular needle. NOW MEASURE THE PIECE FROM HERE. Work 1 more round in stocking st but stop 12-13-14-15-16-17 sts before beg of round. Insert a marker here. This is now beg of round. Now work pattern as follows: Work A.1 (= 10 sts), A.2 (= 11 sts), insert a marker here, work in stocking st over the next 57-65-73-83-95-107 sts, insert a marker here, A.1, A.2, insert a marker here, work in stocking st over the remaining 57-65-73-83-95-107 sts. NOTE: Move the 4 markers upwards when working to make it easier to tell the section with lace pattern and stocking st apart. No of sts in section in stocking st on front and back piece is constant and inc sts in the section with lace pattern in the sides. Continue pattern like this until entire A.1 and A.2 have been worked vertically. There are now 200-216-232-252-276-300 sts on round and piece measures approx. 19 cm in all sizes. Then repeat A.X vertically AT THE SAME TIME continue inc in diagram as before: I.e. lace pattern in each side inc with 12 sts and there are 2 eyelet rows (1 eyelet row = 1 dec + 1 YO) more in A.1 and A.2 in each side every time A.X is worked 1 time vertically. When piece measures 43-44-45-46-47-48 cm, there are approx. 320-336-352-376-404-432 sts on round. Work 1 round in stocking st. Then work 2 ridges. Cast off. SLEEVE: Worked in the round on double pointed needles up to sleeve cap, then work back and forth on needle. Cast on 53-55-57-59-61-63 sts on double pointed needles size 4.5 mm. Work 2 ridges in GARTER ST in the round - see explanation above. Insert 1 marker at beg of round (1st st on round is mid under sleeve). Then work in stocking st. When piece measures 3-4-5-5-3-5 cm, inc 1 st on each side of st mid under sleeve (= 2 sts inc). Repeat inc every 5½-4½-3½-3-2½-2 cm 5-6-7-8-9-10 more times in total = 65-69-73-77-81-85 sts. When piece measures 34-34-33-32-29-29 cm (shorter measurements in the larger sizes because of longer sleeve cap and wider shoulders), cast off 5-5-7-7-9-9 sts mid under sleeve and work back and forth until finished measurements. Cast off for sleeve cap at beg of every row in each side as follows: 2 sts 4-4-4-4-3-3 times and 1 st 2-3-3-3-3-8 times. Then cast off 2 sts in each side until piece measures 42-43-43-43-43-44 cm. Loosely cast off. Knit another sleeve the same way. ASSEMBLY: Sew the shoulder seams tog. Make sure that to avoid a tight seam. Sew in sleeves in body inside 1 edge st in garter st. |
||||||||||||||||
Diagram explanations |
||||||||||||||||
|
||||||||||||||||
 |
||||||||||||||||
 |
||||||||||||||||
Have you finished this pattern?Tag your pictures with #dropspattern #veneziasweater or submit them to the #dropsfan gallery. Do you need help with this pattern?You'll find 30 tutorial videos, a Comments/Questions area and more by visiting the pattern on garnstudio.com. © 1982-2025 DROPS Design A/S. We reserve all rights. This document, including all its sub-sections, has copyrights. Read more about what you can do with our patterns at the bottom of each pattern on our site. |
||||||||||||||||


With over 40 years in knitting and crochet design, DROPS Design offers one of the most extensive collections of free patterns on the internet - translated to 17 languages. As of today we count 320 catalogues and 12094 patterns translated into English (UK/cm). 12094
We work hard to bring you the best knitting and crochet have to offer, inspiration and advice as well as great quality yarns at incredible prices! Would you like to use our patterns for other than personal use? You can read what you are allowed to do in the Copyright text at the bottom of all our patterns. Happy crafting!
Post a comment to pattern DROPS 168-34
We would love to hear what you have to say about this pattern!
If you want to leave a question, please make sure you select the correct category in the form below, to speed up the answering process. Required fields are marked *.