
Looking for a yarn?


Comments / Questions (168)
![]() Rochas wrote:
Rochas wrote:
Merci pour votre réponse mais les Aug qui se font sur le rang 6 est ce bien sur le 1er rang de brides ou sur le second rang
05.12.2018 - 14:24DROPS Design answered:
Bonjour Mme Rochas, tout à fait, le 6ème rang de A.2 est le rang de brides (= 1 bride dans chaque b du rang précédent) - ou 1er rang de A.2a dans le diagramme, et se crochète sur l'envers du gilet. Bon crochet!
05.12.2018 - 15:14
![]() Rochas wrote:
Rochas wrote:
Bonjour, je voudrais savoir au niveau de l'empiècement pour le 6ème rang où l'on débute en principe les augmentations sur l'envers du travail ; si c'est celui qui se trouve avant l'inscription A9 car pour moi le 6ème rang se trouve sur l'endroit de mon travail encore merci pour votre réponse
05.12.2018 - 13:10DROPS Design answered:
Bonjour Mme Rochas, le 1er rang des diagrammes se crochète sur l'endroit (= on lit les diagrammes de droite à gauche en commençant par le devant gauche et A.1 et en terminant par le devant droit et A.3), tous les rangs pairs seront ainsi crochetés sur l'envers (on lit les diagrammes de gauche à droite en commençant par le devant droit et A.3 et en terminant par le devant gauche et A.1). Bon crochet!
05.12.2018 - 13:27
![]() Gwendoline wrote:
Gwendoline wrote:
Bonjour, lorsque l'on commence les rangs du dos et du devant il est marquer "continuer A8 comme avant" cela veut-il dire qu'il faut refaire un rang identique à celui que l'on vient de faire ou on continue le diagramme sur la ligne suivante ? Merci
04.12.2018 - 20:44DROPS Design answered:
Bonjour Gwendoline, continuez simplement le diagramme en crochetant le rang suivant. Bon crochet!
05.12.2018 - 08:11
![]() Birgit wrote:
Birgit wrote:
Hi, bin immer noch bei Reihe 7 (Passe Gr. M) in der Beschreibung steht bei A4 wie zuvor, was ist damit gemeint, die Häkelschrift zeigt ein anderes Muster als zuvor...
04.12.2018 - 17:13DROPS Design answered:
Liebe Birgit, das heisst, Sie häkeln jetzt A.4 wie Sie zuvor gehäkelt haben = an die selben Stellen, aber jetzt häkeln Sie Reihe 7 in A.4. Viel Spaß beim häkeln!
05.12.2018 - 08:00
![]() Rochas wrote:
Rochas wrote:
Bonsoir, donc quand on fait l'empiècement, pour le diagramme on doit suivre A1-A2-A4-...-A2-A4-A2-A3 pour l'aller et pour le retour est ce qu'on dois faire A3-A2-A4 ....A2-A4-A2-A1 ensuite de suite jusqu'au rang 6 pour les augmentations pour la taille souhaiter moi c'est la taille M
03.12.2018 - 23:31DROPS Design answered:
Bonjour Mme Rochas, tout à fait, sur l'envers, crochetez en sens inverse: A.3, A.2, A.4 ... A.2, A.4, A.2, A.1 et lisez les diagrammes de gauche à droite sur l'envers. Au 6ème rang de A.2 (= sur l'envers), vous augmenterez 3B avant le 8ème marqueur, 6 brides entre les 5ème et le 4ème marrqueur et 3 brides avant le 1er marqueur (+ les augmentations de A.4). Au dernier rang de A.4, placez de nouveau marqueurs sur l'envers comme indiqué et crochetez le dernier rang avant les emmanchures avec A.6, A.2, ... Bon crochet!
04.12.2018 - 07:46
![]() Rochas wrote:
Rochas wrote:
Bonjour j aimerais savoir l empiècement se fait jusqu'à combien de rang. Est ce que ça se crochète tout en un seul morceau ou faut t il faire le dos puis le devant car j ai beau lire les commentaires précédents je suis perdu
02.12.2018 - 01:03DROPS Design answered:
Bonjour Mme Rochas, le nombre de rangs de l'empiècement varie en fonction de la taille: en commençant par le devant gauche, vous crochetez l'empiècement jusqu'au devant droit (vu sur l'endroit), en allers et retours, avec des augmentations (dans les diagrammes + dans les explications). Quand l'empiècement est terminé, vous divisez l'ouvrage en sautant les mailles des manches qui seront finies plus tard et vous terminez le dos et les devants. Lisez attentivement les explications pour votre taille et n'hésitez pas à poser des questions si besoin. Bon crochet!
03.12.2018 - 09:18
![]() Birgit wrote:
Birgit wrote:
Danke, bei A5 schreiben Sie 1Stb,1Lm, 1Stb in das nächste Stäbchen, laut Häkelschrift muss das Stb jedoch in dieselbe Masche, oder? Bei A2 und A4 ebenfalls, oder?
30.11.2018 - 14:04DROPS Design answered:
Liebe Birgit, ja genau 1 Stb, 1 Lm, 1 Stb wird in 1 Stb gehäkelt. Viel Spaß beim häkeln!
30.11.2018 - 14:27
![]() Birgit wrote:
Birgit wrote:
Nun habe ich die Zunahmen an der Passe erledigt und habe 191 Stb. Bin schon wieder verwirrt bei der nächsten Reihe. Mache ich es wie folgt: A1(4Stb, 3LM) A5 in das 6. oder 7. Stb? A2 3Lm, 2stb überspringen, 1Stb, 3LM, 2Stb überspringen, 1fm, usw. Danke!!
30.11.2018 - 13:18DROPS Design answered:
Liebe Birgit, nach der 6. Reihe in A.2 häkeln Sie A.1 wie zuvor ( = 7. Reihe in A.1 = 3 Lm, 4 Stb), dann A.5 über die 3 nächsten Stb (1. Reihe in A.5 = 1 Stb überspringen, 1 Stb, 1Lm, 1 Stb in das nächste Stb, 1 Stb überspringen), A.2 und A.4 weiterhäkeln (= 7. Reihe in A.2/A.4) dh A.2 Reihe 7: *1 Stb überspringen, 1 Stb, 1 Lm, 1 Stb in dans nächste Stb, 2 Stb überspringen, 1 Stb, 1 Lm, 1 Stb in dans nächste Stb, 1 St überspringen* . Viel Spaß beim häkeln!
30.11.2018 - 13:49
![]() Birgit wrote:
Birgit wrote:
Edit: ich mache Größe M
30.11.2018 - 03:17
![]() Birgit wrote:
Birgit wrote:
Bei der 3. Reihe bei der Passe beginne ich wie folgt? 4 Stb, 3Lm, 1Stb oder eine FM in das 6. Stb?
29.11.2018 - 18:37DROPS Design answered:
Liebe Birgit, bei der 1. Reihe in A.1 (= 3. Reihe vom Anfang) häkeln Sie: 3 LM (ersetzt das 1. Stb), 1 Stb in jede der nächsten 3 Maschen, 3 Lm, 1 M überspringen (= 5 Maschen in A.1), dann A.2: *1 FM in das nächste Stb, 3 Lm, 2 Stb überspringen, 1 Stb in das nächste Stb, 3 Lm, 2 Stb überspringen * und von *bis* wiederholen - A.4 = 1 Fm in das Stb, 3 Lm, 1 Stb überspringen, 1 Stb in das Stb, 3 Lm, 1 Stb überspringen. Viel Spaß beim häkeln!
30.11.2018 - 08:11
|
||||||||||||||||||||||||||||
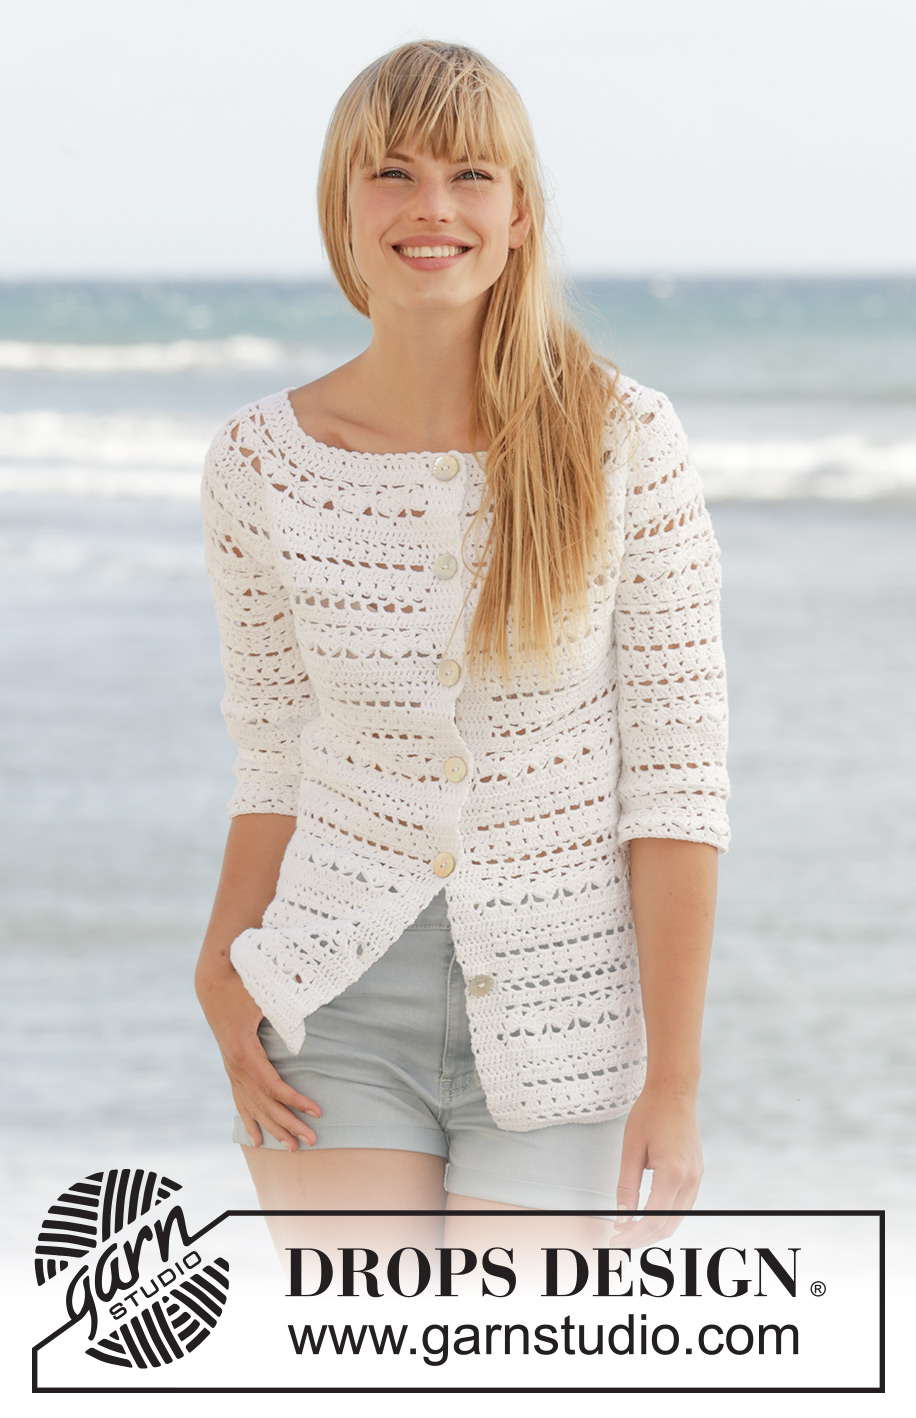
Seashore Bliss Cardigan#seashoreblisscardigan |
||||||||||||||||||||||||||||
|
|
||||||||||||||||||||||||||||
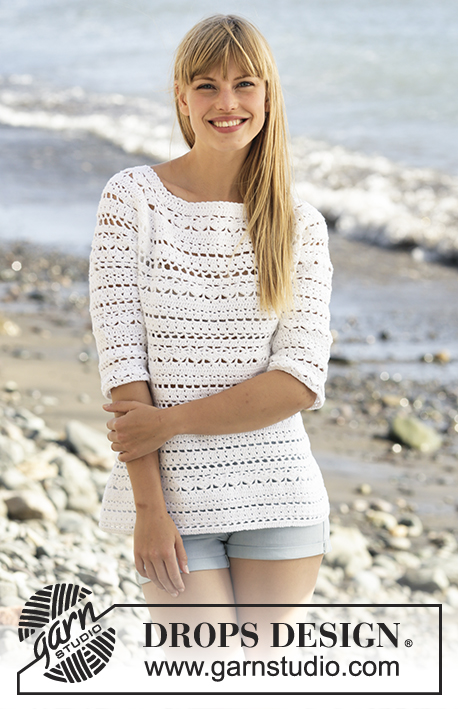
Crochet DROPS jacket with lace pattern and round yoke in ”Cotton Light”. The piece is worked top down. Size: S - XXXL.
DROPS 169-16 |
||||||||||||||||||||||||||||
|
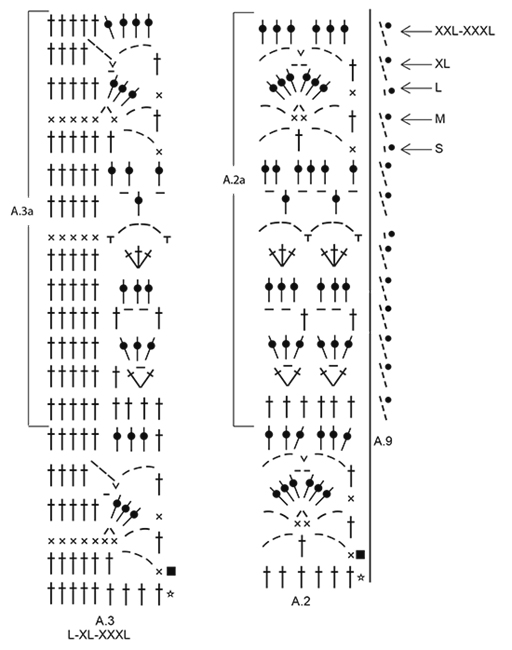
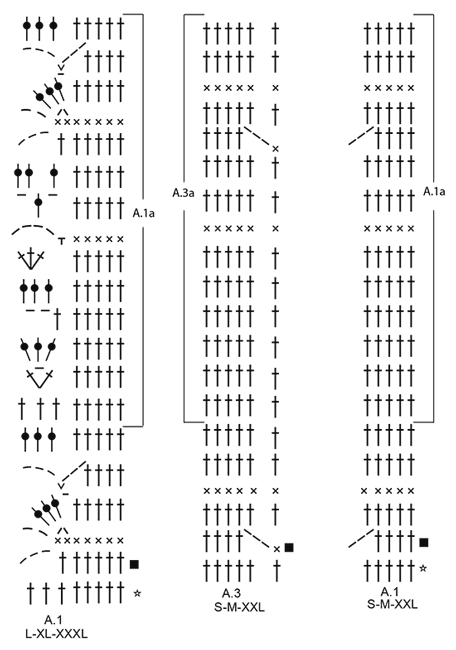
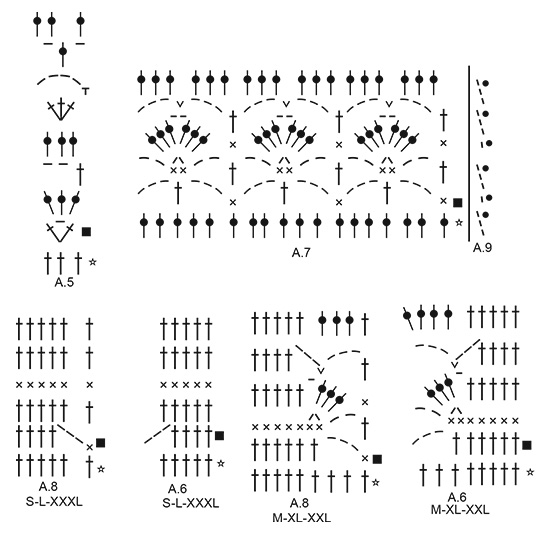
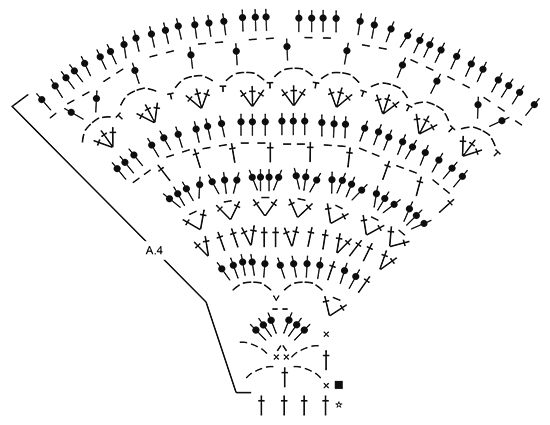
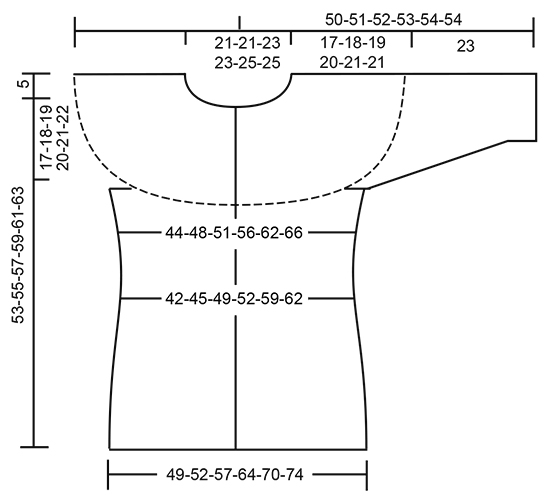
PATTERN: See diagrams A.1 to A.9. Choose diagram for correct size. Diagram A.9 show how to start and end when working in the round. CROCHET INFO: Replace first tr at beg of every tr row with 3 ch. Replace first dc at beg of every dc row with 1 ch. Replace first tr at beg of every tr round with 3 ch, finish the round with 1 sl st in 3rd ch from beg of round. At beg of every dc round, replace first dc with 1 ch and finish round with 1 sl st in 1st ch from beg of round. INCREASE TIP: Inc 1 tr by working 2 tr in same tr. DECREASE TIP: Dec 1 tr by working 2 tr tog as follows: Work 1 tr but wait with last pull through (= 2 sts on hook), then work next tr but on last pull through, pull yarn through all 3 sts on hook. TIP ARMHOLE: Size S, M and XL: In the last repeat of A.2 before marker 1 and marker 3 (= beginning of armhole), replace the last chain stitch with a treble crochet in the last stitch of the same repeat on previous row. ---------------------------------------------------------- JACKET: Worked back and forth, top down. NOTE: It is important to keep the crochet tension vertically so that the measurements on yoke will be correct. YOKE: Work 123-123-134-134-138-140 ch on hook size 4 mm with Cotton Light. Work 1 tr in 4th ch from hook (= 2 tr) - READ CROCHET INFO, 1 tr in each of the next 0-0-4-4-1-3 ch, * skip 1 ch, 1 tr in each of the next 6 ch *, repeat from *-* the entire row = 104-104-114-114-117-119 tr. Work 1 row with 1 tr in every tr and inc 19-19-21-21-30-40 tr evenly - READ INCREASE TIP = 123-123-135-135-147-159 tr. Work next row and insert 8 markers in the piece as follows: Work A.1 (= 5-5-8-8-5-8 sts), repeat A.2 over the next 18-18-18-18-24-24 tr (= 3-3-3-3-4-4 times in width), insert 1st marker, A.4 over the first 4 tr, insert 2nd marker, A.2 over the next 12 tr (= 2 times in width), insert 3rd marker, A.4 over the next 4 tr, insert 4th marker, work A.2 over the next 36-36-42-42-48-54 tr (= 6-6-7-7-8-9 times in width), insert 5th marker, A.4 over the next 4 tr, insert 6th marker, A.2 over the next 12 tr (= 2 times in width), insert 7th marker, A.4 over the next 4 tr, insert 8th marker, A.2 over the next 18-18-18-18-24-24 tr (= 3-3-3-3-4-4 times in width), finish with A.3 (= 6-6-9-9-6-9 tr). REMEMBER THE CROCHET TENSION! SIZE XXL-XXXL: On 5th row (row with tr from RS) in A.2 inc evenly as follows: Between 2nd and 3rd marker and 6th and 7th marker: Inc 6-6 tr. 12-12 tr have been inc in total on row (= 18-18 tr between 2nd and 3rd marker and 6th and 7th marker). Repeat A.2 3-3 times between 2nd and 3rd marker and between 6th and 7th marker: ALL SIZES: On 6th row (row with tr from WS) in A.2 inc evenly as follows: Before 8th marker: Inc 0-3-3-3-6-6 tr (= 24-27-30-30-36-39 tr before 8th marker). Between 7th and 6th marker and 3rd and 2nd marker: Inc 0-0-6-6-6-6 tr (= 12-12-18-18-24-24 tr between these markers). Between 5th and 4th marker: Inc 0-6-6-6-12-12 tr (= 36-42-48-48-60-66 tr between each of these markers). After 1st marker: Inc 0-3-3-3-6-6 tr (= 23-26-29-29-35-38 tr after 1st marker). There are now 179-191-215-215-251-263 tr in total on row. Work next row as follows from RS: Work A.1 over the first 5-5-8-8-5-8 tr as before, A.5 over the next 0-3-3-3-0-0 tr, repeat A.2 over the next 18-18-18-18-30-30 tr (= 3-3-3-3-5-5 times in width), A.4 as before, repeat A.2 over the next 12-12-18-18-24-24 tr (= 2-2-3-3-4-4 times in width), A.4 as before, repeat A.2 over the next 36-42-48-48-60-66 tr (= 6-7-8-8-10-11 times in width), A.4 as before, repeat A.2 over the next 12-12-18-18-24-24 tr (= 2-2-3-3-4-4 times in width), A.4 as before, repeat A.2 over the next 18-18-18-18-30-30 tr as before (= 3-3-3-3-5-5 times in width), A.5 over the next 0-3-3-3-0-0 tr, finish with A.3 over the last 6-6-9-9-6-9 tr as before. SIZE XL-XXL-XXXL: On 8th row (row with tr from WS) in A.2 inc evenly as follows: Before 8th marker: Inc 3-3-3 tr (= 33-39-42 tr before 8th marker). Between 4th and 5th marker: Inc 6-6-6 tr (= 54-66-72 tr between 4th and 5th marker). After 1st marker: Inc 3-3-3 tr (= 32-38-41 tr after 1st marker). Work next row as follows from RS: Work A.1 over the first 8-5-8 tr as before, A.5 over the next 0-3-3 tr, repeat A.2 over the next 24-30-30 tr (= 4-5-5 times in width), A.4 as before, repeat A.2 over the next 18-24-24 tr (= 3-4-4 times in width), A.4 as before, repeat A.2 over the next 54-66-72 tr (= 9-11-12 times in width), A.4 as before, repeat A.2 over the next 18-24-24 tr (= 3-4-4 times in width), A.4 as before, repeat A.2 over the next 24-30-30 tr as before (= 4-5-5 times in width), A.5 over the next 0-3-3 tr, finish with A.3 over the first 9-6-9 tr as before. ALL SIZES: On last row in A.4 (= from WS) insert 1 new marker in the middle of every A.4 (i.e. 18 tr on each side of marker in A.4 = 4 markers). Remove the old markers (= 4 markers remain in piece). Sts between markers are for sleeves (= 48-48-54-54-60-60 tr on each sleeve). When A.4 has been worked 1 time vertically, there are 251-263-287-299-335-347 tr on row. Yoke is now done in size S. SIZE M-L-XL-XXL-XXXL: Work next row from RS as follows: Work A.6 over the first 8-5-8-8-5 tr, continue with A.2 over the next 18-24-24-30-36 tr (= 3-4-4-5-6 times in width), * A.7 over the next 36 tr (= 2 times in width, marker is in the middle of these repetitions), A.2 over the next 12-18-18-24-24 tr (= 2-3-3-4-4 times in width), A.7 over the next 36 tr (= 2 times in width, marker is in the middle of these repetitions) *, A.2 over the next 42-48-54-66-72 tr as before, repeat from *-*, A.2 over the next 18-24-24-30-36 tr (= 3-4-4-5-6 times in width), finish with A.8 over the last 9-6-9-9-6 tr. Work 1-2-3-4-4 rows of A.7 ALL SIZES: Piece now measures 17-18-19-20-21-21 cm vertically. BODY: SIZE M-XL: Work as follows from WS: Work A.8 as before, repeat A.2a (see arrow on where pattern beg in the different sizes) 6-7 times in total in width until 1st marker (= right front piece) - SEE ARMHOLE TIP, work 8-10 ch, skip sts between 1st and 2nd marker (= sleeve), work A.2a 13-15 times in total in width until next marker (= back piece), work 8-10 ch, skip sts between 3rd and 4th marker (= sleeve), work A.2a 6-7 times in total in width, finish with A.6. Insert 1 marker in piece, NOW MEASURE PIECE FROM HERE. SIZE S-L-XXL-XXXL: Work as follows from RS: Work A.6, repeat A.2a (see arrow on where pattern beg in the different sizes) 6-7-8-9 times in total in width until 1st marker (= left front piece) - SEE ARMHOLE TIP, work 8-8-10-10 ch, skip sts between 1st and 2nd marker (= sleeve), work A.2a 12-14-17-18 times in total in width until 3rd marker (= back piece), work 8-8-10-10 ch, skip sts between 3rd and 4th marker (= sleeve), work A.2a 6-7-8-9 times in total in width, finish with A.8. Insert 1 marker in piece, NOW MEASURE PIECE FROM HERE. SIZE S-M-L-XL: Work A.6/A.2a/A.8 as before, work the 8-8-8-10 sts under each sleeve as 1st st in A.6. On last row in A.6 and A.8 (row with tr) dec 4-4-4-2 tr evenly on entire row – READ DECREASE TIP = 167-179-191-209 tr. When A.6 and A.8 have been worked 1 time vertically, work next row as follows from WS: Work A.3a over the first 6-6-9-9 tr, repeat A.2a 26-28-29-32 times in total in width, finish with A.1a over the last 5-5-8-8 tr. SIZE XXL-XXXL: Work from WS: A.3a over the first 6-9 tr, repeat A.2a 37-38 times in total AT THE SAME TIME dec 2-2 tr evenly – READ DECREASE TIP, finish with A.1a over the last 5-8 tr = 233-245 tr. ALL SIZES: Repeat A.1a to A.3a vertically. When piece measures 12 cm, adjust so that next row is with tr, dec 6 tr evenly = 161-173-185-203-227-239 tr. Now repeat A.2a 25-27-28-31-36-37 times in width. SIZE XL-XXL-XXXL: Repeat dec when piece measures 16 cm from marker = 197-221-233 tr. Now repeat A.2a 30-35-36 times in width. ALL SIZES: When piece measures 20-21-22-23-24-25 cm from marker – adjust so that next row is with tr, inc 6 tr evenly. Repeat inc every 3½-3½-2½-2-2-2 cm 3-3-4-6-6-6 more times = 185-197-215-239-263-275 tr. Repeat A.2a 1 more in width on every inc. When all inc are done, repeat A.2a 29-31-33-37-42-43 times in width. Work until piece measures 36-37-38-39-40-41 cm from marker, adjust to finish nicely according to pattern. Fasten off. SLEEVE: SIZE S: Worked in the round. Beg by working mid under armhole as follows: Work 1 sl st in 4th ch of the 8 ch worked in armhole on body. Work 1 ch (= 1 dc). Then work 1 dc in each of the next 4 ch, work A.7 over the next 18 tr, work A.2a (adjust pattern according to A.7) 2 times in total in width, work A.7 over the next 18 tr, finish with 1 dc in each of the last 3 ch. Work the 8 sts under sleeve as 1st st in A.7. When A.7 has been worked 1 time vertically, there are 56 tr on last round. SIZE M-XL-XXL-XXXL: Worked in the round. Beg by working mid under sleeve as follows: Work 1 sl st in 4th ch of the 8-10-10-10 ch worked in armhole on body. Work 3 ch (= 1 tr). Then work 1 tr in each of the next 4-6-6-6 ch, work A.7 as before, work A.2a (adjust pattern according to A.7) 2-3-4-4 times in total in width as before, work A.7, finish with 1 tr in each of the last 3 ch. Work the 8-10-10-10 sts under sleeve as 1st st in A.7. When A.7 has been worked 1 time vertically, there are 56-64-70-70 tr on last round. SIZE L: Worked in the round. Beg by working mid under sleeve as follows: Work 1 sl st in 4th ch of the 8 ch worked in armhole on body. Work 1 ch (= 1 dc). Then work 1 dc in each of the next 4 ch, work A.7 as before, work A.2a (adjust pattern according to A.7) 3 times in total in width as before, work A.7, finish with 1 dc in each of the last 3 ch. Work the 8 sts under sleeve as 1st st in A.7. When A.7 has been worked 1 time vertically, there are 62 tr on last round. ALL SIZES: = 56-56-62-64-70-70 tr. Repeat A.2a 9-9-10-10-11-11 times in total in width while AT THE SAME TIME on first round with tr dec 2-2-2-4-4-4 tr evenly = 54-54-60-60-66-66 tr. When piece measures 10 cm, adjust so that next round is with tr, dec 6 tr evenly = 48-48-54-54-60-60 tr. Then repeat A.2a 8-8-9-9-10-10 times in width. When piece measures 23 cm, adjust to finish nicely according to pattern, fasten off. Work another sleeve the same way. NECK EDGE: Crochet an edge around the neck. Beg mid front. Work * 1 dc in first tr, 3 ch, skip approx. 1 cm *, repeat from *-* around the entire neck. Make sure to avoid a tight neck edge, adjust to finish with 1 dc in last tr on row. Fasten off. ASSEMBLY: Fasten the buttons on left front piece, fasten the top button approx. 2 cm from neck edge, fasten the remaining buttons approx. 8-9-9-8-8-9 cm apart. Button between 2 tr on right front piece. |
||||||||||||||||||||||||||||
Diagram explanations |
||||||||||||||||||||||||||||
|
||||||||||||||||||||||||||||
 |
||||||||||||||||||||||||||||
 |
||||||||||||||||||||||||||||
 |
||||||||||||||||||||||||||||
 |
||||||||||||||||||||||||||||
 |
||||||||||||||||||||||||||||
Have you finished this pattern?Tag your pictures with #dropspattern #seashoreblisscardigan or submit them to the #dropsfan gallery. Do you need help with this pattern?You'll find 13 tutorial videos, a Comments/Questions area and more by visiting the pattern on garnstudio.com. © 1982-2025 DROPS Design A/S. We reserve all rights. This document, including all its sub-sections, has copyrights. Read more about what you can do with our patterns at the bottom of each pattern on our site. |
||||||||||||||||||||||||||||


With over 40 years in knitting and crochet design, DROPS Design offers one of the most extensive collections of free patterns on the internet - translated to 17 languages. As of today we count 320 catalogues and 12093 patterns translated into English (UK/cm). 12093
We work hard to bring you the best knitting and crochet have to offer, inspiration and advice as well as great quality yarns at incredible prices! Would you like to use our patterns for other than personal use? You can read what you are allowed to do in the Copyright text at the bottom of all our patterns. Happy crafting!
Post a comment to pattern DROPS 169-16
We would love to hear what you have to say about this pattern!
If you want to leave a question, please make sure you select the correct category in the form below, to speed up the answering process. Required fields are marked *.