
Looking for a yarn?


Comments / Questions (135)
![]() Yocheved Leifer wrote:
Yocheved Leifer wrote:
I realized that my question ❔ has a typing error. It should read how do I STITCH that?
04.03.2019 - 20:33
![]() Yocheved Leifer wrote:
Yocheved Leifer wrote:
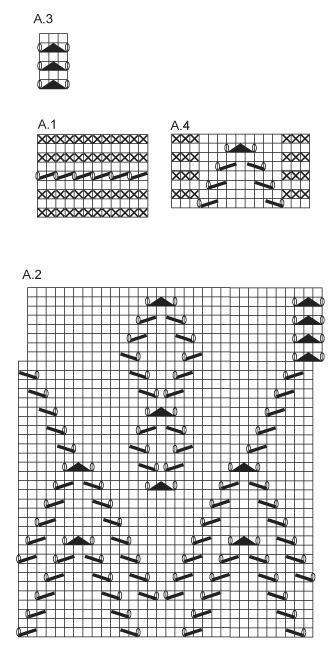
A.2 has 32 stitches across the pattern but further up, the patterns shifts right. How do I starch that?
04.03.2019 - 20:32DROPS Design answered:
Dear Mrs Leifer, start first A.2 on the round with the last st from previous round (= 1 st before marker from beg of round, make 1 YO, move marker from beg of round here, slip the next st (= the last st on round), work together the first 2 sts in 1st A.2 and pass the st over. Continue like this, ie the last st in A.2 will be worked together with the first 2 sts in next A.2. Happy knitting!
05.03.2019 - 10:29
![]() Yocheved Leifer wrote:
Yocheved Leifer wrote:
I would like to make this in a spring summer version. Which yarn would you recommend? Also, I cannot read charts so well. Do you have detailed instructions?
25.02.2019 - 19:02DROPS Design answered:
Dear Mrs Leifer, try our yarn converter to see all possible alternatives and contact your DROPS store for any further assistance choosing a yarn matching your wishes. We only have diagrams to this pattern. This lesson explains how to read diagrams. Happy knitting!
26.02.2019 - 10:35
![]() Lydia wrote:
Lydia wrote:
Last instrucciones están equivocadas para las mangas, espero las corrijan, está mi tejido incompleto. Gracias
12.12.2018 - 02:14
![]() Mona wrote:
Mona wrote:
Deretter strikkes A.2 (= 6-6-7-7-8 rapporter i bredden). Når A.2 er strikket 1 gang i høyden strikkes det videre slik – start 1 m før første m på omg: * A.3 (= 3 m), 29 m glstrikk *, gjenta fra *-* 6-6-7-7-8 ganger. SAMTIDIG når arb måler 15 cm felles det 1 m før hver A.3 – LES FELLTIPS (6-6-7-7-8 m felt). Betyr det at A3 overtar og en ikke skal strikke A2 lenger? eller strikkes A3 kun i starten av hver rapport og deretter A2?
24.11.2018 - 19:30DROPS Design answered:
Hei Mona. A.2 strikkes kun 1 gang i høyden. Videre strikker du A.3 og 29 masker glattstrikk. Dette gjentar du totalt 6-6-7-7-8 ganger rundt. Om du ser på bildet kan du se at A.3 fortsetter oppover til livet (hullradene), mens A.2 er kun strikket nederst på skjørtekanten. God fornøyelse
26.11.2018 - 10:00Guinevere wrote:
I am having a problem with decreases for the sleeve cap. Instructions say to decrease two stitches on each side but where exactly, in the beginning or the end? How are they going to be made, by knitting two together or by slipping one, knitting one, passing slipped stitch over? Please explain, thank you.
14.11.2018 - 00:17DROPS Design answered:
Hi Guinevere, Decrease for the sleeve cap by casting off 2 stitches at the beginning and end of each row until the piece measures 24-27-30-33-36 cm, then 3 stitches at each end of the next row before casting off the remaining stitches. Happy knitting!
14.11.2018 - 08:02Kayleigh Andrews wrote:
Hi, I've just finished the main part of the body and am on the back piece. It says to bind off 2 stitches on both sides of the first row and 1 stitch on both sides of the second row... however I am working in the round. I can bind off at the start of the round but not at the end. Is there a technique I don't know for this, or should I k2tog, or am I supposed to be working on straight needles for this part? Thanks in advance!
28.10.2018 - 17:47DROPS Design answered:
Dear Kayleigh, from the point you cast off stitches to shape the armholes, you cannot continue in the round anymore, but you have to continue the knitting back and forth, in parts (sperately the back and the front). Then you can cast off stitches at the beginning of the rows. I hope this helps. Happy Knitting!
28.10.2018 - 19:18Guinevere wrote:
Hello again. In the first paragraph it is said that the dress is to be knit in the round. After casting on, we should work diagram A.1. Its first row (round) is all Xs , which means purl from RS and knit from WS. The next is blank boxes, so knit from RS and purl from WS. Since that part is knit in the round, how exactly should we work A.1? We don't work WS in the round. A bit confused, any help appreciated.
26.10.2018 - 22:04DROPS Design answered:
Dear Guinevere, The diagrams are always showing every row of the patterns from the RS regerdess of whether it is knitted in the round or flat. So the first few rounds of pattern A.1 should be: 1st round purl, 2nd round: knit, 3d round purl, 4th round: knit, 5th round K2tog, yo, etc. Happy Knitting!
28.10.2018 - 14:38
![]() Guinevere wrote:
Guinevere wrote:
Hi there! Thank you so much for this pattern. My question has to do with the right shoulder. The pattern says "Work as left shoulder but reversed". Could you please specify exactly what must be done? I'm having difficulty understanding what "reversed" is about. Thank you very much for your time, keep up the good work :)
25.10.2018 - 09:14DROPS Design answered:
Dear Guinevere, for the right shoulder, you will work the 4 sts towards middle in garter st for button band (= last 4 sts seen from RS) and shape neck from the beg of row from WS (work the first 4 sts before slipping them on a st holder, work row to the end, turn and work next row from RS, turn and cast off the next 10-13 sts (see size) at the beg of next row from WS... Happy knitting!
25.10.2018 - 10:13
![]() Christina Kechida wrote:
Christina Kechida wrote:
I storl 9-10 år står det lägg upp 48m och öka sen 2 m på varje sida av markör uppr 8 ggr = 66 m, fast jag får det bara till 64 m hur jag än räknar. Ska det vara 66 eller 64m?
14.10.2018 - 14:56DROPS Design answered:
Hei Christina. Du øker 1 maske på hver side av merket (=2 masker økt totalt) totalt 9 ganger. Etter instruksjonene om første øking står det "øk 8 ganger TIL" - dvs totalt 9 ganger inkludert den første økingen. Altså, 48 masker lagt opp + 2 fra første øking = 50 masker. 8 økinger til av 2 masker hver = 66 masker. God fornøyelse.
22.10.2018 - 11:33
|
|||||||||||||||||||
Wendy Darling#wendydarlingdress |
|||||||||||||||||||
 |
 |
||||||||||||||||||
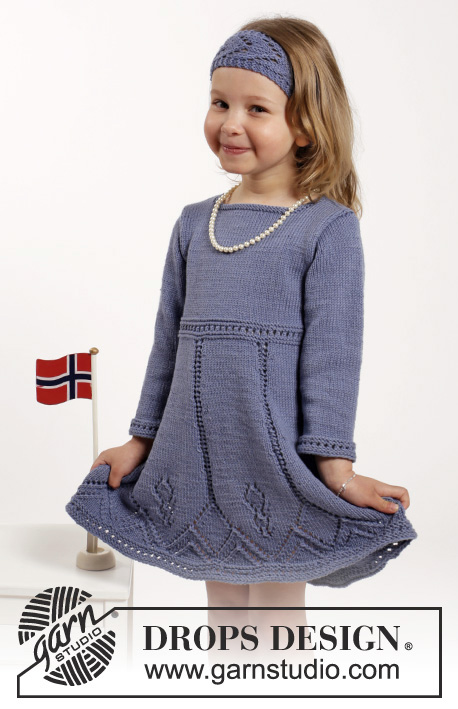
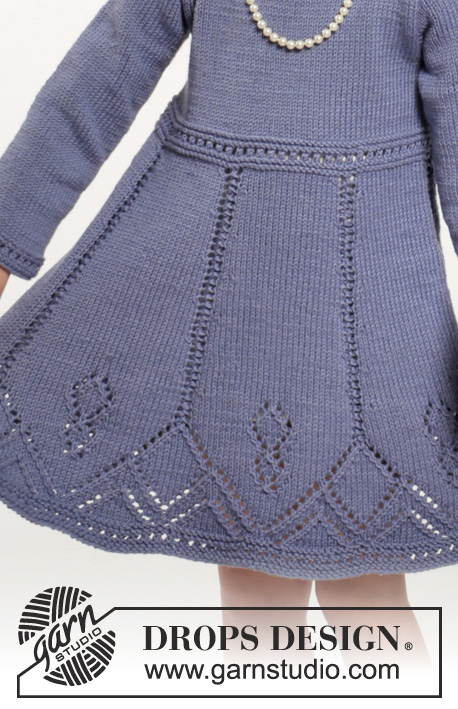
Knitted dress and hair band with lace pattern in DROPS Cotton Merino. Size children 2 - 10 years
DROPS Children 26-6 |
|||||||||||||||||||
|
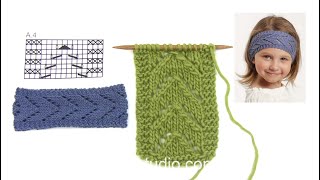
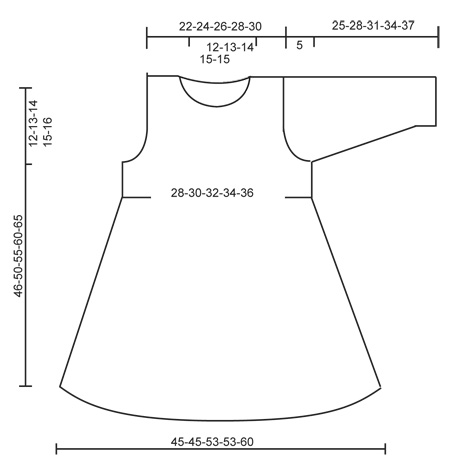
PATTERN: See diagrams A.1 to A.4. DECREASE TIP: Dec as follows before A.3: K 2 tog. Dec as follows after A.3: Slip 1 st as if to K, K 1, psso BUTTONHOLES: Dec for buttonholes on left back piece. Dec by working second and third st tog from mid back, then make a YO. Dec for buttonholes when band measures 2 and 4 cm GARTER ST (back and forth): K all rows. 1 ridge = 2 rows K. ---------------------------------------------------------- DRESS: Worked in the round on circular needle from bottom up. Cast on 192-192-224-224-256 sts on circular needle size 3.5 mm with Cotton Merino. Work A.1. Then work A.2 (= 6-6-7-7-8 repetitions in width). When A.2 has been worked 1 time vertically, work as follows - beg 1 st before first st on round: * A.3 (= 3 sts), 29 sts in stocking st *, repeat from *-* 6-6-7-7-8 times. AT THE SAME TIME when piece measures 15 cm, dec 1 st before every A.3 – READ DECREASE TIP (= 6-6-7-7-8 sts dec). Repeat dec alternately before and after A.3 every every 1-1½-1½-2-2 cm a total of 12-10-12-10-12 times = 120-132-140-154-160 sts. Continue in stocking st and A.3 until piece measures 27-29-32-35-37 cm. Now work A.1 over all sts, on first row in A.1 adjust no of sts to 124-132-140-148-160. Insert 2 markers in the piece; one at the beg of round and 1 after 62-66-70-74-80 sts = sides. Continue in stocking st over all sts. When piece measures 34-37-41-45-49 cm, cast off 6 sts in each side for armholes (i.e. 3 sts on both sides of every marker) and finish each piece separately. BACK PIECE: = 56-60-64-68-74 sts. Continue cast off for armholes in each side at beg of every row as follows: 2 sts 1 time and 1 st 2-2-1-1-2 times = 48-52-58-62-66 sts. When piece measures 38-42-47-52-57 cm, slip the first 22-24-27-29-31 sts (from RS) on 1 stitch holder for right shoulder (work them first) and finish each shoulder separately. LEFT SHOULDER: = 26-28-31-33-35 sts. Continue in stocking st but work the first 4 sts on needle (towards middle) in garter st (= button band). Dec for BUTTONHOLES - see explanation above. When piece measures 44-48-53-58-63 cm, slip the first 4 sts on a stitch holder (work them first), then cast off the next 10-11-12-13-13 sts for neck. Then cast off 1 st on next row towards the neck = 11-12-14-15-17 sts remain on the shoulder. Cast off when piece measures 46-50-55-60-65 cm. RIGHT SHOULDER: Slip the 22-24-27-29-31 sts from stitch holder back on needle and cast on 4 new sts at the end of first row from RS (= button band) = 26-28-31-33-35 sts. Work as left shoulder but reversed, do not dec for buttonholes. FRONT PIECE: = 56-60-64-68-74 sts. Cast off for armhole in the sides as on back piece = 48-52-58-62-66 sts. When piece measures 41-45-50-55-60 cm, slip the middle 18-20-22-24-24 sts on a stitch holder for neck and finish each shoulder separately. Then cast off on every row towards neck: 2 sts 1 time and 1 st 2 times = 11-12-14-15-17 sts remain on shoulder. Cast off when piece measures 46-50-55-60-65 cm. SLEEVE: Worked in the round on double pointed needles. Cast on 40-42-44-46-48 sts on double pointed needles size 3.5 mm with Cotton Merino. Work A.1 over all sts, then work in stocking st. Insert 1 marker at beg of round = mid under sleeve. When piece measures 6 cm, inc 1 st on each side of marker. Inc every 6-3½-3-3-3 cm 2-4-6-7-8 more times = 46-52-58-62-66 sts. When piece measures 20-23-26-29-32 cm, cast off 6 sts mid under sleeve for sleeve cap. Then work sleeve back and forth while AT THE SAME TIME dec for sleeve cap in each side as follows: Cast off 2 sts in each side until piece measures 24-27-30-33-36 cm. Cast off 3 sts in each side, then cast off the remaining sts. Piece measures approx. 25-28-31-34-37 cm. ASSEMBLY: Sew the shoulder seams. Sew in sleeves. Sew the buttons on to right band. Then place the 4 sts from right back piece behind the 4 sts on the left back piece and fasten with small sts. NECK EDGE: Pick up approx. 72 to 88 sts (incl sts on stitch holders) around the neck on circular needle size 3.5 mm. Work 2 ridges. Cast off. ---------------------------------------------------------- HAIR BAND: Cast on 15 sts on needle size 3.5 mm with Cotton Merino. Work 1 ridge in GARTER ST - see explanation above, then work A.4 over all sts. Continue with A.4 until piece measures 41-42-43-44 cm (lightly pull piece when measuring), work a ridge, cast off. Sew cast-on and cast-off edge tog with grafting/kitchener stitches. |
|||||||||||||||||||
Diagram explanations |
|||||||||||||||||||
|
|||||||||||||||||||
 |
|||||||||||||||||||
 |
|||||||||||||||||||
Have you finished this pattern?Tag your pictures with #dropspattern #wendydarlingdress or submit them to the #dropsfan gallery. Do you need help with this pattern?You'll find 30 tutorial videos, a Comments/Questions area and more by visiting the pattern on garnstudio.com. © 1982-2025 DROPS Design A/S. We reserve all rights. This document, including all its sub-sections, has copyrights. Read more about what you can do with our patterns at the bottom of each pattern on our site. |
|||||||||||||||||||


With over 40 years in knitting and crochet design, DROPS Design offers one of the most extensive collections of free patterns on the internet - translated to 17 languages. As of today we count 320 catalogues and 12094 patterns translated into English (UK/cm). 12094
We work hard to bring you the best knitting and crochet have to offer, inspiration and advice as well as great quality yarns at incredible prices! Would you like to use our patterns for other than personal use? You can read what you are allowed to do in the Copyright text at the bottom of all our patterns. Happy crafting!
Post a comment to pattern DROPS Children 26-6
We would love to hear what you have to say about this pattern!
If you want to leave a question, please make sure you select the correct category in the form below, to speed up the answering process. Required fields are marked *.